Install UCP
Install UCP
UCP system requirements
Universal Control Plane can be installed on-premises or on the cloud. Before installing, be sure your infrastructure has these requirements.
Hardware and software requirements
You can install UCP on-premises or on a cloud provider. Common requirements:
- Docker Engine - Enterprise
- Linux kernel version 3.10 or higher. For debugging purposes, it is suggested to match the host OS kernel versions as close as possible.
- A static IP address for each node in the cluster
- User namespaces should not be configured on any node. This function is not currently supported by UCP.
Minimum requirements
- 8GB of RAM for manager nodes
- 4GB of RAM for worker nodes
- 2 vCPUs for manager nodes
- 10GB of free disk space for the
/varpartition for manager nodes (A minimum of 6GB is recommended.) - 500MB of free disk space for the
/varpartition for worker nodes - Default install directories:
- /var/lib/docker (Docker Data Root Directory)
- /var/lib/kubelet (Kubelet Data Root Directory)
- /var/lib/containerd (Containerd Data Root Directory)
Note
Increased storage is required for Kubernetes manager nodes in UCP 3.1.
Recommended production requirements
- 16GB of RAM for manager nodes
- 4 vCPUs for manager nodes
- 25-100GB of free disk space
Note that Windows container images are typically larger than Linux container images. For this reason, you should provision more local storage for Windows nodes and for any DTR setups that store Windows container images.
Also, make sure the nodes are running an operating system supported by Docker Enterprise.
For highly-available installations, you also need a way to transfer files between hosts.
Note
Workloads on manager nodes
Docker does not support workloads other than those required for UCP on UCP manager nodes.
Ports used
When installing UCP on a host, a series of ports need to be opened to incoming traffic. Each of these ports will expect incoming traffic from a set of hosts, indicated as the “Scope” of that port. The three scopes are: - External: Traffic arrives from outside the cluster through end-user interaction. - Internal: Traffic arrives from other hosts in the same cluster. - Self: Traffic arrives to that port only from processes on the same host.
Note
When installing UCP on Microsoft Azure, an overlay network is not used for Kubernetes; therefore, any containerized service deployed onto Kubernetes and exposed as a Kubernetes Service may need its corresponding port to be opened on the underlying Azure Network Security Group.
Make sure the following ports are open for incoming traffic on the respective host types:
| Hosts | Port | Scope | Purpose |
|---|---|---|---|
| managers, workers | TCP 179 | Internal | Port for BGP peers, used for Kubernetes networking |
| managers | TCP 443 (configurable) | External, Internal | Port for the UCP web UI and API |
| managers | TCP 2376 (configurable) | Internal | Port for the Docker Swarm manager. Used for backwards compatibility |
| managers | TCP 2377 (configurable) | Internal | Port for control communication between swarm nodes |
| managers, workers | UDP 4789 | Internal | Port for overlay networking |
| managers | TCP 6443 (configurable) | External, Internal | Port for Kubernetes API server endpoint |
| managers, workers | TCP 6444 | Self | Port for Kubernetes API reverse proxy |
| managers, workers | TCP, UDP 7946 | Internal | Port for gossip-based clustering |
| managers, workers | TCP 9099 | Self | Port for calico health check |
| managers, workers | TCP 10250 | Internal | Port for Kubelet |
| managers, workers | TCP 12376 | Internal | Port for a TLS authentication proxy that provides access to the Docker Engine |
| managers, workers | TCP 12378 | Self | Port for Etcd reverse proxy |
| managers | TCP 12379 | Internal | Port for Etcd Control API |
| managers | TCP 12380 | Internal | Port for Etcd Peer API |
| managers | TCP 12381 | Internal | Port for the UCP cluster certificate authority |
| managers | TCP 12382 | Internal | Port for the UCP client certificate authority |
| managers | TCP 12383 | Internal | Port for the authentication storage backend |
| managers | TCP 12384 | Internal | Port for the authentication storage backend for replication across managers |
| managers | TCP 12385 | Internal | Port for the authentication service API |
| managers | TCP 12386 | Internal | Port for the authentication worker |
| managers | TCP 12388 | Internal | Internal Port for the Kubernetes API Server |
Disable CLOUD_NETCONFIG_MANAGE for SLES 15
For SUSE Linux Enterprise Server 15 (SLES 15) installations, you must
disable CLOUD_NETCONFIG_MANAGE prior to installing UCP.
1. In the network interface configuration file, `/etc/sysconfig/network/ifcfg-eth0`, set
```
CLOUD_NETCONFIG_MANAGE="no"
```
2. Run `service network restart`.
Enable ESP traffic
For overlay networks with encryption to work, you need to ensure that IP protocol 50 (Encapsulating Security Payload) traffic is allowed.
Enable IP-in-IP traffic
The default networking plugin for UCP is Calico, which uses IP Protocol Number 4 for IP-in-IP encapsulation.
If you’re deploying to AWS or another cloud provider, enable IP-in-IP traffic for your cloud provider’s security group.
Enable connection tracking on the loopback interface for SLES
Calico’s Kubernetes controllers can’t reach the Kubernetes API server unless connection tracking is enabled on the loopback interface. SLES disables connection tracking by default.
On each node in the cluster:
sudo mkdir -p /etc/sysconfig/SuSEfirewall2.d/defaults
echo FW_LO_NOTRACK=no | sudo tee /etc/sysconfig/SuSEfirewall2.d/defaults/99-docker.cfg
sudo SuSEfirewall2 start
Timeout settings
Make sure the networks you’re using allow the UCP components enough time to communicate before they time out.
| Component | Timeout (ms) | Configurable |
|---|---|---|
| Raft consensus between manager nodes | 3000 | no |
| Gossip protocol for overlay networking | 5000 | no |
| etcd | 500 | yes |
| RethinkDB | 10000 | no |
| Stand-alone cluster | 90000 | no |
Time Synchronization
In distributed systems like UCP, time synchronization is critical to ensure proper operation. As a best practice to ensure consistency between the engines in a UCP cluster, all engines should regularly synchronize time with a Network Time Protocol (NTP) server. If a server’s clock is skewed, unexpected behavior may cause poor performance or even failures.
Compatibility and maintenance lifecycle
Docker Enterprise is a software subscription that includes three products:
- Docker Engine - Enterprise with enterprise-grade support
- Docker Trusted Registry
- Universal Control Plane
Version compatibility
UCP 3.1.8 requires minimum versions of the following Docker components:
- Docker Enterprise Engine 18.09.0-ee-1 or higher
- DTR 2.6 or higher
Planning UCP installation
Universal Control Plane (UCP) helps you manage your container cluster from a centralized place. This article explains what you need to consider before deploying UCP for production.
System requirements
Before installing UCP, make sure that all nodes (physical or virtual machines) that you’ll manage with UCP:
- Comply with the system requirements, and
- Are running the same version of Docker Engine.
Hostname strategy
UCP requires Docker Enterprise. Before installing Docker Enterprise on your cluster nodes, you should plan for a common hostname strategy.
Decide if you want to use short hostnames, like engine01, or Fully
Qualified Domain Names (FQDN), like node01.company.example.com.
Whichever you choose, confirm your naming strategy is consistent across
the cluster, because Docker Engine and UCP use hostnames.
For example, if your cluster has three hosts, you can name them:
node1.company.example.com
node2.company.example.com
node3.company.example.com
Static IP addresses
UCP requires each node on the cluster to have a static IPv4 address. Before installing UCP, ensure your network and nodes are configured to support this.
Avoid IP range conflicts
The following table lists recommendations to avoid IP range conflicts.
| Component | Subnet | Range | Default IP address |
|---|---|---|---|
| Engine | default-address-pools |
CIDR range for interface and bridge networks | 172.17.0.0/16 - 172.30.0.0/16, 192.168.0.0/16 |
| Swarm | default-addr-pool |
CIDR range for Swarm overlay networks | 10.0.0.0/8 |
| Kubernetes | pod-cidr |
CIDR range for Kubernetes pods | 192.168.0.0/16 |
| Kubernetes | service-cluster-ip-range |
CIDR range for Kubernetes services | 10.96.0.0/16 |
Engine
Two IP ranges are used by the engine for the docker0 and
docker_gwbridge interface.
default-address-pools defines a pool of CIDR ranges that are used to
allocate subnets for local bridge networks. By default the first available
subnet (172.17.0.0/16) is assigned to docker0 and the next available
subnet (172.18.0.0/16) is assigned to docker_gwbridge. Both the
docker0 and docker_gwbridge subnet can be modified by changing the
default-address-pools value or as described in their individual sections
below.
The default value for default-address-pools is:
{
   "default-address-pools": [
         {"base":"172.17.0.0/16","size":16}, <-- docker0
         {"base":"172.18.0.0/16","size":16}, <-- docker_gwbridge
         {"base":"172.19.0.0/16","size":16},
         {"base":"172.20.0.0/16","size":16},
         {"base":"172.21.0.0/16","size":16},
         {"base":"172.22.0.0/16","size":16},
         {"base":"172.23.0.0/16","size":16},
         {"base":"172.24.0.0/16","size":16},
         {"base":"172.25.0.0/16","size":16},
         {"base":"172.26.0.0/16","size":16},
         {"base":"172.27.0.0/16","size":16},
         {"base":"172.28.0.0/16","size":16},
         {"base":"172.29.0.0/16","size":16},
         {"base":"172.30.0.0/16","size":16},
         {"base":"192.168.0.0/16","size":20}
   ]
}
default-address-pools: A list of IP address pools for local bridge
networks. Each entry in the list contain the following:
base: CIDR range to be allocated for bridge networks.
size: CIDR netmask that determines the subnet size to allocate from the
base pool
To offer an example, {"base":"192.168.0.0/16","size":20} will allocate
/20 subnets from 192.168.0.0/16 yielding the following subnets for
bridge networks:192.168.0.0/20 (192.168.0.0 - 192.168.15.255)192.168.16.0/20 (192.168.16.0 - 192.168.31.255)192.168.32.0/20 (192.168.32.0 - 192.168.47.255)192.168.48.0/20 (192.168.32.0 - 192.168.63.255)192.168.64.0/20 (192.168.64.0 - 192.168.79.255)…192.168.240.0/20 (192.168.240.0 - 192.168.255.255)
Note
If the size matches the netmask of the base, then that pool only
containers one subnet.
For example, {"base":"172.17.0.0/16","size":16} will only yield one
subnet 172.17.0.0/16 (172.17.0.0 - 172.17.255.255).
docker0
By default, the Docker engine creates and configures the host system with a
virtual network interface called docker0, which is an ethernet bridge
device. If you don’t specify a different network when starting a container, the
container is connected to the bridge and all traffic coming from and going to
the container flows over the bridge to the Docker engine, which handles routing
on behalf of the container.
Docker engine creates docker0 with a configurable IP range. Containers
which are connected to the default bridge are allocated IP addresses within
this range. Certain default settings apply to docker0 unless you specify
otherwise. The default subnet for docker0 is the first pool in
default-address-pools which is 172.17.0.0/16.
The recommended way to configqure the docker0 settings is to use the
daemon.json file.
If only the subnet needs to be customized, it can be changed by modifying the
first pool of default-address-pools in the daemon.json file.
{
   "default-address-pools": [
         {"base":"172.17.0.0/16","size":16}, <-- Modify this value
         {"base":"172.18.0.0/16","size":16},
         {"base":"172.19.0.0/16","size":16},
         {"base":"172.20.0.0/16","size":16},
         {"base":"172.21.0.0/16","size":16},
         {"base":"172.22.0.0/16","size":16},
         {"base":"172.23.0.0/16","size":16},
         {"base":"172.24.0.0/16","size":16},
         {"base":"172.25.0.0/16","size":16},
         {"base":"172.26.0.0/16","size":16},
         {"base":"172.27.0.0/16","size":16},
         {"base":"172.28.0.0/16","size":16},
         {"base":"172.29.0.0/16","size":16},
         {"base":"172.30.0.0/16","size":16},
         {"base":"192.168.0.0/16","size":20}
   ]
}
Note
Modifying this value can also affect the docker_gwbridge if the size
doesn’t match the netmask of the base.
To configure a CIDR range and not rely on default-address-pools, the
fixed-cidr setting can used:
{
  "fixed-cidr": "172.17.0.0/16",
}
fixed-cidr: Specify the subnet for docker0, using standard CIDR
notation. Default is 172.17.0.0/16, the network gateway will be
172.17.0.1 and IPs for your containers will be allocated from
(172.17.0.2 - 172.17.255.254).
To configure a gateway IP and CIDR range while not relying on
default-address-pools, the bip setting can used:
{
  "bip": "172.17.0.0/16",
}
bip: Specific a gateway IP address and CIDR netmask of the docker0
network. The notation is <gateway IP>/<CIDR netmask> and the default is
172.17.0.1/16 which will make the docker0 network gateway
172.17.0.1 and subnet 172.17.0.0/16.
docker_gwbridge
The docker_gwbridge is a virtual network interface that connects the
overlay networks (including the ingress network) to an individual Docker
engine’s physical network. Docker creates it automatically when you initialize
a swarm or join a Docker host to a swarm, but it is not a Docker device. It
exists in the kernel of the Docker host. The default subnet for
docker_gwbridge is the next available subnet in default-address-pools
which with defaults is 172.18.0.0/16.
Note
If you need to customize the docker_gwbridge settings, you must
do so before joining the host to the swarm, or after temporarily
removing the host from the swarm.
The recommended way to configure the docker_gwbridge settings is to
use the daemon.json file.
For docker_gwbridge, the second available subnet will be allocated from
default-address-pools. If any customizations where made to the docker0
interface it could affect which subnet is allocated. With the default
default-address-pools settings you would modify the second pool.
{
    "default-address-pools": [
       {"base":"172.17.0.0/16","size":16},
       {"base":"172.18.0.0/16","size":16}, <-- Modify this value
       {"base":"172.19.0.0/16","size":16},
       {"base":"172.20.0.0/16","size":16},
       {"base":"172.21.0.0/16","size":16},
       {"base":"172.22.0.0/16","size":16},
       {"base":"172.23.0.0/16","size":16},
       {"base":"172.24.0.0/16","size":16},
       {"base":"172.25.0.0/16","size":16},
       {"base":"172.26.0.0/16","size":16},
       {"base":"172.27.0.0/16","size":16},
       {"base":"172.28.0.0/16","size":16},
       {"base":"172.29.0.0/16","size":16},
       {"base":"172.30.0.0/16","size":16},
       {"base":"192.168.0.0/16","size":20}
   ]
}
Swarm
Swarm uses a default address pool of 10.0.0.0/8 for its overlay
networks. If this conflicts with your current network implementation,
please use a custom IP address pool. To specify a custom IP address
pool, use the --default-addr-pool command line option during Swarm
initialization.
Note
The Swarm default-addr-pool setting is separate from the Docker
engine default-address-pools setting. They are two separate
ranges that are used for different purposes.
Note
Currently, the UCP installation process does not support this flag. To deploy with a custom IP pool, Swarm must first be initialized using this flag and UCP must be installed on top of it.
Kubernetes
There are two internal IP ranges used within Kubernetes that may overlap and conflict with the underlying infrastructure:
- The Pod Network - Each Pod in Kubernetes is given an IP address from
either the Calico or Azure IPAM services. In a default installation
Pods are given IP addresses on the
192.168.0.0/16range. This can be customized at install time by passing the--pod-cidrflag to the UCP install command. - The Services Network - When a user exposes a Service in Kubernetes it
is accessible via a VIP, this VIP comes from a Cluster IP Range. By
default on UCP this range is
10.96.0.0/16. Beginning with 3.1.8, this value can be changed at install time with the--service-cluster-ip-rangeflag.
Avoid firewall conflicts
For SUSE Linux Enterprise Server 12 SP2 (SLES12), the FW_LO_NOTRACK
flag is turned on by default in the openSUSE firewall. This speeds up
packet processing on the loopback interface, and breaks certain firewall
setups that need to redirect outgoing packets via custom rules on the
local machine.
To turn off the FW_LO_NOTRACK option, edit the
/etc/sysconfig/SuSEfirewall2 file and set FW_LO_NOTRACK="no".
Save the file and restart the firewall or reboot.
For SUSE Linux Enterprise Server 12 SP3, the default value for
FW_LO_NOTRACK was changed to no.
For Red Hat Enterprise Linux (RHEL) 8, if firewalld is running and
FirewallBackend=nftables is set in
/etc/firewalld/firewalld.conf, change this to
FirewallBackend=iptables, or you can explicitly run the following
commands to allow traffic to enter the default bridge (docker0) network:
firewall-cmd --permanent --zone=trusted --add-interface=docker0
firewall-cmd --reload
Time synchronization
In distributed systems like UCP, time synchronization is critical to ensure proper operation. As a best practice to ensure consistency between the engines in a UCP cluster, all engines should regularly synchronize time with a Network Time Protocol (NTP) server. If a host node’s clock is skewed, unexpected behavior may cause poor performance or even failures.
Load balancing strategy
UCP doesn’t include a load balancer. You can configure your own load balancer to balance user requests across all manager nodes.
If you plan to use a load balancer, you need to decide whether you’ll add the nodes to the load balancer using their IP addresses or their FQDNs. Whichever you choose, be consistent across nodes. When this is decided, take note of all IPs or FQDNs before starting the installation.
Load balancing UCP and DTR
By default, UCP and DTR both use port 443. If you plan on deploying UCP and DTR, your load balancer needs to distinguish traffic between the two by IP address or port number.
- If you want to configure your load balancer to listen on port 443:
- Use one load balancer for UCP and another for DTR.
- Use the same load balancer with multiple virtual IPs.
- Configure your load balancer to expose UCP or DTR on a port other than 443.
If you want to install UCP in a high-availability configuration that uses a
load balancer in front of your UCP controllers, include the appropriate IP
address and FQDN of the load balancer’s VIP by using one or more --san
flags in the UCP install command or when you’re asked
for additional SANs in interactive mode.
Use an external Certificate Authority
You can customize UCP to use certificates signed by an external Certificate Authority. When using your own certificates, you need to have a certificate bundle that has:
- A ca.pem file with the root CA public certificate,
- A cert.pem file with the server certificate and any intermediate CA public certificates. This certificate should also have SANs for all addresses used to reach the UCP manager,
- A key.pem file with server private key.
You can have a certificate for each manager, with a common SAN. For example, on a three-node cluster, you can have:
- node1.company.example.org with SAN ucp.company.org
- node2.company.example.org with SAN ucp.company.org
- node3.company.example.org with SAN ucp.company.org
You can also install UCP with a single externally-signed certificate for all managers, rather than one for each manager node. In this case, the certificate files are copied automatically to any new manager nodes joining the cluster or being promoted to a manager role.
Step-by-step UCP installation
Universal Control Plane (UCP) is a containerized application that you can install on-premise or on a cloud infrastructure.
Step 1: Validate the system requirements
The first step to installing UCP is ensuring that your infrastructure has all of the requirements UCP needs to run. Also, you need to ensure that all nodes, physical and virtual, are running the same version of Docker Enterprise.
Important
If you are installing UCP on a public cloud platform, refer to the cloud-specific UCP installation documentation.
Step 2: Install Docker Enterprise on all nodes
UCP is a containerized application that requires the commercially supported Docker Engine to run.
Install Docker Enterprise on each host that you plan to manage with UCP. View the supported platforms and click on your platform to get platform-specific instructions for installing Docker Enterprise.
Make sure you install the same Docker Enterprise version on all the
nodes. Also, if you’re creating virtual machine templates with Docker
Enterprise already installed, make sure the /etc/docker/key.json
file is not included in the virtual machine image. When provisioning the
virtual machine, restart the Docker daemon to generate a new
/etc/docker/key.json file.
Step 3: Customize named volumes
Skip this step if you want to use the defaults provided by UCP.
UCP uses named volumes to persist data. If you want to customize the drivers used to manage these volumes, you can create the volumes before installing UCP. When you install UCP, the installer will notice that the volumes already exist, and it will start using them.
If these volumes don’t exist, they’ll be automatically created when installing UCP.
Step 4: Install UCP
To install UCP, you use the docker/ucp image, which has commands to
install and manage UCP.
Make sure you follow the UCP System requirements for opening networking ports. Ensure that your hardware or software firewalls are open appropriately or disabled.
Use ssh to log in to the host where you want to install UCP.
Run the following command:
# Pull the latest version of UCP
docker image pull docker/ucp:3.2.5

# Install UCP
docker container run --rm -it --name ucp \
  -v /var/run/docker.sock:/var/run/docker.sock \
  docker/ucp:3.2.5 install \
  --host-address <node-ip-address> \
  --interactive
This runs the install command in interactive mode, so that you’re prompted for any necessary configuration values. To find what other options are available in the install command, including how to install UCP on a system with SELinux enabled, check the reference documentation.
Important
UCP will install Project Calico for container-to-container communication for Kubernetes. A platform operator may choose to install an alternative CNI plugin, such as Weave or Flannel. Please see Install an unmanaged CNI plugin for more information.
Step 5: License your installation
Now that UCP is installed, you need to license it. To use UCP, you are required to have a Docker Enterprise subscription, or you can test the platform with a free trial license.
Go to Docker Hub to get a free trial license.
In your browser, navigate to the UCP web UI, log in with your administrator credentials and upload your license. Navigate to the Admin Settings page and in the left pane, click License.
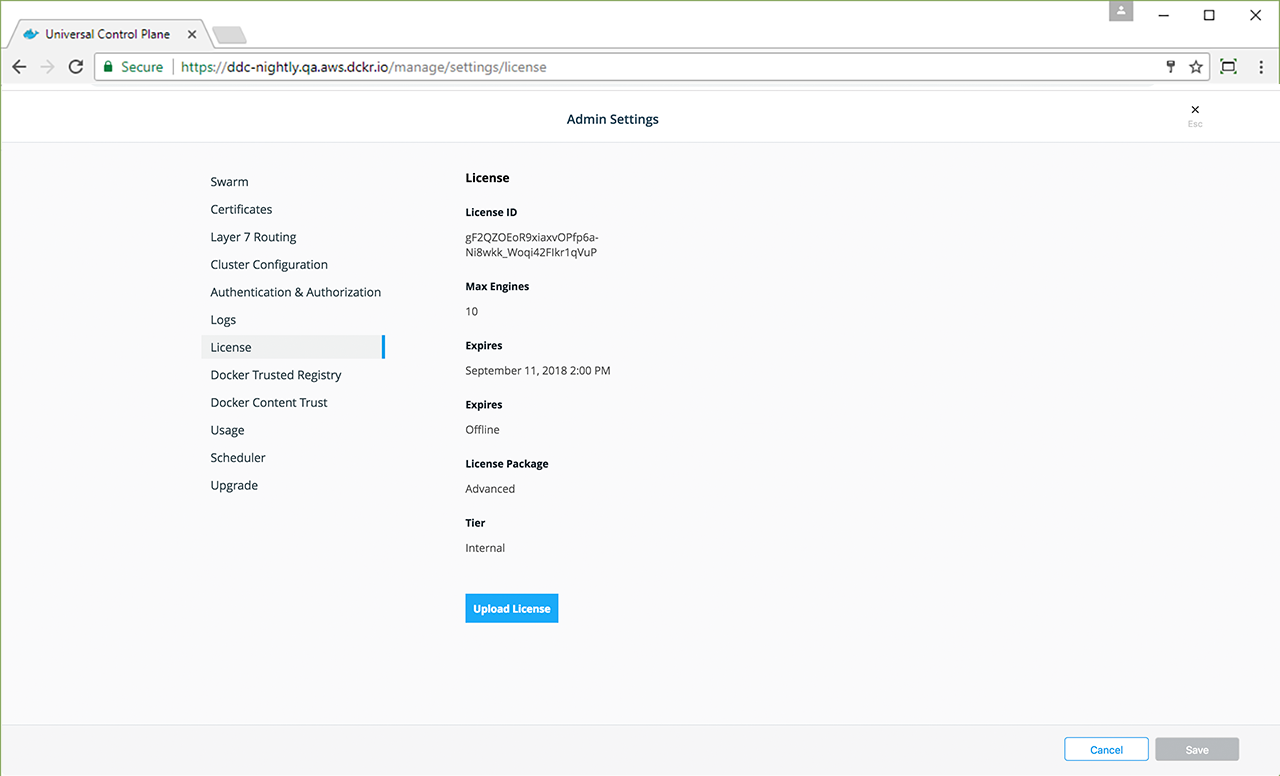
Click Upload License and navigate to your license (.lic) file. When you’re finished selecting the license, UCP updates with the new settings.
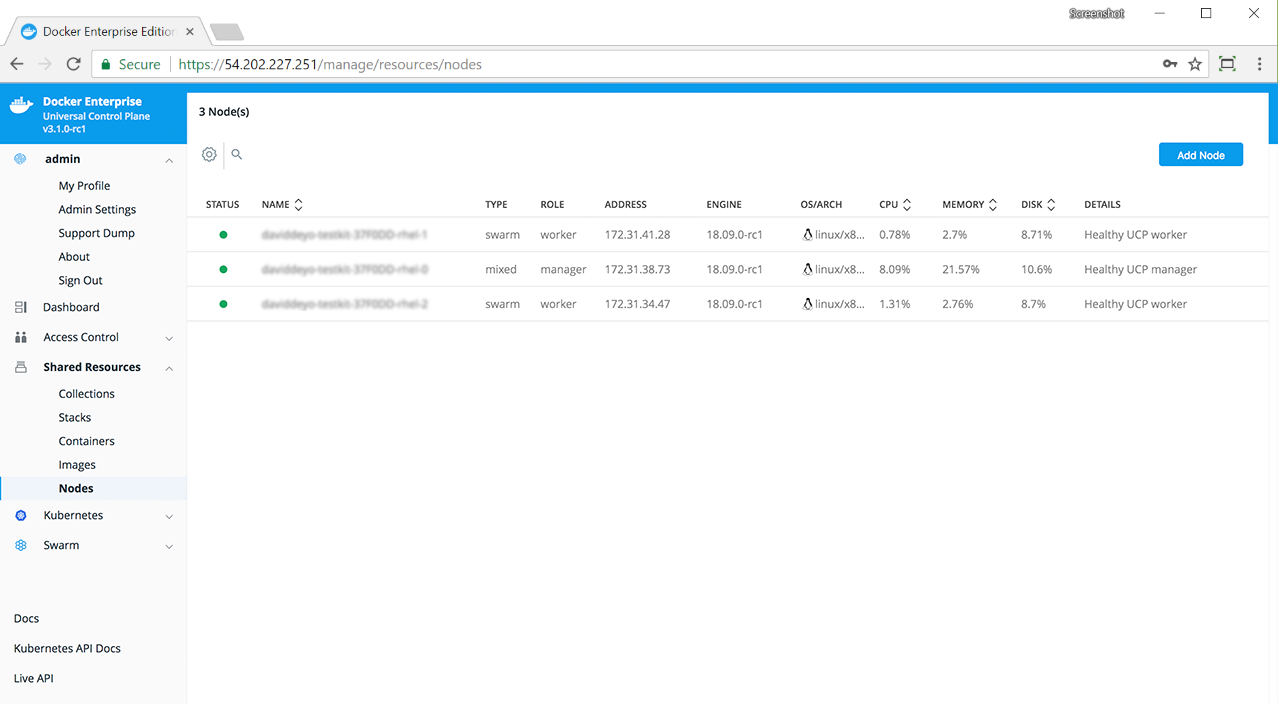
Step 6: Join manager nodes
To make your Docker swarm and UCP fault-tolerant and highly available, you can join more manager nodes to it. Manager nodes are the nodes in the swarm that perform the orchestration and swarm management tasks, and dispatch tasks for worker nodes to execute.
To join manager nodes to the swarm,
In the UCP web UI, navigate to the Nodes page, and click the Add Node button to add a new node.
In the Add Node page, check Add node as a manager to turn this node into a manager and replicate UCP for high-availability.
If you want to customize the network and port where the new node listens for swarm management traffic, click Use a custom listen address. Enter the IP address and port for the node to listen for inbound cluster management traffic. The format is
interface:portorip:port. The default is0.0.0.0:2377.If you want to customize the network and port that the new node advertises to other swarm members for API access, click Use a custom advertise address and enter the IP address and port. By default, this is also the outbound address used by the new node to contact UCP. The joining node should be able to contact itself at this address. The format is
interface:portorip:port.Click the copy icon to copy the
docker swarm joincommand that nodes use to join the swarm.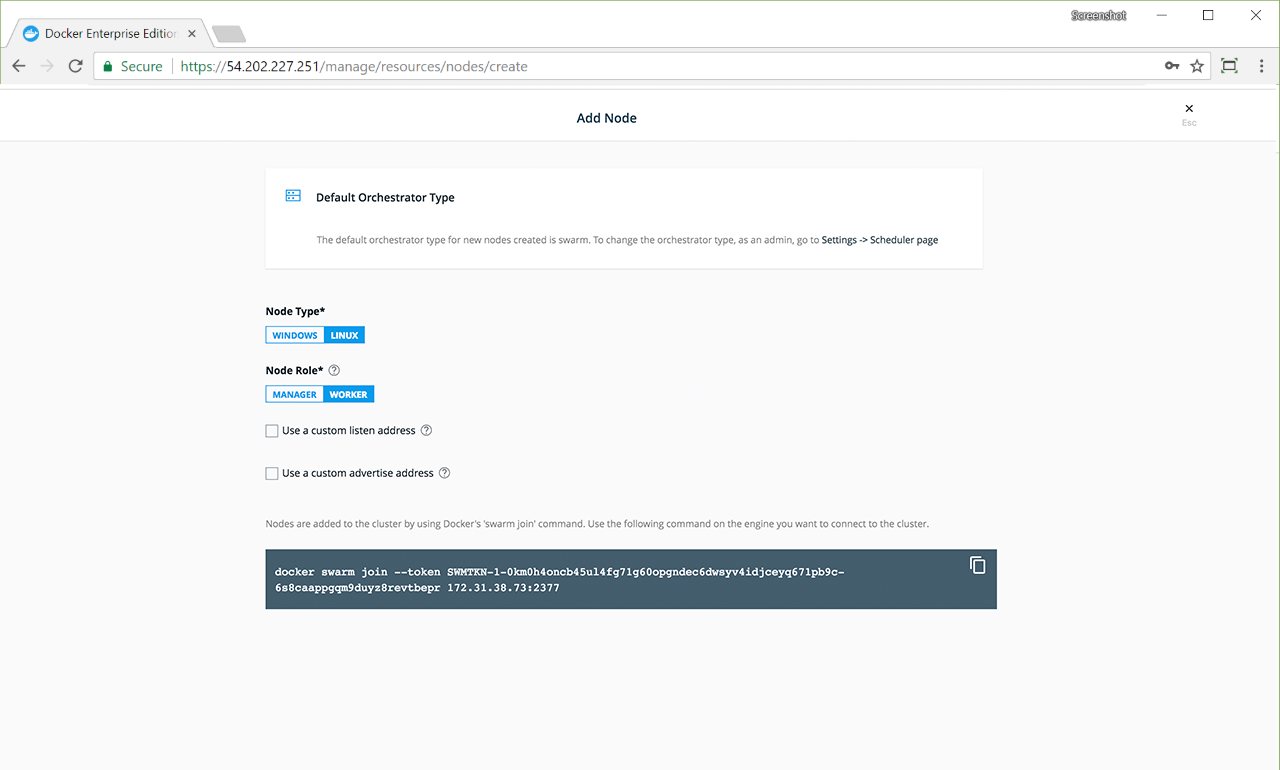
For each manager node that you want to join to the swarm, log in using ssh and run the join command that you copied. After the join command completes, the node appears on the Nodes page in the UCP web UI.
Step 7: Join worker nodes
Note
Skip the joining of worker nodes if you don’t want to add more nodes to run and scale your apps.
To add more computational resources to your swarm, you can join worker nodes. These nodes execute tasks assigned to them by the manager nodes. Follow the same steps as before, but don’t check the Add node as a manager option.
Installing UCP Offline
The procedure to install Universal Control Plane on a host is the same, whether the host has access to the internet or not.
The only difference when installing on an offline host is that instead of pulling the UCP images from Docker Hub, you use a computer that’s connected to the internet to download a single package with all the images. Then you copy this package to the host where you install UCP. The offline installation process works only if one of the following is true:
- All of the cluster nodes, managers and workers alike, have internet access to Docker Hub, and
- None of the nodes, managers and workers alike, have internet access to Docker Hub.
If the managers have access to Docker Hub while the workers don’t, installation will fail.
Versions available
Use a computer with internet access to download the UCP package from the following links.
Download the offline package
You can also use these links to get the UCP package from the command line:
$ wget <ucp-package-url> -O ucp.tar.gz
Now that you have the package in your local machine, you can transfer it to the machines where you want to install UCP.
For each machine that you want to manage with UCP:
Copy the UCP package to the machine.
$ scp ucp.tar.gz <user>@<host>
Use ssh to log in to the hosts where you transferred the package.
Load the UCP images.
Once the package is transferred to the hosts, you can use the
docker loadcommand, to load the Docker images from the tar archive:$ docker load -i ucp.tar.gz
Follow the same steps for the DTR binaries.
Install UCP
Now that the offline hosts have all the images needed to install UCP, you can install UCP on one of the manager nodes.
Install on cloud providers
Install UCP on AWS
Universal Control Plane (UCP) can be installed on top of AWS without any customisation following the UCP install documentation. Therefore this document is optional, however if you are deploying Kubernetes workloads with UCP and want to leverage the AWS kubernetes cloud provider, which provides dynamic volume and loadbalancer provisioning then you should follow this guide. This guide is not required if you are only deploying swarm workloads.
The requirements for installing UCP on AWS are included in the following sections:
Instances
Hostnames
The instance’s host name must be named
ip-<private ip>.<region>.compute.internal. For example:
ip-172-31-15-241.us-east-2.compute.internal
Instance tags
The instance must be tagged with
kubernetes.io/cluster/<UniqueID for Cluster> and given a value of
owned or shared. If the resources created by the cluster is
considered owned and managed by the cluster, the value should be owned.
If the resources can be shared between multiple clusters, it should be
tagged as shared.
kubernetes.io/cluster/1729543642a6 owned
Instance profile for managers
Manager nodes must have an instance profile with appropriate policies attached to enable introspection and provisioning of resources. The following example is very permissive:
{
  "Version": "2012-10-17",
  "Statement": [
    {
      "Effect": "Allow",
      "Action": [ "ec2:*" ],
      "Resource": [ "*" ]
    },
    {
      "Effect": "Allow",
      "Action": [ "elasticloadbalancing:*" ],
      "Resource": [ "*" ]
    },
    {
      "Effect": "Allow",
      "Action": [ "route53:*" ],
      "Resource": [ "*" ]
    },
    {
      "Effect": "Allow",
      "Action": "s3:*",
      "Resource": [ "arn:aws:s3:::kubernetes-*" ]
    }
  ]
}
Instance profile for workers
Worker nodes must have an instance profile with appropriate policies attached to enable access to dynamically provisioned resources. The following example is very permissive:
{
  "Version": "2012-10-17",
  "Statement": [
    {
      "Effect": "Allow",
      "Action": "s3:*",
      "Resource": [ "arn:aws:s3:::kubernetes-*" ]
    },
    {
      "Effect": "Allow",
      "Action": "ec2:Describe*",
      "Resource": "*"
    },
    {
      "Effect": "Allow",
      "Action": "ec2:AttachVolume",
      "Resource": "*"
    },
    {
      "Effect": "Allow",
      "Action": "ec2:DetachVolume",
      "Resource": "*"
    },
    {
      "Effect": "Allow",
      "Action": [ "route53:*" ],
      "Resource": [ "*" ]
    }
}
VPC
VPC tags
The VPC must be tagged with
kubernetes.io/cluster/<UniqueID for Cluster> and given a value of
owned or shared. If the resources created by the cluster is
considered owned and managed by the cluster, the value should be owned.
If the resources can be shared between multiple clusters, it should be
tagged shared.
kubernetes.io/cluster/1729543642a6 owned
Subnet tags
Subnets must be tagged with
kubernetes.io/cluster/<UniqueID for Cluster> and given a value of
owned or shared. If the resources created by the cluster is
considered owned and managed by the cluster, the value should be owned.
If the resources may be shared between multiple clusters, it should be
tagged shared. For example:
kubernetes.io/cluster/1729543642a6 owned
UCP
UCP install
Once all pre-requisities have been met, run the following command to
install UCP on a manager node. The --host-address flag maps to the
private IP address of the master node.
$ docker container run --rm -it \
  --name ucp \
  --volume /var/run/docker.sock:/var/run/docker.sock \
  docker/ucp:3.2.5 install \
  --host-address <ucp-ip> \
  --cloud-provider aws \
  --interactive
Install UCP on Azure
Universal Control Plane (UCP) closely integrates with Microsoft Azure for its Kubernetes Networking and Persistent Storage feature set. UCP deploys the Calico CNI provider. In Azure, the Calico CNI leverages the Azure networking infrastructure for data path networking and the Azure IPAM for IP address management. There are infrastructure prerequisites required prior to UCP installation for the Calico / Azure integration.
UCP Networking
UCP configures the Azure IPAM module for Kubernetes to allocate IP addresses for Kubernetes pods. The Azure IPAM module requires each Azure VM which is part of the Kubernetes cluster to be configured with a pool of IP addresses.
There are two options for provisioning IPs for the Kubernetes cluster on Azure:
- An automated mechanism provided by UCP which allows for IP pool
configuration and maintenance for standalone Azure virtual machines
(VMs). This service runs within the
calico-nodedaemonset and provisions 128 IP addresses for each node by default. - Manual provision of additional IP address for each Azure VM. This
could be done through the Azure Portal, the Azure CLI
$ az network nic
ip-config create
, or an ARM template.
Azure Prerequisites
You must meet the following infrastructure prerequisites to successfully deploy UCP on Azure. Failure to meet these prerequisites may result in significant errors during the installation process.
- All UCP Nodes (Managers and Workers) need to be deployed into the same Azure Resource Group. The Azure Networking components (Virtual Network, Subnets, Security Groups) could be deployed in a second Azure Resource Group.
- The Azure Virtual Network and Subnet must be appropriately sized for your environment, as addresses from this pool will be consumed by Kubernetes Pods.
- All UCP worker and manager nodes need to be attached to the same Azure Subnet.
- Internal IP addresses for all nodes should be set to Static rather than the default of Dynamic.
- The Azure Virtual Machine Object Name needs to match the Azure Virtual Machine Computer Name and the Node Operating System’s Hostname which is the FQDN of the host, including domain names. Note that this requires all characters to be in lowercase.
- An Azure Service Principal with
Contributoraccess to the Azure Resource Group hosting the UCP Nodes. This Service principal will be used by Kubernetes to communicate with the Azure API. The Service Principal ID and Secret Key are needed as part of the UCP prerequisites. If you are using a separate Resource Group for the networking components, the same Service Principal will needNetwork Contributoraccess to this Resource Group. - Kubernetes pods integrate into the underlying Azure networking stack, from an IPAM and routing perspective with the Azure CNI IPAM module. Therefore Azure Network Security Groups (NSG) impact pod to pod communication. End users may expose containerized services on a range of underlying ports, resulting in a manual process to open an NSG port every time a new containerized service is deployed on to the platform. This would only affect workloads deployed on to the Kubernetes orchestrator. It is advisable to have an “open” NSG between all IPs on the Azure Subnet passed into UCP at install time. To limit exposure, this Azure subnet should be locked down to only be used for Container Host VMs and Kubernetes Pods. Additionally, end users can leverage Kubernetes Network Policies to provide micro segmentation for containerized applications and services.
UCP requires the following information for the installation:
subscriptionId- The Azure Subscription ID in which the UCP objects are being deployed.tenantId- The Azure Active Directory Tenant ID in which the UCP objects are being deployed.aadClientId- The Azure Service Principal ID.aadClientSecret- The Azure Service Principal Secret Key.
Azure Configuration File
For UCP to integrate with Microsoft Azure, all Linux UCP Manager and
Linux UCP Worker nodes in your cluster need an identical Azure
configuration file, azure.json. Place this file within
/etc/kubernetes on each host. Since the configuration file is owned
by root, set its permissions to 0644 to ensure the container
user has read access.
The following is an example template for azure.json. Replace ***
with real values, and leave the other parameters as is.
{
    "cloud":"AzurePublicCloud",
    "tenantId": "***",
    "subscriptionId": "***",
    "aadClientId": "***",
    "aadClientSecret": "***",
    "resourceGroup": "***",
    "location": "***",
    "subnetName": "***",
    "securityGroupName": "***",
    "vnetName": "***",
    "useInstanceMetadata": true
}
There are some optional parameters for Azure deployments:
primaryAvailabilitySetName- The Worker Nodes availability set.vnetResourceGroup- The Virtual Network Resource group, if your Azure Network objects live in a separate resource group.routeTableName- If you have defined multiple Route tables within an Azure subnet.
Guidelines for IPAM Configuration
Warning
You must follow these guidelines and either use the appropriate size network in Azure or take the proper action to fit within the subnet. Failure to follow these guidelines may cause significant issues during the installation process.
The subnet and the virtual network associated with the primary interface of the Azure VMs needs to be configured with a large enough address prefix/range. The number of required IP addresses depends on the workload and the number of nodes in the cluster.
For example, in a cluster of 256 nodes, make sure that the address space of the subnet and the virtual network can allocate at least 128 * 256 IP addresses, in order to run a maximum of 128 pods concurrently on a node. This would be in addition to initial IP allocations to VM network interface card (NICs) during Azure resource creation.
Accounting for IP addresses that are allocated to NICs during VM
bring-up, set the address space of the subnet and virtual network to
10.0.0.0/16. This ensures that the network can dynamically allocate
at least 32768 addresses, plus a buffer for initial allocations for
primary IP addresses.
Note
The Azure IPAM module queries an Azure VM’s metadata to obtain a list
of IP addresses which are assigned to the VM’s NICs. The IPAM module
allocates these IP addresses to Kubernetes pods. You configure the IP
addresses as ipConfigurations in the NICs associated with a VM or
scale set member, so that Azure IPAM can provide them to Kubernetes
when requested.
Manually provision IP address pools as part of an Azure VM scale set
Configure IP Pools for each member of the VM scale set during
provisioning by associating multiple ipConfigurations with the scale
set’s networkInterfaceConfigurations. The following is an example
networkProfile configuration for an ARM template that configures
pools of 32 IP addresses for each VM in the VM scale set.
"networkProfile": {
  "networkInterfaceConfigurations": [
    {
      "name": "[variables('nicName')]",
      "properties": {
        "ipConfigurations": [
          {
            "name": "[variables('ipConfigName1')]",
            "properties": {
              "primary": "true",
              "subnet": {
                "id": "[concat('/subscriptions/', subscription().subscriptionId,'/resourceGroups/', resourceGroup().name, '/providers/Microsoft.Network/virtualNetworks/', variables('virtualNetworkName'), '/subnets/', variables('subnetName'))]"
              },
              "loadBalancerBackendAddressPools": [
                {
                  "id": "[concat('/subscriptions/', subscription().subscriptionId,'/resourceGroups/', resourceGroup().name, '/providers/Microsoft.Network/loadBalancers/', variables('loadBalancerName'), '/backendAddressPools/', variables('bePoolName'))]"
                }
              ],
              "loadBalancerInboundNatPools": [
                {
                  "id": "[concat('/subscriptions/', subscription().subscriptionId,'/resourceGroups/', resourceGroup().name, '/providers/Microsoft.Network/loadBalancers/', variables('loadBalancerName'), '/inboundNatPools/', variables('natPoolName'))]"
                }
              ]
            }
          },
          {
            "name": "[variables('ipConfigName2')]",
            "properties": {
              "subnet": {
                "id": "[concat('/subscriptions/', subscription().subscriptionId,'/resourceGroups/', resourceGroup().name, '/providers/Microsoft.Network/virtualNetworks/', variables('virtualNetworkName'), '/subnets/', variables('subnetName'))]"
              }
            }
          }
          .
          .
          .
          {
            "name": "[variables('ipConfigName32')]",
            "properties": {
              "subnet": {
                "id": "[concat('/subscriptions/', subscription().subscriptionId,'/resourceGroups/', resourceGroup().name, '/providers/Microsoft.Network/virtualNetworks/', variables('virtualNetworkName'), '/subnets/', variables('subnetName'))]"
              }
            }
          }
        ],
        "primary": "true"
      }
    }
  ]
}
UCP Installation
Adjust the IP Count Value
During a UCP installation, a user can alter the number of Azure IP
addresses UCP will automatically provision for pods. By default, UCP
will provision 128 addresses, from the same Azure Subnet as the hosts,
for each VM in the cluster. However, if you have manually attached
additional IP addresses to the VMs (via an ARM Template, Azure CLI or
Azure Portal) or you are deploying in to small Azure subnet (less than
/16), an --azure-ip-count flag can be used at install time.
Note
Do not set the --azure-ip-count variable to a value of less than
6 if you have not manually provisioned additional IP addresses for
each VM. The UCP installation will need at least 6 IP addresses to
allocate to the core UCP components that run as Kubernetes pods. This
is in addition to the VM’s private IP address.
Below are some example scenarios which require the --azure-ip-count
variable to be defined.
Scenario 1 - Manually Provisioned Addresses
If you have manually provisioned additional IP addresses for each VM,
and want to disable UCP from dynamically provisioning more IP addresses
for you, then you would pass --azure-ip-count 0 into the UCP
installation command.
Scenario 2 - Reducing the number of Provisioned Addresses
If you want to reduce the number of IP addresses dynamically allocated from 128 addresses to a custom value due to:
- Primarily using the Swarm Orchestrator
- Deploying UCP on a small Azure subnet (for example, /24)
- Plan to run a small number of Kubernetes pods on each node.
For example if you wanted to provision 16 addresses per VM, then you
would pass --azure-ip-count 16 into the UCP installation command.
If you need to adjust this value post-installation, refer to the instructions on how to download the UCP configuration file, change the value, and update the configuration via the API. If you reduce the value post-installation, existing VMs will not be reconciled, and you will have to manually edit the IP count in Azure.
Install UCP
Run the following command to install UCP on a manager node. The
--pod-cidr option maps to the IP address range that you have
configured for the Azure subnet, and the --host-address maps to the
private IP address of the master node. Finally if you want to adjust the
amount of IP addresses provisioned to each VM pass --azure-ip-count.
Note
The pod-cidr range must match the Azure Virtual Network’s Subnet
attached the hosts. For example, if the Azure Virtual Network had the
range 172.0.0.0/16 with VMs provisioned on an Azure Subnet of
172.0.1.0/24, then the Pod CIDR should also be 172.0.1.0/24.
docker container run --rm -it \
  --name ucp \
  --volume /var/run/docker.sock:/var/run/docker.sock \
  docker/ucp:3.2.5 install \
  --host-address <ucp-ip> \
  --pod-cidr <ip-address-range> \
  --cloud-provider Azure \
  --interactive
Creating Azure custom roles
This document describes how to create Azure custom roles to deploy Docker Enterprise resources.
Deploy a Docker Enterprise Cluster into a single resource group
A resource group is a container that holds resources for an Azure solution. These resources are the virtual machines (VMs), networks, and storage accounts associated with the swarm.
To create a custom, all-in-one role with permissions to deploy a Docker Enterprise cluster into a single resource group:
Create the role permissions JSON file.
{
  "Name": "Docker Platform All-in-One",
  "IsCustom": true,
  "Description": "Can install and manage Docker platform.",
  "Actions": [
    "Microsoft.Authorization/*/read",
    "Microsoft.Authorization/roleAssignments/write",
    "Microsoft.Compute/availabilitySets/read",
    "Microsoft.Compute/availabilitySets/write",
    "Microsoft.Compute/disks/read",
    "Microsoft.Compute/disks/write",
    "Microsoft.Compute/virtualMachines/extensions/read",
    "Microsoft.Compute/virtualMachines/extensions/write",
    "Microsoft.Compute/virtualMachines/read",
    "Microsoft.Compute/virtualMachines/write",
    "Microsoft.Network/loadBalancers/read",
    "Microsoft.Network/loadBalancers/write",
    "Microsoft.Network/loadBalancers/backendAddressPools/join/action",
    "Microsoft.Network/networkInterfaces/read",
    "Microsoft.Network/networkInterfaces/write",
    "Microsoft.Network/networkInterfaces/join/action",
    "Microsoft.Network/networkSecurityGroups/read",
    "Microsoft.Network/networkSecurityGroups/write",
    "Microsoft.Network/networkSecurityGroups/join/action",
    "Microsoft.Network/networkSecurityGroups/securityRules/read",
    "Microsoft.Network/networkSecurityGroups/securityRules/write",
    "Microsoft.Network/publicIPAddresses/read",
    "Microsoft.Network/publicIPAddresses/write",
    "Microsoft.Network/publicIPAddresses/join/action",
    "Microsoft.Network/virtualNetworks/read",
    "Microsoft.Network/virtualNetworks/write",
    "Microsoft.Network/virtualNetworks/subnets/read",
    "Microsoft.Network/virtualNetworks/subnets/write",
    "Microsoft.Network/virtualNetworks/subnets/join/action",
    "Microsoft.Resources/subscriptions/resourcegroups/read",
    "Microsoft.Resources/subscriptions/resourcegroups/write",
    "Microsoft.Security/advancedThreatProtectionSettings/read",
    "Microsoft.Security/advancedThreatProtectionSettings/write",
    "Microsoft.Storage/*/read",
    "Microsoft.Storage/storageAccounts/listKeys/action",
    "Microsoft.Storage/storageAccounts/write"
  ],
  "NotActions": [],
  "AssignableScopes": [
    "/subscriptions/6096d756-3192-4c1f-ac62-35f1c823085d"
  ]
}
Create the Azure RBAC role.
az role definition create --role-definition all-in-one-role.json
Deploy Docker Enterprise compute resources
Compute resources act as servers for running containers.
To create a custom role to deploy Docker Enterprise compute resources only:
Create the role permissions JSON file.
{
  "Name": "Docker Platform",
  "IsCustom": true,
  "Description": "Can install and run Docker platform.",
  "Actions": [
    "Microsoft.Authorization/*/read",
    "Microsoft.Authorization/roleAssignments/write",
    "Microsoft.Compute/availabilitySets/read",
    "Microsoft.Compute/availabilitySets/write",
    "Microsoft.Compute/disks/read",
    "Microsoft.Compute/disks/write",
    "Microsoft.Compute/virtualMachines/extensions/read",
    "Microsoft.Compute/virtualMachines/extensions/write",
    "Microsoft.Compute/virtualMachines/read",
    "Microsoft.Compute/virtualMachines/write",
    "Microsoft.Network/loadBalancers/read",
    "Microsoft.Network/loadBalancers/write",
    "Microsoft.Network/networkInterfaces/read",
    "Microsoft.Network/networkInterfaces/write",
    "Microsoft.Network/networkInterfaces/join/action",
    "Microsoft.Network/publicIPAddresses/read",
    "Microsoft.Network/virtualNetworks/read",
    "Microsoft.Network/virtualNetworks/subnets/read",
    "Microsoft.Network/virtualNetworks/subnets/join/action",
    "Microsoft.Resources/subscriptions/resourcegroups/read",
    "Microsoft.Resources/subscriptions/resourcegroups/write",
    "Microsoft.Security/advancedThreatProtectionSettings/read",
    "Microsoft.Security/advancedThreatProtectionSettings/write",
    "Microsoft.Storage/storageAccounts/read",
    "Microsoft.Storage/storageAccounts/listKeys/action",
    "Microsoft.Storage/storageAccounts/write"
  ],
  "NotActions": [],
  "AssignableScopes": [
    "/subscriptions/6096d756-3192-4c1f-ac62-35f1c823085d"
  ]
}
Create the Docker Platform RBAC role.
az role definition create --role-definition platform-role.json
Deploy Docker Enterprise network resources
Network resources are services inside your cluster. These resources can include virtual networks, security groups, address pools, and gateways.
To create a custom role to deploy Docker Enterprise network resources only:
Create the role permissions JSON file.
{
  "Name": "Docker Networking",
  "IsCustom": true,
  "Description": "Can install and manage Docker platform networking.",
  "Actions": [
    "Microsoft.Authorization/*/read",
    "Microsoft.Network/loadBalancers/read",
    "Microsoft.Network/loadBalancers/write",
    "Microsoft.Network/loadBalancers/backendAddressPools/join/action",
    "Microsoft.Network/networkInterfaces/read",
    "Microsoft.Network/networkInterfaces/write",
    "Microsoft.Network/networkInterfaces/join/action",
    "Microsoft.Network/networkSecurityGroups/read",
    "Microsoft.Network/networkSecurityGroups/write",
    "Microsoft.Network/networkSecurityGroups/join/action",
    "Microsoft.Network/networkSecurityGroups/securityRules/read",
    "Microsoft.Network/networkSecurityGroups/securityRules/write",
    "Microsoft.Network/publicIPAddresses/read",
    "Microsoft.Network/publicIPAddresses/write",
    "Microsoft.Network/publicIPAddresses/join/action",
    "Microsoft.Network/virtualNetworks/read",
    "Microsoft.Network/virtualNetworks/write",
    "Microsoft.Network/virtualNetworks/subnets/read",
    "Microsoft.Network/virtualNetworks/subnets/write",
    "Microsoft.Network/virtualNetworks/subnets/join/action",
    "Microsoft.Resources/subscriptions/resourcegroups/read",
    "Microsoft.Resources/subscriptions/resourcegroups/write"
  ],
  "NotActions": [],
  "AssignableScopes": [
    "/subscriptions/6096d756-3192-4c1f-ac62-35f1c823085d"
  ]
}
Create the Docker Networking RBAC role.
az role definition create --role-definition networking-role.json
Upgrade UCP
Before upgrading to a new version of UCP, check the release notes for this version. There you’ll find information about the new features, breaking changes, and other relevant information for upgrading to a particular version.
Plan the upgrade
As part of the upgrade process, you’ll upgrade the Docker EE Engine installed on each node of the cluster to version 17.06.2-ee-8 or higher. You should plan for the upgrade to take place outside of business hours, to ensure there’s minimal impact to your users.
Also, don’t make changes to UCP configurations while you’re upgrading it. This can lead to misconfigurations that are difficult to troubleshoot.
Ensure that your cluster nodes meet the minimum requirements for memory and disk space. In particular, manager nodes must have at least 8GB of memory.
Ensure that your cluster nodes meet the minimum requirements for port openings. The ports in use are documented in the UCP system requirements.
Note
If you are upgrading a cluster to UCP 3.0.2 or higher on Microsoft Azure then please ensure all of the Azure prerequisites are met.
Back up your cluster
Before starting an upgrade, make sure that your cluster is healthy. If a problem occurs, this makes it easier to find and troubleshoot it.
Create a backup of your cluster. This allows you to recover if something goes wrong during the upgrade process.
Note
The backup archive is version-specific, so you can’t use it during the upgrade process. For example, if you create a backup archive for a UCP 2.2 cluster, you can’t use the archive file after you upgrade to UCP 3.0.
Upgrade Docker Engine
For each node that is part of your cluster, upgrade the Docker Engine installed on that node to Docker Engine version 19.03 or higher. Be sure to install the Docker Enterprise Edition.
Starting with the manager nodes, and then worker nodes:
- Log into the node using ssh.
- Upgrade the Docker Engine to version 18.09.0 or higher.
- Make sure the node is healthy.
Note
In your browser, navigate to Nodes in the UCP web interface, and check that the node is healthy and is part of the cluster.
Upgrade UCP
You can upgrade UCP from the web or the command line interface.
Use the web interface to perform an upgrade
When an upgrade is available for a UCP installation, a banner appears.
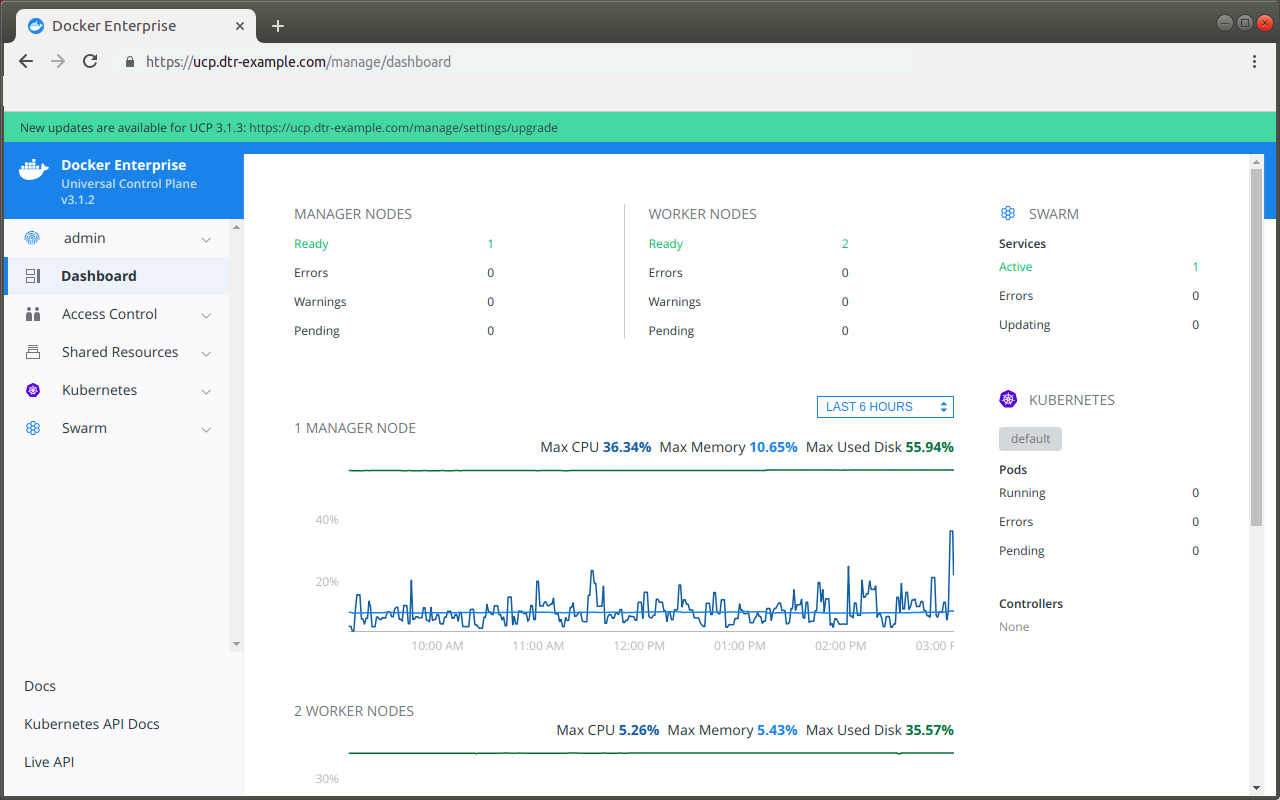
Clicking this message takes an admin user directly to the upgrade process. It can be found under the Upgrade tab of the Admin Settings section.
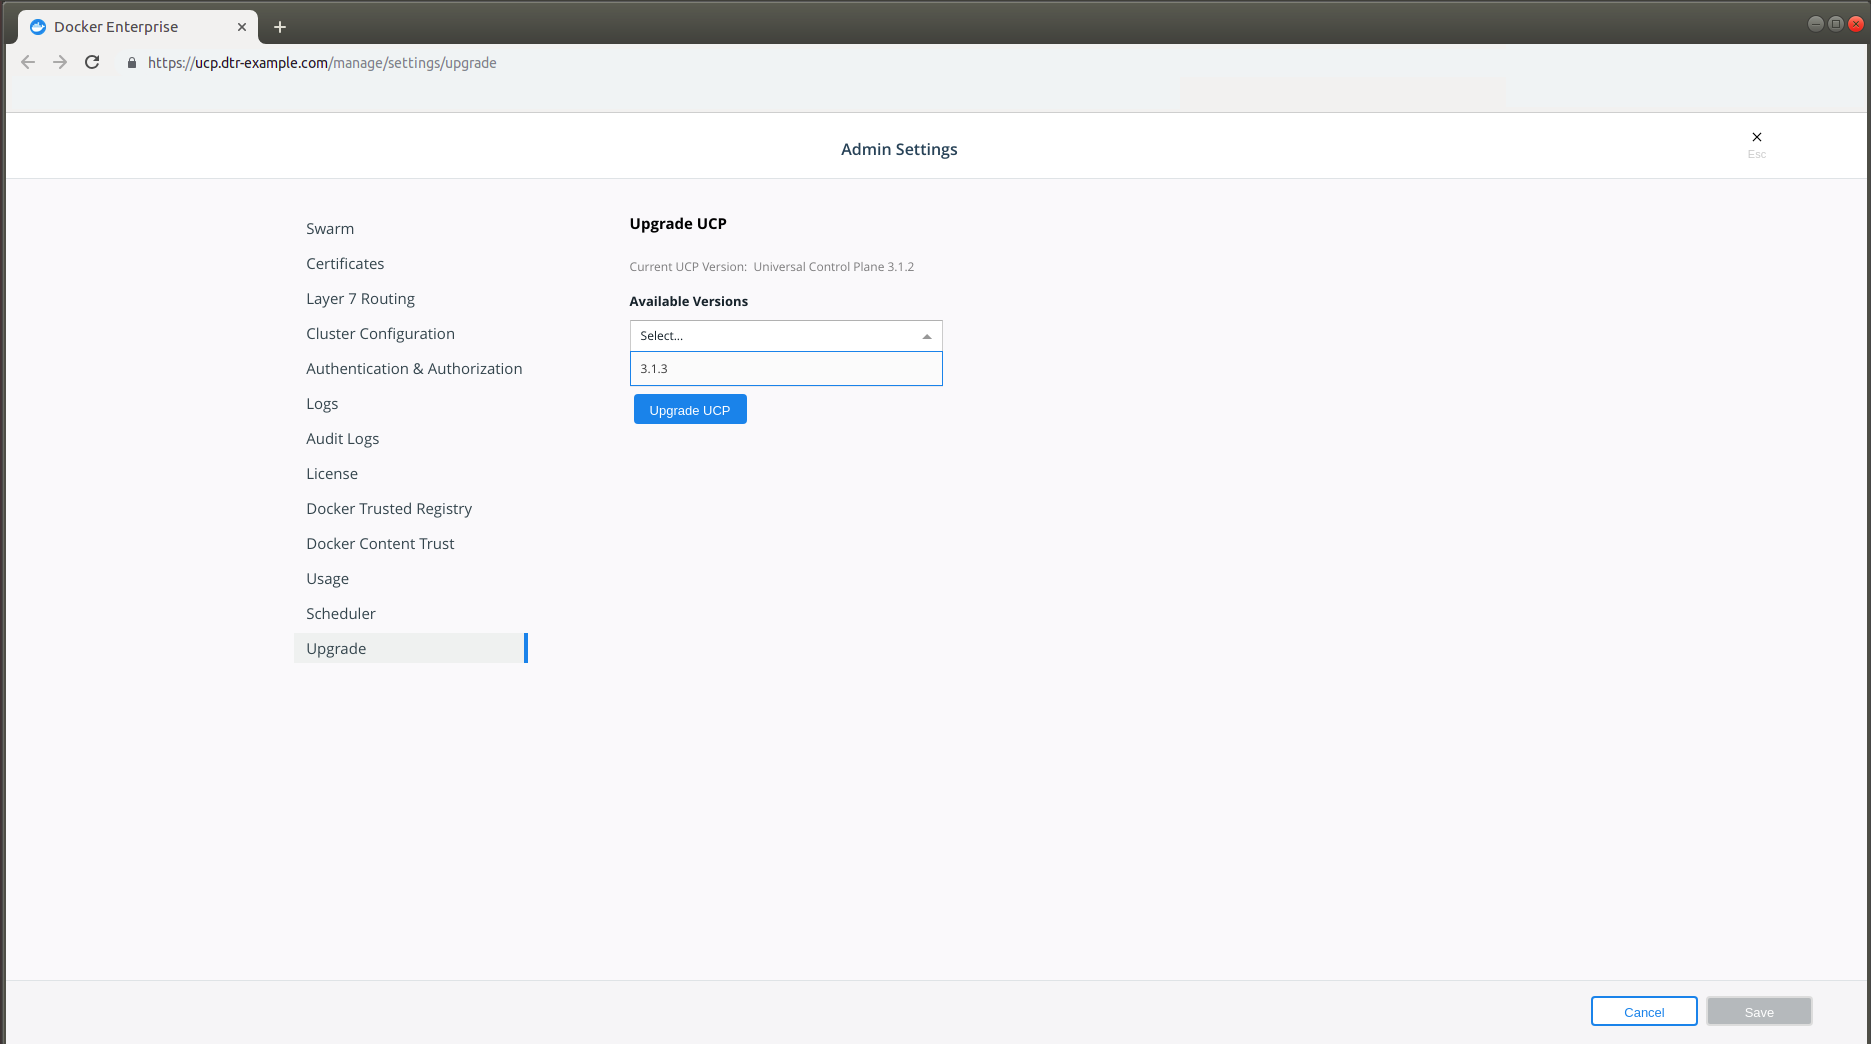
In the Available Versions dropdown, select the version you want to update to and click Upgrade UCP.
During the upgrade, the web interface will be unavailable, and you should wait until completion before continuing to interact with it. When the upgrade completes, you’ll see a notification that a newer version of the web interface is available and a browser refresh is required to see it.
Use the CLI to perform an upgrade
To upgrade from the CLI, log into a UCP manager node using SSH, and run:
# Get the latest version of UCP
docker image pull docker/ucp:3.1.8

docker container run --rm -it \
  --name ucp \
  -v /var/run/docker.sock:/var/run/docker.sock \
  docker/ucp:3.2.5 \
  upgrade --interactive
This runs the upgrade command in interactive mode, which will prompt you for required configuration values.
Once the upgrade finishes, navigate to the UCP web interface and make sure that all the nodes managed by UCP are healthy.
Recommended upgrade paths
- From UCP 3.0: UCP 3.0 > UCP 3.1 > UCP 3.2
- From UCP 2.2: UCP 2.2 > UCP 3.0 > UCP 3.1 > UCP 3.2
Upgrade UCP Offline
Upgrading Universal Control Plane is the same, whether your hosts have access to the internet or not.
The only difference when installing on an offline host is that instead of pulling the UCP images from Docker Hub, you use a computer that’s connected to the internet to download a single package with all the images. Then you copy this package to the host where you upgrade UCP.
Download the offline package
You can also use these links to get the UCP package from the command line:
$ wget <ucp-package-url> -O ucp.tar.gz
Now that you have the package in your local machine, you can transfer it to the machines where you want to upgrade UCP.
For each machine that you want to manage with UCP:
Copy the offline package to the machine.
$ scp ucp.tar.gz <user>@<host>
Use ssh to log in to the hosts where you transferred the package.
Load the UCP images.
Once the package is transferred to the hosts, you can use the
docker loadcommand, to load the Docker images from the tar archive:$ docker load -i ucp.tar.gz
Upgrade UCP
Now that the offline hosts have all the images needed to upgrade UCP, you can upgrade UCP.
Uninstall UCP
UCP is designed to scale as your applications grow in size and usage. You can add and remove nodes from the cluster to make it scale to your needs.
You can also uninstall UCP from your cluster. In this case, the UCP services are stopped and removed, but your Docker Engines will continue running in swarm mode. You applications will continue running normally.
If you wish to remove a single node from the UCP cluster, you should instead remove that node from the cluster.
After you uninstall UCP from the cluster, you’ll no longer be able to
enforce role-based access control (RBAC) to the cluster, or have a
centralized way to monitor and manage the cluster. After uninstalling
UCP from the cluster, you will no longer be able to join new nodes using
docker swarm join, unless you reinstall UCP.
To uninstall UCP, log in to a manager node using ssh, and run the following command:
docker container run --rm -it \
  -v /var/run/docker.sock:/var/run/docker.sock \
  --name ucp \
  docker/ucp:3.2.5 uninstall-ucp --interactive
This runs the uninstall command in interactive mode, so that you are prompted for any necessary configuration values.
The UCP configuration is kept in case you want to reinstall UCP with the
same configuration. If you want to also delete the configuration, run
the uninstall command with the --purge-config option.
Refer to the reference documentation to learn the options available.
Once the uninstall command finishes, UCP is completely removed from all the nodes in the cluster. You don’t need to run the command again from other nodes.
Swarm mode CA
After uninstalling UCP, the nodes in your cluster will still be in swarm
mode, but you can’t join new nodes until you reinstall UCP, because
swarm mode relies on UCP to provide the CA certificates that allow nodes
in the cluster to identify one another. Also, since swarm mode is no
longer controlling its own certificates, if the certificates expire
after you uninstall UCP, the nodes in the swarm won’t be able to
communicate at all. To fix this, either reinstall UCP before the
certificates expire or disable swarm mode by running
docker swarm leave --force on every node.
Restore IP tables
When you install UCP, the Calico network plugin changes the host’s IP tables. When you uninstall UCP, the IP tables aren’t reverted to their previous state. After you uninstall UCP, restart the node to restore its IP tables.