Scan images for vulnerabilities
Scan images for vulnerabilities
Mirantis Secure Registry can scan images in your repositories to verify that they are free from known security vulnerabilities or exposures, using Docker Security Scanning. The results of these scans are reported for each image tag in a repository.
Docker Security Scanning is available as an add-on to Mirantis Secure Registry, and an administrator configures it for your MSR instance. If you do not see security scan results available on your repositories, your organization may not have purchased the Security Scanning feature or it may be disabled. See Set up Security Scanning in MSR for more details.
Note
Only users with write access to a repository can manually start a scan. Users with read-only access can view the scan results, but cannot start a new scan.
The Docker Security Scan process
Scans run either on demand when you click the Start a Scan link or Scan
button, or automatically on any docker push to the repository.
First the scanner performs a binary scan on each layer of the image, identifies the software components in each layer, and indexes the SHA of each component in a bill-of-materials. A binary scan evaluates the components on a bit-by-bit level, so vulnerable components are discovered even if they are statically linked or under a different name.
The scan then compares the SHA of each component against the US National Vulnerability Database that is installed on your MSR instance. When this database is updated, MSR reviews the indexed components for newly discovered vulnerabilities.
MSR scans both Linux and Windows images, but by default Docker doesn’t push foreign image layers for Windows images so MSR won’t be able to scan them. If you want MSR to scan your Windows images, configure Docker to always push image layers <pull-and-push-images>, and it will scan the non-foreign layers.
Security scan on push
By default, Docker Security Scanning runs automatically on
docker push to an image repository.
If your MSR instance is configured in this way, you do not need to do
anything once your docker push completes. The scan runs
automatically, and the results are reported in the repository’s Tags
tab after the scan finishes.
Manual scanning
If your repository owner enabled Docker Security Scanning but disabled
automatic scanning, you can manually start a scan for images in
repositories you have write access to.
To start a security scan, navigate to the repository Tags tab on the web interface, click “View details” next to the relevant tag, and click Scan.
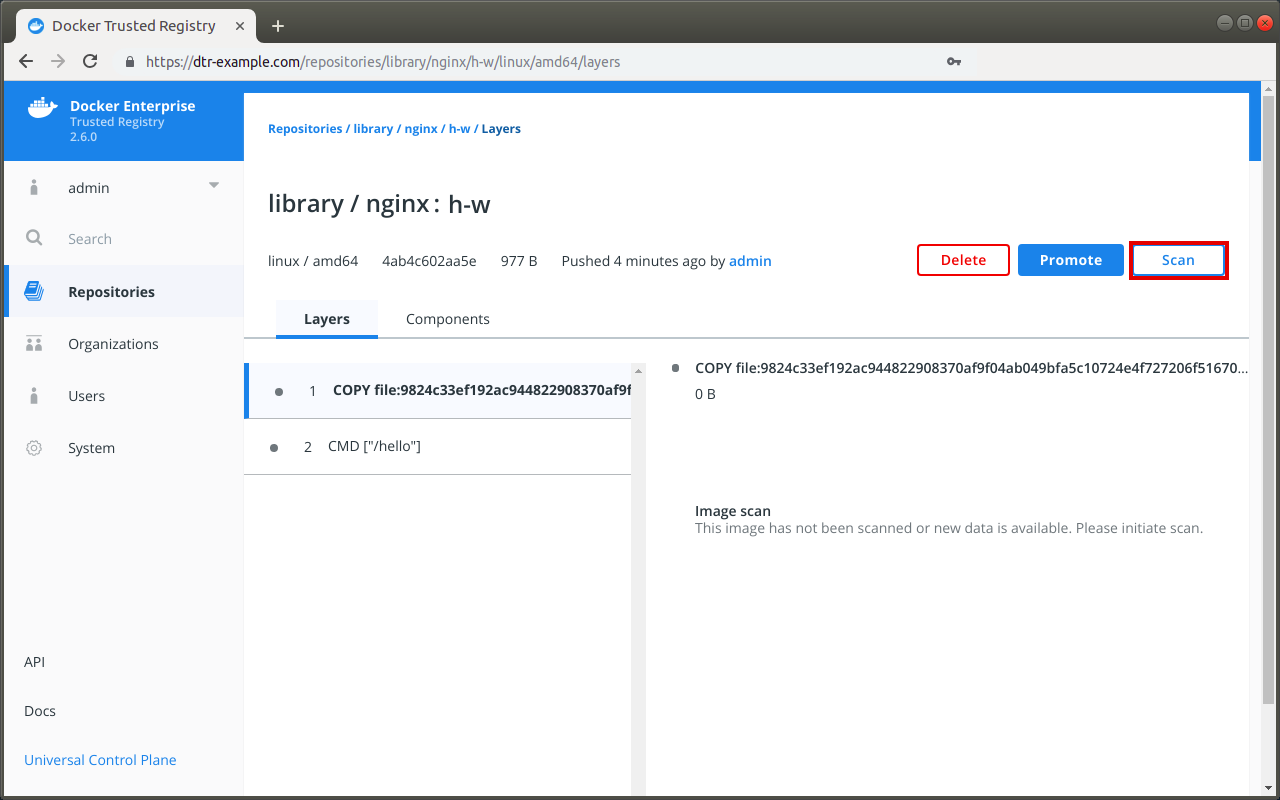
MSR begins the scanning process. You will need to refresh the page to see the results once the scan is complete.
Change the scanning mode
You can change the scanning mode for each individual repository at any time. You might want to disable scanning if you are pushing an image repeatedly during troubleshooting and don’t want to waste resources scanning and re-scanning, or if a repository contains legacy code that is not used or updated frequently.
Note
To change an individual repository’s scanning mode, you
must have write or administrator access to the repo.
To change the repository scanning mode:
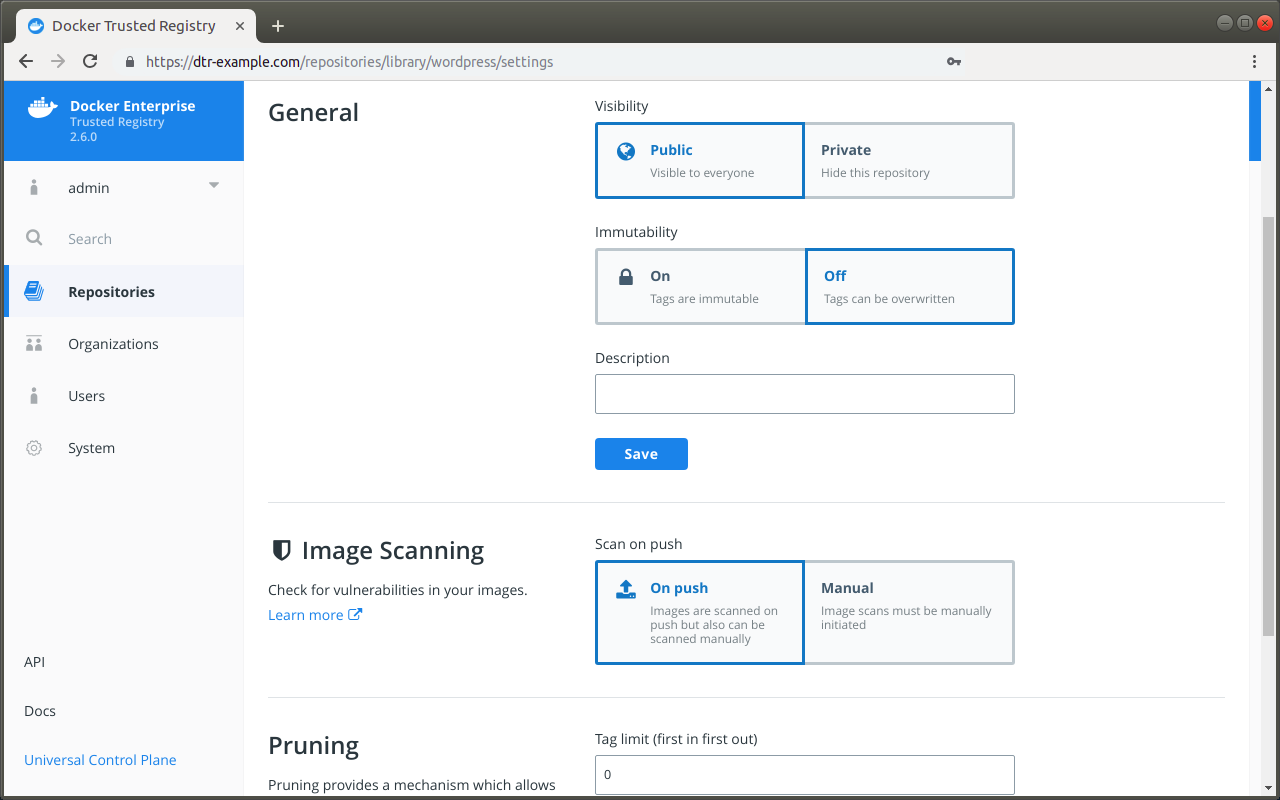
Navigate to the repository, and click the Settings tab.
Scroll down to the Image scanning section.
Select the desired scanning mode.
View security scan results
Once MSR has run a security scan for an image, you can view the results.
The Tags tab for each repository includes a summary of the most recent scan results for each image.
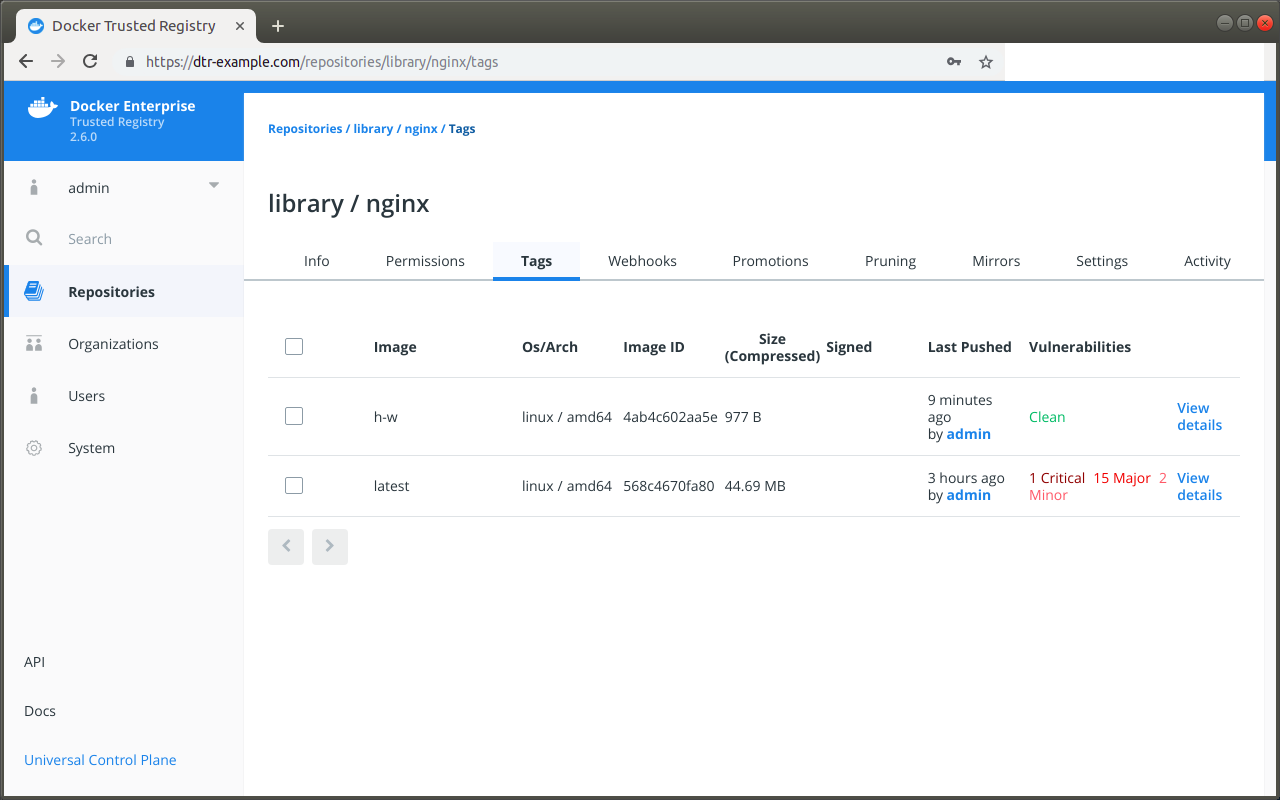
The text Clean in green indicates that the scan did not find any vulnerabilities.
A red or orange text indicates that vulnerabilities were found, and the number of vulnerabilities is included on that same line according to severity: Critical, Major, Minor.
If the vulnerability scan could not detect the version of a component, it reports the vulnerabilities for all versions of that component.
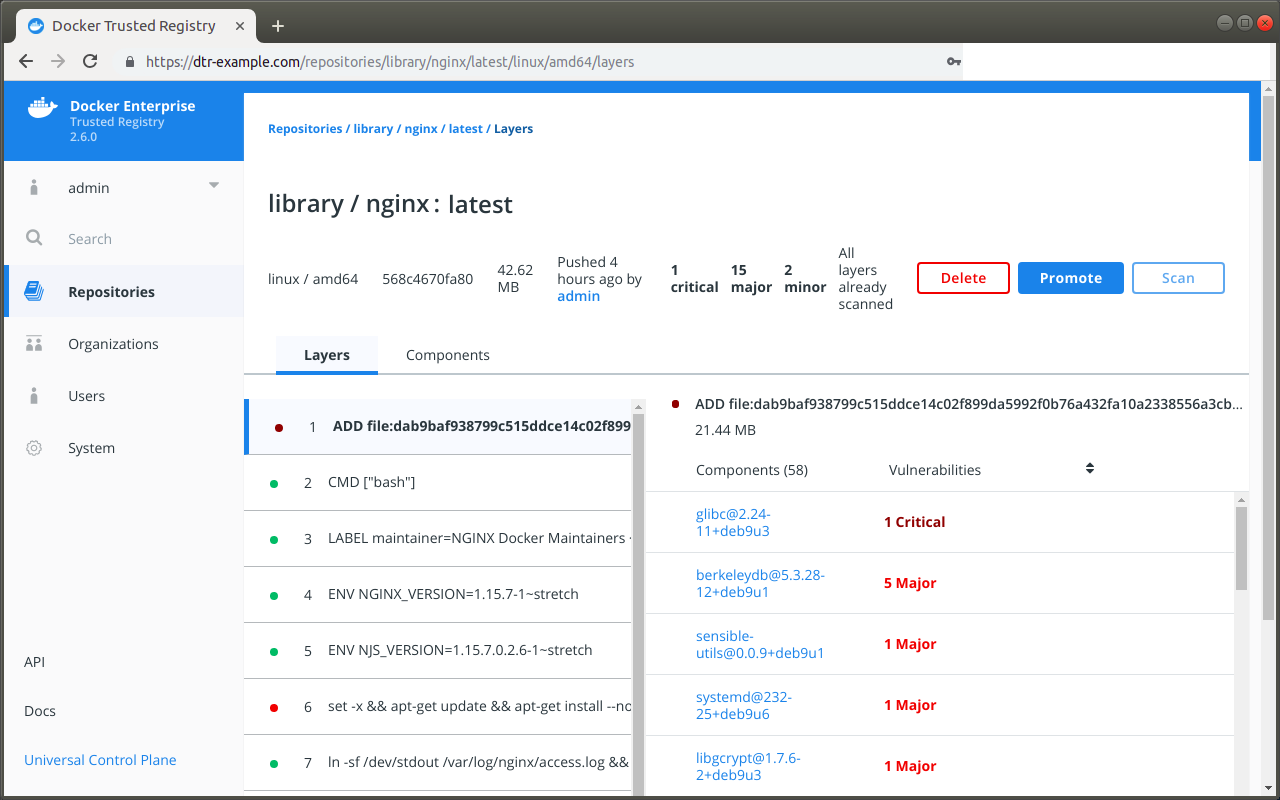
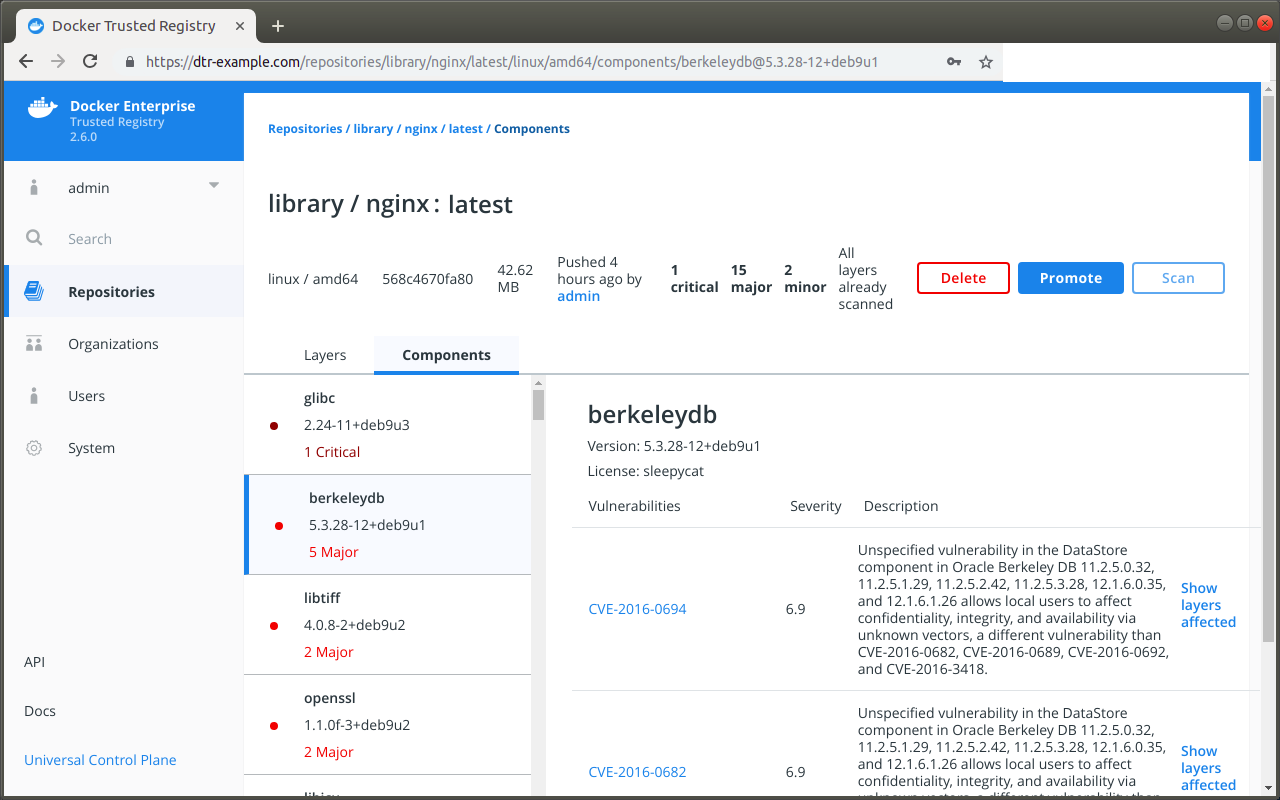
From the repository Tags tab, you can click View details for a specific tag to see the full scan results. The top of the page also includes metadata about the image, including the SHA, image size, last push date, user who initiated the push, the security scan summary, and the security scan progress.
The scan results for each image include two different modes so you can quickly view details about the image, its components, and any vulnerabilities found.
The Layers view lists the layers of the image in the order that they are built by Dockerfile.
This view can help you find exactly which command in the build introduced the vulnerabilities, and which components are associated with that single command. Click a layer to see a summary of its components. You can then click on a component to switch to the Component view and get more details about the specific item.
Note
The layers view can be long, so be sure to scroll down if you don’t immediately see the reported vulnerabilities.
The Components view lists the individual component libraries indexed by the scanning system, in order of severity and number of vulnerabilities found, with the most vulnerable library listed first.
Click on an individual component to view details about the vulnerability it introduces, including a short summary and a link to the official CVE database report. A single component can have multiple vulnerabilities, and the scan report provides details on each one. The component details also include the license type used by the component, and the filepath to the component in the image.
What to do next
If you find that an image in your registry contains vulnerable components, you can use the linked CVE scan information in each scan report to evaluate the vulnerability and decide what to do.
If you discover vulnerable components, you should check if there is an updated version available where the security vulnerability has been addressed. If necessary, you can contact the component’s maintainers to ensure that the vulnerability is being addressed in a future version or a patch update.
If the vulnerability is in a base layer (such as an operating
system) you might not be able to correct the issue in the image. In this
case, you can switch to a different version of the base layer, or you
can find an equivalent, less vulnerable base layer.
Address vulnerabilities in your repositories by updating the images to use updated and corrected versions of vulnerable components, or by using a different component offering the same functionality. When you have updated the source code, run a build to create a new image, tag the image, and push the updated image to your MSR instance. You can then re-scan the image to confirm that you have addressed the vulnerabilities.