MCP Security Best Practices Q4`18 documentation
MCP Security Best Practices
Preface
This documentation provides information on how to use Mirantis products to deploy cloud environments. The information is for reference purposes and is subject to change.
Intended audience
This documentation is intended for deployment engineers, system administrators, and developers; it assumes that the reader is already familiar with network and cloud concepts.
Documentation history
The following table lists the released revisions of this documentation:
| Revision date | Description |
|---|---|
| February 8, 2019 | Q4`18 GA |
Introduction
This document covers security best practices for Mirantis Cloud Platform (MCP) that include:
- Description of typical threats that may affect a customer’s cloud
- Threat modeling techniques
- References to security standards
- Threats mitigation techniques
- Secure configuration of OpenStack components
- Secure configuration of Docker and Kubernetes
- Secure cloud architecture
- Common use cases with using open source security solutions
MCP is a deployment and lifecycle management (LCM) solution that enables DevOps engineers to deploy and operate clouds based on Mirantis OpenStack and Kubernetes through continuous integration and continuous delivery (CI/CD).
Mirantis engineers put efforts to make the components more secure and to deploy cloud architecture capable of withstanding cyber threats.
This guide starts with explaining cyber attack models for threat modeling. These models help you understand threats to protect your cloud against them. The document guides through the most popular threat models: STRIDE from Microsoft, OCTAVE from CERT, and CAPEC from MITRE. In addition, we mention cloud specific threats and affected objects.
The next chapter describes general mitigation techniques for the threat model such as encryption, access controls, logging, load balancing, and so on.
Some components and hosts may need additional configuration after deployment depending on current environment and/or your specific needs. The Secure MCP OpenStack and Secure Kubernetes and Docker chapters describe these aspects. Additionally, refer to OpenStack Security Guide, Docker Security, and Kubernetes Security Best Practices for more information explaining the reasons of such configuration.
The next chapters guide you through the best practices of designing a secure cloud architecture including the demilitarized zone and installation of security solutions on top of cloud platform to provide incident detection, prevention, and investigation processes.
At the end, you can find common use cases that can help you to address the given recommendations.
Threats definition
Before stepping into recommendations this chapter gives an overview of available threat models to define possible attack vectors and suggest mitigation techniques before cloud deployment or in a process of environment configuration.
Threat models
There are three different approaches to threat modeling focusing on:
- software
- assets
- things you protect
- stepping stones
- things attackers want
- attacks and attackers
Let us consider three threat models proposed by Microsoft, CERT, and MITRE that depend on what you are going to focus on when deploying a cloud. Based on these models it will be possible to recommend mitigation techniques for every class of threats in the next chapters.
STRIDE (Microsoft)
STRIDE model focuses on software. We recommend using Microsoft Threat Modeling Tool when planning your cloud to model potential threats you might have in future when running your cloud. As a result, this may affect architectural solutions and change a deployment scenario.
In STRIDE there are six classes of threats corresponding with the letters in the abbreviation.
| Threat class | Description | Examples of affected objects |
|---|---|---|
| Spoofing | Pretending to be something or someone other than yourself | Process, file, host, account, certificate, TLS-protected session |
| Tampering | Modifying something on disk, on a network, or in memory | File, memory, data store, data flow, network, cache |
| Repudiation | Claiming that you did not do something, or were not responsible | Attack to logs, sources of time synchronization |
| Information disclosure | Providing information to someone not authorized to see it | Data from a process, storage, network, cache |
| Denial of Service (DoS) | Absorbing resources needed to provide service | Service availability |
| Elevation of Privileges (EoP) | Allowing someone to do something they are not authorized to do | Process, authorization service |
This guide will refer to STRIDE as a primary threat model used in a software deveopment life cycle.
OCTAVE (CERT)
OCTAVE (Allegro) model focuses on information assets and performs risk assessment. The model consists of eight steps:
- Establish risk measurement criteria
- Develop an information asset profile
- Identify information asset containers
- Identify areas of concern
- Identify threat scenarios
- Identify risks
- Analyze risks
- Select mitigation approach
These steps are organized into four phases:
- Develop risk measurement criteria consistent with the organization’s mission, goal objectives, and critical success factors.
- Create a profile of each critical information asset that establishes clear boundaries for the asset, identifies its security requirements, and identifies all of its containers.
- Identify threats to each information asset in the context of its containers.
- Identify and analyze risks to information assets and begin to develop mitigation approaches.
CAPEC (MITRE)
The Common Attack Pattern Enumeration and Classification (CAPEC) model provides comprehensive threat classification and focuses on mechanisms and vectors of attacks.
OWASP top ten
Open Web Application Security Project (OWASP) provides information on top ten cloud threats:
- Accountability and data risk
- User Identity Federation
- Regulatory compliance
- Business continuity and resiliency
- User privacy and secondary usage of data
- Service and data integration
- Multi-tenancy and physical security
- Incidence analysis and forensics
- Infrastructure security
- Non-production environment exposure
Cloud tenant threats
Threats to tenants may come from a cloud provider (insider threats) or another tenant (co-tenant threats).
Insider threats (from a cloud provider):
- OpenStack services misconfiguration may lead to EoP.
- A failure in maintenance. For example, not wiping disks on nodes between re-allocations may lead to Information Disclosure.
- Improper configuration of security services or turning them off when high loaded. For example, disabling rules and taking protocols out of scan by IDPS may lead to missing an attack (EoP).
- Connecting VMs to the management network may lead to Information Disclosure and, as a result, EoP.
To mitigate the insider threats in two ways:
- Contractually - negotiate agreements related to privacy, security, and reliability, even though, it may increase costs (Information Disclosure).
- Cryptographically - encrypting data on a cloud storage and when transferring through the network channel (Information Disclosure).
- Isolate the management network from tenants’ networks (Information Disclosure, EoP).
Co-tenant threats:
- Another tenant might try to escape a VM and take over the host (EoP).
- Getting access to shared resources such as storage, network, and so on (EoP, Information Disclosure, Availability, Tampering).
- Another tenant might be taken over to run a DoS attack (EoP, Spoofing, DoS).
- Brute-force and dictionary attack (EoP).
- Shared cloud provider’s infrastructure such as:
- A shared mail service may lead to spear-phishing attacks from one tenant to another (Spoofing),
- A shared DNS service may led to DNS poisoning attack (Spoofing, Tampering)
- A shared Web service such as cloud admin web interfaces may be a source of XSS, CSRF, SQL injection, and so on attacks. (EoP)
To mitigate co-tenant threats:
- Provide cloud separation. Use Host Aggregation and Availability Zones to separate VMs with different security level. (EoP, Tampering, Information Disclosure, Availability)
- Use nodes from Trusted Computing Pool based on Intel TXT - a technology designed to harden platforms from the emerging threats of hypervisor attacks, BIOS, firmware attacks, malicious rootkit installations, or other software-based attacks (EoP).
- Brute-force protection. Lock out an attacker’s logins after repeated failures (EoP).
- Change default passwords (EoP).
- Use network IDPS to monitor and detect anomalies in management and tenants networks (Information Disclosure, EoP).
Cloud provider threats
Cloud provider threats cover the following categories of attacks:
- A tenant to hack the provider
- A tenant may run out of a VM or container using security breaches and get access to management network (EoP)
- A fraud tenant can sign up using stolen credentials, for example, to organize a botnet, run a bitcoin miner or Command-and-Control server that a victim will pay for (EoP, Repudiation, Spoofing)
- Brute-force and dictionary attacks (EoP)
- Resource exhaustion (DoS)
- Malicious tenant behaviour that leads to blacklisting or loss of reputation
of a cloud provider that include:
- Outgoing DDoS attacks
- Spamming
- Mining Bitcoins
- Distributing malware, pirated, or other illegal content
- Outsider threats:
- Targeted Attacks (EoP)
- DDoS
- Human-related threats: insider access (EoP) and social engineering (Spoofing, EoP)
- 3-d parties access (Information Disclosure)
- MITM (Information Disclosure) and DoS attacks using BGP exposed to the Internet
- Vulnerabilities in network devices (EoP)
To mitigate cloud provider threats:
- Lock out an attacker’s logins after repeated failures for brute-force protection (EoP).
- Disable indexing by search engines using
robots.txtor similar for public administrative interfaces (Information Disclosure). - Change default passwords (EoP).
- Use WAF to limit access to admin interfaces (EoP).
- Use network IDPS to monitor and detect anomalies in management and tenants networks (EoP, Information Disclosure, Spoofing, Repudiation).
- Enable logging to trace EoP attempts and mitigate repudiation attacks.
- Enable BGP peer filtering (Information Disclosure, EoP).
- Enable vulnerability management (EoP).
See also
Securing the Virtual Environment. How to Defend the Enterprise against Attack, Davi Ottenheimer, Matthew Wallace, Wiley, 2014.
NFV threats
NFV threats are located at intersection of virtualization and general networking threats and, therefore, can be mitigated by hardening both virtualization and networking protection.
Enabling NFV in a cloud environment brings the following threats:
- Intellectual Property related threats. VNFs may come from different vendors that should take measures to protect the proprietary code in VNFs against each other and a cloud operator (Information disclosure).
- VNF images can be altered or replaced by a compromised one (Tampering). To mitigate the tampering threat, provide integrity verification for VNF images.
- Because of dynamic nature of NFV, network traffic loops may occur. For example, when a VNF’s output goes to directly or through intermediaries to its input. This may lead to the DoS amplification attacks. Detect loops during topology validation or when forwarding messages.
- The resources of the virtualisation infrastructure (storage, network connections, memory, CPU, operating system resources) can be exhausted by an attacker causing a DoS attack. To mitigate the DoS attack caused by overconsumption of of the virtualisation infrastructure resources, enable monitoring for degraded performance and anomalies in resource allocation.
- When using the IOMMU technology (for example, Intel VT-d) to provide
the direct access from a network adapter to a VM’s memory, one VM can
access another VM’s memory, prevents VM from starting, alter a hypervisor
or take the whole host down.
To mitigate these threats (information disclosure, DoS, tampering),
verify that your network card uses
shared IOMMUimplemented in the I/O chipset as a part of the SR-IOV standard. - The cloned VNF image may contain confidential information such as private keys, certificates, passwords and tokens. Once one of the images is compromised, all clones are. To mitigate information disclosure threat, use secure key management and a unique key pair for every cloned image. Employ operator-controlled certification authorities (CAs) for internal services such as management, orchestration, and operation within NFVI.
- Diagnostic, debugging, and monitoring interfaces enabled in a VNF for remote support can be exploited by attackers. To prevent unauthorized access using VNFs, provide authorization to control if a VNF can turn into a maintenance mode, what diagnostics functions are allowed, and who can run them.
Attack surface
The more public interfaces the system has, the larger attack surface becomes, and the more it is exposed to external attacks. Minimize the attack surface to save efforts on protecting it against external attacks. To do that, place your API endpoints behind a trust boundary such as Firewall or DMZ.
See also
Threat Modeling: Designing for Security, Adam Shostack, Wiley, 2014.
Targeted attacks and APTs
Modern cyber attacks happen now via a set of cyber espionage processes called Advanced Persistent Threats (APTs) that are capable of running silently for a long period of time collecting specific information on a victim’s computer or network.
Nowadays, attackers do not try to penetrate a security perimeter in a straightforward manner by scanning and exploiting found vulnerabilities, as it may attract too much attention to the attack and it will be blocked in a matter of minutes.
Attackers prefer using more sophisticated techniques based on social engineering to allow a spy program to operate in a hidden way for unlimited amount of time not attracting extra attention from a victim and having an ability to harvest sensitive information and send it to a Command and Control (C&C) server.
The most popular techniques used in targeted attacks are:
- Spear-phishing emails
- Watering hole attacks
- Zero-day exploits
Before running a targeted attack an attacker performs reconnaissance to understand how a targeted environment looks like.
The general APT model might look like:
- Reconnaissance
- Penetration using:
- Spear-phishing
- Watering hole
- USB removable storage
- Delivery of the APT kit
- Lateral movements and EoP
- Data collection
- Data exfiltration
Defensive techniques
The techniques described in this chapter are mostly based on STRIDE as we focus on Mirantis OpenStack, which is a software product. Each threat class is represented with a corresponding set of mitigation techniques and recommended tools. The table below represents information about threats and mitigation techniques based on the STRIDE model.
| Threat Type | Violates | Mitigation | Tools |
|---|---|---|---|
| Spoofing | Authentication | PKI: LS and certificates, digital signatures | Secrets manager (Barbican) |
| Tampering | Integrity | MAC/RBAC, digital signatures | SELinux, AppArmor, grsecurity, Identity Federation, secrets manager (Barbican) |
| Repudiation | Non-repudiation | Secure logging and auditing, digital signatures | LMA toolchain, Keystone CADF events |
| Information disclosure | Confidentiality | Encryption, MAC/RBAC | Volume encryption, ephemeral disk encryption in LVM format, Object encryption, secrets manager (Barbican), SELinux, AppArmor, grsecurity |
| Denial of Service (DoS) | Availability | ACLs, filtering, quotas, geo distribution | Firewall (layer 3,4,7), load balancer, DDoS protection, availability zones in OpenStack |
| Elevation of Privilege (EoP) | Authorization | MAC/RBAC, Group or role membership, privilege ownership, input validation | SELinux, AppArmor, grsecurity, Identity Federation, DMZ |
| Threat Type | Violates | Mitigation | Tools |
|---|---|---|---|
| Insider threats (information disclosure, spoofing) | Cloud tenant security and privacy | Contractually, MAC/RBAC, data encryption (information disclosure), Isolate the management network from tenant’s networks (information disclosure, spoofing), sniff outgoing traffic (information disclosure) | SELinux, AppArmor, grsecurity, volume encryption, ephemeral disk encryption in LVM format, object encryption, secrets Manager (Barbican), DLP |
| Co-tenant threats (spoofing, EoP, DoS, information disclosure, repudiation) | Cloud tenant security and privacy | East-west traffic inspection to detect anomalies and restricted application layer protocols (EoP, information disclosure), brute-force protection (EoP), Cloud separation using Host Agregates and Availability Zones to avoid running VMs with different security level on the same Compute node EoP, information disclosure, DoS), | WAF, IDPS, MOS brute force protection, trusted computing pool based on Intel TXT, host aggregates and Availability Zones in OpenStack Compute |
| Tenants hack the provider: Running out of VM and get access to the management interface or network (EoP), Using stolen another tenant’s credentials (EoP, spoofing, repudiation), brute-force and dictionary attacks (EoP), resource exhaustion (DoS) | Cloud provider security and privacy | Brute force protection (EoP), limit access to admin interfaces (EoP), change default passwords (EoP), monitor and detect anomalies in management and tenants’ networks (EoP, information disclosure), disable indexing by search engines (information disclosure), logging (repudiation) | WAF, IDPS, LMA toolchain, brute-force protection |
| NFV threats: intellectual property (information disclosure), altering of VNF images (tampering), network traffic loops (DoS), exhausting resources of the virtualisation infrastructure (DoS), VM can access another VM’s memory when using IOMMU (EoP), a cloned VNF image may contain confidential information (information disclosure), diagnostic interfaces enabled in a VNF for remote support can be exploited by attackers. | Cloud provider and tenant security and privacy | Protect the proprietary code in VNFs, integrity verification for VNF images, detect loops during topology validation or when forwarding messages, enable monitoring for degraded performance and anomalies in resource allocation, use shared IOMMU within the SR-IOV standard, use secure key management and a unique key pair for every cloned image as well as operator-controlled certification authorities (CAs) for internal services, enable authorization to control VNF’s maintenance operations. | LMA toolchain, SELinux, AppArmor, grsecurity, secrets manager. |
| Outsider threats: targeted attacks (EoP), DDoS, human-related threats: insider access, social engineering (spoofing, EoP), third-party access (information disclosure), MITM (information disclosure) and DoS attacks using BGP exposed to Internet | Cloud provider and tenant security and privacy | DMZ (EoP), increasing staff security awareness (spoofing, EoP), BGP peer filtering (information disclosure, EoP) | Firewall (layer 3,4,7), load balancer, DDoS protection, sandbox |
| Forensic threats | Cloud forensic data | Logging, setting security domain/project with forensic tools | LMA toolchain, network sniffer |
See also
- Barbican https://wiki.openstack.org/wiki/Barbican
- grsecurity https://en.wikibooks.org/wiki/Grsecurity
- SELinux on CentOS https://wiki.centos.org/HowTos/SELinux
- SELinux on Debian and Ubuntu https://wiki.debian.org/SELinux/Setup
- AppArmor http://wiki.apparmor.net/index.php/Main_Page
Respond security incident
The following chapter provides incident response procedure. Incident response procedure describes a set of steps to be performed by the incident response team (IRT) when an information security incident happens within an organization. Incident response aims at revealing the intruder, mitigating the damage, recovering and preventing further penetration.
Typically, incident response procedure includes the following stages:
Preparation.
See the recommendations below.
Detection.
A user or installed security service such as IDS, firewalls, or sandbox generates an alert.
Containment.
- Damage minimization, prevention of wiping compromised systems to take forensic images and other digital evidence.
- Isolation of the compromised VMs or project by temporarily switching them from the Internet to the Security Domain for further investigation.
Investigation.
- IT service collects incident-related data, such as network traffic, files, and logs, and deliver it to IRT.
- Analysis. IRT begins threat analysis using data gathered by the IT service to report recommendations on mitigating the security issue, remediation, and future prevention.
- IRT writes the recommendations to IT service.
For example:
- How to remove malicious code and signs of its presence on the infected hosts and/or VMs.
- What password should be changed if any.
- What keys should be regenerated if any.
- What certificates should be revoked if any.
Remediation.
- IT service removes infection and change passwords, generate new keys.
- IT service recovers hosts, VMs, or network devices from backups reverting changes made by malware.
- IT service scans the recovered VMs, hosts, and networks with IDS updated and restarted with new rules and a vulnerability scanner to discover possible breaches.
- IT service gets the affected VMs and project back to operation.
Prevention.
IRT writes recommendations to IT service describing incident prevention steps. For example:
- Revise enabled protocols.
- Install security updates to address vulnerabilities.
- Update IDS, firewalls, and sandbox with new rules based on mined IoCs.
Lessons learned.
- Write an incident report.
- Analyse IRT performance.
- Write missing documentation.
- Organize lessons learned meeting within two weeks after the incident
covering the following topics:
- Who and when detected the problem.
- The scope of the incident.
- How it was contained.
- Data collected during the investigation.
- Work performed during analysis.
- Remediation steps.
- Areas that need improvement.
Recommendations for the preparation stage:
Create a plan or strategy to handle incidents.
Create IRT, which may include IT and security specialists, as well as an attorney, PR, and HR specialists.
For access control, add a system administrator to IRT to adjust permissions for IRT accounts during incident handling.
Prepare software and hardware tools for incident handling. As an option, you can create a Security Domain in your cloud that may contain network sniffers, malware scanners, debuggers, and a sandbox. Once an incident happens, you can switch the affected project (tenant) from the Internet to the Security Domain so the network traffic will go through network scanners and the suspicious files extracted from the traffic can be analyzed in a sandbox.
Note
Consider the reference model provided by ESTI (ETSI GS NFV-SEC 004) for lawful interception of a communication content (streaming traffic) and related information (event logs) that you can use for monitoring, auditing, forensic, and incident response purposes.
Allocate storage for forensic dumps of compromised VMs and hosts.
Prioritize incidents based on organizational impact, which will determine resources allocated for IRT.
Create a communication plan to know who to contact during an incident and why. Create a contact list of IRT members.
Document an incident. IRT should use Incident Handlers Journal to record any actions performed during incidents handling. Later you can use this documentation as evidence to bring the attacker to justice.
Train your IRT and organize drills.
Linux host security
This section provides information about the security hardening and changes that Mirantis applies to the Ubuntu 16.04 base image. MCP leverages the VCP (Virtual Control Plane) concept. Depending on the node type, MCP installs the Ubuntu machines as follows:
- Nodes on the bare metal hardware. For example, the Nova compute nodes.
Such nodes are provisioned using the MAAS provisioning software. MAAS uses a
maas-ephemeralresource for the bare metal nodes installation. Technically, it includes SquashFS and the Linux kernel, with an Ubuntu mirror pointed to https://mirror.mirantis.com/ repositories. Mirantis does not introduce any changes to themaas-ephemeralresources. All MCP-specific configuration is applied after the initial installation using the SaltStack configuration management software. All the SaltStack formulas leveraged by MCP are available for review at Mirantis Gerrit. - Nodes forming the MCP Virtual Control Plane. Essentially, the KVM virtual
machines. Such nodes are installed as VCP nodes and provisioned using the
Mirantis-built KVM
qcow2images. Mirantis builds these images from the official Ubuntu cloud-images and installs the SaltStack configuration management components.
The Salt Master node called cfg01 node includes the SaltStack components
preinstalled along with additional software utilities required to provision an
MCP cluster, for example, the Jenkins master.
MCP with SaltStack applies the following CIS hardening to the Ubuntu bare metal and VCP nodes:
- CIS 1.1.1.1 - Ensure mounting of
cramfsfilesystems is disabled (scored). - CIS 1.1.1.2 - Ensure mounting of
freevxfsfilesystems is disabled (scored). - CIS 1.1.1.3 - Ensure mounting of
jffs2filesystems is disabled (scored). - CIS 1.1.1.4 - Ensure mounting of
hfsfilesystems is disabled (scored). - CIS 1.1.1.5 - Ensure mounting of
hfsplusfilesystems is disabled (scored). - CIS 1.1.1.6 - Ensure mounting of
squashfsfilesystems is disabled (scored). - CIS 1.1.1.7 - Ensure mounting of
udffilesystems is disabled (scored). - CIS 1.1.1.8 - Ensure mounting of FAT filesystems is disabled (scored).
- CIS 1.1.14 - Ensure
nodevoption set on/dev/shmpartition (scored). - CIS 1.1.15 - Ensure
nosuidoption set on/dev/shmpartition (scored). - CIS 1.1.16 - Ensure
noexecoption set on/dev/shmpartition (scored). - CIS 1.1.21 - Disable Automounting (scored).
- CIS 1.4.1 - Ensure permissions on bootloader config are configured (scored).
- CIS 1.5.1 - Ensure core dumps are restricted (scored).
- CIS 1.5.2 - Ensure XD/NX support is enabled (not scored).
- CIS 1.5.3 - Ensure address space layout randomization (ASLR) is enabled (scored).
- CIS 1.5.4 - Ensure prelink is disabled (scored).
- CIS 1.6.2.2 - Ensure all AppArmor Profiles are enforcing (scored).
- CIS 1.7.1.2 - Ensure local login warning banner is configured properly (not scored).
- CIS 1.7.1.3 - Ensure remote login warning banner is configured properly (not scored).
- CIS 1.7.1.4 - Ensure permissions on
/etc/motdare configured (not scored). - CIS 1.7.1.6 - Ensure permissions on
/etc/issue.netare configured (not scored). - CIS 2.2.1.1 - Ensure time synchronization is in use (not scored).
- CIS 2.3.1 - Ensure NIS Client is not installed (scored).
- CIS 2.3.3 - Ensure talk client is not installed (scored).
- CIS 2.3.4 - Ensure telnet client is not installed (scored).
- CIS 3.3.3 - Ensure IPv6 is disabled (not scored).
- CIS 3.5.1 - Ensure DCCP is disabled (not scored).
- CIS 3.5.2 - Ensure SCTP is disabled (not scored).
- CIS 3.5.3 - Ensure RDS is disabled (not scored).
- CIS 3.5.4 - Ensure TIPC is disabled (not scored).
- CIS 3.6.1 - Ensure iptables is installed (scored).
- CIS 4.1.1.1 - Ensure audit log storage size is configured (not scored).
- CIS 4.2.2.2 - Ensure logging is configured (not scored).
- CIS 4.2.2.5 - Ensure remote
syslog-ngmessages are only accepted on designated log hosts (not scored). - CIS 5.1.8 - Ensure
atandcronis restricted to authorized users (scored). - CIS 5.2.4 - Ensure SSH X11 forwarding is disabled (scored).
- CIS 5.2.12 - Ensure SSH Idle Timeout Interval is configured (scored).
- CIS 5.2.13 - Ensure SSH
LoginGraceTimeis set to one minute or less (scored). - CIS 5.2.15 - Ensure SSH warning banner is configured (scored).
- CIS 5.3.2 - Ensure lockout for failed password attempts is configured (not scored).
- CIS 5.4.1 - Set Shadow Password Suite Parameters:
- CIS 5.4.1.1 - Ensure password expiration is 90 days or less (scored).
- CIS 5.4.1.2 - Ensure minimum days between password changes is 7 or more (scored).
- CIS 5.4.1.3 - Ensure password expiration warning days is 7 or more (scored).
- CIS 5.4.1.4 - Ensure inactive password lock is 30 days or less (scored).
- CIS 5.4.2 - Ensure system accounts are non-login (scored).
- CIS 5.4.4 - Ensure the default user umask is
027or more restrictive (scored). - CIS 6.1.2 - Ensure permissions on
/etc/passwdare configured (scored). - CIS 6.1.3 - Ensure permissions on
/etc/shadoware configured (scored). - CIS 6.1.3 - Ensure permissions on
/etc/shadoware configured (scored). - CIS 6.1.4 - Ensure permissions on
/etc/groupare configured (scored). - CIS 6.1.5 - Ensure permissions on
/etc/gshadoware configured (scored). - CIS 6.1.6 - Ensure permissions on
/etc/passwd-are configured (scored). - CIS 6.1.7 - Ensure permissions on
/etc/shadow-are configured (scored). - CIS 6.1.8 - Ensure permissions on
/etc/group-are configured (scored). - CIS 6.1.9 - Ensure permissions on
/etc/gshadow-are configured (scored). - CIS 6.2.6 - Ensure root PATH Integrity (scored).
Secure MCP OpenStack
Reference architecture
You can enable TLS encryption for OpenStack endpoints at deployment stage and access an environment through the OpenStack Dashboard using the HTTPS protocol. In the default configuration, Load Balancer (HAProxy) terminates TLS and forwards decrypted HTTP requests further to OpenStack API endpoints to avoid overloading OpenStack services, for example, when scaling, which may cause DoS or result in failures due to lack of testing. This architecture is based on the threat model where an attacker is outside.
Note
The current architecture does not protect against internal attacks. For example, when a malicious administrator can access to the management network and private keys, or a malicious user can escape VM using a vulnerability in a hypervisor and gains access to the management network. In such case, API endpoints should employ TLS encryption using a separate key pair different from the one used for services in public network. Moreover, limit access to the key pair used to encrypt traffic in the Management network. Use IDS/IPS for admin networks to detect an anomaly in traffic as well.

See also
OpenStack Security Guide for more secure reference architectures.
Encryption strategies
This section describes the encryption strategies and recommendations for your MCP OpenStack deployment.
Cryptography introduction
You can employ encryption for protecting network traffic, secrets, and ordinary data at rest. Consider the following recommendations stated in the NIST standard for choosing appropriate cipher suites and key management techniques:
For storing passwords, always use a salt. A salt should be unique for every stored password and randomly generated.
For symmetric encryption with passphrases, use a passphrase with appropriate entropy valid for particular cipher key strength and expected brute-force durability. For example, a valid passphrase for 128 bit cipher (CAST-5, AES-128) should contain at least 128 bits of entropy.
Whenever possible, use ephemeral keys to maintain forward secrecy. Use Diffie-Hellman for exchanging keys.
Whenever possible, use Elliptic Curve Cryptography (ECC) as it requires less computational power than RSA or DSA.
To protect sensitive data (encrypting and digitally signing) in a long perspective (2031 year and beyond), use cipher suites and key length with security strength 128 or more (192, 256).
Note
The finite-field cryptography (FFC) and integer-factorization cryptography (IFC) algorithms with higher security strength of 192 and 256 bits are not currently included in the NIST standards for interoperability and efficiency reasons.
Use the algorithms that have security strength of 128 bits that are secure and efficient at the same time. To protect data until 2030, you can use cipher suites and key length with the security strength of 112 bits.
| Until 2030 (key strength = 112 bits) | After 2030 (key strength = 128 bits) | |
|---|---|---|
| Hashing and digital signatures | SHA-224, SHA-512/224, SHA3-224 | SHA-256, SHA-512/256, SHA3-256 |
| Symmetric | 3TDEA | AES-128 |
| FFC | DSA and Diffie-Hellman(DH) L=2048, N=224 | DSA and Diffie-Hellman(DH) L=3072, N=256 |
| IFC | RSA-2048 | RSA-3072 |
| Elliptic-curve (ECC) | ECDSA with the key size f=224-255 | ECDSA with the key size f=256-383 |
where L - is the size of the public key, N - is the size of the private key.
MCP OpenStack cryptography considerations
To provide for confidentiality and integrity of network traffic inside your OpenStack deployment, Mirantis recommends using cryptographic protective measures, such as the Transport Layer Security (TLS) protocol. MCP provides solutions for various TLS encryption use cases. The most common ones are described below.
By default, only the traffic that is transmitted over public networks is encrypted. However, cryptography support, TLS encryption, and optionally X.509-based certificate authentication is also available for the MCP management plane services like MySQL, RabbitMQ, libvirt control channel and live migration data channel, and libvirt NoVNC proxy.
When deploying an MCP OpenStack environment, consider enabling cryptographic measures to better protect the MCP cluster from eavesdropping and public to control plane attacks:
- MCP Deployment Guide: Enable TLS for cluster internal API HTTP transport
- MCP Deployment Guide: Enable TLS for RabbitMQ and MySQL server-server communications
- MCP Deployment Guide: Enable TLS for RabbitMQ and MySQL client-server communications
- MCP Deployment Guide: Enable TLS for Libvirt control channel and live migration data
- MCP Deployment Guide: Enable TLS for Libvirt VNC to NoVNC clients (since Queens release)
- MCP Deployment Guide: Enable encryption for Memcached
See also
Account management
According to GLBA, HIPAA, PCI, SOX, and FFIEC, an organization must prove to have control over privileged users and know who holds master passwords and track these users’ activity.
Recommendations:
Do not use shared privileged accounts such as
rootoradmin.Do not use hard-coded privileged accounts.
Avoid using privileged accounts such as root for installation and configuration, use
sudoto gain privileges instead.Do not use shared privileged accounts (
adminorroot) to login remotely through SSH to any node. Disable login for privileged accounts:PermitRootLogin no
Key and certificate management
Recommendations:
- Use different key pairs to sign and encrypt messages to mitigate information disclosure and tampering attacks.
- Do not use the public same key in different certificates due to possible substitution (spoofing) attacks.
- Use secure protocols for dissemination of certificate and revocation information such as LDAP repositories.
- Update keys and corresponding certificates every three quarters.
- Provide reliable storage for expired keys that can be used later to retrieve and recover encrypted data.
- Consider using the OpenStack Anchor - an ephemeral PKI certification system that uses automated issuing rules and short life certificates to mitigate common certificate security issues.
Host security
To improve host security, create the IT host security policy and apply the recommended enhancements. Find the example of the IT host security policy in Appendix A.
Mandatory access control
Use Linux mandatory access control (MAC) enhancements to mitigate EoP threat. SELinux, AppArmor, and grsecurity are possible MAC security enhancements for Linux. The choice of a Linux security enhancement may depend on your personal experience and type of a host OS distribution.
Rootwrap
Rootwrap is a security wrapper designed to allow a service-specific
unprivileged user to run a number of actions as the root user in the
safest manner possible mitigating EoP such as when an attacker takes
advantage of a running service with root privileges. The
rootwrap.conf file contains filter definition directories and
specifies command filters to be loaded for them. Since the configuration
file is in the trusted security path, it needs to be owned and writeable
only by the root user to avoid tampering.
On a host Linux machine, enable encryption for a home
directory when creating a privileged user to mitigate information disclosure
threat.
For example, on Ubuntu use the following command:
adduser --encrypt-home
You might want to encrypt not the whole Home directory but only a specific
folder of files. In such case you can use the ~/.Private folder to store
keys and configuration files. The data stored in this folder will be decrypted
when the folder is automatically mounted on logon.
Compute and hypervisor security
In this context we see two types of threats:
- hypervisor threats
- multi-project threats
Malicious application can escape the VM through exploitation of a vulnerability or a direct access to hardware or hypervisor OS and compromise other VMs running on a physical node which may belong to another projects (EoP).
The hypervisor security should be a prime concern because a single fault on the hypervisor level may compromise the whole environment.
For example, having access to the hypervisor an attacker can look into
VM images by simply mounting a virtual disk (information disclosure).
Even more, mounting a filesystem as read only can help to avoid
tampering. An attacker becomes untraceable because peeking files this
way does not update file access time (repudiation).
To mitigate EoP on a hypervisor:
- Use the hypervisor certified against FIPS 140-2 and take Common Criteria Certification requirements into consideration.
- Limit access to hypervisor OS (a full OS or kernel the hypervisor runs on), the VM manager, and all interfaces used to manage VMs.
- Do not use hypervisor memory optimization such as Copy-on-Write (COW) mechanisms shown to be vulnerable to side-channel attacks when used in multi-project environment.
- Disable PCI passthrough for your hypervisor, which means that an VM instance should not have a direct access to hardware such as memory (DMA) or video cards (GPUs).
- Harden virtual hardware (QEMU for KVM) by:
- Minimizing the code base by removing unused components from a QEMU configuration.
- Building QEMU with compiler hardening enabled, which may include: stack protection, data execution prevention, Address Space Layout Randomization (ASLR) by enabling Position Independent Executable (PIE)
- Using mandatory access controls such as sVirt, SELinux, AppArmor, or grsecurity to put QEMU process into a separate security context.
- A hypervisor must host only VMs of the same security level that can be classified based on their role, function, or access to sensitive data. Use Host Aggregates and Availability Zones to group Compute nodes for running VMs of the same security level.
To mitigate EoP on for a Compute service:
- Limit an access by providing strict access permissions to the
nova.conffile and/var/lib/novafolder. - Use file integrity monitoring (FIM) tools such as
iNotifyorSamhainto trace unexpected files modifications. - Use
rootwrapto execute Compute commands as the root user. - Use trusted compute pools.
- Implement centralized logging to mitigate a risk of a repudiation attack.
- Enable mandatory access control (MAC) with
SELinux,AppArmor, orgrsecurity. - Enable encryption for Compute metadata traffic.
See also
- FIPS 140-2
- Common Criteria Certification
- OpenStack Security Guide
- Secure with rootwrap
- Compute security hardening
- Security advisories by:
- Xen: http://xenbits.xen.org/xsa/
- VMware: http://blogs.vmware.com/security/
- Others (KVM, and more): http://seclists.org/oss-sec
Virtual consoles
In the OpenStack Compute service, you can use VNC or SPICE protocols. The MCP OpenStack Dashboard service supports the VNC protocol. When using VNC, enable TLS for desktop traffic encryption.
See also
Compute hardware platform security
Consider using Intel Trusted Execution Technology (TXT) to build a chain of trust from server’s firmware to a hypervisor to prevent EoP and tampering attacks to BIOS, MBR, and boot loader that can be implemented by bootkits or ransomware but mostly for the Windows platform. A bootkit is an advanced malware capable to inject itself at a booting stage before OS starts to avoid being detected by a host security solutions such as HIPS (antiviruses). For example, the recent MBR bootkit called HDRoot discovered in 2015 managed to poison MBR to launch later the backdoor as a system service when Windows starts. Another threat is cryptolockers. For example, Petya and Mamba cryptolockers can encrypt Master File Table and disk partitions correspondingly.
To mitigate EoP attacks and tampering attacks, use Trusted Filter for Filter Scheduler in OpenStack that implements Intel TXT to schedule workloads requiring trusted execution only to trusted compute resources. Clusters can have both trusted and untrusted compute resources. Trusted compute resources are grouped into the Trusted Computing Pool.
Workloads not requiring trusted execution can be scheduled on any node, depending on utilization, while workloads with a trusted execution requirement will be scheduled only to trusted nodes.
Images
Recommendations:
- Consider using image signing to mitigate tampering attack
- Use trusted and verified VM images. Images from non-trusted sources may contain security breaches or unsolicited malicious code (spoofing, information disclosure).
- Scan a VM image that you are going to use with a vulnerability scanner like Nessus and an antivirus scanner.
Networking
This section includes recommendations to secure networking equipment and services.
Network equipment
Recommendations:
- Change initial vendor’s default passwords for all networking equipment to mitigate EoP.
- Use a network management utility provided by a vendor. The management utility helps to ensure that network operations are less error-prone and have adequate change management record history. Note, that a network equipment must be homogenic, provided by a single vendor.
- Document network equipment changes and use change management process such as ITIL / ISO 2000 service management techniques.
Networking service
Recommendations:
- Use an isolated management network to provide communication between the OpenStack Networking services and other OpenStack core services to mitigate spoofing and tampering attacks.
- Enable security groups to specify the type of traffic and a direction
(ingress/egress) that is allowed to pass through a virtual interface port.
Disable security groups in Compute service and proxy all security group
calls to Networking API. To do that, set
firewall_drivertonova.virt.firewall.NoopFirewallDriverto preventnova-computefrom performing iptables-based filtering;security_group_apitoneutronto have all security group requests proxied to Networking service. - Secure Networking API endpoint through TLS 1.2 or later. Use TLS 1.2 or later with available stack of ciphers. For example, you can use DHE-RSA-AES256-GCM-SHA384 cipher with DH public key size 3072 bit and private key size 256. In case of ECC, use TLS_ECDHE_RSA_WITH_AES_256_CBC_SHA384 cipher with a 256 bits DH key length using elliptic curves. SP800-131A approves AES-128, 192, 256 bits encryption to mitigate information disclosure threat. See the Cryptography introduction section above.
- Keep private keys secure on API endpoints by using appropriate file permissions and other controls to mitigate information disclosure threat.
- Define a network policy enforcement (RBAC) to Networking-related actions,
depending on customer’s requirements, policy, and use case to mitigate
EoP threat. Customize the Networking
policy.jsonfile. - Networking service separates projects by utilizing iptables along with
ebtablesrules. These rules prevents MAC and ARP spoofing attacks onvirtualor NFV L2 layer. - Configure per-tenant quotas for L2 and L3 resources and security groups for projects to avoid overconsumption of network resources and mitigate DoS attacks. See OpenStack Admin Guide for basic quotas configuration.
CLI and API
OpenStack CLI python clients require a username and password supplied to perform a request. The OpenStack CLI client can authenticate a user in several ways by using:
- The
OS_USERNAMEandOS_PASSWORDenvironment variables that may result in information disclosure and EoP. - The OpenStack RC file, which you can download from the Dashboard with environment variables already set for a user. However, storing credentials into unencrypted files on a disk is prohibited and may result in information disclosure and EoP.
OpenStackClientthat supports authentication:- by typing password for each request
- with the provisioned authentication token
To avoid risk of revealing passwords, use OpenStackClient.
To use old OpenStack CLI Python clients, perform EoP mitigation steps
described below:
- To access OpenStack API through OpenStack python CLI clients, dedicate additional node or virtual machine, place it into separate internal DMZ and use it solely only for this purpose (a jump host).
- On this node disable all unnecessary services and disable SFTP service, or make SSH/SFTP only accessible from dedicated, trusted network segment.
- On this node, consider using grsecurity patched kernel.
- Implement bash or other shell script that will wrap standard OpenStack python CLI clients and will require password to be entered for each run. Supplied password will set environment variable and unset it after every run.
- Disable shell history for all users.
Messaging
OpenStack components uses the OSLO messaging security library to communicate
with worker processes running on compute nodes and a cloud controller
node. For best possible performance and scalability OSLO library does not
employ signing or encryption. As a result, messaging security depends on
message broker’s security.
You need to protect a messaging broker. Mirantis OpenStack uses the
RabbitMQ messaging broker.
Recommendations for messaging security and RabbitMQ:
Delete the RabbitMQ guest user.
Separate API functional publishers (Nova, Cinder, Neutron, and others) by leveraging
rabbit_virtual_hostconfiguration setting for each API and creating appropriate Rabbit virtual host:rabbitmqctl add_vhost
For each RabbitMQ virtual host create unique credentials along with appropriate permissions:
rabbitmqctl add_user
rabbitmqctl set_permissions
Monitor RabbitMQ network activity with iptables or other monitoring tool to get accounting information.
Forward the RabbitMQ and HAProxy logs to the central syslog server.
Use TLS for messaging transport security.
See also
Identity
Use Identity API v3 that obtained the following features:
- Identity Federation
- External authentication
- Multi-factor authentication
- Authorization mechanisms
- Multiple domains support
The sections below include recommendations for authentication, Identity Federation, and Identity middleware.
Authentication
General recommendations:
- Do not use simple login and password credentials, as Identity does not enforce policies on password strength, expiration, or failed authentication attempts as recommended by NIST Special Publication 800-118.
- Use Identity extensions or external authentication.
To integrate Identity authentication with an existing directory
service, use LDAP. You can map LDAP users into roles and groups within
Identity in
/etc/keystone/keystone.conffor use by the various OpenStack services.
External authentication
Use an SQL identity backend together with X.509 authentication or Kerberos for Keystone under Apache instead of using the username and password pair. Attributes coming with X.509 certificate could be matched against OpenStack identity data structures such as projects, domains, and groups.
Multi-factor authentication
Multi-factor authentication reduces the risk of passwords being compromised. We recommend using at least two-factor authentication (TFA) for privileged accounts such as admin to comply with NIST 800-53 IA-2(1) guidance.
Implement multi-factor authentication by leveraging the external
authentication mechanism .
Similar to the Federation scenario Keystone process is executed on
Apache HTTPD. Once authenticated with multi-factor authentication
mechanisms, Apache web server will pass down an authenticated user
to Keystone using the REMOTE_USER environment variable.
Also we recommend that you enable TLS for client authentication to provide an additional factor of authentication. This requires certificates to be issued for OpenStack services, which can be self-signed and issued by internal authority. However, in this case you need to disable the validity check or mark a certificate as trusted.
Tokens
By default a token expiries in one hour. The recommended expiry value should be set to a lower value that allows enough time for internal services to complete tasks.
Fernet tokens are the most preferable to use. Fernet provides a secure messaging protocol specially designed for REST API communication being non-persistent and lightweight to reduce operational overhead. It uses AES-CBC to encrypt data and SHA HMAC to sign.
Domains
The Identity V3 API introduces a multi-tenancy model via using multiple domains where users can be represented with different authentication back ends and even have different attributes. Users of different domains can be mapped to a single set of roles and privileges, that are used in the policy definitions to access the various service resources.
You can enable domain-specific authentication drivers for multiple
domains in the [identity] section of the keystone.conf file.
A domain owner can create additional users, groups, and roles to be used within the domain.
Groups
A group is a container representing a collection of users. Rather than assign a role directly to a user/project, a domain owner can assign a role to a group, and then add users to that group.
Note
- Generally, groups and domains are optional. However, when using Federation (e.g. SAML), roles or policies are mapped to groups.
- The domain name and role name is globally unique across all domains.
- The username, project, and group name are only unique to the owning domain.
Brute-force prevention
The Identity service is susceptible to a brute-force attack. By default, the OpenStack Identity service does not provide the way to block accounts after repeated unsuccessful login attempts, which may lead to an OpenStack cluster compromise.
To counteract the brute-force attack:
Specify the necessary strength of a user’s password.
Detect the attack by reviewing of access control logs to discover unsuccessful attempts to access accounts.
Note
Currently, Keystone does not log information whether a particular login attempt was successful or not. There is no way to detect a brute-force attack with standard OpenStack services. To detect and count login failures, install WAF and check for the 401 Unauthorized HTTP response from the OpenStack Identity service.
Prevent the attack by blocking a user’s IP after the specified number of unsuccessful login attempts by means of WAF. Find the use case below describing how to prevent the brute-force attack that attacker runs through the OpenStack Dashboard service on the Mirantis OpenStack controller.
Note
This approach does not work for authentication via the Keystone public API endpoint, because, as a side effect, WAF may block IP of proxy nodes in the HA cluster when a user reaches the limit of login failures made via the OpenStack Dashboard.Also, the brute-force prevention based on IP blocking is powerless when an attacker sends every new authentication request through a new proxy bot leveraging a botnet resources.
Use multi-factor authentication for privileged user accounts.
Identity Federation
Identity Federation brings an ability to have several clouds served by the same Identity provider.
Requirements:
- Identity API v3 OS-FEDERATION Extension
- Apache 2.2.22 or later
- Ubuntu 12.04 or later
You can configure your Identity service to be used as a Service Provider or an Identity Provider.
There are three major protocols for Identity Federation: SAML, OpenID, and OAuth. Two of them are supported under Apache now:
- SAML 2.0 implementations:
- Shibboleth
- Mellon
- OpenID Connect
OpenStack Security Guide explains the way of configuring Federation using the Shibboleth protocol on Ubuntu with the Apache HTTPD server.
Authentication middleware
To secure the authentication middleware:
- Do not use a custom WSGI authentication middleware as it may bring additional security risks due to improper implementation.
- Remove
admin_tokenmiddleware. This WSGI middleware effectively bypasses identification + authentication. There is no traceability or accountability in its use. It is exclusively intended for bootstrapping Identity service before any user accounts exists and is useful for a SQL-based identity deployment, but not necessarily against a read-only LDAP deployment.
To mitigate the risk admin_token middleware,
disable it and move to domain-based approach for security management:
Create a new domain for cloud management purposes:
cloud_admin_domain.Assign the
adminrole to an appropriate user.Update the Identity
policy.jsonfile to match newly created domain.Replace:
"cloud_admin": [["rule:admin_required", "domain_id:admin_domain_id"]],
with:
"cloud_admin": [["rule:admin_required","domain_id:<cloud_admin_domain_id>"]],
Remove
admin_tokenfrom/etc/keystone/keystone.conf.Remove the
admin_tokenauth middleware from/etc/keystone/keystone-paste.ini:[filter:admin_token_auth] paste.filter_factory = keystone.middleware: AdminTokenAuthMiddleware.factory
Key manager
Use Barbican, a Key Manager OpenStack project, to provide secure storage, provisioning, and management of secret data including symmetric and asymmetric keys, certificates, and raw binary data.
Note
Starting from the OpenStack Ocata release, the Barbican certificate provisioning API is deprecated. Mirantis recommends that you provision TLS certificates using the Certification Authority specific tools. Externally provisioned certificates can still be stored and managed using Barbican.
See also
Storage
This section includes recommendations to secure a block and object storage including the Ceph solution.
Block storage
To secure the block storage:
Set strict access permissions (at least
640) for the following configuration files in/etc/cinder/:cinder.conf,api-paste.ini,policy.json,rootwrap.conf.Do not set the
noauthvalue to parameterauth_strategyunder the[DEFAULT]section.Enable TLS for authentication.
Enable secure file permissions for Network-attached storage (NAS) by the following setting in
/etc/cinder/cinder.conf:[DEFAULT] nas_secure_file_permissions = auto
To avoid a DoS attack when an attacker sends an oversized request, verify
osapi_max_request_body_sizeormax_request_body_sizeunder the[oslo_middleware]section in/etc/cinder/cinder.confis set to114688:[DEFAULT] osapi_max_request_body_size = 114688 [oslo_middleware] max_request_body_size = 114688
Object storage
To secure the object storage:
- Use a private (V)LAN network segment for your storage nodes in the data domain.
- Configure each Object Storage service to run under a non-root service
account, for example use a username
swiftwith the primary groupswift.
Object storage architecture implies using whether an individual proxy node or multiple proxy nodes with a possibility to use a load balancer. Every proxy node should have at least two interfaces: public and private. Set up a firewall to protect the public interface on a proxy node. The public facing service on a the proxy node is an HTTP web server that handles endpoint client requests, authenticates them, and performs the appropriate action. The private interface establishes outgoing connections to storage nodes on the private storage network.
See also
Ceph
To secure Ceph:
Use
cephxto authenticate users and daemons to protect against MitM attacks (information disclosure, tampering). Thecephxtool uses shared secret keys for authentication.Note
A network communication channel is not encrypted including the messages used to configure sared secret keys. The system is primarily intended to be used in trusted environments.
For block storage encryption, Ceph-disk can utilize Linux dm-crypt functionality through the
--dmcryptparameter to mitigate information disclosure threat.Note
The keys are stored in
/etc/ceph/keysby default, which requires setting strict permissions for this folder.Use Ceph in a multi-project mode to mitigate EoP.
See also
Dashboard
The OpenStack Dashboard service security includes:
- Linux node security
- Django security
- Application security (Horizon)
- Apache httpd web application container and its AppArmor/SELinux profiles
- Apache httpd and mod_wsgi configuration
- Apache TLS and cipher suite configuration
To secure the OpenStack Dashboard service:
Do not deploy OpenStack Dashboard on a shared subdomain with user-generated content (EoP).
Disable local image uploads through Horizon by setting
HORIZON_IMAGES_ALLOW_UPLOADtoFalsein yourlocal_settings.pyfile to protect against a DoS attack.Configure the
ALLOWED_HOSTSsetting with the fully qualified host name(s) that are served by the OpenStack Dashboard (EoP).Deploy the OpenStack Dashboard service behind the HTTPS web server with TLS v1.2.
Note
A user should set up a local DNS resolver to resolve hostnames (FQDN) of TLS-wrapped endpoints to corresponding IP addresses of these endpoints to mitigate the spoofing threat.
For HTTPS set session cookie to
HTTPONLY.To secure the session and the
CSRFcookie, update the following options in the/etc/openstack-dashboard/local_settings.pyfile:SESSION_COOKIE_HTTPONLY = True CSRF_COOKIE_SECURE = True SESSION_COOKIE_SECURE = True
Configure your web server to send a restrictive Cross Origin Resource Sharing (CORS) header with each response allowing only the dashboard domain and protocol:
Access-Control-Allow-Origin: https://example.com/
Note
Do not allow the wild card origin to mitigate DoS threat.
Deploy the OpenStack Dashboard service to a dedicated virtual machine or container, in a demilitarized zone (DMZ) separated from other services.
Protect a Linux host and Apache web server following security best practices.
To store as a session state, use dedicated Memcache servers, not shared with other OpenStack services (EoP).
Disable HTTP methods you do not need.
Use TFA for a Web access to mitigate EoP.
Follow OWASP security guidelines for web application security.
To mitigate EoP and DoS threats, place the OpenStack Dashboard service beyond a Web Application Firewall (WAF).
To mitigate EoP, use IDPS along with real time threat monitoring software.
Prior to deploying the OpenStack Dashboard service into production, perform security assessment:
- Scan all publicly exposed IPs with a vulnerability assessment tool.
- Run a penetration test according to the OWASP top ten guideline.
Monitoring
Mirantis Cloud Platform includes the Logging, Monitoring, and Alerting (LMA) toolchain solution called StackLight LMA.
To enable secure monitoring:
- Forward logs from all cloud nodes to the central log collector.
- Protect syslog protocol by using TLS.
- Separate duties for management of logging subsystem and cloud management.
- Use a security intelligence solution to detect potentially unwanted or harmful activities. For example, IBM QRadar SIEM or open source AlienVault OSSIM along with Ceilometer agents and the Prometheus back end.
Auditing
Auditing as well as monitoring capabilities are essential part of
requirements noted in security standards such as FIPS-140-2, PCI-DSS,
SoX, ISO 27017 and corporate policies. The common way to add the auditing
capability for OpenStack services is to adopt the CADF (Cloud Audit Data
Federation) model, which describes details of resource activity or events
in JSON format by answering the seven W questions:
What, When, Who, On What, Where, From Where, To Where.
OpenStack services can enable CADF through pyCADF (Python-based CADF library). To minimize CADF adoption costs in OpenStack, you can leverage OpenStack messaging infrastructure and publish audit events as OpenStack notifications with no need to wait for acknowledgment.
For API requests, an OpenStack service should include an audit middleware into pipeline currently implemented in the Keystone project. The audit middleware generates an audit event based on an audit map, which specifies what type of data should be extracted from API requests and replies.
Enable CADF notifications in Keystone
To enable the CADF format notifications in the Identity service:
Set the
notification_formatoption tocadfin the default section ofkeystone.conf:[DEFAULT] notification_format = cadf
Set a notification driver by specifying one of the possible values:
messaging,messagingv2,routing,log,test,noopfor thedriveroption in theoslo_messaging_notificationssection:[oslo_messaging_notifications] driver = messagingv2
Note
You can also use the
notification_driverparameter in the default section, which has been deprecated, to specify a destination for notifications.Note
You can specify multiple notification drivers. For example,
messagingv2andlogto send a notification to the RabbitMQ, as well as to print to a local Keystone log.(Optional) Set an AMQP topic and custom transport URL.
Note
By default, notifications are sent to the
notifications.infoqueue in RabbitMQ. You do not need to specifytransport_urlandtopicsin this case.For example:
[oslo_messaging_notifications]
transport_url = rabbit://{{ rabbitmq.user }}:{{ rabbitmq.password }}@{{ address('rabbitmq', rabbitmq.port) }}
topics = keystone_notifications
(Optional) You can unsubscribe from specific type of notifications by using
notification_opt .. code-block:: ini_outoption in the default section. For example, to opt-out noisy notifications with successful authentication, specify:[DEFAULT] notification_opt_out = identity.authenticate.success
Restart the Apache service for changes to take effect:
service apache2 restart
Verify if the Identity service sends notifications in the CADF format.
See the Keystone log
/var/log/keystone/keystone-public.logif the notification driver is set tolog.For example:
2017-01-26 09:19:01.307 27791 INFO
oslo.messaging.notification.identity.authenticate
[req-bf5a6c59-7f0f-4436-84c1-
6dde1699f9cc - - - - -] {"event_type": "identity.authenticate",
"timestamp": "2017-01-26 09:19:01.241364", "payload": {"typeURI":
"http://schemas.dmtf.org/cloud/audit/1.0/event",
"initiator": {"typeURI": "service/security/account/user",
"host": {"agent": "keystoneauth1/2.3.0 python-requests/2.9.1
CPython/2.7.6", "address": "192.168.0.2"}, "user_id":
"42ca947ab83c4b86b843fccd36826a21",
"id": "42ca947ab83c4b86b843fccd36826a21"}, "target":
{"typeURI": "service/security/account/user", "id":
"17b4cc7f-0ddb-51c7-8a55-aba8304f943c"}, "observer":
{"typeURI": "service/security", "id":
"e14fa14a-fb58-55e3-b38a-0cff3f9bd6f1"},
"eventType": "activity", "eventTime": "2017-01-26T09:19:01.139486+0000",
"action": "authenticate", "outcome": "failure", "id":
"d286943b-ce61-5e98-80b4-24aa5c92980a"},
"priority": "INFO", "publisher_id": "identity.node-6.domain.tld",
"message_id": "4879d940-505d-4dbf-9005-bafafd150f0c"}
If the notification driver is set to
messagingormessagingv2, see the RabbitMQ messages in thenotifications.infoqueue set by default or in the queue with the name specified in thetopicoption. For example:{"oslo.message": "{\"priority\": \"INFO\", \"_unique_id\": \ "950c821344064574bb401fb7bb58457f\", \"event_type\": \"identity.authenticate\", \"timestamp\": \"2017-01-25 15:29:37.003472\", \"publisher_id\": \"identity.node-6.domain.tld\", \"payload\": {\"typeURI\": \"http://schemas.dmtf.org/cloud/audit/1.0/event\", \"initiator\": {\"typeURI\": \"service/security/account/user\", \"host\": {\"agent\": \"keystoneauth1/2.3.0 python-requests/2.9.1 CPython/2.7.6\", \"address\": \"192.168.0.2\"}, \"user_id\": \"42ca947ab83c4b86b843fccd36826a21\", \"id\": \"42ca947ab83c4b86b843fccd36826a21\"}, \"target\": {\"typeURI\": \"service/security/account/user\", \"id\": \"d82204a0-d2a9-5034-affa-591d15a9391b\"}, \"observer\": {\"typeURI\": \"service/security\", \"id\": \"da9440a8-71ed-5a61-b747-9fc06164c2ee\"}, \"eventType\": \"activity\", \"eventTime\": \"2017-01-25T15:29:36.316527+0000\", \"action\": \"authenticate\", \"outcome\": \"failure\", \"id\": \"c5cf0d09-d7e4-5526-bf22-fd20868ed7fd\"}, \"message_id\": \"3540d458-b03b-4c92-80bb-477e449112e5\"}", "oslo.version": "2.0"}
Use Ceilometer CLI to show the event of certain type:
ceilometer event-list --query event_type=<EVENT_TYPE>
The example of the CADF Keystone notification formatted as a JSON document:
{
 "_unique_id": "950c821344064574bb401fb7bb58457f",
 "event_type": "identity.authenticate",
 "message_id": "3540d458-b03b-4c92-80bb-477e449112e5",
 "payload": {
 "action": "authenticate",
   "eventTime": "2017-01-25T15:29:36.316527+0000",
   "eventType": "activity",
   "id": "c5cf0d09-d7e4-5526-bf22-fd20868ed7fd",
   "initiator": {
   "host": {
   "address": "192.168.0.2",
   "agent": "keystoneauth1/2.3.0 python-requests/2.9.1 CPython/2.7.6"
   },
   "id": "42ca947ab83c4b86b843fccd36826a21",
   "typeURI": "service/security/account/user",
   "user_id": "42ca947ab83c4b86b843fccd36826a21"
   },
   "observer": {
   "id": "da9440a8-71ed-5a61-b747-9fc06164c2ee",
   "typeURI": "service/security"
   },
   "outcome": "failure",
   "target": {
   "id": "d82204a0-d2a9-5034-affa-591d15a9391b",
   "typeURI": "service/security/account/user"
   },
   "typeURI": "http://schemas.dmtf.org/cloud/audit/1.0/event"
 },
 "priority": "INFO",
 "publisher_id": "identity.node-6.domain.tld",
 "timestamp": "2017-01-25 15:29:37.003472"
}
See also
Enable CADF notifications in other OpenStack services
To enable notification in the CADF format for other OpenStack services,
define the audit filter in the api-paste.ini configuration
file of an OpenStack service and include the audit filter into WSGI
pipeline.
For example, to enable CADF notifications in the Compute service, follow the steps below:
Add the definition of the audit filter to
/etc/nova/api-paste.ini:[filter:audit] paste.filter_factory = keystonemiddleware.audit:filter_factory audit_map_file = /etc/nova/api_audit_map.conf
Download
api_audit_map.conffor Nova from the PyCADF repository:cd /etc/nova/ wget https://raw.githubusercontent.com/openstack/pycadf/master/etc/pycadf/nova_api_audit_map.conf -O api_audit_map.conf
Add the audit filter into the Compute WSGI pipeline. For example:
[composite:openstack_compute_api_v21]
use = call:nova.api.auth:pipeline_factory_v21
noauth2 = cors compute_req_id faultwrap sizelimit noauth2 osapi_compute_app_v21
keystone = cors compute_req_id faultwrap sizelimit authtoken keystonecontext audit osapi_compute_app_v21
(Optional) Specify the service name and requests to be ignored by the filter:
[filter:audit]
service_name = test # opt to set HTTP_X_SERVICE_NAME environ variable
ignore_req_list = GET,POST # opt to ignore specific requests
Add the notification condition into the default section of
nova.conf:[DEFAULT] notify_on_state_change=vm_and_task_state
Set a notification driver in
nova.confby specifying one of the possible values:messaging,messagingv2,routing,log,test,noopfor thedriveroption in theoslo_messaging_notificationssection:[oslo_messaging_notifications] driver = messagingv2
Note
You can specify multiple notification drivers, for example,
messagingv2andlogto send a notification to both: RabbitMQ and a local service log.(Optional) Set an AMQP topic and custom transport URL. For example:
Note
By default, notifications are sent to the
notifications.infoqueue in RabbitMQ. You do not need to specifytransport_urlandtopicsin this case.[oslo_messaging_notifications] transport_url = rabbit://{{ rabbitmq.user }}:{{ rabbitmq.password }}@{{ address('rabbitmq', rabbitmq.port) }} topics = nova_notifications
Restart the Compute WSGI server:
service nova-api restart
Verify if the Compute service sends notifications in the CADF format.
If the notification driver is set to
log, examine/var/log/nova/nova-api.log.If the notification driver is set to
messagingormessagingv2, see the RabbitMQ messages in thenotifications.infoqueue set by default or in the queue with the name specified in thetopicoption.Use Ceilometer CLI to show the event of certain type:
ceilometer event-list --query event_type=<EVENT_TYPE>
Example of a JSON-formatted CADF notification:
{
 "_context_auth_token": "gAAAAABYifp1XvXY0S8yD8yav7hmqWRmFgy4gUwx1ryyEKxrrD7mIGpTOIItG71sOlhbUM9yzhDDSGe4ZBBQk554SU0qrhvINdAP1Jv6hEBwf1J27VWLIWLU5FVnBN1lv0vL26z2Vt3LKac_oYbvwpFByP_4lveza-cHk9fr2fnN0FPFvgPumiqqC0tyQG_ylYtdhSW5aepN",
  "_context_domain": null,
  "_context_instance_lock_checked": false,
  "_context_is_admin": true,
  "_context_project_domain": null,
  "_context_project_id": "298ace13a3bf4674a8af28286569f2d7",
  "_context_project_name": "admin",
  "_context_quota_class": null,
  "_context_read_deleted": "no",
  "_context_read_only": false,
  "_context_remote_address": "192.168.0.2",
  "_context_request_id": "req-f6b96abc-89ed-4a5c-afec-eacc05070568",
  "_context_resource_uuid": null,
  "_context_roles": [
    "admin"
  ],
  "_context_service_catalog": [
    {
     "endpoints": [
        {
        "adminURL": "http://192.168.0.2:8776/v2/298ace13a3bf4674a8af28286569f2d7",
        "internalURL": "http://192.168.0.2:8776/v2/298ace13a3bf4674a8af28286569f2d7",
        "publicURL": "https://public.fuel.local:8776/v2/298ace13a3bf4674a8af28286569f2d7",
        "region": "RegionOne"
        }
     ],
    "name": "cinderv2",
    "type": "volumev2"
    },
    {
    "endpoints": [
        {
        "adminURL": "http://192.168.0.2:8776/v1/298ace13a3bf4674a8af28286569f2d7",
        "internalURL": "http://192.168.0.2:8776/v1/298ace13a3bf4674a8af28286569f2d7",
        "publicURL": "https://public.fuel.local:8776/v1/298ace13a3bf4674a8af28286569f2d7",
        "region": "RegionOne"
        }
     ],
    "name": "cinder",
    "type": "volume"
    }
  ],
  "_context_show_deleted": false,
  "_context_tenant": "298ace13a3bf4674a8af28286569f2d7",
  "_context_timestamp": "2017-01-26T14:11:10.768205",
  "_context_user": "42ca947ab83c4b86b843fccd36826a21",
  "_context_user_domain": null,
  "_context_user_id": "42ca947ab83c4b86b843fccd36826a21",
  "_context_user_identity": "42ca947ab83c4b86b843fccd36826a21
  298ace13a3bf4674a8af28286569f2d7 - - -",
  "_context_user_name": "admin",
  "_unique_id": "8d688a79bf7b418380d2ad7b8f133b89",
  "event_type": "compute.instance.update",
  "message_id": "805ad852-1807-469b-a06e-b428b6916e87",
  "payload": {
    "access_ip_v4": null,
    "access_ip_v6": null,
    "architecture": null,
    "audit_period_beginning": "2017-01-01T00:00:00.000000",
    "audit_period_ending": "2017-01-26T14:11:11.078799",
    "availability_zone": "nova",
    "bandwidth": {},
    "cell_name": "",
    "created_at": "2017-01-26 13:26:53+00:00",
    "deleted_at": "",
    "disk_gb": 0,
    "display_name": "111",
    "ephemeral_gb": 0,
    "host": "node-7.domain.tld",
    "hostname": "111",
    "image_meta": {
    "base_image_ref": "22cf0b00-c01a-4158-b5f6-d5ee67f9db0f",
    "container_format": "bare",
    "disk_format": "qcow2",
    "min_disk": "0",
    "min_ram": "64"
    },
    "image_ref_url": "http://172.16.0.6:9292/images/22cf0b00-c01a-4158-b5f6-d5ee67f9db0f",
    "instance_flavor_id": "f786e6cf-3af9-4169-a95f-1478cfedcc8d",
    "instance_id": "40ab92ca-1c69-445e-b592-fe0b46d0ad9d",
    "instance_type": "m1.micro",
    "instance_type_id": 16,
    "kernel_id": "",
    "launched_at": "2017-01-26T13:30:40.000000",
    "memory_mb": 64,
    "metadata": {},
    "new_task_state": "deleting",
    "node": "node-7.domain.tld",
    "old_state": "active",
    "old_task_state": "deleting",
    "os_type": null,
    "progress": "",
    "ramdisk_id": "",
    "reservation_id": "r-f9fg0oxe",
    "root_gb": 0,
    "state": "active",
    "state_description": "deleting",
    "tenant_id": "298ace13a3bf4674a8af28286569f2d7",
    "terminated_at": "",
    "user_id": "42ca947ab83c4b86b843fccd36826a21",
    "vcpus": 1
  },
  "priority": "INFO",
  "publisher_id": "compute.node-6.domain.tld",
  "timestamp": "2017-01-26 14:11:11.106855"
}
Security features enabled in OpenStack
| Name | Description |
|---|---|
| All Linux nodes conform to CIS baseline hardening, including hardened SSH daemon configuration, hardened firewall rules, hardened TLS cipher suites with TLS v1.2 support, hardened HTTP/REST interfaces passing all OWASP tests | The scope of default CIS hardening:
|
| AppArmor Mandatory Access Control (MAC) framework enables support for improved security on all Linux nodes | AppArmor provides improved security for compute virtual machines by confining workloads and ensuring that different workloads do not interfere (sVirt Libvirtd Linux capability). |
| Ciphersuite enforcement | Strong ciphersuite enforcement (SSH, TLS) compatible with FIPS 140-2 and TLS v.1.2. |
| Seamless LDAP/AD integration for secure authentication purposes | MCP can leverage OpenLDAP and Microsoft Active Directory for appropriate account security including password policies and account security policies. |
| Customized RBAC policies for granular access control [0] | MCP enables customers to develop customized RBAC policies, meeting sophisticated RBAC requirements for appropriate separation of duty (SOD) and granular access control to mitigate EoP attacks. |
| HAProxy for DoS/DDoS attack protection for Web and REST API access [0] | MCP hides all sensitive API and HTTP web UI services behind reverse proxy making mitigation of DoS/DDoS attacks easy to implement and monitor. |
| TLS support with AES128/256 cipher suites and Diffie-Hellman Ephemeral Key Exchange (ECDHE) | Diffie-Hellman Ephemeral Cipher Suites support provides forward secrecy, making MCP resistant to eavesdropping and sniffing attacks. |
| StackLight (LMA toolchain) for improved security analytics and early anomaly detection | StackLight provides advanced analytics enabling early anomaly detection. |
| Network security technologies for workloads protection | A broad range of network security technologies for workloads protection: FWaaS v2 (experimental), OpenContrail SDN controller integration for advanced network service chaining and security services |
| CADF integration for out of the box auditing capabilities [0] | CADF framework incorporated into MCP enables auditing capabilities to to mitigate repudiation and tampering threats sensitive information assets. |
| Enhanced auditing and security intelligence capabilities through integration with third-party SIEM and Security Intelligence tools [0] | Security intelligence solutions offers improved visibility and advanced analytics of cloud events. All events related to cloud operations, privileged user operations, sensitive asset operations are monitored and analyzed in almost real-time. In case suspicious activity occurs, alarm events are triggered. |
| TLS Mutual Authentication for improved API and web access security [0] | Mutual TLS Authentication along with TLS v1.2 support provides additional layer of security by mitigation of information disclosure, for example, Man-In-The-Middle (MITM) attacks. |
| OTP token support (Multi-Factor Authentication) through SAML, OIDC | Multi-Factor Authentication and integration with a broad range of OTP tokens, including RSA SecurID, SafeNet, Yubikey provides substantially improved authentication security when compared to password-only authentication. |
| Federation: SAML 2.0 and OpenID Connect (OIDC) support | MCP is verified to work with corporate federation solutions including Microsoft Active Directory, Shibboleth, IBM Web Sphere Security, Gluu, Ping Federate. |
| Secure network architecture allowing seamless DMZ integration [0] | MCP flexible network templating mechanisms provides support for DMZ network topologies for API and Web UI security. |
| PCI DSS, FISMA/FedRamp compliance [0] | PCI DSS and FISMA/FedRamp compliance is achieved with the help of QSA/3PAO security services providers to achieve the required level of conformance. |
| Brute-force protection [0] | Mitigates DoS attack by monitoring networks for brute-force attacks with relevant HAProxy and Nginx configuration. |
| [0] | (1, 2, 3, 4, 5, 6, 7, 8) Advanced security features require the engagement of Mirantis Services engineers. |
Secure Kubernetes and Docker
This chapter covers Kubernetes and Docker container security best practices.
Secure Kubernetes
To secure a Kubernetes cluster:
- Leverage Kubernetes
secretsandfederated secretsobjects to hold sensitive information, such as passwords, OAuth tokens, and ssh keys. - Do not store sensitive information in a pod definition or in an image.
- Verify that container images contain no vulnerabilities to mitigate the
EoP threat.
- Integrate vulnerability scanning in your CI/CD process.
- Create a private registry with verified images that will be used in your environment.
- Verify that only authorized images can be run in your environment.
- Protect a communication channel to the image registry with TLS.
- Regularly update your images and submit them to the image registry.
- Limit access to Kubernetes nodes to mitigate the tampering and EoP threats.
- Do not provide SSH access to the nodes.
- Use
kubectl execto access a container environment.
- Limit scope of user permissions to mitigate the information disclosure,
tampering, EoP, and DoS threats.
- Use different namespaces to separate resources between users.
- Use Kubernetes Authorization Plugins to further control user access with policies to resources within the namespace.
- Define resource quota to prevent DoS attacks. You can create a corresponding policy and assign it to the specified Kubernetes namespace to limit CPU and memory consumption, as well as the number of pods within the namespace.
- Implement network segmentation to mitigate the EoP, DoS, tampering and information disclosure threats. Use network policies to create network segmentation between pods, services, and containers.
- Apply security context to mitigate the EoP, tampering,
and information disclosure threats.
- Configure the security context for your pods, containers, and volumes that you can define in the deployment yaml.
- Use admission controllers to limit access to a host’s IPC namespace for pods that run with escalated privileges.
- Enable logging to mitigate the repudiation threat.
- Log container’s standard output including errors using a Fluentd agent running on each node.
- Use MCP Stacklight.
Secure Docker
To secure Docker:
- Create a private registry with verified images to mitigate tampering, EoP, information disclosure threats.
- Run minimal images to reduce the attack surface of potential attacks by minimizing the number of binaries and services running in containers to mitigate the EoP threat.
- Use read-only filesystems to mitigate tampering threat and indirectly EoP by preventing from storing malicious code in containers.
- Limit kernel calls that a container can make to reduce the attack surface of potential attacks. Use SELinux or seccomp to mitigate the EoP threat.
- Restrict networking so only linked containers can communicate to reduce
the attack surface. Use
--icc=falseand--iptablesflags when starting the Docker daemon. - Limit memory and CPU resources allocated to a container to prevent DoS attacks where one container takes all the resources and stops other containers from running.
- Disable kernel capabilities using the Docker CLI and JSON file. Follow the principle of least privilege and enable only needed functionality to minimize the attack surface.
- Do not run containers as root except of
systemdto mitigate the EoP threat. - Do not run a container with the
--privilegedflag unless you need access to host hardware. - Use
–security-optinstead of the--privilegedflag to assign the appropriate SELinux/AppArmor security profile to limit the permissions following the principle of least privilege. - Enable encryption for communication between
etcdand other services.
Design secure cloud architecture
You can secure your cloud environment by introducing specific security zones and domains where you can aggregate such tools as intrusion detection and prevention system, firewall, antivirus, and sandbox for deep data analysis and incident response.
However, it should be noted, that security services nees extra computational resources for which a cloud owner has to pay.
When you consider a deployment of a new security solution or creation of security domain or zone, follow the rule:
Do not invest more resources than the cost of your information assets you
want to protect.
Consider a Security-as-a-Service model to reduce operational costs. According to that model tenants can buy extra security services for some of their projects, if necessary.
Most security threats for cloud users come mostly from guest VMs and external/public networks used to transfer the North-South Internet traffic. However, monitor the East-West traffic as well to detect proliferation and presence of APTs. Attackers can perform internal reconnaissance using Advanced Persistent Threat (APT). For example, scan a tenant network for vulnerable systems and propagate further to take over tenant and provider resources to complete the mission.
To design secure cloud architecture:
Provide users with guidance on securing their workloads up to installing malware defense software in guest OS to mitigate EoP.
Create demilitarized zone (DMZ) when deploying your environment to mitigate EoP.
Note
NIST 800-44 recommends establishing DMZ.
Deploy a Dashboard service on a separate node behind DMZ to mitigate DoS and EoP.
Create a Security Domain for deep traffic inspection and incident investigation to mitigate EoP.
Use network IDPS for both N-S and E-W traffic inspection to reveal network indicators of compromise.
Example of the service leg DMZ architecture with Security Domain
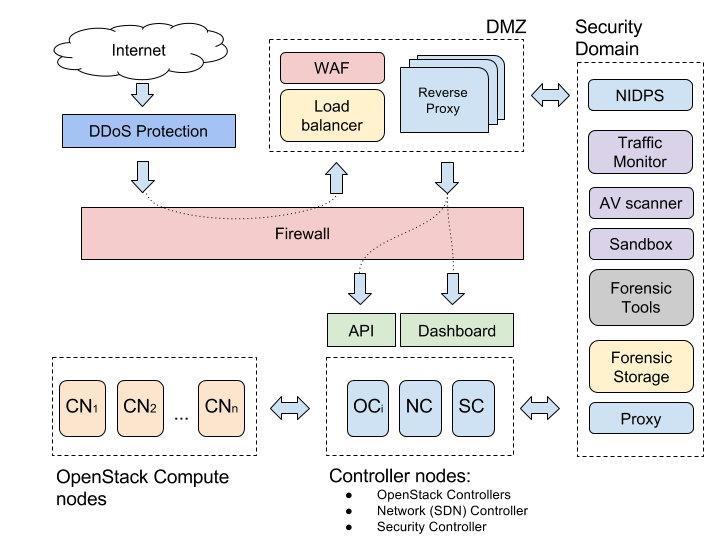
The sections below describe the concepts of the Demilitarized Zone (DMZ) and Security Domain.
Demilitarized zone
Demilitarized zone (DMZ) represents a neutral zone and aims to isolate private network from the Internet by including redundancy in cloud infrastructure. The main idea is in creating an externally accessible reverse-proxy server to forward requests to a server in an internal network. There are different types of DMZ configuration that suit various cloud architectures depending on the security level and performance you want to have.
Consider the example of a service leg DMZ architecture with at least three
network interfaces to communicate with an external (for example, an Internet
border router), internal (API services endpoints and Dashboard),
and DMZ networks.
Even though, two-firewall DMZ is more secure,
the service leg DMZ with a single firewall requires less resources
and easy to manage.
However, the service leg DMZ can not protect against
DoS attacks that may affect an internal cloud services operation.
To fix this problem, use a DDoS protection tool.
Still, it may happen that DDoS will consume all incoming bandwidth
and overload a border router.
As a rule, Firewall is configured to permit external web traffic. This brings a risk of malformed HTTP packets entering the environment. That is why, IDPS system accompanies Firewall. IPS parses the most popular L7 protocols to detect and drop malicious streams minimizing the risk of compromise.
Place the OpenStack Dashboard service and OpenStack APIs endpoints behind Firewall and access the OpenStack services through reverse proxy hosts in DMZ.
WAF presence is mandatory. Consult with WAF vendor regarding options to protect public APIs.
Security domain
Security Domain is a separate project with a set of tools needed for IRT to perform incident analysis and cloud forensics. Once a security issue is discovered in one of the project networks, you can switch traffic from the compromised network or the whole project from the Internet to the Security Domain to contain and investigate an incident.
Security Domain may contain the following components but not limited to:
| Component | Description |
|---|---|
| Network IDPS | Provides deep packet inspection and exfiltration of malicious files from the North-South traffic traveling through DMZ. You can create numerous virtual instances of network IDPS as a VNF to scan East-West traffic in your SDN as well. |
| Network monitor | Records the traffic for investigation and forensics purposes. For example, tcpdump or Wireshark. |
| Antivirus | Scans the files extracted from the network N-S traffic. |
| Sandbox | Analyzes discovered malware or suspicious documents in PDF, SWF, DOC formats that may have exploits on board, for example, in email traffic. |
| Forensic tools | Collect digital evidence for the court. |
| Storage | Specially allocated for forensic purposes stores collected digital evidence such as infected VM images, stored illegal data, dumps of network traffic, logs, and so on. |
| Proxy server | Redirects traffic of the compromised network to the Internet through the Security Domain network, where IRT can perform deep packet inspection and hidden monitoring of the ongoing attack. |
Cloud security solutions
This section includes overview of security solutions that can be deployed on top of an MCP cluster to improve security and privacy.
WAF and load balancer
Web Application Firewall (WAF) is used to filter malformed HTTP requests. For example, XSS attacks, SQL injection, and malicious file inclusion.
A load balancer is not a security solution, but it may help to preserve the availability of services mitigating an impact of DoS attacks.
You can find solutions that combine both WAF and load balancing functionality.
Reverse proxy
To minimize risks of Web server exploitation, use a pool of reverse proxies in DMZ to isolate services inside of the cloud that may be vulnerable to attacks when directly accessed from the Internet.
To set up a reverse proxy:
Install the latest vanilla Linux distribution (Ubuntu) with all security patches installed.
Install a minimal set of packages.
Note
Only web server components must be provided with the latest security updates. No cloud services should be exposed in DMZ.
Install Nginx as a lightweight reverse proxy server with a support of encryption and caching.
You can also use a reverse proxy as:
- a load balancer
- a web accelerator to accelerate encryption for TLS connections
- a security gateway to filter out malformed requests
DDoS protection
Criminals utilize various techniques such as attempted DNS reflection attacks or L7 HTTP floods involving large botnets to force organizations to pay a ransom. SYN, TCP, and HTTP DDoS attacks are the most popular. Attackers use NTP, SSDP, and RIPv1 amplification.
To mitigate DDoS attack:
- Use a load balancing service.
- Deploy an anti-DDoS solution in DMZ.
- Cooperate closely with upstream internet service providers (ISP) and ISP CERT teams. ISP can help mitigate DDoS attacks with additional techniques such as BGP blackholing.
Firewall
Use Palo Alto Networks VM-series firewall as a virtual network function (VNF). This solution helps securing East-West traffic between applications by steering it to VM-series firewall to detect malicious activity such as generated by advanced persistent threats (APT). This solution perfectly fits the needs of a scalable and flexible cloud environment.
Intrusion detection and prevention system
Intrusion Detection System (IDS) monitors network or applications activities for being malicious. Intrusion Prevention System (IPS) identifies malicious activity similarly to IDS, log it, block it, and finally send an intrusion report to an administrator. In other words, IPS is an extension to the IDS funtionality that actively blocks detected cyber attacks by triggering alarms in a system, dropping malicious packets, or even blocking intruder’s IP address.
There two types of IDPS:
- Network-based
- Host-based
Network-based IDPS
Use Network-based IDPS (NIDPS) to detect:
- General purpose cyberattacks
- Probes initiated as a part of targeted attacks
- Policy violations. For example, usage of prohibited communication tools, social networks, TOR access points, Bitcoin miners, so on.
NIDPS is preferable to deploy in a cloud infrastructure.
There are two types of NIDPS based on detection type:
- Signature-based
- Anomaly-based
They work more or less the same way performing real-time traffic scan and analysis, logging, protocol analysis, and content detection.
The available open source solutions are: Suricata, Snort, and Bro.
Download rulesets for Snort and Suricata from the EmergingThreats repository.
To improve detection capabilities of your IDPS, purchase the ET Pro ruleset, which provides more frequent updates and extra rules to block targeted attacks such as C&C servers, DoS attacks, botnets, informational events, exploits, vulnerabilities, SCADA network protocols, exploit kit activity, and more.
NIDPS can monitor a network traffic in several ways:
- Inline
This may affect a network channel throughput and a failure of IDPS may lead to disconnecting an internal network from external resources.
- Using a switch spanning port
You can use vSwitch Switched Port Analyzer (SPAN) or Remote Switched Port Analyer (RSPAN) for port mirroring.
- Using a network tap
You can use Tap-as-a-Service (TaaS) - a project developed to introduce the functionality of port mirroring in OpenStack Neutron provisioned networks.
- Listening directly to a physical interfaces on a host.
For example, on a compute node.
You can deploy NIDPS:
- Inline with a Firewall on a gateway when using the service-leg DMZ.
- On a compute node to listen to a network traffic related to projects hosted on this node.
- On a network controller.
- On a VM. This is the preferable way, which enables easy scaling, migration, and deployment. You need only to mirror traffic from a VM to the monitoring VM with NIDPS on board.
You can use a standalone open source NIDPS or commercial commercial NGFW, NGIPS, and UTM solutions that include an NIDPS component.
Host-based IDPS
NIDPS do not protect from layer 7 attacks. If an attack exploits an unknown vulnerability, you need to have Host-based IDPS (HIDPS) that monitors a host for suspicious activity by analyzing anomalies occurring within that host.
HIDPS may include: a firewall, exploit prevention module, application control, file integrity monitoring, log monitoring, policy enforcement, and antivirus signature scanner.
The open source OSSEC HIDPS is available for Linux, Solaris, AIX, HP-UX, BSD, Windows, Mac and vSphere/ESXI.
Accelerate IDPS
To sniff more than 1 Gbps channel, use a packet steering solution such as
PF_RING.
PF_RING is an open source packet processing framework for Linux
used to provide Direct NIC Access (DNA) to bypass kernel for line
rate RX/TX packet processing. A kernel does not need to use CPU cycles
to process network packets. PF_RING sends packets directly from NIC
to IDS application bypassing kernel. This is called zero-copy (ZC, 0-copy)
and helps improving performance of network traffic analysis.
PF_RING also supports 1-copy mode for non-Intel NICs and wireless
connections. These packets can be injected into a 0-copy stream.
PF_RING ZC can send packets to a VM with an IDPS installed on it.
The following solutions support PF_RING ZC:
- Snort, Suricata, Bro, Wireshark scanners
- KVM
- Docker containers
PF_RING supports the NIC adapters 1/10/40/100 Gbit by the following vendors:
- Intel
- Accolade Technologies
- MYRICOM
- telesoft
- Napatech
- Mellanox Technologies
See also
- IDPS Suricata deployment as a VNF on OpenStack with OpenContrail
- SANS Network IDS & IPS Deployment Strategies
- Tap-as-a-Service project
- Tap-as-a-Service: Enabling Traffic Monitoring in OpenStack Clouds
- Tap-as-a-Service (TaaS): Port Monitoring for Neutron Networks
- Host Intrusion Prevention Systems and Beyond
- Using Suricata over PF_RING
- Install Suricata with PF_RING
- http://www.ntop.org/
Next-generation solution
To reduce infrastructure complexity and vendor management effort, use a NGFW/NGIPS/UTM solution instead of separate Firewall and IDPS solutions.
NGFW/NGIPS/UTM may include the following modules:
- Firewalls L3/4/7
- Network IDPS
- Ggateway antivirus
- Gateway anti-spam
- VPN
- Content filtering
- Load balancing
- DLP
Cloud antivirus
You may consider installing a cloud antivirus solution to enforce security of the environment. An antivirus can be thought as an advanced Host-based IPS. You can install a regular enterprise antivirus solution on VMs that does not know anything about your cloud environment and manage them using the administration console supplied by a vendor. However, the problem with regular antiviruses is that being offline for a long time VMs have not updates antivirus databases making AV protection less bulletproof.
Therefore, specially designed for virtualization antivirus solutions were introduced of two types:
- Aagent-based
- Agentless
Agent-based antivirus
Antivirus agent is deployed on every VM within the project and communicates with the module on a hypervisor. This creates computing resource consumption especially what makes this approach not efficient at scale.
Agentless antivirus
Agentless approach is based on Virtual Security Appliance (VSA) to scan files access by VMs and Network Security Appliance (NSA) to scan network traffic between VMs sitting on a host. Unfortunately, only VMware, Citrix, and Microsoft support VSA and NSA.
These solutions leverage the power of a hypervisor to reduce the load to VMs caused by regular antivirus applications. However, they have several limitations related to detection of zero-day attacks:
- An antivirus even equipped with a heuristic engine in the majority of cases does not detect unknown zero-day malware. To avoid being detected modern cyber espionage platforms like EquationDrug utilized by Regin and Epic Turla APTs use a kernel-mode rootkit driver to hide its files, registry keys, and processes by hooking some of the Native API functions.
- An advanced malware can disarm an antivirus once discovered on a targeted machine.
- A cloud in many cases is a heterogenous (hybrid) environment built on different operating systems and hypervisors that increases deployment and operational costs, and also makes your protection not flexible and vendor dependent.
Mirantis does not recommend heavy investments into malware protection on nodes. It is sufficient to configure built-in Linux firewall properly, use sensible access control policy (logins/passwords, SSH keys, so on), and deploy NGFW or IDPS for network traffic monitoring. For advanced protection against zero-day and targeted attacks, use sandbox-based solutions where you can upload suspicious files and URLs for analysis.
Forensic solution
If you need to make your environment resistent against zero-day attacks or reduce impact of a security incident. Your incident response team (IRT) should react fast to determine the scope and impact of the incident.
In such case IRT needs automation tools:
- To analyse malware used in an attack.
- To figure out a vector of the attack, a security breach, compromised services, lost data.
- To minimize overall losses by rapid neutralizing the attack.
To satisfy these requirements:
Create a Security Domain with incident analysis and investigation toolkit as well as storage to store digital evidence.
Once a project or cluster is compromised, change a gateway IP to redirect to a forensic network for monitoring and analysis.
Take advantage of using automated malware analysis systems within the Security Domain for both: early detection of suspicious objects and forensic investigation.
For example, use IDPS such as Suricata, Snort, or Bro to extract files from a mail or web unencrypted stream and send them to a malware analysis sandbox to verify behavior by opening or executing it in an isolated environment.
Note
For TLS/SSL encrypted traffic, terminate encryption on a virtual proxy server or use a special hardware-based firewall solution capable of decrypting traffic for deep packet inspection with a high throughput.
Use cases
Install ModSecurity WAF on OpenStack controller
Web services running on OpenStack controllers, especially the ones exposed to the Internet, may be vulnerable to various types of web-based attacks. One of the most dangerous attack vectors are injection attacks, rated as the number one in the OWASP top ten. Exploiting this type of vulnerabilities may lead to data loss or corruption (tampering), lack of accountability repudiation), DoS, or, in some scenarios, complete host takeover (EoP) leading to cluster compromise.
Whenever possible, use Web Application Firewall (WAF) to add additional layer of security to prevent web attacks. ModSecurity is an open source WAF implementation for the Apache web server able to protect from the multiple type of attacks including SQL injections.
Follow the steps below to install ModSecurity 2.9.1 with the OWASP core ruleset (https://github.com/SpiderLabs/owasp-modsecurity-crs) on Ubuntu 14.04.
The default installation will enforce base rule protection on all local OpenStack services: Keystone, Horizon, Zabbix, and RadosGW, if present.
Install the required packages:
sudo apt-get update && sudo apt-get upgrade
sudo apt-get install --yes libyajl-dev libxml2
libxml2-dev liblua5.1 apache2-prefork-dev git
Enable
unique_idfor Apache. It adds the magic token for each request which is guaranteed to be unique. The environment variableUNIQUE_IDis set to the identifier for each request.sudo a2enmod unique_id sudo service apache2 restart
Download ModSecurity and compile it with JSON support, which is required for Keystone protection:
cd ~
wget https://www.modsecurity.org/tarball/2.9.1/modsecurity-2.9.1.tar.gz
tar xvzf modsecurity-2.9.1.tar.gz
cd modsecurity-2.9.1/
./configure --with-yajl="/usr/lib/x86_64-linux-gnu /usr/include/yajl"
sudo make
sudo make install
Create the module configuration files:
sudo touch /etc/apache2/mods-available/security2.conf
echo -e "<IfModule security2_module>\n\tSecDataDir
/var/cache/modsecurity\n\tIncludeOptional/etc/modsecurity/*
.conf\n</IfModule>" >
/etc/apache2/mods-available/security2.conf
#sudo touch /etc/apache2/mods-available/security2.load
echo -e "LoadFile libxml2.so.2\nLoadModule security2_module
/usr/lib/apache2/modules/mod_security2.so" >
/etc/apache2/mods-available/security2.load
sudo mkdir -p /etc/modsecurity/
sudo cp modsecurity.conf-recommended unicode.mapping /etc/modsecurity/
sudo mv /etc/modsecurity/modsecurity.conf{-recommended,}
Enable the ModSecurity module:
sudo a2enmod security2
sudo service apache2 restart
Warning
The command below will turn on the ModSecurity engine with base rules for all sites on the given host. Verify that the sites are not blocked by the rules due to the false positives. Test this before deploying to production.
sudo sed -i 's/SecRuleEngine DetectionOnly/SecRuleEngine On/'
/etc/modsecurity/modsecurity.conf
Download and install the OWASP core rule set:
cd /tmp
git clone https://github.com/SpiderLabs/owasp-modsecurity-crs.git
sudo cp -r owasp-modsecurity-crs/* */etc/modsecurity/
sudo cp /tmp/owasp-modsecurity-crs/modsecurity_crs_10_setup.conf.example
/etc/modsecurity/modsecurity_crs_10_setup.conf
sudo sed -i '$iIncludeOptional "/etc/modsecurity/activated_rules/*.conf"'
/etc/apache2/mods-available/security2.conf
Enable the rules:
Option 1: Enable only the rules for the SQL injection attack:
sudo ln -s
/etc/modsecurity/base_rules/modsecurity_crs_41_sql_injection_attacks.conf
/etc/modsecurity/activated_rules/modsecurity_crs_41_sql_injection_attacks.conf
Option 2: Enable all base rules:
sudo ls /etc/modsecurity/base_rules | xargs -I {} sudo ln -s
/etc/modsecurity/base_rules/{} /etc/modsecurity/activated_rules/{}
Note
Optional rules customization for Zabbix and Horizon is necessary because otherwise ModSecurity can block access. Add the additional file
/etc/modsecurity/horizon.confwith the following content:<LocationMatch "/horizon/"> SecRuleRemoveById 981318 </LocationMatch> <LocationMatch "/zabbix/"> SecRuleRemoveById 981318 </LocationMatch>
Brute-force attack prevention on OpenStack controller
The Identity service does not provide the brute-force protection capability. That is why, this use case will help you install the Web Application Firewall (WAF) with rules dedicated to mitigating and limiting the strength of the brute-force attack that an attacker outside runs through the OpenStack Dashboard service (Horizon) connected to the public network.
Caution
The use case has several limitations and does not cover the following type of attacks:
- An external attack through the public Keystone endpoint, because it may lead to blocking proxy IPs when an attacker goes through the public OpenStack Dashboard. To prevent the brute-force attack on the Keystone level, enable notification of failed login attempts in the OpenStack Identity service. See Enable CADF notifications in Keystone for more details.
- An internal attack from within the security perimeter when the Management network is compromised.
- The brute-force prevention using IP blocking is useless for an attack strengthen by a botnet.
To prevent the brute-force attack that comes through the OpenStack Dashboard, on the OpenStack controller, complete the following steps:
- Install ModSecurity on the OpenStack controllers.
- Create brute-force rules for ModSecurity.
- Verify alerts generated by ModSecurity in log files.
Install ModSecurity on OpenStack controller
To install the latest version of ModSecurity on OpenStack controllers with Ubuntu 14.04, follow the steps:
Install required packages:
sudo apt-get update && sudo apt-get upgrade
sudo apt-get install --yes libyajl-dev libxml2 libxml2-dev
liblua5.1 apache2-prefork-dev git
Enable
unique_idfor Apache that adds a magic token to each request to guarantee it is unique. The environment variableUNIQUE_IDis set to the identifier for each request.sudo a2enmod unique_id sudo service apache2 restart
Download ModSecurity and compile it with JSON support required for the OpenStack Identity service and other JSON-based APIs.
cd ~
wget https://www.modsecurity.org/tarball/2.9.1/modsecurity-2.9.1.tar.gz
tar xvzf modsecurity-2.9.1.tar.gz
cd modsecurity-2.9.1/
./configure --with-yajl="/usr/lib/x86_64-linux-gnu /usr/include/yajl"
sudo make
sudo make install
Create module configuration files
sudo touch /etc/apache2/mods-available/security2.conf
echo -e "<IfModule security2_module>\n\tSecDataDir
/var/cache/modsecurity\n\tIncludeOptional /etc/modsecurity/
.conf\n</IfModule>" >
/etc/apache2/mods-available/security2.conf

sudo touch /etc/apache2/mods-available/security2.load
echo -e "LoadFile libxml2.so.2\nLoadModule security2_module
/usr/lib/apache2/modules/mod_security2.so" >
/etc/apache2/mods-available/security2.load

mkdir -p /etc/modsecurity
sudo cp modsecurity.conf-recommended unicode.mapping /etc/modsecurity/
sudo mv /etc/modsecurity/modsecurity.conf{-recommended,}
Enable modsecurity module:
sudo a2enmod security2
sudo service apache2 restart
Turn on the ModSecurity engine with base rules for all sites on the given host.
Note
Verify that sites are not blocked by the rules due to the false positives. Test this before deploying to production.
sudo sed -i 's/SecRuleEngine DetectionOnly/SecRuleEngine On/'
/etc/modsecurity/modsecurity.conf
Create brute-force rules for ModSecurity
To create brute-force rules for ModSecurity WAF, follow the steps:
Create the configuration file in the
/etc/modsecurity/directory with.confextension to detect the brute-force attack.Note
ModSecurity enables all the
/etc/modsecurity/* .conffiles with rules after restarting Apache.The rules to block access from the specified IP for ten minutes after more than ten failed login attempts per controller:
Note
The limit for failed attempts is set per controller. Therefore, the overall limit is multiplied by the number of controllers. In this example, for three controllers the limit is 30.
SecAction "phase:1,id:``10001``,pass,nolog,initcol:IP=%{REQUEST_HEADERS.x-forwarded-for}"

# Check for horizon login ``/horizon/auth/login/``

SecRule REQUEST_METHOD "@streq POST" "phase:5, chain,nolog,t:none,pass,id:``12341``"
SecRule REQUEST_URI "(?i)(        )" "chain"
        SecRule RESPONSE_STATUS "^200" \
                "setvar:IP.counter=+1"

# Block for 10 minutes after 10 failed attempts per controller``

SecRule IP:counter "@gt 10" \
      "phase:5,pass,t:none,id:'00012' \
      setvar:IP.block,\
      setvar:IP.counter=0,\
      expirevar:IP.block=600"

#Reset counter after successful login (response is '302 FOUND')

SecRule RESPONSE_STATUS "^302" \
"phase:5,chain,t:none,nolog,pass,id:'00004',setvar:!IP.counter"
SecRule REQUEST_URI "/horizon/auth/login/"


# Block and log IP

      SecRule IP:block "@eq 1" \``
            "phase:2,deny,status:403,id:'00010',\``
            msg:'Brute-force attack detected - IP:
            %{REQUEST_HEADERS.x-forwarded-for}blocked for 10 min'"
For debugging purposes, you may need to remove the block or reset the counter. To remove the block, uncomment the rules below and send the following request with the specified parameters from the blocked IP:
GET /some_random_url/?=this_is_a_random_string:# Allow to disable the block / reset counter (uncomment following two rules to take effect) # In order to disable block send following request with parameters from blocked IP # GET /some_random_url/?=this_is_a_random_string # SecRule ARGS "@streq this_is_a_random_string" "id:``331331``,chain,log,msg:``Unblocking: %{REQUEST_HEADERS.x-forwarded-for}``, phase:1, setvar:!IP.block, setvar:!IP.counter" # SecRule REQUEST_URI "/some_random_url/"
Restart Apache to load the new rules:
service apache2 restart
Verify alerts in log files
To verify that ModSecurity properly detects a brute-force attack
through the OpenStack Dashboard, find the appropriate alert messages
in the log files: /var/log/modsec_audit.log
and /var/log/apache2/horizon_error.log.
For example:
Message: Access denied with code 403 (phase 2). Operator EQ matched 10 at IP:block.
[file "/etc/modsecurity/bruteforce.conf"] [line "38"] [id "00010"] [msg "Brute-force attack
detected - IP: 172.16.0.254 blocked for 10 min"]
IDPS Suricata deployment as a VNF on OpenStack with OpenContrail
The use case shows Intrusion Detection and Prevention System (IDPS) Suricata installation as a virtual network function (VNF) on OpenStack.
To enable Suricata IDPS as a VNF:
- Deploy OpenStack with Contrail SDN that will bring NFV into your cloud.
- Create a VM image with the Suricata IDPS installed.
- Configure the Contrail SDN to run an IDPS service instance (VNF) and steer traffic to this instance for further analysis.
Install IDPS
To install IDPS on a VM:
Configure network interfaces. For example:
#The loopback network interface
auto lo
iface lo inet loopback

#The internal network interface
auto eth0
iface eth0 inet dhcp

#The external network interface
auto eth1
iface eth1 inet dhcp

#The management network interface (recommended)
auto eth2
iface eth2 inet dhcp
Install Suricata IDPS.
Note
To enable NFQUEUE for IPS mode, install Netfilter packages and configure Suricata with
--enable-nfqueueoption before build. See theIPS mode with NFQUEUEsection below for steps.To capture traffic as it comes to a NIC avoiding packets reassembling by a network adapter, turn off offloads for a network interface you want to sniff. For example, configure eth0 with
ethtoolas root:ethtool -K eth0 rx off tx off sg off tso off gso off rxvlan off txvlan off gro off lro off
Note
If offloads are enabled, this may lead to reassembling incoming packets that results in changing packet structure and increasing its size. Suricata may not process reassembled packets correctly. If GRO and LRO are enabled, you will see the error message when launching Suricata:
[ERRCODE: SC_ERR_PCAP_CREATE(21)] - Using Pcap capture with GRO or LRO
activated can lead to capture problems.
To extract files over 1 Mb in size from HTTP traffic, increase a value of the stream engine option
stream.reassembly.depth(default is 1 Mb), which controls the depth into a stream in which Suricata looks, or set to0for no limit insuricata.yaml.
You can run IDPS in two modes based on a service type:
- IDS (Contrail’s Analyzer)
Analyzing traffic and generating alerts.
- IPS or inline (Contrail’s Firewall)
Blocking or modifying packets and generating alerts.
You can deploy IDPS in two ways based on a service mode:
- As a router (Contrail’s In-Network)
IDS or IPS is placed between at least two networks and packets are routed.
- As a bridge (Contrail’s Transparent)
IDS or IPS forwards packets between network interfaces without modification.
See also
IDS mode
In IDS mode you can use the following actions:
- Pass
Stops scanning the packet matched by a signature and skips to the end of allrules (only for this packet)
- Alert
IDS fires up an alert for the packet matched by a signature
To set up IDS as a router between two networks, configure iptables to forward and masquerade packets between networks.
To route traffic in IDS mode between internal network connected to the
eth0 network interface of the IPS VM and external network connected to
eth1, run the following commands:
sysctl -w net.ipv4.ip_forward=1
/etc/init.d/networking restart
iptables -t nat -A POSTROUTING -o eth1 -j MASQUERADE
iptables -A FORWARD -i eth1 -o eth0 -m state --state RELATED,ESTABLISHED -j ACCEPT
iptables -A FORWARD -i eth0 -o eth1 -j ACCEPT
Note
If you need to route the traffic that goes to the Internet, add an extra network interface to the IDPS VM and connect it to the Contrail internal network (SNAT). Route packets from internal and external networks to the Contrail internal network, so Contrail Controller can deliver them to a BGP router connected to the Internet in its turn.
You can also use In-Network-NAT mode to simplify packets routing between
networks. In this mode return traffic does not need to be routed to the source
network.
To test the IDS mode on the created VM:
Create
/etc/suricata/rules/test.rulesfile and write the following rule:alert http any any -> any any (msg:"Alarm detected"; content:"Alarm"; nocase; classtype:policy-violation; sid:1; rev:1;)
Add
test.rulesto a list of rules in thesuricata.yamlconfiguration file.Reboot IDPS VM or start Suricata manually in a daemon mode:
sudo suricata -c /etc/suricata/suricata.yaml -i eth0 -D
Verify if
suricata.logcontains no errors after Suricata starts up:tail -f /etc/suricata/suricata.log
Make any HTTP request with the word
Alarm. For example:curl http://google.com/Alarm
View the
fast.logto check if Suricata generated the appropriate alert message:Alarm detected:tail -f /etc/suricata/fast.log
IPS mode
In IPS mode you can block traffic bridged between two network interfaces using the following actions:
- Drop
A packet containing a signature is discarded immediately and will not be sent any further. The receiver does not receive a message resulting in a time-out. All subsequent packets of a flow are dropped.
- Reject
An active rejection of the packet, both a receiver and sender receive a reject packet. If the packet concerns TCP, it will be a reset-packet, otherwise it will be an ICMP-error packet for all other protocols.
Note
Suricata generates an alert in both IPS modes.
To enable IPS or inline mode (the Firewall Contrail’s service type),
use:
- NFQ
Netfilter on Linux.
Note
NFQ supports multiple queues processing, which you should specify explicitly in iptables rules and suricata command line options. For example, you can configure load balancing with NFQ as follows:
iptables -A INPUT -j NFQUEUE --queue-balance 0:3
suricata -c /etc/suricata/suricata.yaml -q 0 -q 1 -q 2 -q 3
- IPFW
A divert socket on FreeBSD.
- AF_PACKET
Level 2 Linux bridge, which supports automatic load balancing for better performance.
- PF_RING
Improve your performance with
PF_RING ZCif your NIC supports Zero Copy (ZC) mode as well.
IPS mode using NFQ
NFQUEUE is an iptables and ip6tables target entity that delegate
the decision on packets to a user space software like IPS.
To enable IPS mode using ``NFQ``:
Install Netfilter packages:
sudo apt-get -y install libnetfilter-queue-dev libnetfilter-queue1 libnfnetlink-dev libnfnetlink0
Configure Suricata with
--enable-nfqueueoption.Build and install.
Configure iptables.
To scan bridged packets, add the rule:
sudo iptables -I FORWARD -j NFQUEUE
To use
repeatSuricataNFQmode, add the rule below specifying a source chain you need:iptables -I FORWARD -m mark ! --mark $MARK/$MASK -j NFQUEUE``
This rule forwards packets to
NFQUEUEonly if they do not have a specified mark that can be set by Suricata after packet processing.
Warning
If you stop Suricata, the packets that come into
NFQUEUEwill not be processed and, as a result, will not be passed further.Note
On Linux with the kernel version greater or equal 3.6, set the
fail-openoption toyesinsuricata.yamlto make the kernel accept the packet if Suricata is not able to keep pace.Configure Suricata NFQ modes in the
suricata.yamlconfiguration file:- Accept
In default
NFQmode, Suricata generates a terminal verdict: pass or drop. A packet will not be inspected by the rest of the iptables rules.
- Repeat
Suricata generates a non-terminal verdict and mark the packets that will be reinjected again at the first rule of iptables. Add the following rule to iptables:
iptables -I FORWARD -m mark ! --mark $MARK/$MASK -j NFQUEUE
- Route
To send a packet to another queue after an
ACCEPTdecision, set mode torouteand setroute-queuevalue. Use a route mode to scan packets with multiple network scanners on the same VM.
The example of the
NFQconfiguration insuricata.yaml:nfq: mode: accept # nfq mode: accept, repeat, route repeat-mark: 1 # used for repeat mode to mark a packet repeat-mask: 1 # used for repeat mode to mark a packet route-queue: 2 # for 'route' mode batchcount: 20 # max length of a batching verdict cache fail-open: yes # a packet is accepted when queue is full
Start Suricata to filter packets in
NFQUEUE:suricata -c /etc/suricata/suricata.yaml -q 0 -D
Note
By default all incoming packets go the queue with the number
0. However, you can define the queue number explicitly:iptables -A FORWARD -j NFQUEUE --queue-num 0
Test IPS mode with NFQ:
Modify the test rule in the
/etc/suricata/rules/test.rulesfile to drop or reject packets:drop http any any -> any any (msg:"Alarm detected"; content:"Alarm"; nocase; classtype:policy-violation; sid:1; rev:1;)
or
reject http any any -> any any (msg:"Alarm detected"; content:"Alarm";
nocase; classtype:policy-violation; sid:1; rev:1;)
Start Suricata to scan the queues with forwarded packets:
suricata -c /etc/suricata/suricata.yaml -q 0 -q 1 -D
Download the
testfile with theAlarmword inside on the IPS VM. For example:wget http://<WEB_SERVER_IP>/testVerify that wget successfully downloads the file.
Add the following rules to iptables on IPS VM to forward incoming and outgoing
packets:
iptables -A INPUT -j NFQUEUE
iptables -A OUTPUT -j NFQUEUE --queue-num 1
Download the
testfile again:wget http://<WEB_SERVER_IP>/testVerify that Suricata blocks the downloading file. Example of output:
wget http://10.20.0.2:8080/test
--2016-05-11 13:58:36-- http://10.20.0.2:8080/test
Connecting to 10.20.0.2:8080... connected.
HTTP request sent, awaiting response…
Verify that
/var/log/suricata/fast.logcontains the alert message showing the Suricata dropped the packet. For example:05/11/2016-13:58:36.889314 [Drop] [**] [1:1:1] Alarm detected [**] [Classification: Potential Corporate Privacy Violation] [Priority: 1] {TCP} 10.20.0.2:8080 -> 10.20.0.8:49628
IPS mode using AF_PACKET
AF_PACKET establishes a software bridge between two interfaces by copying
packet from one interface to another (and reverse).
To enable IPS mode using the ``AF_PACKET`` Linux bridge:
Edit the
af-packetsection in thesuricata.yamlconfiguration file:af-packet: - interface: eth0 threads: auto defrag: yes cluster-type: cluster_flow cluster-id: 98 copy-mode: ips copy-iface: eth1 buffer-size: 64535 use-mmap: yes - interface: eth1 threads: auto cluster-id: 97 defrag: yes cluster-type: cluster_flow copy-mode: ips copy-iface: eth0 buffer-size: 64535 use-mmap: yes
Note
cluster-idis used to group threads for a corresponding interface when load balancing.cluster-idvalues should be different for every interface.Start Suricata with the
--af-packetoption:suricata -c /etc/suricata/suricata.yaml --af-packet -D
Verify that Suricata has turned on the IPS mode.
Modify the test rule in the
/etc/suricata/rules/test.rulesfile to drop or reject packets:drop http any any -> any any (msg:"Alarm detected"; content:"Alarm"; nocase; classtype:policy-violation; sid:1; rev:1;)
or
reject http any any -> any any (msg:"Alarm detected"; content:"Alarm";
nocase; classtype:policy-violation; sid:1; rev:1;)
View http traffic on the destination interface eth1 on the IPS VM:
sudo tcpdump -i eth1 tcp port <HTTP_PORT> -A -w tcpdump.output
Download the
testfile with theAlarmword inside on the IPS VM. For example:wget http://<WEB_SERVER_IP>/testTerminate tcpdump and verify if the
testfile with theAlarmword was blocked by IPS in the tcpdump output log that contains traffic bridged to the destination interfaceeth1.
IPS mode using PF_RING
PF_RING is a Linux network socket that use NAPI to copy packets from
the NIC to the PF_RING circular buffer, and then the user space
application reads packets from the ring.
Note
For servers with physical network adapters you can use ZC, Napatech, Myricom, Linux TCP/IP Stack injection, Sysdig, Link Aggregation, Libzero consumer, DAG, DNA modules. You can also leverage PF_RING with ZC on a KVM virtual machine.
To enable IPS mode using vanilla ``PF_RING``:
Install
PF_RINGpackages:sudo apt-get install build-essential bison flex linux-headers-$(uname -r) libnuma-dev
Download the latest
PF_RINGlibrary, extract, and build the library:wget http://sourceforge.net/projects/ntop/files/PF_RING/PF_RING-6.2.0.tar.gz tar -xvzf PF_RING-6.2.0.tar.gz cd PF_RING-6.2.0/ make cd kernel; sudo make install cd ../userland/lib; sudo make install cd ../userland/libpcap; ./configure; make sudo cp libpcap* /usr/local/lib/; sudo cp pcap.h /usr/local/include/
Note
Verify that new libpcap library can be found by Suricata when configuring. For example, in
/usr/local/lib/. Otherwise, you will see the following warning message:WARNING! libcap-ng library not found
Verify that the PF_RING Linux kernel module has been successfully loaded:
modinfo pf_ring
cat /proc/net/pf_ring/info
Configure Suricata with
--enable-pfringoption and path to libs and include headers. For example:LIBS="-lrt -lnuma" ./configure --prefix=/usr --sysconfdir=/etc --localstatedir=/var \ --enable-pfring --with-libpfring-includes=/usr/local/include \ --with-libpfring-libraries=/usr/local/lib
Build and install Suricata:
make
sudo make install-full
Run Suricata with
PF_RING:sudo suricata --pfring-int=eth0 --pfring-cluster-id=99 \ --pfring-cluster-type=cluster_flow \ -c /etc/suricata/suricata.yaml -D
Tune up
PF_RINGinsuricata.yaml, if necessary. Theeth0interface is enabled by default:pfring: - interface: eth0 threads: 1 cluster-id: 99 cluster-type: cluster_flow
Test Suricata in IDS mode:
Create
/etc/suricata/rules/test.rulesfile and write the following rule:alert http any any -> any any (msg:"Alarm detected"; content:"Alarm"; nocase; classtype:policy-violation; sid:1; rev:1;)”
Add
test.rulesto a list of rules in thesuricata.yamlconfiguration file.Start Suricata manually in a daemon mode:
sudo suricata --pfring-int=eth0 --pfring-cluster-id=99 \
--pfring-cluster-type=cluster_flow \
-c /etc/suricata/suricata.yaml -D
Or update the active ruleset without rebooting Suricata:
sudo kill -USR2 <suricata pid>
Verify that
suricata.logcontains no errors after Suricata starts up:tail -f /etc/suricata/suricata.log
Make any HTTP request with the word
Alarm. For example:curl http://google.com/AlarmView the
fast.logto verify if Suricata generated the alert message:Alarm detected:tail -f /etc/suricata/fast.log
Enable file extraction
The file extraction feature has been included in Suricata since the version 2.0. The feature enables file extraction from HTTP and SMTP traffic. You can take advantage of this feature when you want to analyze incoming files from Web or mail traffic in a sandbox or multiscanner.
To enable file extraction feature, follow the steps below:
In the
test.rulefile, create or modify a rule to add thefilestoreoption:alert http any any -> any any (msg:"Alarm detected"; content:"Alarm"; nocase; classtype:policy-violation; filestore ; sid:1; rev:1;)
Verify that you have a proper value for the stream engine option
stream.reassembly.depth(default 1 Mb) insuricata.yaml. Increase the value for files greater than 1Mb or set to0for no limit.Verify that you turned off the offloads
rx,tx,sg,tso,gso,rxvlan,txvlan,gro,lro:ethtool -k eth0
Start Suricata or reload the active ruleset:
kill -USR2 <suricata pid>
Download the
testtext file containing the wordAlarminside on the IDPS VM:wget http://<web server IP>:8080/test
Go to the folder with extracted files:
cd /var/log/suricata/files
View the
file.1content if it equals to the downloadedtestfile:sudo cat file.1
Example of system output:
Alarm
Open
file.1.metato see the file’s metadata:sudo cat file.1.meta
Example of system output:
TIME: 05/12/2016-18:02:58.514611
SRC IP: 10.20.0.2
DST IP: 10.20.0.8
PROTO: 6
SRC PORT: 8080
DST PORT: 41632
APP PROTO: http
HTTP URI: /test
HTTP HOST: 10.20.0.2
HTTP REFERER: <unknown>
HTTP USER AGENT: Wget/1.15 (linux-gnu)
FILENAME: /test
MAGIC: ASCII text
STATE: CLOSED
MD5: cb545549b596e5235285364023d07146
SIZE: 6
More rules to detect and extract Windows and Linux executables are below:
alert http any any -> any any (msg:"==ELF file=="; content:"ELF"; distance:0;
classtype:policy-violation; filestore;sid:3; rev:1;)

alert http any any -> any any (msg:"==PE file=="; content:"|0D 0A 0D 0A|MZ";
distance:0; classtype:policy-violation; filestore;sid:4; rev:1;)

alert http any any -> any any (msg:"==EXE file=="; fileext:"exe";
classtype:policy-violation; filestore;sid:14; rev:1;)
See also
Run in daemon mode
When you deploy Suricata on a service instance, you can start Suricata automatically on system boot up and run in a daemon mode.
To run Suricata in the daemon mode:
Disable console output and set it to a file in the
suricata.yamlconfiguration file:outputs: - console: enabled: no - file: enabled: yes filename: /var/log/suricata.log
Make Suricata start on system boot up:
Create the initialization script
/etc/init/suricata.conf:# suricata description "IDPS Daemon" start on runlevel [2345] stop on runlevel [!2345] expect fork exec suricata -D --pidfile /var/run/suricata.pid -c /etc/suricata/suricata.yaml -i eth0
or
- Specify the
--pidfileoption insuricata.yaml.
Alerts management
Configure your SIEM solution to process, store, and visualize the alerts generated by IDPS.
Alternatively, you can use Barnyard2 and Snorby open source solutions.
IDPS as a VNF
In OpenStack environments with a network functions virtualization infrastructure (NFVI) enabled you can run an IDPS instance as a virtualized network function (VNF). VNFs are building blocks that you can use to create a scalable service that includes a sequence of virtual functions in service chaining.
To enable IDPS as a VNF:
Once IDPS VM is configured and verified, upload the IDPS VM image to your cloud environment using OpenStack Dashboard. QCOW2 or VMDK formats of the image are preferable.
Go to the Contrail web UI. For example: https://172.16.0.3:8143/
Open the Service Templates panel in the Configure tab.
Create an IPS template service.
Select the service mode for your service:
- In-Network or routed mode
Service VM instance is between at least two networks and packets are routed. Examples include NAT, Layer 3 firewall, load balancer, HTTP proxy, and so on.
- In-Network NAT
Similar to in-network mode. However, return traffic does not need to be routed to the source network.
In-network-natmode is particularly useful for NAT service.
- Transparent or bridge mode
Is transparent for communication between instances and packets are not modified. The
transparentmode fits L2 firewall and IDPS.
Specify the number of interfaces for a service in Service Type.
- For
Firewalltype Contrail allocates at least two interfaces: ingress and egress. - For
Analyzertype - at least one interface is needed.
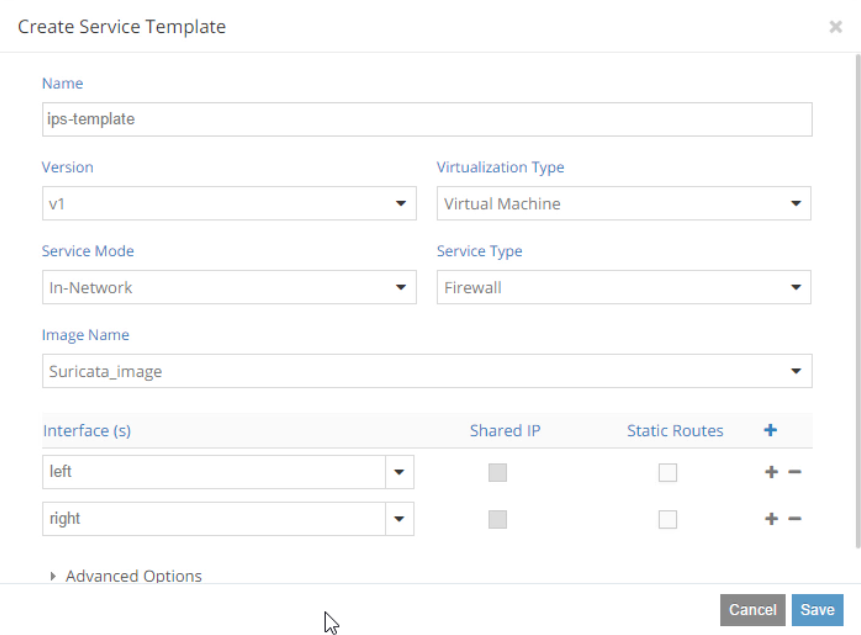
- For
In Advanced Options you can enable Service Scaling, select Availability Zone for your service instances, and select an instance flavor.
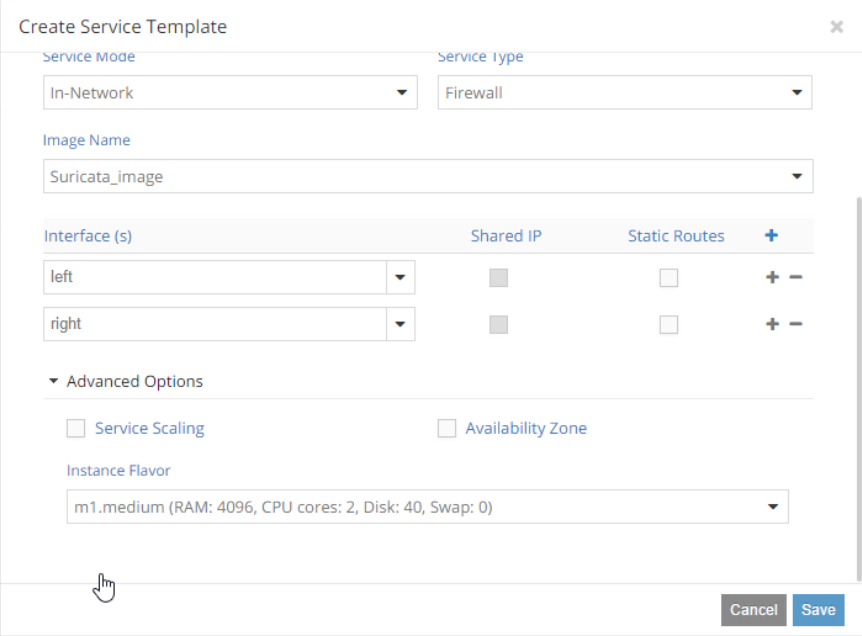
In Service instances panel, create an
ips-instanceservice instance based on the available service template and connect network interfaces to internal and external networks. As a result,ips-instancewill act as an alternative router connecting two networks.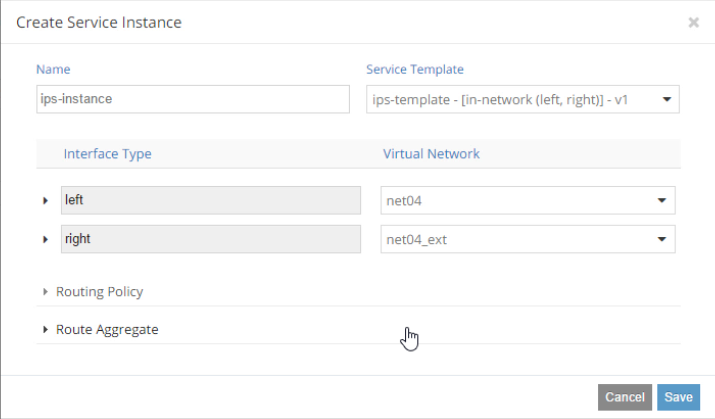
Go to the Networking->Policies panel to create a service policy. The
ips-policytells Contrail to pass any traffic between internal and external to theips-instanceservice instance.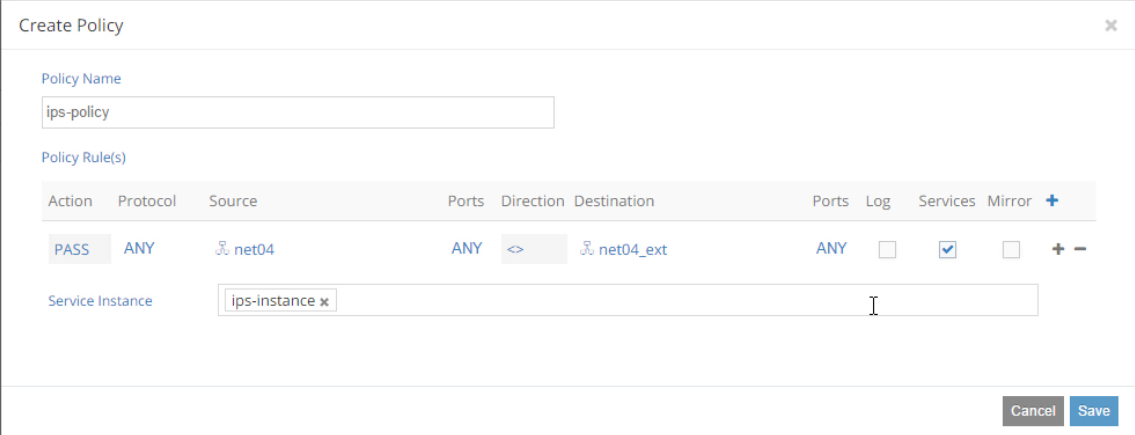
Note
OpenContrail provides traffic mirroring feature as well.
Assign the created
ips-policypolicy to the affected networks internal and external in the Networking->Networks panel.Test your service chaining:
Create a VM
TestVMfrom where you can download malicious content from external network.Configure iptables to route traffic between internal and external traffic (a router mode).
Note
You can also test your IPS service instance in a bridge mode by installing it between the default router and external network.
The current network topology with
ips-instanceand theTestVMrunning in the internal network will look like: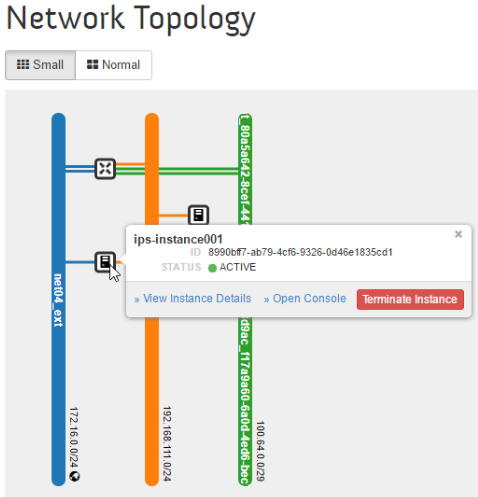
Verify if Contrail correctly direct traffic between networks to the service instance.
From the
TestVMping the external network gateway. For example:ping 172.16.0.1
On the
ips-instanceVM, start tcpdump:sudo tcpdump -i eth0
In the
ips-instanceVM, verify that you can see ICMP packets going between two networks:
Set up a web server in external network and create a test file with the word
Alarminside.Download the test file from
TestVM. For example:curl http://172.16.0.30:8080/testIn the
ips-instanceVM, view thefast.logto check if Suricata generated the appropriate alert message:Alarm detected:tail -f /etc/suricata/fast.log
See also
Incident detection and prevention with IDPS and malware sandbox
This use case demonstrates how to detect an attack using IDPS Suricata and a malware sandbox.
Watch the demo IDPS Suricata as a VNF from OpenStack Summit 2016 in Austin.
Targeted attack modeling
To verify if your cluster is well protected against targeted attacks, you can create a simulation tool or script to model Advanced Persistent Threat (APT) behavior inside of the network.
The tool should cover the following stages of the APT model:
- Penetration:
- Spear-phishing
- Watering hole
- USB removable storage
- Delivery of the APT kit
- Lateral movements and EoP
- Data collection
- Data exfiltration
Appendix
Comply with security standards
Mirantis Cloud Platform enables running customers’ clouds in a secure way providing data protection through complience with security standards.
Find the security standards, projects, programs, and acts to comply below:
- ISO 27001:2022
- Payment Card Industry (PCI) Data Security Standard
- The Federal Risk and Authorization Management Program (FedRAMP)
- Federal Information Security Management Act (FISMA) project
- Health Insurance Portability and Accountability Act (HIPAA) Security and Privacy standards
- EU General Data Protection Regulation
Recommended security solutions
| Class of tool | Vendor | Solution | Comments |
|---|---|---|---|
| Firewall | Palo Alto Networks | Palo Alto NGFW | |
| Firewall | Juniper | SRX Series: Next-Generation Anti-Threat Firewall, vSRX Virtual Firewall, cSRX Container Firewall | |
| Firewall | Cisco | Firepower NGFW | |
| IDPS | Open Source | Suricata | |
| IDPS | Open Source | Snort | |
| IDPS | Cisco | Firepower NGFW | includes IDPS |
| IDPS | Palo Alto Networks | Palo Alto NGFW | includes IDPS |
| Load balancers | Open Source | HAProxy | |
| Load balancers | Imperva | Imperva hardware appliances or Incapsula SaaS solution | |
| Load balancers | F5 | F5 Load balancer | |
| DDoS Protection | Arbor Networks | Arbor Cloud | |
| DDoS Protection | Imperva | Incapsula DDoS Protection | |
| LMA toolchain | Mirantis | MCP StackLight | integrated into MCP |
| Forensics | Open Source | Cuckoo Sandbox | |
| Forensics | FireEye | Network Forensics Platform (PX series), Investigation Analysis system (IA series), Malware Analysis (AX series) | |
| Sandbox | Open Source | Cuckoo Sandbox | |
| Sandbox | Juniper | Sky Advanced Threat Prevention | |
| Sandbox | FireEye | Malware Analysis (AX series) | |
| Sandbox | Fortinet | FortiSandbox | |
| Sandbox | NioGuard | NioGuard Analysis System | |
| Anti-Spam | FireEye | eSPM |
IT host security policy
To design your own IT host security policy, consider the security recommendations by:
- Security Technical Implementation Guides (STIGs)
- Federal Risk and Authorization Management Program (FedRAMP)
- Payment Card Industry Data Security Standard (PCI DSS)
STIG hardening recommendations
The Security Technical Implementation Guides (STIGs) are the configuration standards for secure installation and maintenance of computer software and hardware introduced by Defense Information Systems Agency (DISA) in support of the United States Department of Defense (DoD). The guides include recommended administrative processes to reduce exploitation possibility. STIG scanning software is used to implement and validate proper configuration.
Verify that your Linux host comply with the STIG recommendations. For example:
The system must not permit interactive boot. To disable the ability forusers toperform interactive startups, edit the file
/etc/sysconfig/init. Add or correct the line:PROMPT=no
The
PROMPToption allows the console user to perform an interactive system startup, in which it is possible to select the set of services which are started on boot.All rsyslog-generated log files must be owned by
rootand have mode0600or less permissive. The log files generated byrsyslogcontain valuable information regarding system configuration, user authentication, and other such information. Log files should be protected from unauthorized access. The owner of all log files written byrsyslogshould beroot.The system must set a maximum audit log file size. The total storage foraudit log files must be large enough to retain log informationover the period required. This is a function of the maximum logfile size and the number of logs retained. Determine the amount of audit data (in megabytes - at least 6 Mb) that should be retained ineach log file. Edit the file
/etc/audit/auditd.conf. Add or modify the following line, substituting the correct value for[STOREMB]:max_log_file = [STOREMB]
The audit system must be configured to audit successful file system mounts. The unauthorized exportation of data to external media could result in an informationleak where classified information, Privacy Act information, and intellectual property could be lost. An audit trail should be created each time afilesystem is mounted to help identify and guard against informationloss. At a minimum, the audit system should collect media exportationevents for all users and root. Add the following to
/etc/audit/audit.rules, settingARCHto eitherb32orb64as appropriate for your system:-a always,exit -F arch=ARCH -S mount -F auid>=500 -F auid!=4294967295 -k export -a always,exit -F arch=ARCH -S mount -F auid=0 -k export
The SSH daemon must set a timeout interval on idle sessions. Causing idle users to be automatically logged out guards against compromises one system leading trivially to compromises on another. SSH allows administrators to set an idle timeout interval. After this interval has passed, theidle user will be automatically logged out. To set an idle timeout interval, edit the following line in
/etc/ssh/sshd_configas follows:ClientAliveInterval <INTERVAL>
The timeout interval is given in seconds. To have a timeout of 15 minutes, set the interval to 900. If a shorter timeout has already been set for the login shell, that value will preempt any SSH setting made here. Keep in mind that some processes may stop SSH from correctly detecting that the user is idle.
The SSH daemon must not permit user environment settings. SSH environment options potentially allow users to bypass access restriction in some configurations. To ensure users are not able to present environment options to the SSH daemon, add or correct the following line in
/etc/ssh/sshd_config:PermitUserEnvironment no
The SNMP service must not use a default password. Presence of the default SNMP password enables querying of different system aspects and could result in unauthorized knowledge of the system. Edit
/etc/snmp/snmpd.conf, remove default community stringpublic. Upon doing that, restart the SNMP service.The system default umask for the bash shell and in
/etc/profilemust be077. Theumaskvalue influences the permissions assigned to files when they are created. A misconfigured umask value could result in files with excessive permissions that can be read and/or written to by unauthorized users.To ensure the default umask for users of the Bash shell is set properly, add or correct the
umasksetting in/etc/bashrcto read as follows:umask 077
To ensure the default umask controlled by
/etc/profileis set properly, add or correct theumasksetting in/etc/profileto read as follows:umask 077
Auditing must be enabled at boot by setting a kernel parameter. Each process on the system carries an
auditableflag which indicates whether its activities can be audited. Althoughauditdtakes care of enabling this for all processes which launch after it does, adding the kernel argument ensures it is set for every process during boot. To ensure all processes can be audited, even those which start prior to the audit daemon, add the argumentaudit=1to the kernel line in/etc/grub.confas follows:kernel/vmlinuz-version ro vga=ext root=/dev/VolGroup00/LogVol00 rhgb quiet audit=1.
The Bluetooth kernel module must be disabled preventing the kernel from loading thekernel module provides an additional safeguard against its activation. The kernel’s module loading system can be configured to prevent loading of the Bluetooth module. Add the following to the appropriate
/etc/modprobe.dconfiguration file to prevent the loading of the Bluetooth module:install net-pf-31 /bin/false install bluetooth /bin/false
Use the openstack-ansible-security role to provide host security
hardening for OpenStack environments deployed with Openstack-Ansible.
FedRAMP recommendations
The FedRAMP program provides documents and templates with details needed to comply with FedRAMP requirements.
PCI DSS recommendations
Find the quick summary of PCI DSS recommendations below:
- Restrict the use of administrative functions to defined endpoint networks and devices, such as specific laptops or desktops that have been approved for such access.
- Require multi-factor authentication for all administrative functions.
- Ensure that all changes are implemented and tested properly. Consider requiring additional management oversight, above and beyond that which is required through the normal change-management process.
- Separate administrative functions such that hypervisor administrators do not have the ability to modify, delete, or disable hypervisor audit logs.
- Send hypervisor logs to physically separate, secured storage as close to real-time as possible.
- Monitor audit logs to identify activities that could indicate a breach in the integrity of segmentation, security controls, or communication channels between workloads. Implement an automatic log analysis solution and develop scripts notifying of all potentially harmful actions, according to company security policy.
- Separate duties for administrative functions, such that authentication credentials for the hypervisor do not have access to applications, data, or individual virtual components.
Examples
This section provide examples of security best practices mentioned in this document.
Investigate and prevent targeted attack (APT)
Typically, Advanced Persistent Threats (APTs), as well as backdoors, communicate with C&C servers to get commands from attackers and send back collected information. The network traffic is usually encrypted and sent via a usual http port. This prevents it from being detected by Network Data Leakage Prevention (DLP) or antivirus systems. However, every APT generates a specific traffic that contains unique network IoCs. Based on the analysis of network behavior of recent APTs, it is possible to reveal patterns of targeted attacks to detect still unknown cyber espionage campaign.
For example, the CozyDuke (Office Monkeys) APT
sends http requests to the hacked website acting as a proxy C&C server,
which replies with the specific for the victim set of payload
modules. The transmitted data is Base64 encoded. After taking
Base64 off, the HTTP stream contains a binary content that seems to be
an encrypted executable.
To analyse further, disassemble the backdoor to find out the algorithm (RC4) used for traffic encryption.

Analysing the code, it is possible to find the RC4 key in the memory when the backdoor exports it in a BLOB format to be stored as a header before the encrypted data. The key is 16 bytes and generated every time a new session is created:
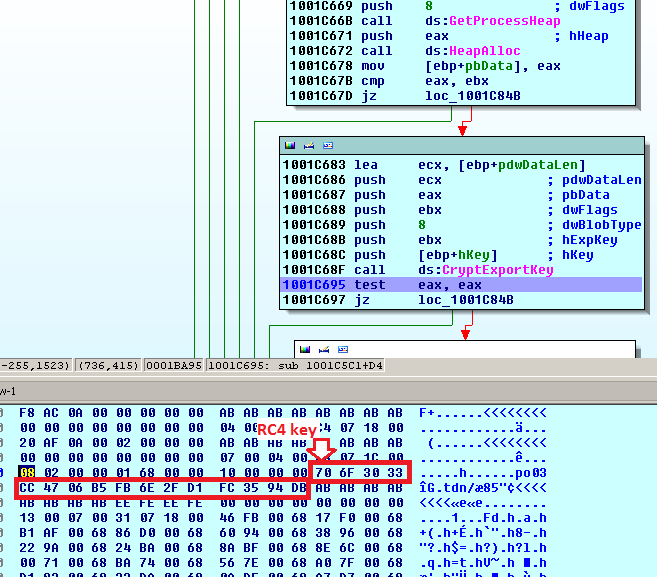
The network packet before being encoded with Base64 contains the key at the beginning, so the server can use it to decrypt the message:

The same key is used to encrypt local configuration file of the backdoor
called racss.dat.
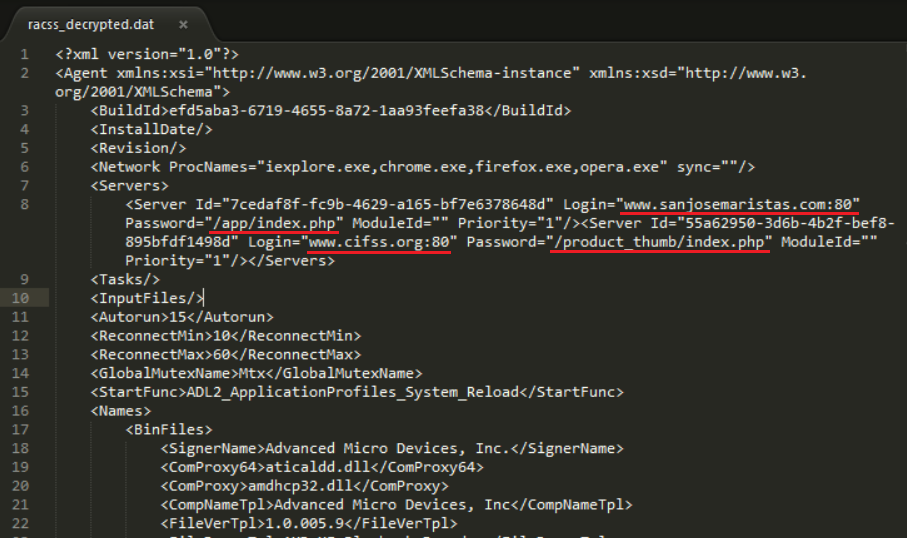
The XML config file shows the C&C proxy server addresses. According to the
information in <Servers> section, two URLs are used to establish
the connection with the C&C proxy, which is merely a someone’s hacked website.
After the short analysis of the threat, network IoCs were found. You can add these network IoCs to the rules of NGFW/IDPS solutions deployed in your cloud. Once blacklists are updated you can monitor if there are more infected machines in a subnet or within a whole cluster.
For incident response, it is important to reveal a security breach and fix it to prevent the penetration in future. In case of the analyzed attack, no exploits were used, but spear-phishing and social engineering methods. In this case, you need to scan SMTP traffic and create rules to block suspicious attached files according to the corporate security policy.
To prevent targeted attacks (APTs):
Terminate TLS on (reverse-)proxy servers for both incomig and outgoing traffic.
Filter out executable and documents from incoming traffic.
Scan the extracted from traffic incoming files with an antivirus solution.
Open the extracted executable and documents from incoming traffic in a sandbox to verify their behaviour for being malicious.
Mirror documents excluding active content such as embedded scripts.
Enable TOR blocking rules on network IDPS.
Note
APTs can communicate with a C&C server in the TOR network. The outgoing TOR traffic can be encapsulted into HTTP and encrypted with TLS to be delivered through a public CDN network to TOR using the domain fronting technique.
Example of threat modeling for Ceph RBD
The example presents a threat modeling process for Ceph RBD. You can use the Microsoft Threat Modeling Tool to draw a data flow diagram (DFD) and run threat modeling using the STRIDE threat model described in this document.
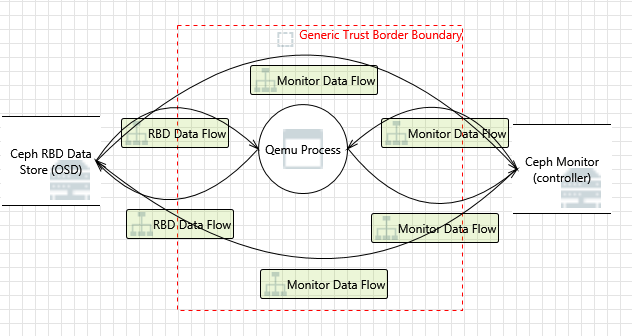
After modeling is completed, the tool suggests a list of potential threats to be mitigated. The tool distributes the discovered threats between interactions. Therefore, the report suggests the list of threats by categories connected to a particular interaction (data flow) on the diagram. Below you can find modeling information by the Microsoft Threat Modeling Tool for each interaction.
An example of threat modeling for the Monitor Data Flow interaction:
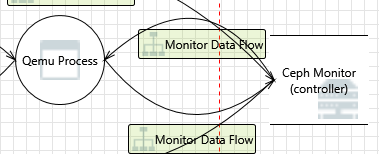
Spoofing of Destination Data Store Generic Data Store [State: Not Started] [Priority: High]
Category: Spoofing Description: Ceph Monitor (controller) may be spoofed by an attacker and this may lead to data being written to the attacker’s target instead of Ceph Monitor (controller). Consider using a standard authentication mechanism to identify the destination data store. Justification: <no mitigation provided> Data Store Inaccessible [State: Not Started] [Priority: High]
Category: Denial Of Service Description: An external agent prevents access to a data store on the other side of the trust boundary. Justification: <no mitigation provided> Data Flow Generic Data Flow Is Potentially Interrupted [State: Not Started] [Priority: High]
Category: Denial Of Service Description: An external agent interrupts data flowing across a trust boundary in either direction. Justification: <no mitigation provided> Potential Excessive Resource Consumption for OS Process or Generic Data Store [State: Not Started] [Priority: High]
Category: Denial Of Service Description: Does Qemu Process or Ceph Monitor (controller) take explicit steps to control resource consumption? Resource consumption attacks can be hard to deal with, and there are times that it makes sense to let the OS do the job. Be careful that your resource requests don’t deadlock, and that they do timeout. Justification: <no mitigation provided> Data Flow Sniffing [State: Not Started] [Priority: High]
Category: Information Disclosure Description: Data flowing across Monitor Data Flow may be sniffed by an attacker. Depending on what type of data an attacker can read, it may be used to attack other parts of the system or simply be a disclosure of information leading to compliance violations. Consider encrypting the data flow. Justification: <no mitigation provided> Data Store Denies Generic Data Store Potentially Writing Data [State: Not Started] [Priority: High]
Category: Repudiation Description:https://www.microsoft.com/en-us/sdl/adopt/threatmodeling.aspx Ceph Monitor (controller) claims that it did not write data received from an entity on the other side of the trust boundary. Consider using logging or auditing to record the source, time, and summary of the received data. Justification: <no mitigation provided> The Generic Data Store Data Store Could Be Corrupted [State: Not Started] [Priority: High]
Category: Tampering Description: Data flowing across Monitor Data Flow may be tampered with by an attacker. This may lead to corruption of Ceph Monitor (controller). Ensure the integrity of the data flow to the data store. Justification: <no mitigation provided> Authenticated Data Flow Compromised [State: Not Started] [Priority: High]
Category: Tampering Description: An attacker can read or modify data transmitted over an authenticated dataflow. Justification: <no mitigation provided>
See also