Manually discover and commission the physical nodes
Manually discover and commission the physical nodes
You can discover and commission your physical nodes manually using the MAAS web UI.
To discover and commission physical nodes manually:
Power on a physical node.
In the MAAS UI, verify that the server has been discovered.
On the Nodes tab, rename the discovered host accordingly. Click Save after each renaming.
In the Settings tab, configure the Commissioning release and the Default Minimum Kernel Version to Ubuntu 16.04 TLS ‘Xenial Xerus’ and Xenial (hwe-16.04), respectively.
Note
The above step ensures that the NIC naming convention uses the predictable schemas, for example,
enp130s0f0rather thaneth0.In the Deploy area, configure the Default operating system used for deployment and Default OS release used for deployment to Ubuntu and Ubuntu 16.04 LTS ‘Xenial Xerus’, respectively.
Leave the remaining parameters as defaults.
(Optional) Modify the commissioning process as required. For more information and examples, see: Add custom commissioning scripts.
Commission the node:
- From the Take Action drop-down list, select Commission.
- Define a storage schema for each node.
- On the Nodes tab, click the required node link from the list.
- Scroll down to the Available disks and partitions section.
- Select two SSDs using check marks in the left column.
- Click the radio button to make one of the disks the boot target.
- Click Create RAID to create an MD
raid1volume. - In RAID type, select
RAID 1. - In File system, select
ext4. - Set
/as Mount point. - Click Create RAID.
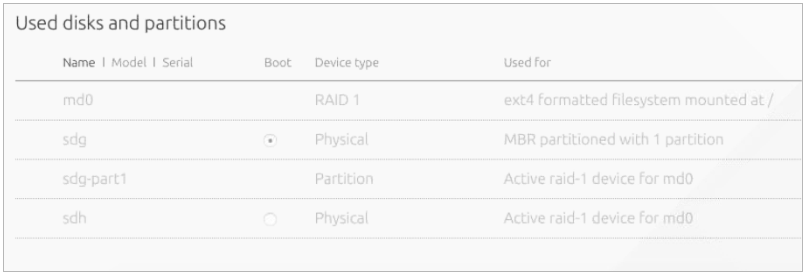
The Used disks and partitions section should now look as follows:
Repeat the above steps for each physical node.
Proceed to Manually provision the physical nodes.