Introduction
This documentation provides information on how to deploy Mirantis Container Runtime (MCR). The documentation is intended to help operators to understand the core concepts of the product.
The information provided in this documentation set is being constantly improved and amended based on the feedback and kind requests from the consumers of MCR.
Product Overview
Mirantis Container Runtime (MCR) enables you to power your business-critical applications with the industry-leading enterprise container engine. You can run containers on any platform with a fully supported and highly secure container runtime. MCR provides the core functionality and security compliance needed to enable your container orchestration solution of choice with certified proven support for both Kubernetes and Swarm. The most common use cases include:
- Container orchestration solution
Organisations often have unique container orchestration requirements and may choose to utilise alternative systems to manage their containers. MCR provides freedom to select the best orchestration solution for your needs whilst still ensuring you have a secure, trusted, and supported container runtime to run your mission-critical workloads.
- Secure and validated containers
The challenges in ensuring that the software supply chain is secure does not stop at the container orchestration solution. The key part of securing your container solution is ensuring that only validated and trusted containers can be deployed and run. MCR combined with Mirantis Secure Registry (MSR) gives you the ability to validate and sign your container images to ensure that only approved images can be run in your environment.
- Secure validated encryption
Regulated industries need to meet federal regulations to ensure that appropriate levels of encryption are enabled. MCR provides FIPS 140-2 Validated cryptography ensuring that you meet the highest standards necessary to comply with the federal requirements.
- Multiple operating systems and infrastructures
With the drive towards multi-cloud and hybrid cloud, computing organisations need to support multiple operating systems on multiple platforms. MCR is certified to run on multiple operating systems, including CentOS, RHEL, Ubuntu, and Windows, for consistent runtime regardless of the platform.
Reference Architecture
The Mirantis Container Runtime (MCR) Reference Architecture is a work in progress, the intent of which is to keep MCR users apprised of the technical details that pertain to the differences between MCR and Docker Engine.
Storage driver compatibility
overlay2 is the only storage driver supported by MCR
23.0, with the exception of btrfs, which MCR
supports on SLES.
Note
A number of unsupported storage driver options that are available in MCR 20.10 are unavailable in MCR 23.0, as Mirantis is moving users away from unsupported configurations.
The
vfsstorage driver is available in MCR 23.0 for debugging purposes only.
Deployment Guide
Mirantis Container Runtime (MCR) is a client-server application with these major components:
A server which is a type of long-running program called a daemon process (the dockerd command).
A REST API which specifies interfaces that programs can use to talk to the daemon and instruct it what to do.
A command line interface (CLI) client (the docker command).
MCR can be installed on several Linux distros as well as on Windows.
Note
MCR is derived from the Moby project, an open framework created by Docker Inc. As such, most of the product commands and setup instruction are identical to those for Docker Engine.
Install the license
Warning
Users are not authorized to run MCR without a valid license. For more information, refer to Mirantis Agreements and Terms.
For MCR to recognize your license, you must apply your customer license file at runtime.
To make MCR aware of your license and entitlement, perform the following for each node that will host MCR:
Download the license file.
If you purchased a license from the Mirantis Store, the license file is available through a link in your confirmation email. Otherwise, contact Mirantis Sales and Support to gain access to the file.
Apply the license file.
Platform
Applying the license
Linux distributions
Determine the location of the data root directory. This information is available in the
daemon.jsonfile associated with MCR. Alternatively, you can specify the data root directory using the --data-root flag at MCR start up. Note that the default data-root directory is/var/lib/docker.Copy the license file to the data root directory and name it
docker.lic. It is imperative that the license be readable by the account/user that runs the docker daemon.
Windows servers
Currently, you do not need to apply a license for Windows server systems, as Mirantis Container Runtime can be run using the installation script.
Note
MKE, MSR, and Mirantis Container Cloud have implied MCR licenses.
Install MCR on Linux distros
Install Mirantis Container Runtime for CentOS
There are two ways to install and upgrade Mirantis Container Runtime (MCR):
YUM repository: Set up a Docker repository and install Mirantis Container Runtime from it. This is the recommended approach because installation and upgrades are managed with YUM and easier to do.
RPM package: Download the RPM package, install it manually, and manage upgrades manually. This is useful when installing Mirantis Container Runtime on air-gapped systems with no access to the internet.
Prerequisites
Perform all prerequisites as required prior to installing MCR on CentOS.
Architectures and storage drivers
Mirantis Container Runtime supports CentOS 64-bit, latest version, running on
x86_64.
On CentOS, Mirantis Container Runtime supports the overlay2 storage
drivers. The following limitations apply:
If
selinuxis enabled,overlay2is supported on CentOS 7.4 or higher.If
selinuxis disabled,overlay2is supported on CentOS 7.2 or higher with kernel version 3.10.0-693 and higher.
Uninstall old Docker versions
The Mirantis Container Runtime package is called docker-ee. Older
versions were called docker or docker-engine. Uninstall all
older versions and associated dependencies. The contents of
/var/lib/docker/ are preserved, including images, containers,
volumes, and networks.
sudo yum remove docker \
                docker-client \
                docker-client-latest \
                docker-common \
                docker-latest \
                docker-latest-logrotate \
                docker-logrotate \
                docker-selinux \
                docker-engine-selinux \
                docker-engine\
                docker-ee\
                docker-ee-cli
Repo install and upgrade
The advantage of using a repository from which to install Mirantis Container Runtime (or any software) is that it provides a certain level of automation. RPM-based distributions such as CentOS, use a tool called YUM that work with your repositories to manage dependencies and provide automatic updates.
Set up the repository
You only need to set up the repository once, after which you can install Mirantis Container Runtime from the repo and repeatedly upgrade as necessary.
Remove existing Docker repositories from
/etc/yum.repos.d/:sudo rm /etc/yum.repos.d/docker*.repo
Temporarily store
https://repos.mirantis.comin an environment variable. This variable assignment does not persist when the session ends:export DOCKERURL="https://repos.mirantis.com"
Store the value of the variable,
DOCKERURL(from the previous step), in ayumvariable in/etc/yum/vars/:sudo -E sh -c 'echo "$DOCKERURL/centos" > /etc/yum/vars/dockerurl'
Store your OS version string in
/etc/yum/vars/dockerosversion:sudo sh -c 'echo "7" > /etc/yum/vars/dockerosversion'
Install the
yum-utilsthat provides the yum-config-manager utility.sudo yum install -y yum-utils
Enable the extras RHEL repository. This ensures access to the
container-selinuxpackage required bydocker-ee.The repository can differ per your architecture and cloud provider , so review the options in this step before running one of the following commands.
For all architectures except IBM Power
sudo yum-config-manager --enable rhel-7-server-extras-rpms
For IBM Power only (little endian)
sudo yum-config-manager --enable extras
sudo subscription-manager repos --enable=rhel-7-for-power-le-extras-rpms
sudo yum makecache fast
sudo yum -y install container-selinux
Depending on cloud provider, you may also need to enable another repository. Refer to the official product documentation for more information.
AWS (where
REGIONis a literal and does not represent the region your machine is running in)Azure
Red Hat Update Infrastructure for on-demand Red Hat Enterprise Linux VMs in Azure
Add the Mirantis Container Runtime stable repository:
sudo -E yum-config-manager \
    --add-repo \
    "$DOCKERURL/centos/docker-ee.repo"
Install from the repository
Install the latest patch release, or proceed to the next step to install a specific version.
sudo yum -y install docker-ee docker-ee-cli \
docker-ee-rootless-extras containerd.io
Note
MCR nodes in rootless mode cannot currently be a member of an MKE cluster.
If prompted to accept the GPG key, verify that the fingerprint matches
77FE DA13 1A83 1D29 A418 D3E8 99E5 FF2E 7668 2BC9, and if so, accept it.To install a specific version of Mirantis Container Runtime (recommended in production), list versions and install:
List and sort the versions available in your repo. This example sorts results by version number, highest to lowest, and is truncated:
sudo yum list docker-ee  --showduplicates | sort -r

docker-ee.x86_64      23.0.ee.2-1.el7.centos      docker-ee-stable-19.03
The list returned depends on which repositories you enabled, and is specific to your version of CentOS (indicated by
.el7in this example).Install a specific version by its fully qualified package name, which is the package name (
docker-ee) plus the version string (2nd column) starting at the first colon (:), up to the first hyphen, separated by a hyphen (-). For example,docker-ee-23.0.1.sudo yum -y install docker-ee-<VERSION_STRING> \ docker-ee-cli-<VERSION_STRING> \ docker-ee-rootless-extras-<VERSION_STRING> containerd.io
Note
MCR nodes in rootless mode cannot currently be a member of an MKE cluster.
For example, if you want to install the 23.0.1 version run the following:
sudo yum -y install docker-ee-23.0.1 docker-ee-cli-23.0.1 containerd.io
Docker is installed but not started. The
dockergroup is created, but no users are added to the group.Start Docker:
sudo systemctl start docker
Verify that Mirantis Container Runtime is installed correctly by running the
hello-worldimage. This command downloads a test image, runs it in a container, prints an informational message, and exits:sudo docker run hello-world
Mirantis Container Runtime is installed and running. Use
sudoto run Docker commands.
Package install and upgrade
To manually install MCR, download the .rpm file for your
release. You need to download a new file each time you want to upgrade MCR.
Install with a package
Go to repos.mirantis.com in your browser.
Navigate to
centos/7/x86_64/stable-<VERSION>/Packagesand download the.rpmfile for the Docker version you want to install.Install MCR.
sudo yum install <path_to_downloaded_centos_package_.rpm>
Docker is installed but not started. The
dockergroup is created, but no users are added to the group.Start Docker
sudo systemctl start docker
Verify that Mirantis Container Runtime is installed correctly by running the
hello-worldimage. This command downloads a test image, runs it in a container, prints an informational message, and exits:sudo docker run hello-world
Mirantis Container Runtime is installed and running. Use
sudoto run Docker commands.
Upgrade with a package
Download the newer package file.
Repeat the installation procedure, using
yum -y upgradeinstead ofyum -y install, and point to the new file.
Enable MCR Telemetry
By default, MCR automatically records and transmits data to Mirantis for monitoring and analysis purposes. The data collected provides the Mirantis Customer Success Organization with information that helps us to better understand the operational use of MCR by our customers. It also provides key feedback in the form of product usage statistics, which enable our product teams to enhance Mirantis products and services.
To disable the telemetry function, set
features.telemetry to false in your /etc/docker/daemon.json file.
Change the setting to true to re-enable telemetry.
{"features":{"telemetry": false}}
Caution
To send the telemetry, verify that dockerd can resolve api.segment.io
and create a TCP (HTTPS) connection on port 443.
Run MCR as a non-root user (Rootless mode)
Note
MCR nodes in rootless mode cannot belong to a MKE cluster.
For information on rootless mode installation and configuration, refer to the Docker documentation Run the Docker daemon as a non-root user (Rootless mode).
Uninstall Mirantis Container Runtime
Uninstall the Mirantis Container Runtime package:
sudo yum -y remove docker-ee \
docker-ee-cli \
containerd.io \
container-selinux
Delete all images, containers, and volumes (because these are not automatically removed from your host):
sudo rm -rf /var/lib/docker
Delete other Docker related resources:
sudo rm -rf /run/docker
sudo rm -rf /etc/docker
Delete any edited configuration files manually.
Install Mirantis Container Runtime for Oracle Linux
There are two ways to install and upgrade Mirantis Container Runtime (MCR).
YUM repository: Set up a Docker repository and install Mirantis Container Runtime from it. This is the recommended approach because installation and upgrades are managed with YUM and easier to do.
RPM package: Download the RPM package, install it manually, and manage upgrades manually. This is useful when installing Mirantis Container Runtime on air-gapped systems with no access to the internet.
Prerequisites
Perform all prerequisites as required prior to installing MCR on Oracle Linux.
Architectures and storage drivers
Mirantis Container Runtime supports the following Oracle Linux 64-bit versions:
Note
MCR does not support the Oracle Linux Unbreakable Enteprise Kernel (UEK).
Mirantis recommends the use of fast storage, such as solid-state media (SSD).
FIPS 140-2 cryptographic module support
Federal Information Processing Standards (FIPS) Publication 140-2 is a United States Federal security requirement for cryptographic modules.
With Mirantis Container Runtime license for versions 23.0.x, Mirantis provides FIPS 140-2 support in Oracle Linux 7.x and 8.x (as per the MCR 23.0 Compatibility Matrix). This includes a FIPS supported cryptographic module. If the Oracle Linux implementation already has FIPS support enabled, FIPS is also automatically enabled in MCR. If FIPS support is not already enabled in your Oracle Linux implementation, refer to the Oracle Linux product documentation for enablement instructions.
To verify the FIPS 140-2 module is enabled in the Linux kernel, confirm
the file /proc/sys/crypto/fips_enabled contains 1.
cat /proc/sys/crypto/fips_enabled
1
Note
FIPS is only supported in Mirantis Container Runtime. MKE and MSR currently do not have support for FIPS 140-2.
You can override FIPS 140-2 compliance on a system that is not in FIPS 140-2 mode. Note, this does not change FIPS 140-2 mode on the system. To override the FIPS 140-2 mode, follow ths steps below.
Create a file called
/etc/systemd/system/docker.service.d/fips-module.conf. Add the
following:
[Service]
Environment="DOCKER_FIPS=1"
Reload the Docker configuration to systemd.
sudo systemctl daemon-reload
Restart the Docker service as root.
sudo systemctl restart docker
To confirm Docker is running with FIPS 140-2 enabled, run the
docker info command.
Disabling FIPS 140-2
If the system has the FIPS 140-2 cryptographic module installed on the operating system, it is possible to disable FIPS 140-2 compliance.
To disable FIPS 140-2 in Docker but not the operating system, set the
value DOCKER_FIPS=0 in the
/etc/systemd/system/docker.service.d/fips-module.conf.
Reload the Docker configuration to systemd.
sudo systemctl daemon-reload
Restart the Docker service as root.
sudo systemctl restart docker
Uninstall old Docker versions
The Mirantis Container Runtime package is called docker-ee. Older
versions were called docker or docker-engine. Uninstall all
older versions and associated dependencies. The contents of
/var/lib/docker/ are preserved, including images, containers,
volumes, and networks.
sudo yum remove docker \
                docker-engine \
                docker-engine-selinux \
                docker-ee-cli \
                checkpolicy \
                libcgroup \
                libseccomp \
                libsemanage-python \
                policycoreutils-python \
                python-IPy \
                setools-libs
Repo install and upgrade
The advantage of using a repository from which to install Mirantis Container Runtime (or any software) is that it provides a certain level of automation. RPM-based distributions such as Oracle Linux, use a tool called YUM that work with your repositories to manage dependencies and provide automatic updates.
Set up the repository
You only need to set up the repository once, after which you can install Mirantis Container Runtime from the repo and repeatedly upgrade as necessary.
Remove existing Docker repositories from
/etc/yum.repos.d/:sudo rm /etc/yum.repos.d/docker*.repo
Temporarily store
https://repos.mirantis.comin an environment variable. This variable assignment does not persist when the session ends:export DOCKERURL="https://repos.mirantis.com"
Store the value of the variable,
DOCKERURL(from the previous step), in ayumvariable in/etc/yum/vars/:sudo -E sh -c 'echo "$DOCKERURL/oraclelinux" > /etc/yum/vars/dockerurl'
Also, store your OS version string in
/etc/yum/vars/dockerosversion. Most users should use7, but you can also use the more specific minor version.sudo sh -c 'echo "7" > /etc/yum/vars/dockerosversion'
Install required packages:
yum-utilsprovides the yum-config-manager utility:sudo yum install -y yum-utils
Enable the
ol7_addonsOracle repository. This ensures access to thecontainer-selinuxpackage required bydocker-ee.sudo yum-config-manager --enable ol7_addons
Add the Mirantis Container Runtime stable repository:
sudo -E yum-config-manager \
--add-repo \
"$DOCKERURL/oraclelinux/docker-ee.repo"
Remove existing Docker repositories from
/etc/yum.repos.d/:sudo rm /etc/yum.repos.d/docker*.repo
Temporarily store
https://repos.mirantis.comin an environment variable. This variable assignment does not persist when the session ends:export DOCKERURL="https://repos.mirantis.com"
Store the value of the variable,
DOCKERURL(from the previous step), in ayumvariable in/etc/yum/vars/:sudo -E sh -c 'echo "$DOCKERURL/oraclelinux" > /etc/yum/vars/dockerurl'
Also, store your OS version string in
/etc/yum/vars/dockerosversion. Most users should use8, but you can also use the more specific minor version.sudo sh -c 'echo "8" > /etc/yum/vars/dockerosversion'
Install the
yum-utilsthat provides the yum-config-manager utility:sudo yum install -y yum-utils
Add the Mirantis Container Runtime stable repository:
sudo -E yum-config-manager \
  --add-repo \
  "$DOCKERURL/oraclelinux/docker-ee.repo"
Install from the repository
Install the latest patch release, or go to the next step to install a specific version:
sudo yum -y install docker-ee docker-ee-cli \
docker-ee-rootless-extras containerd.io
Note
MCR nodes in rootless mode cannot currently be a member of an MKE cluster.
If prompted to accept the GPG key, verify that the fingerprint matches
77FE DA13 1A83 1D29 A418 D3E8 99E5 FF2E 7668 2BC9, and if so, accept it.To install a specific version of Mirantis Container Runtime (recommended in production), list versions and install:
List and sort the versions available in your repo. This example sorts results by version number, highest to lowest, and is truncated:
sudo yum list docker-ee  --showduplicates | sort -r

docker-ee.x86_64      23.0.ee.2-1.el7.oraclelinux      docker-ee-stable-18.09
The list returned depends on which repositories you enabled, and is specific to your version of Oracle Linux (indicated by
.el7in this example).Install a specific version by its fully qualified package name, which is the package name (
docker-ee) plus the version string (2nd column) starting at the first colon (:), up to the first hyphen, separated by a hyphen (-). For example,docker-ee-18.09.1.sudo yum -y install docker-ee-<VERSION_STRING> \ docker-ee-cli-<VERSION_STRING> \ docker-ee-rootless-extras-<VERSION_STRING> containerd.io
Note
MCR nodes in rootless mode cannot currently be a member of an MKE cluster.
For example, if you want to install the 23.0.3 version run the following:
sudo yum -y install docker-ee-23.0.3 docker-ee-cli-23.0.3 containerd.io
Docker is installed but not started. The
dockergroup is created, but no users are added to the group.Start Docker:
sudo systemctl start docker
Verify that Mirantis Container Runtime is installed correctly by running the
hello-worldimage. This command downloads a test image, runs it in a container, prints an informational message, and exits:sudo docker run hello-world
Mirantis Container Runtime is installed and running. Use
sudoto run Docker commands.
Upgrade from the repository
Add the new repository.
Follow the installation instructions and install a new version.
Package install and upgrade
To manually install MCR, download the .rpm file for your
release. You need to download a new file each time you want to upgrade MCR.
Install with a package
Go to repos.mirantis.com in your browser.
Navigate to
oraclelinux/7/x86_64/. Choose your Oracle Linux version, architecture, and MCR version. Download the.rpmfile from thePackagesdirectory.Install MCR.
sudo yum install <path_to_downloaded_oracle_package_.rpm>
Docker is installed but not started. The
dockergroup is created, but no users are added to the group.Start Docker:
sudo systemctl start docker
Verify that Mirantis Container Runtime is installed correctly by running the
hello-worldimage. This command downloads a test image, runs it in a container, prints an informational message, and exits:sudo docker run hello-world
Mirantis Container Runtime is installed and running. Use
sudoto run Docker commands.
Go to repos.mirantis.com in your browser. Navigate to
oraclelinux/. Choose your Oracle Linux version, architecture, and MCR version. Download the.rpmfile from the Packages directory.If you have trouble with selinux using the packages under the 8 directory, try choosing the version-specific directory instead.
Install Mirantis Container Runtime, changing the path below to the path where you downloaded the Docker package.
sudo yum install <path_to_downloaded_oraclelinux_package_.rpm>
Docker is installed but not started. The docker group is created, but no users are added to the group.
Start Docker:
sudo systemctl start docker
Verify that Mirantis Container Runtime is installed correctly by running the hello-world image. This command downloads a test image, runs it in a container, prints an informational message, and exits:
sudo docker run hello-world
Mirantis Container Runtime is now installed and running. Make sure to use sudo to run Docker commands (refer to the Docker documentation for Linux postinstall for information on how to allow non-privileged users to run Docker commands.
Upgrade with a package
Download the newer package file.
Repeat the installation procedure, using
yum -y upgradeinstead ofyum -y install, and point to the new file.
Enable MCR Telemetry
By default, MCR automatically records and transmits data to Mirantis for monitoring and analysis purposes. The data collected provides the Mirantis Customer Success Organization with information that helps us to better understand the operational use of MCR by our customers. It also provides key feedback in the form of product usage statistics, which enable our product teams to enhance Mirantis products and services.
To disable the telemetry function, set
features.telemetry to false in your /etc/docker/daemon.json file.
Change the setting to true to re-enable telemetry.
{"features":{"telemetry": false}}
Caution
To send the telemetry, verify that dockerd can resolve api.segment.io
and create a TCP (HTTPS) connection on port 443.
Run MCR as a non-root user (Rootless mode)
Note
MCR nodes in rootless mode cannot belong to a MKE cluster.
For information on rootless mode installation and configuration, refer to the Docker documentation Run the Docker daemon as a non-root user (Rootless mode).
Uninstall Mirantis Container Runtime
Uninstall the Mirantis Container Runtime package:
sudo yum -y remove docker-ee
Delete all images, containers, and volumes (because these are not automatically removed from your host):
sudo rm -rf /var/lib/docker
Delete other Docker related resources:
sudo rm -rf /run/docker sudo rm -rf /var/run/docker sudo rm -rf /etc/docker``
You must delete any edited configuration files manually.
Install Mirantis Container Runtime for Red Hat Enterprise Linux
There are two ways to install and upgrade Mirantis Container Runtime (MCR).
YUM repository: Set up a Docker repository and install Mirantis Container Runtime from it. This is the recommended approach because installation and upgrades are managed with YUM and easier to do.
RPM package: Download the RPM package, install it manually, and manage upgrades manually. This is useful when installing Mirantis Container Runtime on air-gapped systems with no access to the internet.
Prerequisites
Perform all prerequisites as required prior to installing MCR on Red Hat Enterprise Linux.
Architectures and storage drivers
Mirantis Container Runtime supports Red Hat Enterprise Linux 64-bit, versions
7.4 and higher running on x86_64. Refer to the
MCR 23.0 Compatibility Matrix for specific details.
On Red Hat Enterprise Linux, Mirantis Container Runtime supports the
overlay2 storage driver. The following limitations apply:
OverlayFS: If
selinuxis enabled, theoverlay2storage driver is supported on RHEL 7.4 or higher.If
selinuxis disabled,overlay2is supported on RHEL 7.2 or higher with kernel version 3.10.0-693 and higher.
FIPS 140-2 cryptographic module support
Federal Information Processing Standards (FIPS) Publication 140-2 is a United States Federal security requirement for cryptographic modules.
With Mirantis Container Runtime license for versions 23.0.x, Mirantis provides FIPS 140-2 support in RHEL 7.x, 8.x, and 9.x (as per the MCR 23.0 Compatibility Matrix). This includes a FIPS supported cryptographic module. If the RHEL implementation already has FIPS support enabled, FIPS is also automatically enabled in MCR. If FIPS support is not already enabled in your RHEL implementation, see the Red Hat Product Documentation for instructions on how to enable it.
To verify the FIPS 140-2 module is enabled in the Linux kernel, confirm
the file /proc/sys/crypto/fips_enabled contains 1.
cat /proc/sys/crypto/fips_enabled
1
Note
FIPS is only supported in Mirantis Container Runtime. MKE and MSR currently do not have support for FIPS 140-2.
You can override FIPS 140-2 compliance on a system that is not in FIPS 140-2 mode. Note, this does not change FIPS 140-2 mode on the system. To override the FIPS 140-2 mode, follow ths steps below.
Create a file called
/etc/systemd/system/docker.service.d/fips-module.conf. Add the
following:
[Service]
Environment="DOCKER_FIPS=1"
Reload the Docker configuration to systemd.
sudo systemctl daemon-reload
Restart the Docker service as root.
sudo systemctl restart docker
To confirm Docker is running with FIPS 140-2 enabled, run the
docker info command.
Disabling FIPS 140-2
If the system has the FIPS 140-2 cryptographic module installed on the operating system, it is possible to disable FIPS 140-2 compliance.
To disable FIPS 140-2 in Docker but not the operating system, set the
value DOCKER_FIPS=0 in the
/etc/systemd/system/docker.service.d/fips-module.conf.
Reload the Docker configuration to systemd.
sudo systemctl daemon-reload
Restart the Docker service as root.
sudo systemctl restart docker
Uninstall old Docker versions
The Mirantis Container Runtime package is called docker-ee. Older
versions were called docker or docker-engine. Uninstall all
older versions and associated dependencies. The contents of
/var/lib/docker/ are preserved, including images, containers,
volumes, and networks.
sudo yum remove docker \
                docker-client \
                docker-client-latest \
                docker-common \
                docker-latest \
                docker-latest-logrotate \
                docker-logrotate \
                docker-selinux \
                docker-engine-selinux \
                docker-engine
Repo install and upgrade
The advantage of using a repository from which to install Mirantis Container Runtime (or any software) is that it provides a certain level of automation. RPM-based distributions such as Red Hat Enterprise Linux, use a tool called YUM that work with your repositories to manage dependencies and provide automatic updates.
Set up the repository
You only need to set up the repository once, after which you can install Mirantis Container Runtime from the repo and repeatedly upgrade as necessary.
Remove existing Docker repositories from
/etc/yum.repos.d/:sudo rm /etc/yum.repos.d/docker*.repo
Temporarily store
https://repos.mirantis.comin an environment variable. This variable assignment does not persist when the session ends:export DOCKERURL="https://repos.mirantis.com"
Store the value of the variable,
DOCKERURL(from the previous step), in ayumvariable in/etc/yum/vars/:sudo -E sh -c 'echo "$DOCKERURL/rhel" > /etc/yum/vars/dockerurl'
Also, store your OS version string in
/etc/yum/vars/dockerosversion. Most users should use7,8, or9but you can also use the more specific minor version, starting from7.2.sudo sh -c 'echo "7" > /etc/yum/vars/dockerosversion'
Install the
yum-utilsthat provides the yum-config-manager utility.sudo yum install -y yum-utils
Enable the
extrasRHEL repository. This ensures access to thecontainer-selinuxpackage required bydocker-ee.The repository can differ per your architecture and cloud provider, so review the options in this step before running:
For all architectures except IBM Power:
sudo yum-config-manager --enable rhel-7-server-extras-rpms
For IBM Power only (little endian):
sudo yum-config-manager --enable extras
  sudo subscription-manager repos --enable=rhel-7-for-power-le-extras-rpms
  sudo yum makecache fast
  sudo yum -y install container-selinux
Depending on cloud provider, you may also need to enable another repository:
For AWS:
sudo yum-config-manager --enable rhel-7-server-rhui-extras-rpms
For Azure:
sudo yum-config-manager --enable rhui-rhel-7-server-rhui-extras-rpms
Add the Mirantis Container Runtime stable repository:
sudo -E yum-config-manager \
     --add-repo \
     "$DOCKERURL/rhel/docker-ee.repo"
Remove existing Docker repositories from
/etc/yum.repos.d/:sudo rm /etc/yum.repos.d/docker*.repo
Temporarily store
https://repos.mirantis.comin an environment variable. This variable assignment does not persist when the session ends:export DOCKERURL="https://repos.mirantis.com"
Store the value of the variable,
DOCKERURL(from the previous step), in ayumvariable in/etc/yum/vars/:sudo -E sh -c 'echo "$DOCKERURL/rhel" > /etc/yum/vars/dockerurl'
Also, store your OS version string in
/etc/yum/vars/dockerosversion. Most users should use8, but you can also use the more specific minor version.sudo sh -c 'echo "8" > /etc/yum/vars/dockerosversion'
Install the
yum-utilsthat provides the yum-config-manager utility:sudo yum install -y yum-utils
Add the Mirantis Container Runtime stable repository:
sudo -E yum-config-manager \
  --add-repo \
  "$DOCKERURL/rhel/docker-ee.repo"
Remove existing Docker repositories from
/etc/yum.repos.d/:sudo rm /etc/yum.repos.d/docker*.repo
Temporarily store
https://repos.mirantis.comin an environment variable. This variable assignment does not persist when the session ends:export DOCKERURL="https://repos.mirantis.com"
Store the value of the variable,
DOCKERURL(from the previous step), in ayumvariable in/etc/yum/vars/:sudo -E sh -c 'echo "$DOCKERURL/rhel" > /etc/yum/vars/dockerurl'
Also, store your OS version string in
/etc/yum/vars/dockerosversion. Most users should use9, but you can also use the more specific minor version.sudo sh -c 'echo "9" > /etc/yum/vars/dockerosversion'
Install the
yum-utilsthat provides the yum-config-manager utility:sudo yum install -y yum-utils
Add the Mirantis Container Runtime stable repository:
sudo -E yum-config-manager \
  --add-repo \
  "$DOCKERURL/rhel/docker-ee.repo"
Install from the repository
Install the latest patch release, or proceed to the next step to install a specific version.
sudo yum -y install docker-ee docker-ee-cli \
docker-ee-rootless-extras containerd.io
Note
MCR nodes in rootless mode cannot currently be a member of an MKE cluster.
If prompted to accept the GPG key, verify that the fingerprint matches
77FE DA13 1A83 1D29 A418 D3E8 99E5 FF2E 7668 2BC9, and if so, accept it.To install a specific version of Mirantis Container Runtime (recommended in production), list versions and install:
List and sort the versions available in your repo. This example sorts results by version number, highest to lowest, and is truncated:
sudo yum list docker-ee  --showduplicates | sort -r

docker-ee.x86_64      23.0.ee.2-1.el7.rhel      docker-ee-stable-18.09
The list returned depends on which repositories you enabled, and is specific to your version of Red Hat Enterprise Linux (indicated by
.el7in this example).Install a specific version by its fully qualified package name, which is the package name (
docker-ee) plus the version string (2nd column) starting at the first colon (:), up to the first hyphen, separated by a hyphen (-). For example,docker-ee-23.0.1.sudo yum -y install docker-ee-<VERSION_STRING> \ docker-ee-cli-<VERSION_STRING> \ docker-ee-rootless-extras-<VERSION_STRING> containerd.io
Note
MCR nodes in rootless mode cannot currently be a member of an MKE cluster.
For example, if you want to install the 23.0.1 version run the following:
sudo yum -y install docker-ee-23.0.1 docker-ee-cli-23.0.1 containerd.io
Docker is installed but not started. The
dockergroup is created, but no users are added to the group.Start Docker:
sudo systemctl start docker
Verify that Mirantis Container Runtime is installed correctly by running the
hello-worldimage. This command downloads a test image, runs it in a container, prints an informational message, and exits:sudo docker run hello-world
Mirantis Container Runtime is installed and running. Use sudo to run Docker
commands.
Upgrade from the repository
Add the new repository.
Follow the installation instructions and install a new version.
Package install and upgrade
To manually install Mirantis Container Runtime, download the .rpm file for
your release. You need to download a new file each time you want to upgrade.
Install with a package
Enable the extras RHEL repository. This ensures access to the
container-selinuxpackage which is required bydocker-ee:sudo yum-config-manager --enable rhel-7-server-extras-rpms
Alternately, obtain that package manually from Red Hat. There is no way to publicly browse this repository.
Go to repos.mirantis.com in your browser. Navigate to
rhel/. Choose your Red Hat Enterprise Linux version, architecture, and Docker version. Download the.rpmfile from thePackagesdirectory.If you have trouble with
selinuxusing the packages under the 7 directory, try choosing the version-specific directory instead, such as 7.3.Install MCR, changing the path below to the path where you downloaded the Docker package.
sudo yum install <path_to_downloaded_rhel_package_.rpm>
Docker is installed but not started. The docker group is created, but no users are added to the group.
Start Docker:
sudo systemctl start docker
Verify that Mirantis Container Runtime is installed correctly by running the hello-world image. This command downloads a test image, runs it in a container, prints an informational message, and exits:
sudo docker run hello-world
Mirantis Container Runtime is now installed and running. Make sure to use sudo to run Docker commands (refer to the Docker documentation for Linux postinstall for information on how to allow non-privileged users to run Docker commands.
Go to repos.mirantis.com in your browser. Navigate to
rhel/. Choose your Red Hat Enterprise Linux version, architecture, and Docker version. Download the.rpmfile from the Packages directory.If you have trouble with selinux using the packages under the 8 directory, try choosing the version-specific directory instead.
Install Mirantis Container Runtime, changing the path below to the path where you downloaded the Docker package.
sudo yum install <path_to_downloaded_rhel_package_.rpm>
Docker is installed but not started. The docker group is created, but no users are added to the group.
Start Docker:
sudo systemctl start docker
Verify that Mirantis Container Runtime is installed correctly by running the hello-world image. This command downloads a test image, runs it in a container, prints an informational message, and exits:
sudo docker run hello-world
Mirantis Container Runtime is now installed and running. Make sure to use sudo to run Docker commands (refer to the Docker documentation for Linux postinstall for information on how to allow non-privileged users to run Docker commands.
Go to repos.mirantis.com in your browser. Navigate to
rhel/. Choose your Red Hat Enterprise Linux version, architecture, and Docker version. Download the.rpmfile from the Packages directory.If you have trouble with selinux using the packages under the 9 directory, try choosing the version-specific directory instead.
Install Mirantis Container Runtime, changing the path below to the path where you downloaded the Docker package.
sudo yum install <path_to_downloaded_rhel_package_.rpm>
Docker is installed but not started. The docker group is created, but no users are added to the group.
Start Docker:
sudo systemctl start docker
Verify that Mirantis Container Runtime is installed correctly by running the hello-world image. This command downloads a test image, runs it in a container, prints an informational message, and exits:
sudo docker run hello-world
Mirantis Container Runtime is now installed and running. Make sure to use sudo to run Docker commands (refer to the Docker documentation for Linux postinstall for information on how to allow non-privileged users to run Docker commands.
Upgrade with a package
Download the newer package file.
Repeat the installation procedure, using
yum -y upgradeinstead ofyum -y install, and point to the new file.
Enable MCR Telemetry
By default, MCR automatically records and transmits data to Mirantis for monitoring and analysis purposes. The data collected provides the Mirantis Customer Success Organization with information that helps us to better understand the operational use of MCR by our customers. It also provides key feedback in the form of product usage statistics, which enable our product teams to enhance Mirantis products and services.
To disable the telemetry function, set
features.telemetry to false in your /etc/docker/daemon.json file.
Change the setting to true to re-enable telemetry.
{"features":{"telemetry": false}}
Caution
To send the telemetry, verify that dockerd can resolve api.segment.io
and create a TCP (HTTPS) connection on port 443.
Run MCR as a non-root user (Rootless mode)
Note
MCR nodes in rootless mode cannot belong to a MKE cluster.
For information on rootless mode installation and configuration, refer to the Docker documentation Run the Docker daemon as a non-root user (Rootless mode).
Uninstall Mirantis Container Runtime
Uninstall the Mirantis Container Runtime package:
sudo yum -y remove docker-ee
Delete all images, containers, and volumes (because these are not automatically removed from your host):
sudo rm -rf /var/lib/docker
Delete other Docker related resources:
sudo rm -rf /run/docker
sudo rm -rf /var/run/docker
sudo rm -rf /etc/docker
You must delete any edited configuration files manually.
Install Mirantis Container Runtime for SLES
Prerequisites
Perform all prerequisites as required prior to installing MCR on SLES.
OS requirements
To install Mirantis Container Runtime, you need the 64-bit version of SLES 12.x
or later, running on the x86_64 architecture. Mirantis Container Runtime is
not supported on OpenSUSE.
The only supported storage driver for Mirantis Container Runtime on SLES
is Btrfs, which is used by default if the underlying filesystem
hosting /var/lib/docker/ is a BTRFS filesystem.
Note
IBM Z (s390x) is supported for Mirantis Container Runtime 17.06.xx only.
Firewall configuration
Docker creates a DOCKER iptables chain when it starts. The SUSE
firewall may block access to this chain, which can prevent you from
running containers with published ports. You may see errors such as the
following:
WARNING: IPv4 forwarding is disabled. Networking will not work.
docker: Error response from daemon: driver failed programming external
        connectivity on endpoint adoring_ptolemy
        (0bb5fa80bc476f8a0d343973929bb3b7c039fc6d7cd30817e837bc2a511fce97):
        (iptables failed: iptables --wait -t nat -A DOCKER -p tcp -d 0/0 --dport 80 -j DNAT --to-destination 172.17.0.2:80 ! -i docker0: iptables: No chain/target/match by that name.
 (exit status 1)).
If you see errors like this, adjust the start-up script order so that the firewall is started before Docker, and Docker stops before the firewall stops. Refer to the SLES systemd daemon documentation.
Uninstall old versions
Older versions of Docker were called docker or docker-engine. If
you use OS images from a cloud provider, you may need to remove the
runc package, which conflicts with Docker. If these are installed,
uninstall them, along with associated dependencies.
sudo zypper rm docker docker-engine runc
If removal of the docker-engine package fails, use the following
command instead:
sudo rpm -e docker-engine
It’s OK if zypper reports that none of these packages are installed.
The contents of /var/lib/docker/, including images, containers,
volumes, and networks, are preserved. The Mirantis Container Runtime
package is now called docker-ee.
Configure the Btrfs filesystem
By default, SLES formats the / filesystem using Btrfs, so most
people do not not need to do the steps in this section. If you use OS
images from a cloud provider, you may need to do this step. If the
filesystem that hosts /var/lib/docker/ is not a BTRFS
filesystem, you must configure a BTRFS filesystem and mount it on
/var/lib/docker/.
Check whether
/(or/var/or/var/lib/or/var/lib/docker/if they are separate mount points) are formatted using Btrfs. If you do not have separate mount points for any of these, a duplicate result for/is returned.df -T / /var /var/lib /var/lib/docker
You need to complete the rest of these steps only if one of the following is true:
You have a separate
/var/filesystem that is not formatted with BtrfsYou do not have a separate
/var/or/var/lib/or/var/lib/docker/filesystem and/is not formatted with Btrfs
If
/var/lib/dockeris already a separate mount point and is not formatted with Btrfs, back up its contents so that you can restore them after step 3.Format your dedicated block device or devices as a Btrfs filesystem. This example assumes that you are using two block devices called
/dev/xvdfand/dev/xvdg. Make sure you are using the right device names.Important
Double-check the block device names because this is a destructive operation.
sudo mkfs.btrfs -f /dev/xvdf /dev/xvdg
There are many more options for Btrfs, including striping and RAID. See the Btrfs documentation.
Mount the new Btrfs filesystem on the
/var/lib/docker/mount point. You can specify any of the block devices used to create the Btrfs filesystem.sudo mount -t btrfs /dev/xvdf /var/lib/docker
Don’t forget to make the change permanent across reboots by adding an entry to
/etc/fstab.If
/var/lib/dockerpreviously existed and you backed up its contents during step 1, restore them onto/var/lib/docker.
Install Mirantis Container Runtime
You can install Mirantis Container Runtime in different ways, depending on your needs.
Most users set up Docker’s repositories and install from them, for ease of installation and upgrade tasks. This is the recommended approach.
Some users download the RPM package and install it manually and manage upgrades completely manually. This is useful in situations such as installing Docker on air-gapped systems with no access to the internet.
Install using the repository
Before you install Mirantis Container Runtime for the first time on a new host machine, you need to set up the Docker repository. Afterward, you can install and update Docker from the repository.
Set up the repository
Temporarily add the
$DOCKER_EE_BASE_URLand$DOCKER_EE_URLvariables into your environment. This only persists until you log out of the session.DOCKER_EE_BASE_URL="https://repos.mirantis.com" DOCKER_EE_URL="${DOCKER_EE_BASE_URL}/sles/<SLES_VERSION>/<ARCH>/stable-<DOCKER_VERSION>"
And substitute the following:
SLES_VERSIONis15or12.3.ARCHisx86_64.DOCKER_VERSIONis23.0
As an example, your command should look like:
DOCKER_EE_BASE_URL="https://repos.mirantis.com"
DOCKER_EE_URL="${DOCKER_EE_BASE_URL}/sles/15/x86_64/stable-23.0"
Use the following command to set up the stable repository. Use the command as-is. It works because of the variable you set in the previous step.
sudo zypper addrepo $DOCKER_EE_URL docker-ee-stable
Import the GPG key from the repository.
sudo rpm --import "${DOCKER_EE_BASE_URL}/sles/gpg"
Install Mirantis Container Runtime
Update the
zypperpackage index.sudo zypper refresh
If this is the first time you have refreshed the package index since adding the Docker repositories, you are prompted to accept the GPG key, and the key’s fingerprint is shown. Verify that the fingerprint matches
77FE DA13 1A83 1D29 A418 D3E8 99E5 FF2E 7668 2BC9and if so, accept the key.Install the latest patch release, or proceed to the next step to install a specific version.
sudo yum -y install docker-ee docker-ee-cli \
docker-ee-rootless-extras containerd.io
Note
MCR nodes in rootless mode cannot currently be a member of an MKE cluster.
Start Docker.
SLES 15:
sudo systemctl start docker
SLES 12:
sudo service docker start
On production systems, you should install a specific version of Mirantis Container Runtime instead of always using the latest. List the available versions. The following example only lists binary packages and is truncated. To also list source packages, omit the
-t packageflag from the command.zypper search -s --match-exact -t package docker-ee
The contents of the list depend upon which repositories you have enabled. Choose a specific version to install. The fourth column is the version string. The last column is the repository name, which indicates which repository the package is from and by extension its stability level. To install a specific version, append the version string to the package name and separate them by a hyphen (
-):On SLES15
Requires the addition of the
docker-ee-rootless-extraspackage.sudo zypper install docker-ee-<VERSION_STRING> \ docker-ee-cli-<VERSION_STRING> \ docker-ee-rootless-extras-<VERSION_STRING> containerd.io
Note
MCR nodes in rootless mode cannot currently be a member of an MKE cluster.
On SLES12
sudo zypper install docker-ee-<VERSION_STRING> \
docker-ee-cli-<VERSION_STRING> containerd.io
Docker is installed but not started. The
dockergroup is created, but no users are added to the group.Configure Docker to use the Btrfs filesystem. This is only required if the ``/`` filesystem is not using BTRFS. However, explicitly specifying the
storage-driverhas no harmful side effects.Edit the file
/etc/docker/daemon.json(create it if it does not exist) and add the following contents:{ "storage-driver": "btrfs" }
Save and close the file.
Start Docker.
sudo service docker start
Verify that Docker is installed correctly by running the
hello-worldimage.sudo docker run hello-world
This command downloads a test image and runs it in a container. When the container runs, it prints an informational message and exits.
Mirantis Container Runtime is installed and running. You need to use
sudo to run Docker commands.
Upgrade Mirantis Container Runtime
To upgrade Mirantis Container Runtime, follow the steps below:
If upgrading to a new major Mirantis Container Runtime version, such as when going from Docker 20.10.x to Docker 23.0.x, add the new repository.
Run
sudo zypper refresh.Follow the installation instructions, choosing the new version you want to install.
Install from a package
If you cannot use the official Docker repository to install Mirantis Container
Runtime, you can download the .rpm file for your release and install it
manually. You need to download a new file each time you want to upgrade Docker.
Go to repos.mirantis.com in your browser.
Go to
sles/15/x86_64/stable-23.0/and choose the directory corresponding to the desired Mirantis Container Runtime version. Download the.rpmfile from thePackagesdirectory.Import the official Docker official GPG key.
sudo rpm --import https://repos.mirantis.com/sles/gpg
Install Docker, changing the path below to the path where you downloaded the Docker package.
sudo zypper install <path_to_downloaded_sles_package_.rpm>
Docker is installed but not started. The
dockergroup is created, but no users are added to the group.Configure Docker to use the Btrfs filesystem. This is only required if the ``/`` filesystem is not using Btrfs. However, explicitly specifying the
storage-driverhas no harmful side effects.Edit the file
/etc/docker/daemon.json(create it if it does not exist) and add the following contents:{ "storage-driver": "btrfs" }
Save and close the file.
Start Docker.
sudo service docker start
Verify that Docker is installed correctly by running the
hello-worldimage.sudo docker run hello-world
This command downloads a test image and runs it in a container. When the container runs, it prints an informational message and exits.
Mirantis Container Runtime is installed and running. You need to use
sudo to run Docker commands.
Upgrade Mirantis Container Runtime
To upgrade Mirantis Container Runtime, download the newer package file
and repeat the installation procedure,
using zypper update instead of zypper install, and pointing to
the new file.
Enable MCR Telemetry
By default, MCR automatically records and transmits data to Mirantis for monitoring and analysis purposes. The data collected provides the Mirantis Customer Success Organization with information that helps us to better understand the operational use of MCR by our customers. It also provides key feedback in the form of product usage statistics, which enable our product teams to enhance Mirantis products and services.
To disable the telemetry function, set
features.telemetry to false in your /etc/docker/daemon.json file.
Change the setting to true to re-enable telemetry.
{"features":{"telemetry": false}}
Caution
To send the telemetry, verify that dockerd can resolve api.segment.io
and create a TCP (HTTPS) connection on port 443.
Run MCR as a non-root user (Rootless mode)
Note
MCR nodes in rootless mode cannot belong to a MKE cluster.
For information on rootless mode installation and configuration, refer to the Docker documentation Run the Docker daemon as a non-root user (Rootless mode).
Uninstall Mirantis Container Runtime
Uninstall the Mirantis Container Runtime package using the command below.
sudo zypper rm docker-ee docker-ee-cli containerd.io
Images, containers, volumes, or customized configuration files on your host are not automatically removed. To delete all images, containers, and volumes.
sudo rm -rf /var/lib/docker/*
If you used a separate BTRFS filesystem to host the contents of
/var/lib/docker/, you can unmount and format the Btrfs filesystem.
You must delete any edited configuration files manually.
Install Mirantis Container Runtime for Ubuntu
Prerequisites
Perform all prerequisites as required prior to installing MCR on Ubuntu.
Uninstall old versions
Use the apt-get remove command to uninstall Docker Community versions, if present.
sudo apt-get remove docker docker-engine docker-ce docker-ce-cli docker.io
The apt-get command may report that none of the packages are installed.
Note
The contents of /var/lib/docker/, including images, containers,
volumes, and networks, are preserved.
Extra steps for aufs
For Ubuntu 16.04 and higher, the Linux kernel includes support for overlay2, and Mirantis Container Runtime uses it as the default storage driver. If you need to use aufs instead, it must be manually configured.
Install Mirantis Container Runtime
Mirantis Container Runtime can be installed either by using Mirantis repositories, or by downloading and installing the DEB package and thereafter manually managing all upgrades. The Mirantis repository method is recommended, for the ease it lends in terms of both installation and upgrade tasks. The more manual DEB package approach, however, is useful in certain situations, such as installing MCR on air-gapped system that have no access to the Internet.
Continue from this point if you are using Mirantis repositories on Ubuntu, or to install from a Debian package go to Install from a Debian package.
Install using the repository
To install Mirantis Container Runtime on a new host machine using the Mirantis repository you must first set the repository up on the machine.
Set up the repository
Update the
aptpackage index.sudo apt-get update
Install packages to allow
aptto use a repository over HTTPS.sudo apt-get install \ apt-transport-https \ ca-certificates \ curl \ software-properties-common
Temporarily store
https://repos.mirantis.comin an environment variable. This variable assignment does not persist when the session ends:DOCKER_EE_URL="https://repos.mirantis.com"
Temporarily add a
$DOCKER_EE_VERSIONvariable into your environment.DOCKER_EE_VERSION=23.0
Add Docker’s official GPG key using your customer Mirantis Container Runtime repository URL.
curl -fsSL "${DOCKER_EE_URL}/ubuntu/gpg" | sudo apt-key add -
Verify that you now have the key with the fingerprint
DD91 1E99 5A64 A202 E859 07D6 BC14 F10B 6D08 5F96, by searching for the last eight characters of the fingerprint. Use the command as-is. It works because of the variable you set earlier.sudo apt-key fingerprint 6D085F96 pub 4096R/0EBFCD88 2017-02-22 Key fingerprint = DD91 1E99 5A64 A202 E859 07D6 BC14 F10B 6D08 5F96 uid Docker Release (EE deb) <docker@docker.com> sub 4096R/6D085F96 2017-02-22
Set up the stable repository, using the following command as-is (which works due to the variable set up earlier in the process).
sudo add-apt-repository \
  "deb [arch=$(dpkg --print-architecture)] $DOCKER_EE_URL/ubuntu \
  $(lsb_release -cs) \
  stable-$DOCKER_EE_VERSION"
Note
The included lsb_release -cs sub command returns the name of your Ubuntu distribution, for example,
focal.
Install Mirantis Container Runtime
Update the
aptpackage index.sudo apt-get update
Install the latest version of Mirantis Container Runtime and containerd, or go to the next step to install a specific version. Any existing installation of MCR is replaced.
sudo apt-get install docker-ee docker-ee-cli docker-ee-rootless-extras containerd.io
Warning
If you have multiple Mirantis repositories enabled, installing or updating without specifying a version in the
apt-get installor apt-get update command always installs the highest possible version, which may not be appropriate for your stability needs.On production systems, you should install a specific version of Mirantis Container Runtime instead of always using the latest. The following output is truncated.
apt-cache madison docker-ee

docker-ee | *:23.0~ee-0~ubuntu-focal | https://repos.mirantis.com/ubuntu focal/stable amd64 Packages
The contents of the list depend upon which repositories are enabled, and are specific to your version of Ubuntu (indicated by the
focalsuffix on the version, in this example). Choose a specific version to install. The second column is the version string. The third column is the repository name, which indicates which repository the package is from and by extension its stability level. To install a specific version, append the version string to the package name and separate them by an equals sign (=).sudo apt-get install docker-ee=<VERSION_STRING> \ docker-ee-cli=<VERSION_STRING> \ docker-ee-rootless-extras=<VERSION_STRING> containerd.io
Note
MCR nodes in rootless mode cannot currently be a member of an MKE cluster.
The MCR daemon starts automatically.
Verify that MCR is installed correctly by running the
hello-worldimage.sudo docker run hello-world
This command downloads a test image and runs it in a container. When the container runs, it prints an informational message and exits.
Mirantis Container Runtime is installed and running. The docker
group is created but no users are added to it. You need to use sudo
to run MCR commands.
Upgrade Mirantis Container Runtime
If upgrading to a new major Mirantis Container Runtime version (such as when going from version 20.10 to 23.0), add the new repository.
Run
sudo apt-get update.Follow the installation instructions, choosing the new version you want to install.
Install from a Debian package
If you cannot use the Mirantis repository to install Mirantis Container
Runtime, you can download the .deb files for your release and install them
manually. You need to download a new file or set of files each time you want to
upgrade Mirantis Container Runtime.
Go to repos.mirantis.com in your browser.
Go to
/ubuntu/dists/bionic/pool/stable-<VERSION>/amd64/and download the.debfile for the Ubuntu release and architecture you want to install.Note
Starting with 19.03, you have to download three
.debfiles. They aredocker-ee-cli_<version>.deb,containerd.io_<version>.deb, anddocker-ee_<version>.deb.Install MCR, changing the path below to the path where you downloaded the Mirantis Container Runtime package.
sudo dpkg -i <path_to_downloaded_ubuntu_package_.deb>
Or, if you downloaded the three
.debfiles, you must install them in the following order:sudo dpkg -i /path/to/docker-ee-cli_<version>.deb sudo dpkg -i /path/to/containerd.io_<version>.deb sudo dpkg -i /path/to/docker-ee_<version>.deb
The MCR daemon starts automatically.
Verify that MCR is installed correctly by running the
hello-worldimage.sudo docker run hello-world
This command downloads a test image and runs it in a container. When the container runs, it prints an informational message and exits.
Mirantis Container Runtime is installed and running. The docker group is
created but no users are added to it. You need to use sudo to run MCR
commands.
Upgrade Mirantis Container Runtime
To upgrade Mirantis Container Runtime, download the newer package file and repeat the installation procedure, pointing to the new file.
Enable MCR Telemetry
By default, MCR automatically records and transmits data to Mirantis for monitoring and analysis purposes. The data collected provides the Mirantis Customer Success Organization with information that helps us to better understand the operational use of MCR by our customers. It also provides key feedback in the form of product usage statistics, which enable our product teams to enhance Mirantis products and services.
To disable the telemetry function, set
features.telemetry to false in your /etc/docker/daemon.json file.
Change the setting to true to re-enable telemetry.
{"features":{"telemetry": false}}
Caution
To send the telemetry, verify that dockerd can resolve api.segment.io
and create a TCP (HTTPS) connection on port 443.
Run MCR as a non-root user (Rootless mode)
Note
MCR nodes in rootless mode cannot belong to a MKE cluster.
For information on rootless mode installation and configuration, refer to the Docker documentation Run the Docker daemon as a non-root user (Rootless mode).
Uninstall Mirantis Container Runtime
Uninstall the Mirantis Container Runtime package.
sudo apt-get purge docker-ee docker-ee-cli containerd.io
Images, containers, volumes, or customized configuration files on your host are not automatically removed. Run the following command to delete all images, containers, and volumes.
sudo rm -rf /var/lib/docker
You must delete any edited configuration files manually.
Install MCR on Windows Servers
Mirantis Container Runtime (MCR) enables native Docker containers on Windows Server. The Mirantis Container Runtime installation package includes everything you need to run Docker on Windows Server. This topic describes pre-install considerations, and how to download and install Mirantis Container Runtime.
Note
Refer to the MCR 23.0 Compatibility Matrix for information on which Windows Server versions are supported.
System requirements
Windows OS CPU and RAM requirements that must be met are specified in the Windows Server Requirements.
Install MCR with an Internet connection
Mirantis provides an installation script to ease MCR installation on a Windows Server machine. The script uses default values, thus allowing it to be run without configuration. You can, however, override the default values with script parameters and env variables. Parameter values take precedence over env variables. Both take precedence over inbuilt default values.
The installation script must be executed from an elevated command prompt. If you want to change the default daemon values, ensure that you have the alternative cofigurations and the related collateral in place prior to executing the script. For example, if you want to enable TLS, store the certificates and write the daemon configuration file before invoking the script.
Obtain the installation script for MCR for Windows Server at https://get.mirantis.com/install.ps1.
(Optional): Allow downloaded script files to run in the current session
Set-ExecutionPolicy -ExecutionPolicy RemoteSigned -Force -Scope Process;
Run the installation script.
The installer will issue a prompt, should it require a reboot.
Note
The installation script installs a numerically higher version by default. The latest tag, however, explicitly denotes the binary that was last pushed, which may not be a numerically higher version.
Test your MCR installation by running the
hello-worldcontainer.docker run hello-world:nanoserver
The container starts, prints the
Hello from Docker!message, and then exits.Unable to find image 'hello-world:nanoserver' locally nanoserver: Pulling from library/hello-world bce2fbc256ea: Pull complete 3ac17e2e6106: Pull complete 8cac44e17f16: Pull complete 5e160e4d8db3: Pull complete Digest: sha256:25eac12ba40f7591969085ab3fb9772e8a4307553c14ea72d0e6f98b2c8ced9d Status: Downloaded newer image for hello-world:nanoserver Hello from Docker! This message shows that your installation appears to be working correctly.
FIPS 140-2 cryptographic module support
Federal Information Processing Standards (FIPS) Publication 140-2 is a United States Federal security requirement for cryptographic modules.
MCR provides FIPS 140-2 support in Windows Server, which includes a FIPS supported cryptographic module. If the Windows implementation already has FIPS support enabled, FIPS is automatically enabled in MCR.
Note
FIPS 140-2 is only supported in MCR. MKE and MSR currently do not support FIPS 140-2.
To enable FIPS 140-2 compliance on a system that is not in FIPS 140-2 mode, run the following command in PowerShell:
[System.Environment]::SetEnvironmentVariable("DOCKER_FIPS", "1", "Machine")
You can also enable FIPS 140-2 mode using the Windows Registry. To update the pertinent registry key, execute the following PowerShell command as an Administrator:
Set-ItemProperty -Path "HKLM:\System\CurrentControlSet\Control\Lsa\FipsAlgorithmPolicy\" -Name "Enabled" -Value "1"
Restart the Docker service.
Stop-Service docker
Start-Service docker
To confirm Docker is running with FIPS-140-2 enabled, run the docker info.
Labels:
 com.docker.security.fips=enabled
Note
FIPS-140-2 compliance can be disabled if the FIPS-140-2 cryptographic
module is installed on the operating system. To disable FIPS-140-2 in
Docker but not the operating system, set the value "DOCKER_FIPS","0" in
[System.Environment].\
Install MCR offline
If your hardware is air-gapped you can still install MCR. To do so, download the installer and copy the files to the air-gapped machine (the default installation assumes that the zipped files and script are in the same location).
On any Internet connected system, go to https://get.mirantis.com/install.ps1 to obtain the MCR for Windows Server installation script.
(Optional): Allow the downloaded script files to run in the current session.
Set-ExecutionPolicy -ExecutionPolicy RemoteSigned -Force -Scope Process;
Run the installation script with the
-DownloadOnlyparameter. As per the parameter name, this action only downloads the zip file (no installation is performed)..\<installation-script> -DownloadOnly
Copy the installation script and the installation zip file over to the air-gapped machine and run the install with the
-Offlineparameter..\<installation-script> -Offline
If prompted, reboot the installer.
Install a specific version
Use the following three parameters separately or in tandem to install a specific version of MCR for Windows Server.
Caution
MCR does not support using earlier versions of containerd than the version with which it is released. For supported containerd versions, refer to the Major component versions section of the required MCR version in Release Notes.
.\install.ps1 -Channel
.\install.ps1 -ContainerdVersion
.\install.ps1 -DockerVersion
For example, the installation script will always use the latest GA.
For parameter descriptions, refer to Install script usage.
Update MCR
To update MCR to the most recent release, download the latest copy of the installation script and rerun the installation steps.
Obtain the installation script for MCR for Windows Server at https://get.mirantis.com/install.ps1.
(Optional): Allow downloaded script files to run in the current session.
Set-ExecutionPolicy -ExecutionPolicy RemoteSigned -Force -Scope Process
Run the installation script.
Install script usage
The installation script uses the parameters detailed below.
Parameter |
Description |
|---|---|
.PARAMETER DownloadUrl |
[Alternately specified by $Env:DOWNLOAD_URL] Specifies an alternative repository in which to download container runtime packages. |
.PARAMETER Channel |
[Alternately specified by $Env:CHANNEL]
Specifies which channel to use for picking the binaries (examples
include |
.PARAMETER DockerVersion |
[Alternately specified by $Env:DOCKER_VERSION] Specifies the version number for the DockerEE binaries to install. The latest version is the default. |
.PARAMETER ContainerdVersion |
[Alternately specified by $Env:CONTAINERD_VERSION] Specifies the version number for the containerd binaries to install The latest version is the default. |
.PARAMETER DryRun |
If specified, list different steps to use without actually invoking those steps. |
.PARAMETER Uninstall |
If specified, uninstalls all packages. This includes
unregistering the corresponding services and removing paths
for the package from the registry.
All other script parameters (except |
.PARAMETER Ver |
Print version info for the script and exit. |
.PARAMETER NoServiceStarts |
If specified, services are not started on successful install. By default, all services installed by the script are left in a running state before exit. |
.PARAMETER DestPath |
Path to the directory under which binaries will be installed. Default: %PROGRAMDATA% |
.PARAMETER OfflinePackagesPath |
The folder for airgap/offline scenarios. For use when the
offline or |
.PARAMETER Offline |
Install packages in offline/airgap mode. By default the
current directory is used to locate previously
downloaded packages, a setting that can be overridden by using
the |
.PARAMETER DownloadOnly |
Download and save packages for later offline/airgap install. |
.PARAMETER EngineOnly |
Skip all steps except those related to MCR. |
Install script notes
In scenarios where you have existing software installed that has its own copies of OpenSSL libraries, you may encounter the following error:
OpenSSL error: error:0F06D065:common libcrypto
routines:FIPS_mode_set:fips mode not supported
This is often arises if you have ming/mingw64 as a part of your PATH env variable. As a workaround, ensure that the offending software is not on the PATH and run the script again.
The script supports airgap functionality by providing access to download packages while online, as well as to install those selfsame packages while offline.
For downloads, please ensure that the script has access to the internet. Use the
-DownloadOnlyparameter. By default the script will use the current directory to store the packages after download, a setting that can be changed by specifying the path explicitly with the-OfflinePackagesPathparameter.For offline/airgap install, please use the
-Offlineparameter. By default the script searches for pacakages in the current directory, a setting that can be changed by specifying the-OfflinePackagesPathparameter.While downloading using
-DownloadOnlyparameter, confirm that the download path is accessible to the script, especially if you run the script without administrative rights.
The following is required so that the script can be invoked with named
parameters (for example, -ContainerdVersion 1.3.4...). If a parameter is
used, its type is checked by powershell - we give a higher precedence to the
parameters specified in this manner versus the same value specified by env
vars.
Parameters received at invocation time. Some of these values are merged with values specified by env vars - see reconcileParams. Others are used as-is.
Disable MCR Telemetry
By default, MCR automatically records and transmits data to Mirantis for monitoring and analysis purposes. The data collected provides the Mirantis Customer Success Organization with information that helps Mirantis to better understand the operational use of MCR by our customers. It also provides key feedback in the form of product usage statistics, which enables our product teams to enhance Mirantis products and services.
To disable the telemetry function, set features.telemetry to false in
the daemon.json file, which is located in
C:\ProgramData\docker\config\.
{"features":{"telemetry": false}}
You can change the setting back to true to re-enable telemetry
Caution
To send the telemetry, verify that dockerd can resolve api.segment.io
and create a TCP (HTTPS) connection on port 443.
Uninstall MCR
Use the following commands to remove MCR from a Windows Server.
Leave any active Docker Swarms.
docker swarm leave --force
Prune container data.
docker system prune -all
Run the installation script using the
uninstallflag to remove MCR from the system.
Use MCR with Kubernetes
Customers who use MCR with Kubernetes directly (without MKE) must use a
plugin maintained by Kubernetes called dockershim for Kubernetes 1.23 and
below or a plugin maintained by Mirantis called cri-docker (included in
MCR) for Kubernetes 1.24 and above.
To configure cri-docker:
systemctl enable cri-docker.service
Use MCR with Docker Swarm
Mirantis Container Runtime (MCR) supports the use of Docker Swarm.
The following Docker documentation topics offer detailed information that can help you to run MCR in swarm mode:
Security
Several Docker resources are available which cover the basics of Mirantis Container Runtime security, including:
Docker Security Documentation describes the fundamentals, such as namespaces and control groups, the attack surface of the Docker daemon, and other kernel security features.
CIS Docker Community Edition Benchmark details the various security-related options in MCR.
Docker Bench Security is a script that audits your configuration of MCR against the CIS Benchmark.
Antivirus and antimalware
When antivirus and antimalware software products scan files in use by MCR,
these files can lock in a way that causes Docker commands to hang or causes
orphaned snapshots to leak disk space. To circumvent these problems, you can
add the Docker data directory to the software’s exclusion list, which is by
default /var/lib/docker on Linux systems and %ProgramData%\docker on
Windows Server systems. As a result of this action, though, viruses or malware
in local Docker images, writable layers of containers, or volumes will go
undetected.
Note
If you choose to exclude the Docker data directory from background virus scanning, Mirantis recommends that you schedule recurring tasks for stopping MCR, for scanning the data directory, and for restarting MCR. Make sure to stagger these recurring tasks, though, as running them in sync can cause a system outage.
Docker Content Trust
When transferring data among networked systems, trust is a central concern. In particular, when communicating over an untrusted medium such as the internet, it is critical to ensure the integrity and the publisher of all the data a system operates on. You use Docker Engine to push and pull images to a public or private registry. Docker Content Trust (DCT) gives you the ability to verify both the integrity and the publisher of all the data received from a registry over any channel.
Docker Content Trust provides the ability to use digital signatures for data sent to and received from remote Docker registries. These signatures allow client-side or runtime verification of the integrity and publisher of specific image tags.
Through DCT, image publishers can sign their images and image consumers can verify the signatures of the images they pull. Publishers could be individuals or organizations manually signing their content or automated software supply chains signing content as part of their release process.
Image tags and DCT
An individual image record has the following identifier:
[REGISTRY_HOST[:REGISTRY_PORT]/]REPOSITORY[:TAG]
A particular image REPOSITORY can have multiple tags. For example,
latest and 3.1.2 are both tags on the mongo image. An image
publisher can build an image and tag combination many times changing the image
with each build.
DCT is associated with the TAG portion of an image. Each image repository
has a set of keys that image publishers use to sign an image tag. Image
publishers have discretion on which tags they sign.
An image repository can contain an image with one tag that is signed and
another tag that is not. For example, consider the Mongo image repository. The latest tag could be unsigned
while the 3.1.6 tag could be signed. It is the responsibility of the image
publisher to decide if an image tag is signed or not. In this representation,
some image tags are signed, others are not:
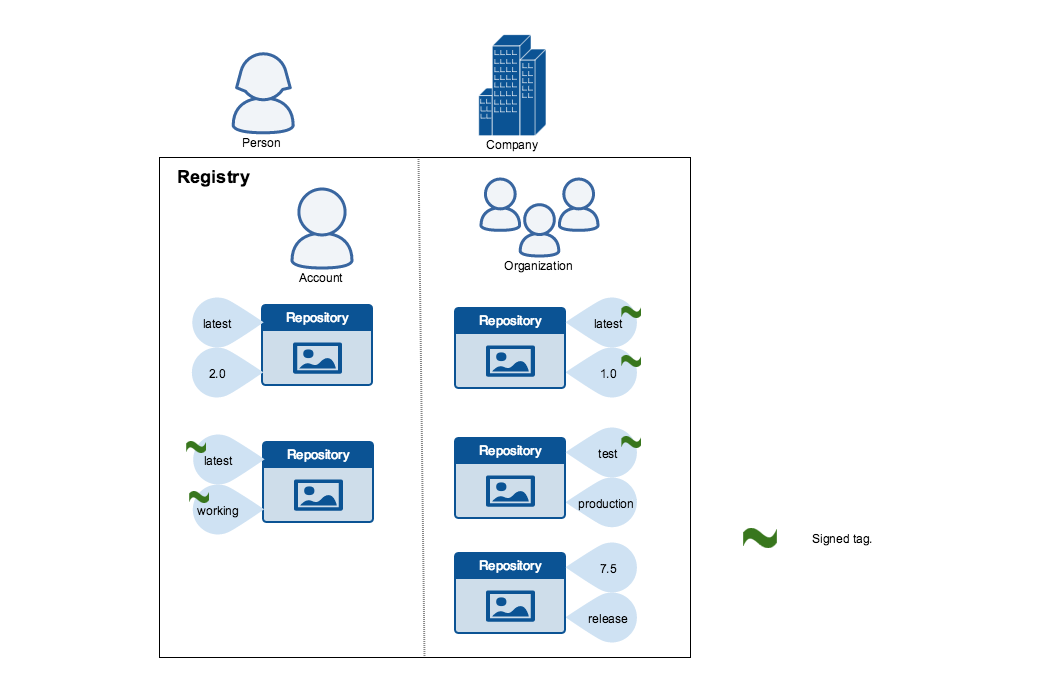
Publishers can choose to sign a specific tag or not. As a result, the content
of an unsigned tag and that of a signed tag with the same name may not match.
For example, a publisher can push a tagged image someimage:latest and sign
it. Later, the same publisher can push an unsigned someimage:latest image.
This second push replaces the last unsigned tag latest but does not affect
the signed latest version. The ability to choose which tags they can sign
allows publishers to iterate over the unsigned version of an image before
officially signing it.
Image consumers can enable DCT to ensure that images they use are signed. If a consumer enables DCT, they can only pull, run, or build with trusted images. Enabling DCT is a bit like applying a “filter” to your registry. Consumers “see” only signed image tags while the less desirable, unsigned image tags are “invisible” to them.
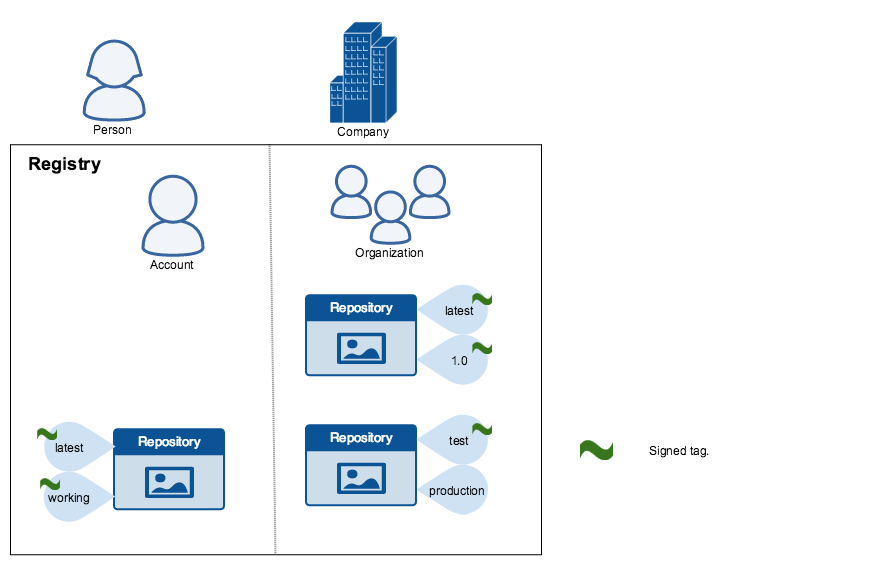
To the consumer who has not enabled DCT, nothing changes with regard to how they work with Docker images. Every image is visible regardless of whether it is signed or not.
Docker Content Trust Keys
Trust for an image tag is managed through the use of signing keys. A key set is created when an operation using DCT is first invoked. A key set consists of the following classes of keys:
an offline key that is the root of DCT for an image tag
repository or tagging keys that sign tags
server-managed keys such as the timestamp key, which provides freshness security guarantees for your repository
The following image depicts the various signing keys and their relationships:
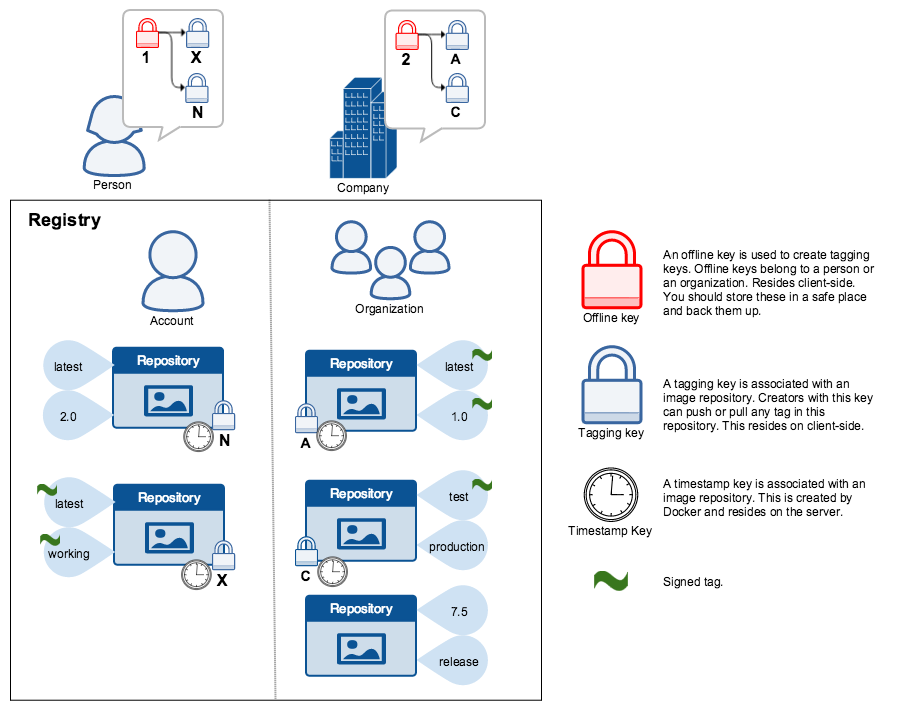
Warning
Once lost, the root key is not recoverable.
You should back up the root key somewhere safe. Given that it is only required to create new repositories, you should store it offline in hardware. For details on securing, and backing up your keys, make sure you read Manage keys for content trust.
Signing Images with Docker Content Trust
Within the Docker CLI, you can sign and push a container image with the $ docker trust command syntax. This is built on top of the Notary feature set, more information for which can be found in the Notary Github Repository.
A prerequisite for signing an image is a container image Registry with a Notary server attached, such as a Mirantis Secure Registry or Docker Hub. Instructions for standing up a self-hosted environment can be found in the Docker official documentation, Deploy Notary Server with Compose.
A delegation key pair is required to sign a container image. These keys can be generated locally using $ docker trust key generate or generated by a certificate authority. If you are using Mirantis Kubernetes Engine, the Client Bundle provides adequate keys for a delegation.
To sign images with Docker Content Trust:
Add the delegation private key to the local Docker trust repository, which by default is stored in
~/.docker/trust/.If you are generating delegation keys with $ docker trust key generate, the private key is automatically added to the local trust store.
If you are importing a separate key, such as one from a MKE Client Bundle, you must use the $ docker trust key load command:
$ docker trust key generate jeff
Generating key for jeff...
Enter passphrase for new jeff key with ID 9deed25:
Repeat passphrase for new jeff key with ID 9deed25:
Successfully generated and loaded private key. Corresponding public key
available: /home/ubuntu/Documents/mytrustdir/jeff.pub
If you have an existing key, run the following command:
$ docker trust key load key.pem --name jeff
Loading key from "key.pem"...
Enter passphrase for new jeff key with ID 8ae710e:
Repeat passphrase for new jeff key with ID 8ae710e:
Successfully imported key from key.pem
Add the delegation public key to the Notary server. Each delegation key in Notary is specific to a particular image repository. If this is the first time you are adding a delegation to that repository, this command will also initiate the repository, using a local Notary canonical root key. To understand more about initiating a repository, and the role of delegations, refer to the official Docker documentation, Delegations for content trust.
$ docker trust signer add --key cert.pem jeff msr.example.com/admin/demo
Adding signer "jeff" to msr.example.com/admin/demo...
Enter passphrase for new repository key with ID 10b5e94:
Use the delegation private key to sign a particular tag and push the signature up to the registry.
$ docker trust sign msr.example.com/admin/demo:1
Signing and pushing trust data for local image msr.example.com/admin/demo:1, may overwrite remote trust data
The push refers to repository [msr.example.com/admin/demo]
7bff100f35cb: Pushed
1: digest: sha256:3d2e482b82608d153a374df3357c0291589a61cc194ec4a9ca2381073a17f58e size: 528
Signing and pushing trust metadata
Enter passphrase for signer key with ID 8ae710e:
Successfully signed msr.example.com/admin/demo:1
Alternatively, once the keys have been imported an image can be pushed with the $ docker push command:
$ export DOCKER_CONTENT_TRUST=1

$ docker push msr.example.com/admin/demo:1
The push refers to repository [msr.example.com/admin/demo:1]
7bff100f35cb: Pushed
1: digest: sha256:3d2e482b82608d153a374df3357c0291589a61cc194ec4a9ca2381073a17f58e size: 528
Signing and pushing trust metadata
Enter passphrase for signer key with ID 8ae710e:
Successfully signed msr.example.com/admin/demo:1
To view remote trust data for a tag or repository:
Run the $ docker trust inspect command to view remote trust data for a tag or a repository:
$ docker trust inspect --pretty msr.example.com/admin/demo:1

Signatures for msr.example.com/admin/demo:1

SIGNED TAG          DIGEST                                                             SIGNERS
1                   3d2e482b82608d153a374df3357c0291589a61cc194ec4a9ca2381073a17f58e   jeff

List of signers and their keys for msr.example.com/admin/demo:1

SIGNER              KEYS
jeff                8ae710e3ba82

Administrative keys for msr.example.com/admin/demo:1

  Repository Key:    10b5e94c916a0977471cc08fa56c1a5679819b2005ba6a257aa78ce76d3a1e27
  Root Key:  84ca6e4416416d78c4597e754f38517bea95ab427e5f95871f90d460573071fc
To remove remote trust data for a tag:
Run the $ docker trust revoke command to remove remote trust data for a tag:
$ docker trust revoke msr.example.com/admin/demo:1
Enter passphrase for signer key with ID 8ae710e:
Successfully deleted signature for msr.example.com/admin/demo:1
Runtime Enforcement with Docker Content Trust
Note
Runtime enforcement is a feature that is exclusive to MCR. It is not available in Moby or Docker CE.
The implementation is separate from the
only run signed imagesfeature of Mirantis Kubernetes Engine.
Docker Content Trust within the Mirantis Container Runtime prevents a user from using a container image from an untrusted source. It will also prevent a user from building a container image from a base layer from an untrusted source. Trusted sources can include Official Docker Images, found on the Docker Hub or User trusted sources, with repositories and tags signed with the commands detailed in Signing Images with Docker Content Trust.
Engine Signature Verification prevents the following:
$ docker container run of an unsigned or altered image.
$ docker pull of an unsigned or altered image.
$ docker build where the FROM image is not signed or is not scratch.
Note
The implicit pulls and runs performed by worker nodes for a Swarm service on $ docker service create and $ docker service update are also verified. Tag resolution of services requires that all nodes in the Swarm including managers have content trust enabled and similarly configured.
DCT does not verify that the filesystem of a running container has not been altered from what was in the image. For example, it does not prevent a container from writing to the filesystem, once the container is running. Moreover, it does not prevent the image filesystem from being altered on the disk of a Docker host. DCT will also not prevent unsigned images from being imported, loaded, or created.
Enabling DCT within the Mirantis Container Runtime
DCT is controlled by the Docker Engine configuration file, which by default is
located at /etc/docker/daemon.json. For more information on the
configuration file, refer to the official docker documentation, Daemon
configuration file.
Note
The configuration can be set only on Linux machines.
The content-trust section is based around a mode option that
instructs the engine on whether to enforce signed images, and a
trust-pinning section that instructs the engine on which sources to trust.
Mode can take one of three values: disabled, permissive, or
enforced.
disabledVerification is not active and the remainder of the content-trust related configuration is ignored. This is the default value if
modeis not specified.permissiveVerification will be performed, while failures are only logged. Images that cannot be verified successfully can still be pulled and run. This configuration is intended for testing of changes related to
content-trust. The results of the signature verification are displayed in the MCR daemon logs.enforcedContent trust is enforced, thus an image that cannot be verified successfully is not pulled or run.
{
    "content-trust": {
        "mode": "<variable-type>"
    }
}
Official Docker images
Note
The IDs of all Notary root keys that are used to verify Docker Official Images are embedded in MCR.
If you want to configure MCR so that only Docker Official Images can be used, you can configure your daemon to do so using the embedded key IDs:
{
  "content-trust": {
    "trust-pinning": {
      "official-library-images": true
    },
    "mode": "enforced"
  }
}
User-signed images
There are two options for trust pinning user-signed images: Notary Canonical Root Key ID and Notary Root key ID.
Notary canonical root key ID
The Notary Canonical Root Key ID, or DCT Root Key, describes only the root key
used to sign a repository, or rather its respective keys. This is the root key
on the host that originally signed the repository, such as your workstation. It
can be retrieved from the workstation that signed the repository through
$ grep -r "root" ~/.docker/trust/private/ (assuming your trust data
is at ~/.docker/trust/*). It is expected that this canonical ID has
initiated multiple image repositories (mymsr/user1/image1 and
mymsr/user1/image2).
Retrieve root ID:
$ grep -r "root" ~/.docker/trust/private
/home/ubuntu/.docker/trust/private/0b6101527b2ac766702e4b40aa2391805b70e5031c04714c748f914e89014403.key:role:
root
Use a canonical ID. In the example that follows, the canonical ID has signed two repos,
mymsr/user1/repo1andmymsr/user1/repo2. Note that wildcards are allowed.{ "content-trust": { "trust-pinning": { "root-keys": { "mymsr/user1/*": [ "0b6101527b2ac766702e4b40aa2391805b70e5031c04714c748f914e89014403" ] } }, "mode": "enforced" } }
Notary root key ID
The Notary Root key ID, or DCT Certificate ID, describes the same as the Notary
Canonical Root Key ID; the ID is unique per repository. For example,
mymsr/user1/image1 and mymsr/usr1/image2 will each have a unique
certificate ID. A certificate ID can be retrieved through a $ docker
trust inspect command, labeled as a root-key, referring back to the
Notary key name. This is designed for when different users are signing their
own repositories, such as when there is no central signing server. As a
cert-id is more granular, it would take priority if a conflict occurs over
a root ID.
Retrieve root ID:
$ docker trust inspect mymsr/user1/repo1 | jq -r '.[].AdministrativeKeys[] | select(.Name=="Root") | .Keys[].ID'
9430d6e31e3b3e240957a1b62bbc2d436aafa33726d0fcb50addbf7e2dfa2168
Use cert IDs by specifying two repositories with their DCT root ID.
 {
   "content-trust": {
     "trust-pinning": {
       "cert-ids": {
          "mymsr/user1/repo1": [
            "9430d6e31e3b3e240957a1b62bbc2d436aafa33726d0fcb50addbf7e2dfa2168"
          ],
          "mymsr/user2/repo1": [
            "544cf09f294860f9d5bc953ad80b386063357fd206b37b541bb2c54166f38d08"
          ]
       }
     },
     "mode": "enforced"
   }
}
Using DCT in an offline environment
If your engine is unable to communicate to the registry, DCT can be enabled to
trust cached signature data. This is configured through the
allow-expired-cached-trust-data option.
{
  "content-trust": {
    "trust-pinning": {
      "official-library-images": true,
      "root-keys": {
        "mymsr/user1/*": [
          "0b6101527b2ac766702e4b40aa2391805b70e5031c04714c748f914e89014403"
        ]
      },
      "cert-ids": {
        "mymsr/user2/repo1": [
          "9430d6e31e3b3e240957a1b62bbc2d436aafa33726d0fcb50addbf7e2dfa2168"
        ],
      }
    },
    "mode": "enforced",
    "allow-expired-cached-trust-data": true
  }
}
Client Enforcement with Docker Content Trust
Content trust is disabled by default in the Docker Client. To enable it, set
the DOCKER_CONTENT_TRUST environment variable to 1. This prevents users
from working with tagged images unless they contain a signature.
When DCT is enabled in the Docker client, docker CLI commands that operate
on tagged images must either have content signatures or explicit content
hashes. The commands that operate with DCT are:
push
build
create
pull
run
For example, with DCT enabled a docker pull someimage:latest command
only succeeds if someimage:latest is signed. However, an operation with an
explicit content hash always succeeds as long as the hash exists:
$ docker pull msr.example.com/user/image:1
Error: remote trust data does not exist for msr.example.com/user/image: msr.example.com does not have trust data for msr.example.com/user/image

$ docker pull msr.example.com/user/image@sha256:d149ab53f8718e987c3a3024bb8aa0e2caadf6c0328f1d9d850b2a2a67f2819a
sha256:ee7491c9c31db1ffb7673d91e9fac5d6354a89d0e97408567e09df069a1687c1: Pulling from user/image
ff3a5c916c92: Pull complete
a59a168caba3: Pull complete
Digest: sha256:ee7491c9c31db1ffb7673d91e9fac5d6354a89d0e97408567e09df069a1687c1
Status: Downloaded newer image for msr.example.com/user/image@sha256:ee7491c9c31db1ffb7673d91e9fac5d6354a89d0e97408567e09df069a1687c1
Secure MCR on Windows
Mirantis Container Runtime (MCR), which is derived from Docker Moby, is a foundational component for running containerized workloads on Windows. While containers inherently provide process isolation, additional layers of security are necessary to protect against exploitation.
The information herein places strong emphasis on the securing of both the host Windows system and the container runtime itself. Among the topics covered are Windows Group Policy configurations, OS settings that directly tie to security enhancement, and advanced runtime-specific measures.
Safeguard the Windows host operating system
The security of the Windows host directly impacts the safety of the containers that run on it. Hardening the operating system is the first step to securing MCR.
Advanced Group Policy Configurations
Group Policy is a critical tool for enforcing security configurations across the host environment. Advanced settings for securing Windows are offered below:
Account policies
Set password policies to enforce complexity, expiration, and minimum length:
From the Search bar, run
gpedit.msc.Navigate to Computer Configuration > Windows Settings > Security Settings > Account Policies > Password Policy.
Set Minimum password length to 14 characters and enable Password must meet complexity requirements..
Configure Account lockout threshold to 5 failed attempts.
Logon restrictions
Limit local and remote logon rights to specific administrative accounts:
Navigate to Computer Configuration > Windows Settings > Security Settings > Local Policies > User Rights Assignment.
Assign Deny log on locally to unauthorized groups, and restrict Allow log on through Remote Desktop Services.
Restrict Access to System Tools
Block access to registry editing tools and command-line interpreters for non-administrative users using Software Restriction Policies or AppLocker:
Navigate to guilabel:Computer Configuration > Windows Settings > Security Settings > Application Control Policies > AppLocker > Executable Rules > Create new rule.
Input the following as a rule:
- Deny
- Select users or groups
- Select "Path"
- Paths for registry editing tools:
  - %windir%\regedit.exe
  - %windir%\system32\regedt32.exe

  Paths for command-line interpreters:
  - %windir%\system32\cmd.exe
  - %windir%\system32\windowspowershell\v1.0\powershell.exe
Adjust Local Security Policy
The Local Security Policy tool provides granular controls over system security. Mirantis recommends that you disable NTLM authentication and secure anonymous access
Disable NTLM Authentication
To enforce the use of Kerberos for authentication to reduce susceptibility to pass-the-hash attacks:
Navigate to Local Policies > Security Options > Network security: Restrict NTLM: NTLM Authentication in this domain > Deny All > Apply.
Secure Anonymous Access
Navigate to Local Policies > Security Options and enable:
Harden File System and Registry Permissions
To prevent unauthorized tampering, restrict access to all critical system directories, for example C:WindowsSystem32:
Open File Explorer and navigate to C:Windows.
Right-click on the
System32folder and select Properties.Go to the Security tab and click on Advanced >Tab Auditing > Flag “Replace all child object auditing entries with inheritable auditing entries from this object.
Click on Disable inheritance.
Use Access Control Lists (ACLs)) to secure sensitive registry keys:
icacls "HKEY_LOCAL_MACHINE\SYSTEM\ControlSet001\Services\docker" /deny "Users:(F)"
Use the Registry Editor, as it is forbidden to use icacls by way of the CLI.
Network Security Enhancements
Host-Based Firewall Rules
Configure Windows Defender Firewall to block all inbound traffic by default and to only allow explicitly defined traffic into container endpoints:
New-NetFirewallRule -DisplayName "Deny All Inbound" -Direction Inbound -Action Block
IPsec Policies
Implement IPsec rules to secure network traffic:
Access the Windows Advanced Firewall MMC snap-in to configure IPsec for container-to-host communications.
Open firewall settings by way of CLI
wf.msc.Go to Connection Security Rules > New Rule..(Depending on the application and its traffic).
For DNS Security, deploy DNSSEC to authenticate DNS responses and mitigate DNS spoofing. DNS server must be installed.
DNS Security
Deploy DNSSEC to authenticate DNS responses and to mitigate DNS spoofing.
Secure Boot and Credential Guard
Enable Secure Boot, which ensures that only signed OS components load during startup, by running msinfo32.exe.
Check Secure Boot State under System Summary.
Enable Credential Guard, to isolate secrets using virtualization-based security, by way of Group Policy. #. Navigate to :guilabel:Computer Configuration > Administrative Templates > System > Device Guard. #. Click on Turn on Virtualization Based Security. #. Click on Enabled. #. Click Apply.
Enhance security for MCR
MCR inherits many strengths from Docker Moby, while also sharing the vulnerabilities of that product. Securing MCR requires thoughtful configuration and operational rigor.
Runtime-Specific Security Features
Process Isolation
Use Windows Server process isolation for compatibility while ensuring system isolation:
docker run --isolation=process <container>
Hyper-V Isolation
Use Hyper-V isolation:or added security, especially when running untrusted workloads:
docker run --isolation=hyperv <container>
Immutable Infrastructure
Configure containers to run in read-only mode.
Image Security
Digitally Sign Images
Implement Docker Content Trust (DCT) to enforce signed images:
$env:DOCKER_CONTENT_TRUST=1
Scan Images for Vulnerabilities
Use scanning tools such as Trivy or native Mirantis tools to identify vulnerabilities:
trivy image <image>
Restrict Container Privileges
Drop Capabilities
Reduce the attack surface of the container by dropping unnecessary privileges:
docker run --cap-drop=ALL --cap-add=NET_ADMIN <container>
Note
The following applies for Windows server 2022:
docker run --cap-drop=ALL <container>
docker run --cap-add=ALL <container>
Limit Resource Consumption
Prevent resource starvation attacks by capping memory and CPU usage:
docker run --memory="512m" --cpus="1" <container>
Secure Docker Daemon Communication
Enable TLS
Configure the Docker daemon to require TLS for all communications by
generating certificates and configuring the daemon.json file as follows:
{
  "tls": true,
  "tlsverify": true,
  "tlscacert": "C:\\DockerCers\\ca.pem",
  "tlscert": "C:\\DockerCerts\\server-cert.pem",
  "tlskey": "C:\\DockerCerts\\server-key.pem",
  "hosts": ["tcp://0.0.0.0:2376"]
}
Restrict Daemon Access
Use Access Control Lists (ACLs) to restrict access to the Docker named pipe (npipe://).
Operational best practices
Best practices for securing MCR on Windows fall into three general areas:
Continuous monitoring
Centralized logging
Regular vulnerability assessment
Continuous monitoring
Deploy monitoring tools, such as Prometheus to collect metrics and Grafana for visualization. You can use these tools to monitor resource utilization and detect anomalies in real-time.
Centralized logging
Implement logging drivers for centralized log management:
{
  "log-driver": "syslog",
  "log-opts": {
    "syslog-address": "tcp://<log-server>:514"
  }
}
Regular vulnerability assessment
Scan the host system and container workloads for vulnerabilities regularly, using such tools as Nessus and Microsoft Defender ATP.
Open Source Components and Licenses
Click any product component license below to download a text file of that license to your local system.
Get Support
Mirantis Container Runtime (MCR) subscriptions provide access to prioritized support for designated contacts from your company, agency, team, or organization. MCR service levels are based on your subscription level and the cloud or cluster that you designate in your technical support case. Our support offerings are described on the Enterprise-Grade Cloud Native and Kubernetes Support page. You may inquire about Mirantis support subscriptions by using the contact us form.
The CloudCare Portal is the primary way
that Mirantis interacts with customers who are experiencing technical issues.
Access to the CloudCare Portal requires prior authorization by your company,
agency, team, or organization, and a brief email verification step. After
Mirantis sets up its backend systems at the start of the support subscription,
a designated administrator at your company, agency, team, or organization, can
designate additional contacts. If you have not already received and verified an
invitation to our CloudCare Portal, contact your local designated
administrator, who can add you to the list of designated contacts. Most
companies, agencies, teams, and organizations have multiple designated
administrators for the CloudCare Portal, and these are often the persons most
closely involved with the software. If you do not know who your local
designated administrator is, or you are having problems accessing the CloudCare
Portal, you may also send an email to Mirantis support at
support@mirantis.com.
Once you have verified your contact details and changed your password, you and all of your colleagues will have access to all of the cases and resources purchased. Mirantis recommends that you retain your Welcome to Mirantis email, because it contains information on how to access the CloudCare Portal, guidance on submitting new cases, managing your resources, and other related issues.
We encourage all customers with technical problems to use the knowledge base, which you can access on the Knowledge tab of the CloudCare Portal. We also encourage you to review the MKE product documentation and release notes prior to filing a technical case, as the problem may already be fixed in a later release or a workaround solution provided to a problem experienced by other customers.
One of the features of the CloudCare Portal is the ability to associate cases with a specific MKE cluster. These are referred to in the Portal as “Clouds”. Mirantis pre-populates your customer account with one or more Clouds based on your subscription(s). You may also create and manage your Clouds to better match how you use your subscription.
Mirantis also recommends and encourages customers to file new cases based on a specific Cloud in your account. This is because most Clouds also have associated support entitlements, licenses, contacts, and cluster configurations. These greatly enhance the ability of Mirantis to support you in a timely manner.
You can locate the existing Clouds associated with your account by using the Clouds tab at the top of the portal home page. Navigate to the appropriate Cloud and click on the Cloud name. Once you have verified that the Cloud represents the correct MKE cluster and support entitlement, you can create a new case via the New Case button near the top of the Cloud page.
One of the key items required for technical support of most MKE cases is the support bundle. This is a compressed archive in ZIP format of configuration data and log files from the cluster. There are several ways to gather a support bundle, each described in the paragraphs below. After you obtain a support bundle, you can upload the bundle to your new technical support case by following the instructions in the Mirantis knowledge base, using the Detail view of your case.
Obtain a full-cluster support bundle using the MKE web UI
Log in to the MKE web UI as an administrator.
In the left-side nagivation panel, navigate to <user name> and click Support Bundle.
It may take several minutes for the download to complete.
Note
The default name for the generated support bundle file is
docker-support-<cluster-id>-YYYYmmdd-hh_mm_ss.zip. Mirantis suggests that you not alter the file name before submittal to the customer portal. However, if necessary, you can add a custom string betweendocker-supportand<cluster-id>, as in:docker-support-MyProductionCluster-<cluster-id>-YYYYmmdd-hh_mm_ss.zip.Submit the support bundle to Mirantis by clicking Share support bundle on the success prompt that displays when the support bundle finishes downloading.
Note
Mirantis uses the support bundles you submit for product improvement purposes. Be aware, though that these submissions are not sent directly to the Mirantis Customer Support team that is assigned to the particular issue.
Fill in the Jira feedback dialog, and click Submit.
Obtain a single-node support bundle using the CLI
Use SSH to log into a node and run:
MKE_VERSION=$((docker container inspect ucp-proxy \
--format '{{index .Config.Labels "com.docker.ucp.version"}}' \
2>/dev/null || echo -n 3.7.9)|tr -d [[:space:]])

docker container run --rm \
  --name ucp \
  -v /var/run/docker.sock:/var/run/docker.sock \
  --log-driver none \
  mirantis/ucp:${MKE_VERSION} \
  support > \
  docker-support-${HOSTNAME}-$(date +%Y%m%d-%H_%M_%S).tgz
Important
If SELinux is enabled, include the following additional flag:
--security-opt label=disable.
Note
The CLI-derived support bundle only contains logs for the node on which you are running the command. If your MKE cluster is highly available, collect support bundles from all manager nodes.
Use PowerShell to obtain a support bundle
Run the following command on Windows worker nodes to collect the support information and automatically place it in a zip file:
$MKE_SUPPORT_DIR = Join-Path -Path (Get-Location) -ChildPath 'dsinfo'
$MKE_SUPPORT_ARCHIVE = Join-Path -Path (Get-Location) -ChildPath $('docker-support-' + (hostname) + '-' + (Get-Date -UFormat "%Y%m%d-%H_%M_%S") + '.zip')
$MKE_PROXY_CONTAINER = & docker container ls --filter "name=ucp-proxy" --format "{{.Image}}"
$MKE_REPO = if ($MKE_PROXY_CONTAINER) { ($MKE_PROXY_CONTAINER -split '/')[0] } else { 'mirantis' }
$MKE_VERSION = if ($MKE_PROXY_CONTAINER) { ($MKE_PROXY_CONTAINER -split ':')[1] } else { '3.6.0' }
docker container run --name windowssupport `
-e UTILITY_CONTAINER="$MKE_REPO/ucp-containerd-shim-process-win:$MKE_VERSION" `
-v \\.\pipe\docker_engine:\\.\pipe\docker_engine `
-v \\.\pipe\containerd-containerd:\\.\pipe\containerd-containerd `
-v 'C:\Windows\system32\winevt\logs:C:\eventlogs:ro' `
-v 'C:\Windows\Temp:C:\wintemp:ro' $MKE_REPO/ucp-dsinfo-win:$MKE_VERSION
docker cp windowssupport:'C:\dsinfo' .
docker rm -f windowssupport
Compress-Archive -Path $MKE_SUPPORT_DIR -DestinationPath $MKE_SUPPORT_ARCHIVE
Release Notes
Important
Mirantis Container Runtime 23.0 follows the version numbering scheme of the upstream Moby and Docker CLI projects. Mirantis may skip upstream versions released in short succession, though, and opt instead to release a patch that contains the content of all upstream versions released in the intervening period since the previous MCR 23.0 patch release.
The MCR 23.0.19 patch release focuses on the delivery of CVE and bug fixes.
The MCR 23.0.18 patch release focuses on the delivery of CVE and bug fixes.
The MCR 23.0.17 patch release focuses on the delivery of CVE and bug fixes.
The MCR 23.0.16 patch release focuses on the delivery of CVE and bug fixes.
Patch release for MCR 23.0, which focuses on the delivery of bug fixes and the upgrade to Go 1.22.
Updated containerd 1.6.36
Patch release for MCR 23.0, which focuses on the delivery of CVE and bug fixes.
Updated containerd 1.6.33
Updated runc 1.1.13-m1
Updated cri-dockerd 0.3.15
Updated Fipster (Go runtime) go1.21.12m
Patch release for MCR 23.0, which focuses on the delivery of CVE and bug fixes.
Updated containerd to version
1.6.32
Patch release for MCR 23.0, which focuses on the delivery of CVE and bug fixes.
Updated cri-dockerd to version
0.3.14Updated Fipster (Go runtime) to version
go1.21.10m
Patch release for MCR 23.0, which focuses on the delivery of CVE and bug fixes.
Updated containerd to version
1.6.31-rc.1Updated runc to
1.1.12-m3Updated cri-dockerd to version
0.3.13Updated Fipster (Go runtime) to version
go1.21.9m3
Patch release for MCR 23.0, which focuses on the delivery of CVE and bug fixes.
Updated containerd to version
1.6.30-rc.2Updated runc to
1.1.12-rc1.m1Updated cri-dockerd to version
0.3.11Updated Fipster (Go runtime) to version
go1.21.8m1
Patch release for MCR 23.0 that delivers a runc update that fixes CVE-2024-21626.
Patch release for MCR 23.0, which focuses on the delivery of CVE and bug fixes.
Fixed an issue that pertains to the enabling of FIPS for Swarm.
Fixed an issue that prevented docker exec from working in FIPS mode.
Updated Fipster (Go runtime) to version
1.20.12m1Updated containerd to version
1.6.28-rc.1Update cri-dockerd to version
0.3.9Updated buildx version
0.12.0m (4932eecc)
Patch release for MCR 23.0, which introduces the following key product improvements:
Updated Fipster (Go runtime) to version
go1.20.10m1Updated containerd to version
1.6.25-rc.1Update cri-dockerd to version
0.3.7Updated buildx version
0.12.0-rc1Resolved CVEs in the Go runtime
Patch release for MCR 23.0, which introduces the following key product improvements:
Updated Fipster (Go runtime) to version
go1.19.12m1Updated containerd to version
1.6.22Resolved CVEs in the Go runtime
Patch release for MCR 23.0, which introduces the following key product improvements:
Updated Fipster (Go runtime) to version
go1.19.10m1Updated containerd to version
1.6.21Updated docker buildx to version
0.10.5Updated cri-dockerd to version
0.3.4Resolved CVEs in the Go runtime
Patch release for MCR 23.0, which introduces the following key product improvements:
Updated Fipster (Go runtime) to version
go1.19.8m1Bug fixes in the daemon and CLI
Resolved CVEs in the Go runtime
Patch release for MCR 23.0, which introduces the following key product improvements:
Updated Fipster (Go runtime) to version
go1.19.7m3Updated containerd to version
1.6.19Updated docker buildx to version
0.10.4Updated cri-dockerd to version
0.3.1Resolved CVEs in Moby
Resolved CVEs in the Go runtime and FIPS module
Initial release for MCR 23.0, which introduces the following features and improvements:
Storage driver removals
Semantic Versioning (SemVer) format
CSI drivers
BuildKit and buildx by default
Volume Prune and API 1.42
Windows Server 2019 required
Health checks
Rootless and seccomp
23.0.19
Release date |
Name |
Upstream release |
|---|---|---|
2025-JUN-04 |
MCR 23.0.19 |
Moby 23.0.19 and Docker CLI 23.0.19 |
Changelog
MCR 23.0.19 comprises the Moby 23.0.19 upstream release.
Changes specific to MCR
MCR contains the following component updates:
Fipster (Go runtime)
go1.23.9-m1
Changes from upstream
The MCR 23.0.19 patch release focuses on the delivery of CVE and bug fixes.
GitHub milestones
The GitHub milestones offer full detail on the pull requests and changes as they correlate to the upstream Moby 23.0.19 release:
Major component versions
Version detail for the major components that comprise MCR 23.0.19 is presented in the table below:
Component |
Version |
|---|---|
Fipster (Go runtime) |
|
Known issues
Known issues that apply to Moby 23.0.18 and thus also to MCR 23.0.18 include:
moby/moby#47728 The DNS records for containers on a node that has restarted may not be resolvable by containers on other nodes on the same overlay network. This may also occur without a daemon restart, if the underlay network is experiencing packet loss at the time the container is started. Only recently uncovered, this has been an issue since the advent of the NetworkDB moby component.
Platform test detail
Platform |
Kernel tested |
|---|---|
RHEL 9.6 |
5.14.0-570.58.1.el9_6.x86_64 |
RHEL 9.4 |
5.14.0-427.96.1.el9_4.x86_64 |
RHEL 8.10 |
4.18.0-553.81.1.el8_10.x86_64 |
Rocky 8.10 |
4.18.0-553.el8_10.x86_64 |
SLES15 SP6 |
6.4.0-150600.23.73-default |
Ubuntu 22.04 |
6.8.0-1040-aws |
Windows 2022 Core |
10.0 20348 (20348.2849.amd64fre.fe_release_svc_prod1.241101-1732) |
Windows 2019 Core |
10.0 17763 (17763.1.amd64fre.rs5_release.180914-1434) |
23.0.18
Release date |
Name |
Upstream release |
|---|---|---|
2025-APR-22 |
MCR 23.0.18 |
Moby 23.0.18 and Docker CLI 23.0.18 |
Changelog
MCR 23.0.18 comprises the Moby 23.0.18 upstream release.
Changes specific to MCR
MCR contains the following component updates:
Fipster (Go runtime)
go1.23.8-m1
Changes from upstream
The upstream pull requests detailed in the sections that follow are those that pertain to the MCR product. For the complete list of changes and pull requests upstream, refer to the GitHub milestones.
What is new
The MCR 23.0.18 patch release focuses on the delivery of CVE and bug fixes.
Security
golang.org/x/net/http/httpproxy
Fix CVE-2025-22870: Proxy, http/httpproxy: do not mismatch IPv6 zone ids against hosts.
openssl
Fix CVE-2024-13176: Adds a constant-time implementation of ECDSA, to mitigate a potential side-channel vulnerability.
Fix CVE-2024-9143: Adds additional checking of elliptic curve parameters.
Fix CVE-2024-5535: Adds handling a situation when calling the OpenSSL API function SSL_select_next_proto with an empty supported client protocols buffer may cause a crash or memory contents to be sent to the peer.
runc
Follow up on fix CVE-2024-45310: Handle all possible os.MkdirAll cases to handle some regressions.
containerd
Fix GHSA-265r-hfxg-fhmg: Fix integer overflow in User ID handling.
Bug fixes
containerd
containerd/containerd#11319: Fix fatal map concurrency error in httpstream.
containerd/containerd#10764: Fix the race condition during GC of snapshots when client retries.
containerd/containerd#11359: Fix console TTY leak in runc shim.
containerd/containerd#11100: Fix panic due to nil dereference cgroups v2.
runc
opencontainers/runc#4417: Fix some certain situations (a system with lots of mounts or racing mounts) we could accidentally end up leaking mounts from the container into the host.
opencontainers/runc#4444: The fallback logic for O_TMPFILE clones of /proc/self/exe had a minor bug that would cause us to miss non-noexec directories and thus fail to start containers on some systems.
opencontainers/runc#4294 opencontainers/runc#4452: Sometimes the cloned /proc/self/exe file descriptor could be placed in a way that it would get clobbered by the Go runtime. We had a fix for this already but it turns out it could still break in rare circumstances, but it has now been fixed.
GitHub milestones
The GitHub milestones offer full detail on the pull requests and changes as they correlate to the upstream Moby 23.0.18 release:
Major component versions
Version detail for the major components that comprise MCR 23.0.18 is presented in the table below:
Component |
Version |
|---|---|
Fipster (Go runtime) |
|
Known issues
Known issues that apply to Moby 23.0.18 and thus also to MCR 23.0.18 include:
moby/moby#47728 The DNS records for containers on a node that has restarted may not be resolvable by containers on other nodes on the same overlay network. This may also occur without a daemon restart, if the underlay network is experiencing packet loss at the time the container is started. Only recently uncovered, this has been an issue since the advent of the NetworkDB moby component.
23.0.17
Release date |
Name |
Upstream release |
|---|---|---|
2025-MAR-10 |
MCR 23.0.17 |
Moby 23.0.17 and Docker CLI 23.0.17 |
Changelog
MCR 23.0.17 comprises the Moby 23.0.17 upstream release.
Changes specific to MCR
MCR contains the following component updates:
Fipster (Go runtime)
go1.22.12-m1
Changes from upstream
The upstream pull requests detailed in the sections that follow are those that pertain to the MCR product. For the complete list of changes and pull requests upstream, refer to the GitHub milestones.
What is new
The MCR 23.0.17 patch release focuses on the delivery of CVE and bug fixes.
Security
go net/http: Fix CVE-2024-45336, the HTTP client drops sensitive headers after following a cross-domain redirect.
go crypto/x509: Fix CVE-2024-45341, a certificate with a URI which has a IPv6 address with a zone ID may incorrectly satisfy a URI name constraint that applies to the certificate chain.
GitHub milestones
The GitHub milestones offer full detail on the pull requests and changes as they correlate to the upstream Moby 23.0.17 release:
Major component versions
Version detail for the major components that comprise MCR 23.0.17 is presented in the table below:
Component |
Version |
|---|---|
Fipster (Go runtime) |
|
Known issues
Known issues that apply to Moby 23.0.17 and thus also to MCR 23.0.17 include:
moby/moby#47728 The DNS records for containers on a node that has restarted may not be resolvable by containers on other nodes on the same overlay network. This may also occur without a daemon restart, if the underlay network is experiencing packet loss at the time the container is started. Only recently uncovered, this has been an issue since the advent of the NetworkDB moby component.
23.0.16
Release date |
Name |
Upstream release |
|---|---|---|
2024-DEC-04 |
MCR 23.0.16 |
Moby 23.0.16 and Docker CLI 23.0.15 |
Changelog
MCR 23.0.16 comprises the Moby 23.0.16 upstream release.
Changes specific to MCR
MCR contains the following component updates:
runc 1.1.15
Fipster (Go runtime)
go1.22.9-m1
Changes from upstream
The upstream pull requests detailed in the sections that follow are those that pertain to the MCR product. For the complete list of changes and pull requests upstream, refer to the GitHub milestones.
What is new
The MCR 23.0.16 patch release focuses on the delivery of CVE and bug fixes.
Bug fixes
Fipster(Go runtime)
golang/go#69155 Upgrade to go1.22.9-m1, which fixes the suspected root cause for crashes that some users have experienced with MCR 23.0.15.
runc
opencontainers/runc#4334 rootfs: fix ‘can we mount on top of /proc’ check.
opencontainers/runc#4361 vendor: google.golang.org/protobuf 1.33.0.
opencontainers/runc#3837 rootfs: try to scope MkdirAll to stay inside the rootfs.
opencontainers/runc#4392 nsenter: cloned_binary: remove bindfd logic entirely.
opencontainers/runc#4391 seccomp: patchbpf: always include native architecture in stub.
opencontainers/runc#4425 runc run: fix mount leak.
Security
runc: Fix CVE-2024-45310, a low-severity attack that allowed maliciously configured containers to create empty files and directories on the host.
GitHub milestones
The GitHub milestones offer full detail on the pull requests and changes as they correlate to the upstream Moby 23.0.16 release:
Major component versions
Version detail for the major components that comprise MCR 23.0.16 is presented in the table below:
Component |
Version |
|---|---|
Fipster (Go runtime) |
|
Known issues
Known issues that apply to Moby 23.0.16 and thus also to MCR 23.0.16 include:
moby/moby#47728 The DNS records for containers on a node that has restarted may not be resolvable by containers on other nodes on the same overlay network. This may also occur without a daemon restart, if the underlay network is experiencing packet loss at the time the container is started. Only recently uncovered, this has been an issue since the advent of the NetworkDB moby component.
23.0.15
Release date |
Name |
Upstream release |
|---|---|---|
2024-SEPT-30 |
MCR 23.0.15 |
Moby 23.0.15 and Docker CLI 23.0.15 |
Changelog
MCR 23.0.15 comprises the Moby 23.0.15 upstream release.
Changes specific to MCR
MCR contains the following component updates:
containerd 1.6.36
Changes from upstream
The upstream pull requests detailed in the sections that follow are those that pertain to the MCR product. For the complete list of changes and pull requests upstream, refer to the github-milestones-23.0.15.
What is new
The MCR 23.0.15 patch release focuses on the delivery of bug fixes and the upgrade to Go 1.22.
Bug fixes
containerd
containerd/containerd#10333 Remove overlayfs volatile option on temp mounts.
containerd/containerd#10470 Support for dropping inheritable capabilities.
containerd/containerd#10511 Regenerate UUID if state is empty in introspection service.
containerd/containerd#10500 Set stderr to empty string when using terminal on Windows.
containerd/containerd#10535 Ensure /run/containerd gets created with correct perms.
containerd/containerd#10676 Fix bug where init exits were being dropped.
GitHub milestones
The GitHub milestones offer full detail on the pull requests and changes as they correlate to the upstream Moby 23.0.15 release:
Major component versions
Version detail for the major components that comprise MCR 23.0.15 is presented in the table below:
Component |
Version |
|---|---|
23.0.15 |
|
Fipster (Go runtime) |
|
Known issues
Known issues that apply to Moby 23.0.15 and thus also to MCR 23.0.15 include:
moby/moby#47728 The DNS records for containers on a node that has restarted may not be resolvable by containers on other nodes on the same overlay network. This may also occur without a daemon restart, if the underlay network is experiencing packet loss at the time the container is started. Only recently uncovered, this has been an issue since the advent of the NetworkDB moby component.
23.0.14
Release date |
Name |
Upstream release |
|---|---|---|
2024-JULY-29 |
MCR 23.0.14 |
Moby 23.0.14 and Docker CLI 23.0.10 |
Changelog
MCR 23.0.14 comprises the Moby 23.0.14 upstream release.
Changes specific to MCR
MCR contains the following component updates:
containerd 1.6.33
runc 1.1.13-m1
cri-dockerd 0.3.15
Fipster (Go runtime) go1.21.12m
Changes from upstream
The upstream pull requests detailed in the sections that follow are those that pertain to the MCR product. For the complete list of changes and pull requests upstream, refer to the github-milestones-23.0.14.
What is new
The MCR 23.0.14 patch release focuses on the delivery of CVE and bug fixes.
Bug fixes
Moby
moby/moby#47891 Do not depend on containerd platform. Parse to return a typed error.
moby/moby#47988 builder/mobyexporter: Add missing nil check.
containerd
containerd/containerd#10271 Migrate log imports to
github.com/containerd/log.containerd/containerd#10267 Migrate
errdefspackage togithub.com/containerd/errdefs.containerd/containerd#10268 Fix usage of “unknown” platform.
containerd/containerd#10263 Explicitly set release latest to false.
containerd/errdefs#1 Add common files.
cri-dockerd
Mirantis/cri-dockerd/#373 Add common files.
runc
opencontainers/runc#4231 runc list: fix race with runc delete.
opencontainers/runc#4277 Fix set nofile rlimit error.
opencontainers/runc#4284 libct/cg/fs: fix setting rt_period vs rt_runtime.
opencontainers/runc#4315 Fix a debug msg for user ns in nsexec.
opencontainers/runc#4316 script/*: fix gpg usage wrt keyboxd.
opencontainers/runc#4244 Silence security false positives from golang/net.
opencontainers/runc#4257 libcontainer: allow containers to make apps think fips is enabled/disabled for testing.
Security
The runc binaries provided here were built with go1.21.11, which includes a
security fix
for os.RemoveAll to fix a bug that would allow an attacker to trick runc
into deleting a directory on the host. We encourage users to update, and if
they build runc themselves, make sure they build their binaries using
go1.21.11 or later, or go1.22.4 or later.
GitHub milestones
The GitHub milestones offer full detail on the pull requests and changes as they correlate to the upstream Moby 23.0.14 release:
Major component versions
Version detail for the major components that comprise MCR 23.0.14 is presented in the table below:
Component |
Version |
|---|---|
Fipster (Go runtime) |
|
Known issues
Known issues that apply to Moby 23.0.14 and thus also to MCR 23.0.14 include:
moby/moby#47728 The DNS records for containers on a node that has restarted may not be resolvable by containers on other nodes on the same overlay network. This may also occur without a daemon restart, if the underlay network is experiencing packet loss at the time the container is started. Only recently uncovered, this has been an issue since the advent of the NetworkDB moby component.
23.0.13
Release date |
Name |
Upstream release |
|---|---|---|
2024-JUNE-18 |
MCR 23.0.13 |
Moby 23.0.13 and Docker CLI 23.0.10 |
Changelog
MCR 23.0.13 comprises the Moby 23.0.13 upstream release.
Changes specific to MCR
MCR contains the following component updates:
containerd
1.6.32
Changes from upstream
The upstream pull requests detailed in the sections that follow are those that pertain to the MCR product. For the complete list of changes and pull requests upstream, refer to the GitHub milestones.
What is new
The MCR 23.0.13 patch release focuses on the delivery of CVE and bug fixes.
Bug fixes
moby/moby#37175 Docker node promote failing.
containerd/containerd#10234 Handle unsupported config versions.
containerd/containerd#10212 Preserve CL_UNPRIVILEGED locked flags during remount of bind mounts.
containerd/containerd#10199 Update metadata snapshotter to lease on already exists.
containerd/containerd#10130 Update apparmor template to allow confined runc to kill containers
containerd/containerd#10103 Prevent GC from schedule itself with 0 period.
containerd/containerd#9993 Configure otel from env instead of config.toml.
containerd/containerd#10127 Fix snapshotter root path when not under containerd root.
containerd/containerd#10119 Fix CreatedAt time set to 269 years ago if create network failed.
containerd/containerd#10045 Fix unexpected order of mounts.
containerd/containerd#10113 Update HTTP fallback to better account for TLS timeout and previous attempts.
containerd/containerd#10064 Fix use of invalid token on retry fetching layer.
Deprecations
containerd/containerd#9993 Configure otel from env instead of config.toml.
GitHub milestones
The GitHub milestones offer full detail on the pull requests and changes as they correlate to the upstream Moby 23.0.13 release:
Major component versions
Version detail for the major components that comprise MCR 23.0.13 is presented in the table below:
Component |
Version |
|---|---|
Fipster (Go runtime) |
|
Known issues
Known issues that apply to Moby 23.0.13 and thus also to MCR 23.0.13 include:
moby/moby#47728 The DNS records for containers on a node that has restarted may not be resolvable by containers on other nodes on the same overlay network. This may also occur without a daemon restart, if the underlay network is experiencing packet loss at the time the container is started. Only recently uncovered, this has been an issue since the advent of the NetworkDB moby component.
23.0.12
Release date |
Name |
Upstream release |
|---|---|---|
2024-MAY-28 |
MCR 23.0.12 |
Moby 23.0.12 and Docker CLI 23.0.10 |
Changelog
MCR 23.0.12 comprises the Moby 23.0.12 upstream release.
Changes specific to MCR
MCR contains the following component updates:
cri-dockerd
0.3.14Fipster (Go runtime)
go1.21.10m
What is new
The MCR 23.0.12 patch release focuses on the delivery of CVE and bug fixes.
Security
The upgrade to cri-dockerd 0.3.14 resolves the following CVE:
The upgrade to Fipster resolves the following CVE:
Changes from upstream
The upstream pull requests detailed in the sections that follow are those that pertain to the MCR product. For the complete list of changes and pull requests upstream, refer to the GitHub milestones.
Enhancements
moby/moby#47831 apparmor: Allow confined runc to kill containers.
moby/moby#47780 Don’t check source exists with CreateMountpoint.
Security
Resolves the following CVE in moby/moby:
GitHub milestones
The GitHub milestones offer full detail on the pull requests and changes as they correlate to the upstream Moby 23.0.12 release:
Major component versions
Version detail for the major components that comprise MCR 23.0.12 is presented in the table below:
Component |
Version |
|---|---|
Fipster (Go runtime) |
|
Known issues
Known issues that apply to Moby 23.0.12 and thus also to MCR 23.0.12 include:
moby/moby#47728 The DNS records for containers on a node that has restarted may not be resolvable by containers on other nodes on the same overlay network. This may also occur without a daemon restart, if the underlay network is experiencing packet loss at the time the container is started. Only recently uncovered, this has been an issue since the advent of the NetworkDB moby component.
ENGINE-855 Promoting a worker node to the manager role shortly after demoting a different manager node down to a worker role can cause the newly promoted node to fail. The node fails before it becomes a manager and is never joined to the Raft quorum.
Workaround:
Wait 30 seconds between demoting a manager node to a worker role and promoting a different worker node to a manager role. If a node promotion fails:
Run the docker node rm command from a different manager node to remove the failed worker node from the cluster.
Run the docker swarm leave command from the failed worker node to have that node exit the cluster. The worker node can now rejoin the cluster as a fresh manager.
23.0.11
Release date |
Name |
Upstream release |
|---|---|---|
2024-MAY-06 |
MCR 23.0.11 |
Moby 23.0.11 and Docker CLI 23.0.10 |
Changelog
MCR 23.0.11 comprises the Moby 23.0.11 upstream release.
Changes specific to MCR
MCR contains the following component updates:
containerd
1.6.31-rc.1runc
1.1.12-m3cri-dockerd
0.3.13Fipster (Go runtime)
go1.21.9m3
What is new
The MCR 23.0.11 patch release focuses on the delivery of CVE and bug fixes.
Security
The upgrade to cri-dockerd 0.3.13 resolves the following CVE:
The upgrade to runc/ctr 1.1.12-m3 resolves the following CVEs:
The upgrade to buildx dependencies resolves the following CVE:
The upgrade to Fipster resolves the following CVE:
Functional
The configured Runtime Enforcement mode for Docker Content Trust is reported in
docker infounder the Server labelcom.docker.content-trust.mode.The Docker Official Images root keys embedded in MCR have been updated to include the key used to sign images in the
library/eqmxrepository.
Changes from upstream
The upstream pull requests detailed in the sections that follow are those that pertain to the MCR product. For the complete list of changes and pull requests upstream, refer to the GitHub milestones.
Security
Resolves the following CVE in moby/moby:
Bug fixes
moby/moby#47515 daemon: overlay2: remove world writable permission from the lower file
moby/moby#47529 builder-next: fix missing lock in ensurelayer.
moby/moby#47535 volume: Don’t decrement refcount below 0.
moby/moby#47699 Fix cases where we are wrapping a nil error.
containerd/containerd#10038 Fix runc shim to only defer init process exits.
GitHub milestones
The Github milestones offer full detail on the pull requests and changes as they correlate to the upstream Moby 23.0.11 release:
Major component versions
Version detail for the major components that comprise MCR 23.0.11 is presented in the table below:
Component |
Version |
|---|---|
Fipster (Go runtime) |
|
Known issues
Known issues that apply to Moby 23.0.11 and thus also to MCR 23.0.11 include:
moby/moby#47728 The DNS records for containers on a node that has restarted may not be resolvable by containers on other nodes on the same overlay network. This may also occur without a daemon restart, if the underlay network is experiencing packet loss at the time the container is started. Only recently uncovered, this has been an issue since the advent of the NetworkDB moby component.
ENGINE-855 Promoting a worker node to the manager role shortly after demoting a different manager node down to a worker role can cause the newly promoted node to fail. The node fails before it becomes a manager and is never joined to the Raft quorum.
Workaround:
Wait 30 seconds between demoting a manager node to a worker role and promoting a different worker node to a manager role. If a node promotion fails:
Run the docker node rm command from a different manager node to remove the failed worker node from the cluster.
Run the docker swarm leave command from the failed worker node to have that node exit the cluster. The worker node can now rejoin the cluster as a fresh manager.
23.0.10
Release date |
Name |
Upstream release |
|---|---|---|
2024-MAR-20 |
MCR 23.0.10 |
Moby 23.0.10 and Docker CLI 23.0.10 |
Important
Following the initial MCR 23.0.10 patch release, as testing and internal usage continued, it was discovered that Mirantis customers on Linux could be impacted by an upstream race condition issue in the 1.6.30-rc.1 version of containerd. To remedy the matter, Mirantis quickly replaced that version of containerd with a new version, containerd 1.6.30-rc.2.
Mirantis recommends that you check the containerd version on your MCR 23.0.10 deployment. If you have containerd 1.6.30-rc.1, download and install containerd 1.6.30-rc.2.
To learn more about the upstream race container issue, refer to Mirantis patches containerd to address race condition on the Mirantis blog.
Changelog
MCR 23.0.10 comprises the Moby 23.0.10 upstream release.
Changes specific to MCR
MCR contains the following component updates:
containerd
1.6.30-rc.2runc
1.1.12-rc1.m1cri-dockerd
0.3.11Fipster (Go runtime)
go1.21.8m1
What is new
The MCR 23.0.10 patch release focuses on the delivery of CVE and bug fixes.
Security
The upgrade to cri-dockerd 0.3.11 resolves the following CVEs:
The upgrade to runc/ctr 1.1.12-m1 resolves the following CVEs:
The upgrade to containerd 1.6.30-rc.2 resolves the following CVEs:
The upgrade to buildkit 0.10.7-m1 resolves the following CVE:
Resolves the following CVEs in rootlesskit:
Changes from upstream
The upstream pull requests detailed in the sections that follow are those that pertain to the MCR product. For the complete list of changes and pull requests upstream, refer to the GitHub milestones.
Security
Resolves the following CVE in moby/dockerd:
Resolves the following CVE in Golang:
Bug fixes
moby/moby#47307 Docker build cache broken after v24.0.7 when building “ltsc2019/1809” Windows container images on Windows 11.
moby/moby#47325 Plugins: Fix panic when fetching by digest.
containerd/containerd#9726 CRI pause image is not pinned when it’s pulled by ctr.
containerd/containerd#7802 Containerd v1.6.12 slow memory leak when pod readiness probe gets stuck forever.
containerd/containerd#9745 Glob pattern matching not applied to relative paths.
containerd/containerd#9719 TaskExit event can be sent for an exec process after TaskExit is sent for the init process.
GitHub milestones
The Github milestones offer full detail on the pull requests and changes as they correlate to the upstream Moby 23.0.10 release:
Major component versions
Version detail for the major components that comprise MCR 23.0.10 is presented in the table below:
Component |
Version |
|---|---|
Fipster (Go runtime) |
|
23.0.9-1
For information on the MCR 23.0.9-1 release and its effect on MKE, refer to the the following technical bulletins:
MCR Technical Bulletin: runc process.cwd and leaked fds container breakout
MKE Technical Bulletin: Understanding the Potential Impact and Mitigation of CVE-2024-21626
Important
Launchpad users should confirm that they have installed the latest version before using the product to install MCR 23.0.9-1.
Release date |
Name |
Upstream release |
|---|---|---|
2024-FEB-08 |
MCR 23.0.9-1 |
Moby 23.0.9 and Docker CLI 23.0.9 |
Changelog
MCR 23.0.9-1 comprises the Moby 23.0.9 upstream release.
Changes specific to MCR
An upgrade to runc 1.1.11-rc1.m1 resolves CVE-2024-21626.
Major component versions
Version detail for the major components that comprise MCR 23.0.9-1 is presented in the table below:
Component |
Version |
|---|---|
Fipster (Go runtime) |
|
0.10.7 |
|
23.0.9
Release date |
Name |
Upstream release |
|---|---|---|
2024-JAN-31 |
MCR 23.0.9 |
Moby 23.0.9 and Docker CLI 23.0.9 |
Changelog
MCR 23.0.9 comprises the Moby 23.0.9 upstream release.
Changes specific to MCR
Fixed an issue that pertains to the enabling of FIPS for Swarm. Users need to be aware that with this fix in place, FIPS-disabled nodes can no longer join a FIPS-enabled cluster.
Fixed an issue that prevented docker exec from working in FIPS mode.
MCR contains the following component updates:
containerd 1.6.28-rc.1
cri-dockerd 0.3.9
buildx 0.12.0m (4932eecc)
Fipster (Go runtime)
1.20.12m1
Changes from upstream
The upstream pull requests detailed in the sections that follow are those that pertain to the MCR product. For the complete list of changes and pull requests upstream, refer to the GitHub milestones.
What is new
The MCR 23.0.9 patch release focuses on the delivery of CVE and bug fixes.
Security
The upgrade to cri-dockerd 0.3.9 resolves the following CVEs:
The upgrade to runc/ctr 1.1.11-rc1 resolves the following CVEs:
The upgrade to containerd 1.6.28-rc.1 resolves the following CVEs:
The upgrade to buildx 0.12.0m resolves the following CVE:
Bug fixes
moby/moby#46621
client.ContainerWaitpreviously returned the wrong error when context is cancelled.containerd/containerd#9613 Update of shim pidfile permissions to 0644.
containerd/containerd#9441 Fixed windows default path overwrite issue.
containerd/containerd#9453 Update of push to inherit distribution sources from parent.
containerd/containerd/GHSA-7ww5-4wqc-m92c Mask
/sys/devices/virtual/powercappath in runtime spec and deny in default apparmor profile.containerd/containerd#9111 Check whether content actually needed to be pushed to remote registry, and also whether the cross-repo was mounted or already existed.
containerd/containerd#9105 Soft deprecate log package.
containerd/containerd/#9189 Always try to establish the TLS connection when TLS is configured.
containerd/containerd/#9169 CRI: stop recommending
disable_cgroup.containerd/containerd/#9150 Allow images with artifacts layers to pull.
containerd/containerd/#9166 Require plugins to succeed after registering readiness.
containerd/containerd/#9210 Circumvent potential deadlock in create handler in
containerd-shim-runc-v2.containerd/containerd/#9236 Added handling for missing basic auth credentials.
containerd/containerd/#9267 Addition of a new image label if it is docker schema 1.
containerd/containerd/#9300 Fixed ambiguous TLS fallback.
containerd/containerd/#9329 Expose usage of deprecated features
containerd/containerd/#9345 Fixed shimv1 leak issue.
containerd/containerd/#9382 CRI: fix using the pinned label to pin image.
GitHub milestones
The Github milestones offer full detail on the pull requests and changes as they correlate to the upstream Moby 23.0.9 release:
Major component versions
Version detail for the major components that comprise MCR 23.0.9 is presented in the table below:
Component |
Version |
|---|---|
Fipster (Go runtime) |
|
0.10.7 |
|
23.0.8
Release date |
Name |
Upstream release |
|---|---|---|
2023-11-20 |
MCR 23.0.8 |
Moby 23.0.8 and Docker CLI 23.0.8 |
Changelog
MCR 23.0.8 comprises the Moby 23.0.8 upstream release.
Changes specific to MCR
MCR contains the following component updates:
containerd 1.6.25-rc.1
cri-dockerd 0.3.7
buildx 0.12.0-rc1
Fipster (Go runtime)
go1.20.10m1
Changes from upstream
The upstream pull requests detailed in the sections that follow are those that pertain to the MCR product. For the complete list of changes and pull requests upstream, refer to the GitHub milestones.
What is new
The MCR 23.0.8 patch release focuses on the delivery of CVE and bug fixes.
Security
Resolved NVD CVE-2023-39325
Resolved NVD CVE-2023-44487
Deny containers access to
/sys/devices/virtual/powercapby default, a change that hardens against CVE-2020-8694, CVE-2020-8695, CVE-2020-12912, and an attack known as the PLATYPUS attack.For more detail, refer to https://github.com/moby/moby/commit/81ebe71275768629689a23bc3bca34b3b374a6a6.
Bug fixes
moby/moby#46704 Atomically fixed an issue wherein images failed to pull when interrupted by a power cut.
GitHub milestones
The Github milestones offer full detail on the pull requests and changes as they correlate to the upstream Moby 23.0.8 release:
Major component versions
Version detail for the major components that comprise MCR 23.0.8 is presented in the table below:
Component |
Version |
|---|---|
Fipster (Go runtime) |
|
0.10.7-0.20230412161310-d52b2d584242 |
|
23.0.7
Release date |
Name |
Upstream release |
|---|---|---|
2023-09-26 |
MCR 23.0.7 |
Moby 23.0.7 and Docker CLI 23.0.7 |
Changelog
MCR 23.0.7 comprises the Moby 23.0.7 upstream release.
Changes specific to MCR
MCR contains the following component updates:
containerd v1.6.22, which fixes the following CVEs:
Fipster (Go runtime)
go1.19.12m1, which fixes:Resolved CVE-2023-29409
Security fix net/http: insufficient sanitization of Host header.
Changes from upstream
The upstream pull requests detailed in the sections that follow are those that pertain to the MCR product. For the complete list of changes and pull requests upstream, refer to the GitHub milestones.
What is new
The MCR 23.0.7 patch release focuses on the delivery of CVE and bug fixes.
Bug fixes
moby/moby#45635 Fixed an issue wherein encrypted overlay networks did not work on ports other than 4789.
GitHub milestones
The Github milestones offer full detail on the pull requests and changes as they correlate to the upstream Moby 23.0.7 release:
Major component versions
Version detail for the major components that comprise MCR 23.0.7 is presented in the table below:
Component |
Version |
|---|---|
Fipster (Go runtime) |
|
0.10.7-0.20230412161310-d52b2d584242 |
|
23.0.6
Release date |
Name |
Upstream release |
|---|---|---|
2023-07-13 |
MCR 23.0.6 |
Moby 23.0.6 and Docker CLI 23.0.6 |
Changelog
MCR 23.0.6 comprises the Moby 23.0.6 upstream release.
Changes specific to MCR
MCR contains the following component versions:
Fipster (Go runtime)
go1.19.10m1Contains fixes for the following CVEs: CVE-2023-29402, CVE-2023-29403 CVE-2023-29404, and CVE-2023-29405.
containerd
v1.6.21buildx
0.10.5cri-dockerd
0.3.4
Changes from upstream
The upstream pull requests detailed in the sections that follow are those that pertain to the MCR product. For the complete list of changes and pull requests upstream, refer to the GitHub milestones.
What is new
The MCR 23.0.6 patch release focuses on the delivery of CVE and bug fixes.
Bug fixes
moby/moby#45465 Fixed an issue wherein the vfs storage driver was not working on NFS.
GitHub milestones
The Github milestones offer full detail on the pull requests and changes as they correlate to the upstream Moby 23.0.6 release:
Major component versions
Version detail for the major components that comprise MCR 23.0.5 is presented in the table below:
Component |
Version |
|---|---|
Fipster (Go runtime) |
|
0.10.7-0.20230412161310-d52b2d584242 |
|
23.0.5
Release date |
Name |
Upstream release |
|---|---|---|
2023-05-16 |
MCR 23.0.5 |
Moby 23.0.5 and 23.0.4, Docker CLI 23.0.5 and 23.0.4 |
Changelog
MCR 23.0.5 combines the Moby 23.0.4 and Moby 23.0.5 upstream releases.
Changes specific to MCR
MCR contains the following component versions:
Fipster (Go runtime)
go1.19.8m1Contains fixes for the following CVEs: CVE-2023-24534, CVE-2023-24536 CVE-2023-24537, CVE-2023-24538.
containerd
v1.6.20
Changes from upstream
The upstream pull requests detailed in the sections that follow are those that pertain to the MCR product. For the complete list of changes and pull requests upstream, refer to the GitHub milestones.
What is new
docker/cli#4229 Added the
--all/-aoption to thedocker volume prunecommand.docker/cli#4320 Added the
--format=jsonoption to thedocker infocommand.
Bug fixes
docker/cli#4141 Fixed a performance regression introduced in Docker CLI 23.0.0.
docker/cli#4157 Fixed an issue wherein the progress indicator on docker cp was not functioning as intended.
docker/cli#4177 Fixed an issue with shell completion for docker compose --file.
moby/moby#45246 Fixed an error that was caused by the incorrect handling of “default-address-pools” in
daemon.json.moby/moby#45350 Fixed a log loss with the AWSLogs log driver.
moby/moby#45403 Fixed a regression introduced in
v23.0.4wherein dockerd would refuse to start if thefixed-cidrconfig parameter was provided but notbip.moby/moby#45376 Fixed a panic in libnetwork that occurred during daemon startup.
moby/moby#45410 Fixed an issue wherein the
tagevent was not sent when an image was built with buildx.
GitHub milestones
The Github milestones offer full detail on the pull requests and changes as they correlate to the upstream Moby 23.0.4 and Moby 23.0.5 releases:
Major component versions
Version detail for the major components that comprise MCR 23.0.5 is presented in the table below:
Component |
Version |
|---|---|
Fipster (Go runtime) |
|
0.10.7-0.20230208155512-4f0ee09c40e2 |
|
23.0.3
Release date |
Name |
Upstream release |
|---|---|---|
2023-04-04 |
MCR 23.0.3 |
Moby 23.0.3 and 23.0.2, Docker CLI 23.0.3 and 23.0.2 |
Changelog
MCR 23.0.3 combines the Moby 23.0.2 and Moby 23.0.3 upstream releases.
Changes specific to MCR
MCR contains the following component versions:
Fipster (Go runtime)
go1.19.7m3Fixes for Go CVEs: CVE-2022-41724, CVE-2022-41723, CVE-2022-41725, CVE-2022-41722, and CVE-2023-24532.
Fixes for FIPS module CVEs: CVE-2023-0286, CVE-2023-0215, and CVE-2022-4304.
Early backport of Go CL 478660 to solve a regression related to
RLIMIT_NOFILE.
containerd
v1.6.19buildx
v0.10.4cri-dockerd
v0.3.1
Changes from upstream
The upstream pull requests detailed in the sections that follow are those that pertain to the MCR product. For the complete list of changes and pull requests upstream, refer to the GitHub milestones.
What is new
The MCR 23.0.3 patch release focuses on the delivery of CVE and bug fixes.
Security
moby/moby#45110 Credentials are now redacted from Git URLs when generating BuildKit buildinfo. Fixes CVE-2023-26054.
Fixed a number of issues that can cause Swarm encrypted overlay networks to fail to uphold their guarantees, addressing CVE-2023-28841, CVE-2023-28840, and CVE-2023-28842.
A lack of kernel support for encrypted overlay networks now reports as an error.
Encrypted overlay networks are eagerly set up, rather than waiting for multiple nodes to attach.
Encrypted overlay networks are now usable on Red Hat Enterprise Linux 9 through the use of the
xt_bpfkernel module.
Users of Swarm overlay networks should review GHSA-vwm3-crmr-xfxw to ensure that unintentional exposure has not occurred. In addition, you can consult Mirantis
KB000009856for temporary mitigation instructions.
Bug fixes
containerd/containerd#8087, moby/moby#45043 Resolved a failure to start containers on detection of an AppArmor-enabled kernel, due to missing checks for
apparmor_parser.moby/moby#45159 Fixed an issued wherein anonymous volumes created by a
VOLUMEline in a Dockerfile were being excluded from volume prune.moby/moby#45155 Fixed an issue wherein errors were not properly propagated during removal of volumes on a Swarm node.
moby/moby#45112 Initiated a temporary fix in BuildKit
COPY --linkby disabling mergeop/diffop optimization.moby/swarmkit#3112, moby/moby#45107 Fixed an issue wherein child tasks were not properly cleaned up following the removal of a parent Swarm job.
moby/swarmkit#3082, moby/moby#45107 Fixed an issue with Swarm service creation logic that prevented a GenericResource and a non-default network from being used together.
moby/swarmkit#3116, moby/moby#45107 Fixed an issue wherein Swarm CSI support required that the CSI plugin offer staging endpoints in order to publish a volume.
containerd/fifo#47, moby/moby#45051 Fixed an issue wherein a panic occurred due to log buffering in a small number of configurations.
moby/moby#45016 Errors that originate in the REST-to-Swarm-gRPC-API translation layer are now logged at the debug level, to reduce redundancy and noise.
moby/moby#45000 Fixed an issue wherein a DNS resolution problem affected containers created with --dns-opt or --dns-search when systemd-resolved was used outside the container.
moby/moby#44980 Fixed a panic that occurred whenever an attempt was made to log a malformed/incorrect DNS query that originated from a container.
docker/cli#4107 Improved the speed of docker ps by allowing users to opt out of size calculations using --size=false.
docker/cli#4092 Extended support for Bash completion to all plugins.
docker/cli#4083 Fixed an issue wherein docker stack deploy failed on Windows when special environment variables set by
cmd.exeare present.docker/cli#4065 Added forward compatibility for future API versions by considering empty image tags to be the same as
<none>.docker/cli#4063 Context files are now written atomically to reduce the probability of corruption, with improvements made to the correlating error message.
GitHub milestones
The Github milestones offer full detail on the pull requests and changes as they correlate to the upstream Moby 23.0.2 release:
In addition, as a security-only release, Moby 23.0.3 is tracked by a GitHub security advisory rather than a milestone:
Major component versions
Version detail for the major components that comprise MCR 23.0.3 is presented in the table below:
Component |
Version |
|---|---|
Fipster (Go runtime) |
|
0.10.7-0.20230208155512-4f0ee09c40e2 |
|
23.0.1
Release date |
Name |
Upstream release |
|---|---|---|
2023-02-23 |
MCR 23.0.1 |
Moby 23.0.1 and 23.0.0, Docker CLI 23.0.1 and 23.0.0 |
Highlights
Enhancement |
Detail |
|---|---|
Storage driver removals |
Beginning with the release of MCR 23.0, Mirantis no longer delivers unsupported storage drivers to customers. While this creates an upgrade barrier for customers using MCR 20.10 with an unsupported storage driver, it is certain to prevent the late discovery of an unsupportable MCR deployment.
In addition, Mirantis continues to make the In removing the unsupported storage drivers, Mirantis aims to align customers with a longer-term migration to new storage backends that are currently under development in the Moby project. Other points of interest:
|
Semantic Versioning (SemVer) format |
Beginning with the MCR 23.0 release, in alignment with Moby, Semantic Versioning (SemVer) replaces Calendar Versioning (CalVer). Upstream Moby is moving to SemVer as part of the migration to a Go module, however Moby 23.0 is not yet Go module compatible. |
CSI drivers |
MCR 23.0 introduces experimental support for Container Storage Interface (CSI) drivers in Swarm. CSI drivers are the same storage drivers that Kubernetes uses, and as Swarm matures as a CSI-compliant implementation it is expected that an entire ecosystem of persistent storage backends will become available. For use with Swarm, a CSI driver must not have a direct coupling to the Kubernetes control plane. The driver must also be packaged natively for Swarm as an Engine plugin. At this time, CSI on Swarm is only fit for development and experimental use. Mirantis is working actively with the Moby development community to evangelize Swarm CSI and further develop its implementation, quickly addressing any bugs and missing features as these become apparent. |
BuildKit and buildx by default |
MCR 23.0 defaults to the BuildKit builder ( Refer to the upstream documentation, Differences between legacy builder and BuildKit for more information. |
Volume prune and API 1.42 |
The MCR 23.0 release increments the supported Docker Engine API version to 1.42. With this version of the API, the volume prune action only considers anonymous volumes, ignoring those that were given a name at creation. This change in behavior only occurs when both the CLI and daemon support API version 1.42. Only MCR 23.0 supports API 1.42 at this time, and thus an updated API client such as the MCR 23.0 CLI is required to encounter this new behavior. Users should be aware that older versions of the Docker Engine API continue to consider both anonymous and named volumes when performing a volume prune. A new Refer to Docker Engine API (1.42) for the full API documentation, and to Engine API version history for the full list of changes. |
Windows Server 2019 required |
Support for Windows Server 2016 is dropped in MCR 23.0. Windows Server RS5 / LTSC 2019 (build 17763) is the new baseline version. |
Health checks |
In MCR 23.0, the overhead that is required to perform a health check is no longer counted as part of the time threshold. Health checks now properly resume when the daemon is restarted with running containers. Also, rather than being left to hang indefinitely, timed-out health checks are now more reliably killed. |
Rootless and seccomp |
MCR 23.0 further develops rootless mode by improving support for privileged features, and by making significant enhancements to the capabilities of the seccomp filtering implementation. Advanced MCR users should consider the following changes when diagnosing issues with privilege and permissions:
|
Changelog
MCR 23.0.1 represents the first iteration of the MCR 23.0 major release, combining the Moby 23.0.0 and Moby 23.0.1 upstream releases.
Changes specific to MCR
MCR no longer builds unsupported storage drivers, also known as graphdrivers.
apparmor is now unconditionally installed on Ubuntu systems.
MCR contains the following component versions:
Fipster (Go runtime)
go1.19.5m1containerd
v1.6.17buildx
v0.10.0cri-dockerd
v0.3.0
Changes from upstream
The upstream pull requests detailed in the sections that follow are those that pertain to the MCR product. For the complete list of changes and pull requests upstream, refer to the GitHub milestones.
What is new
moby/moby#43992 Set Buildx and BuildKit as the default builder on Linux.
docker/cli#3314 Alias
docker buildtodocker buildx build.To use the legacy builder, set
DOCKER_BUILDKIT=0.Refer to Multi-stage builds to learn the differences between how BuildKit and the legacy builder handle multi-stage builds.
moby/moby#41759, moby/moby#42862 Add support for pulling
zstdcompressed layers.
moby/moby#43887, moby/moby#43993 Added support for alternate OCI runtimes that are compatible with the containerd runtime v2 API on Linux.
moby/moby#42089 Added support for the containerd
runhcsshim on Windows (off by default).moby/moby#42393 Added the
dockerd --validateoption, to check the daemon JSON configuration and exit.moby/moby#42835 Added the ability to configure the daemon HTTP proxy through flags or JSON configuration.
moby/moby#42626 Added support for RFC 3021 point-to-point networks (IPv4 /31s) and single hosts (IPv4 /32s). For networks with two or fewer addresses, IPAM does not reserve a network and broadcast address.
moby/moby#42542 Added support for setting
ipvlan_flagand using thel3sipvlan_modein theipvlannetwork driver.moby/moby#43557 Added support for displaying the value of the
metacopyoption for theoverlay2storage driver.moby/moby#43368 Added support for describing Windows devices using the syntax
IDType://ID.moby/moby#42330 Added
RootlessKit,slirp4netns, andVPNKitversion reporting.moby/moby#41982 Added experimental support for SwarmKit cluster volumes (CSI).
docker/cli#3606 CLI: Add cluster volume (CSI) options to
docker volume.docker/cli#3662 CLI: Add cluster volume (CSI) support to
docker
stack
.
docker/cli#2907 Added support for SwarmKit jobs in
docker stack deploy.docker/cli#3544 Added the
docker stack configcommand, which outputs the merged and interpolated configuration files as used bystack deploy.docker/cli#3567 Added the
docker context showcommand, which prints the name of the current context.docker/cli#2936 Added the
--format=jsonshorthand variant of--format="{{ json . }}"to all commands supporting the--formatflag.docker/cli#3377 Added a
--quietoption to both thedocker createanddocker runcommands, to suppress output when pulling an image.docker/cli#3547 Added a
--forceoption to thedocker network rmsubcommand, which causes the CLI to return a0exit code even if the network does not exist. This option has no effect on the server-side procedure for removing a network.docker/cli#3614 Added a
--signaloption to thedocker stopanddocker restartcommands.moby/moby#44703 Added a
--version(-v) flag todocker-proxy.moby/moby#44778 Plugins are now discoverable in well-known user-level paths when the daemon is running in rootless mode.
moby/moby#44777, moby/moby#44832 Improved the daemon handling of common alternate JSON encodings in the JSON configuration file, which includes the reporting of useful errors.
UTF-8 with a byte order mark is accepted.
UTF-16 with a byte order mark is accepted.
Invalid UTF-8 is reported early, with a comprehensible error message.
moby/moby#43369 Now allows the use of
STOPSIGNALthrough thedocker commitcommand.moby/moby#42132 Added a new option to the
awslogslog driver, to allow for skipping log stream creation in CloudWatch.moby/moby#42838 Added a new option to the
awslogslog driver, to specify the log format that is sent to CloudWatch.moby/moby#43100 Added a new option to the
fluentdlog driver, to set the reconnection interval.moby/moby#42224 Added new options-setters to the Go API client:
WithTLSClientConfigFromEnv(),WithHostFromEnv(), andWithVersionFromEnv().docker/cli#3429 Added generation of shell command completion through a
docker completionsubcommand.Added to the API:
moby/moby#42064
Swarmheader toGET /_pingandHEAD /_ping, which allows single-request detection of Swarm support.moby/moby#43206
signalparameter toPOST /containers/{id}/stopandPOST /containers/{id}/restart, to set the signal used.moby/moby#43484
CreateMountPointparameter toPOST /containers/create.moby/moby#42531
shared-sizeparameter toGET /images/json, to enable shared-size computation of images.moby/moby#42559
typeparameter toGET /system/df, to control which object types are considered in computing disk usage.
Removed
docker/cli#2504 Removed support for reading configuration from
~/.dockercfg.docker/cli#3739 Removed the
-gand--graphdaemon options in favor of--data-root.docker/cli#3470 Removed client-side sorting of results, in favor of the order in which the search API returns results.
docker/cli#3542 Removed warnings related to deprecated storage drivers from the CLI. Such warnings are now handled by the daemon instead.
docker/cli#3543 Removed
Experimentalclient field fromdocker version.moby/moby#43378 Explicit opt-in is required to use deprecated storage drivers, which are not automatically selected when upgrading.
moby/moby#43472 Removed deprecated support for
overlayandoverlay2storage drivers on backing filesystems withoutd_typesupport.moby/moby#44279 Removed the deprecated
overrideKernelCheckoption from theoverlay2storage driver.moby/moby#43695 Removed support for the deprecated
io.containerd.runtime.v1.linuxOCI runtime.moby/moby#42451, moby/moby#42499, moby/moby#42506, moby/moby#42511, moby/moby#42520, moby/moby#42683, moby/moby#42684, moby/moby#42685, moby/moby#43187 Removed LCOW (Linux Containers on Windows).
Removed daemon options related to legacy overlay networks used with standalone Swarm:
moby/moby#40383 Removed
--cluster-xxoptions fromdockerd.moby/moby#42247 Removed
host-discoveryand overlay networks with external k/v stores.
moby/moby#44414 Removed a deprecated
armplatform fallback.--platform linux/arm/vYnow returns an error whenarm/vYis not available rather than pulling the wrong image.moby/moby#42694 Removed the deprecated
SetCustomHTTPHeaders(),CustomHTTPHeaders()options-setters from the Go client API.moby/moby#44022 Removed the deprecated
WithDialer()option-setter from the Go client API. Instead, useWithDialContext().moby/moby#43250 Removed the daemon implementation of
opts.QuotedString, which has moved to the CLI.moby/moby#43555 Removed the separate daemon ID from the trust-key in the daemon, and disabled the generation of the trust-key.
moby/moby#43214 Removed from the API the deprecated
KernelMemoryoption fromPOST /containers/createon API version >= 1.42.moby/moby#43254 Removed daemon support for Windows versions older than Windows Server RS5 / LTSC 2019 (build 17763).
Deprecated
moby/moby#42608 Deprecated
BuilderSizeon API version >= 1.42.moby/moby#43908 Deprecated
BuildCache.Parentin favor of the newly introducedBuildCache.Parentson API version >= 1.42.moby/moby#43477 Deprecated
pkg/urlutil, moving the implementation tobuilder/remotecontext/urlutil.
Upgrades
moby/moby#42708 Upgraded
rootlesskittov0.14.4.moby/moby#44959 Upgraded
buildkittov0.10.7-0.20230208155512-4f0ee09c40e2.moby/moby#44858 Upgraded
swarmkittov2.0.0-20230119195359-904c221ac281.moby/moby#44658 Upgraded
hcsshimv0.9.6.
Security
moby/moby#41620 Changed permissions on container
hostconfig.jsonfiles to0600from0644.moby/moby#42481 Fixed
--seccomp-profilefailing to acceptunconfinedand renamed the default seccomp profile tobuiltin.moby/moby#42501 Build always done with seccomp support, and removed the
seccompbuild tag.moby/moby#43553 Added seccomp support on
riscv64.moby/moby#42648 Added support for setting flags passed to
seccomp(2)in seccomp profiles.moby/moby#42005 Refactored seccomp types to reuse runtime-spec, and added support for
ErrnoRet.moby/moby#42604 Added support for
DefaultErrnoRetinseccompprofiles.moby/moby#42649 Added an explicit
DefaultErrnoRetfield to the default seccomp profile, with no resulting behavior change.moby/moby#44563 Blocked
socketwithAF_VSOCKin the default seccomp profile.moby/moby#42083 Reenabled
process_vm_readvandprocess_vm_writevin the default seccomp profile.moby/moby#43812 Added syscalls related to PKU to the default seccomp profile.
moby/moby#43775 Now allow
clock_settime64withCAP_SYS_TIME.moby/moby#43988 Now allow
bpfwithCAP_BPFandperf_event_openwithCAP_PERFMON.moby/moby#42681 Explicitly set the
clone3syscall to returnENOSYSin the default seccomp profile, in order to ensureglibccorrectly falls back to usingclone.
Bug fixes
moby/moby#44944 Fixed an issue wherein BuildKit-enabled builds with inline caching enabled were causing the daemon to crash.
moby/moby#44959 Fixed an issue wherein BuildKit improperly loaded cached layers created by previous versions.
moby/moby#44937 Fixed an issue wherein
ipvlannetworks created prior to upgrading would prevent the daemon from starting.moby/moby#44922 Fixed an issue wherein the
overlay2storage driver failed early inmetacopytesting when it was initialized on an unsupported backing filesystem.moby/moby#44892 Fixed an issue wherein
execexit events were misinterpreted as container exits under some runtimes, such as Kata Containers.docker/cli#4004 Improved the error message that the CLI returned upon receipt of a truncated JSON response caused by the API hanging up during a request.
docker/cli#4004 Fixed an incorrect CLI exit code that occurred when attempting to execute a directory with a
runccompiled using Go 1.20.docker/cli#4004 Fixed an issue wherein
--device-write-bpsinterpreted thesizeargument not as a size but as a path.moby/moby#42661 Promoted
overlay2to default storage driver.btrfsandzfsare now opt-in.docker/cli#2708 Added a loading spinner to the
docker cpcommand.docker/cli#2819 Deprecated the
ElectAuthServerfunction and forced it to return the default registry without calling theGET /infoAPI endpoint.docker/cli#2940 Progress bars no longer reverse when Swarm services are rolled back.
docker/cli#2972
net.JoinHostPort()is now used to fix formatting with IPv6 addresses.docker/cli#3044 CLI error messages are now printed to
stderr.docker/cli#3179 Improved the performance of
docker infofor instances in which a custom--formatis used that only requires local information. Now, the CLI only uses the daemon API if it detects that information from the daemon is required.docker/cli#3245 Removed the default value from the
--stop-signalflag, as at times it may not reflect the actual default in use by the daemon.docker/cli#3257 Added Compose schema
3.10todocker stackto thus allow ommission of theversionfield (resulting inlatest).docker/cli#3445 Compose version
3is now equivalent to3.x, the latest version, indocker stack.docker/cli#3302 Fixed an issue wherein
<Ctrl-C>did not sendSIGTERMwhen invokingdocker runwithout--interactive(-i) on Windows.docker/cli#3469 Added relative source paths to the
runcommand in the-v/--volumeand-m/--mountflags.docker/cli#3627
docker exec
-t
now sets the console size for the executed process immediately upon creation.docker/cli#3645 Updated the pretty-print format of
docker info, to provide more details on installed plugins.docker/cli#3668 Added printing of warning messages for the
docker context listanddocker context usecommands, to display whenever the context is overridden by the environment.docker/cli#3694 Added a custom
aliasesannotation, to print all available aliases for a command.docker/cli#3721 The CLI no longer creates or updates the context file when running
docker context usewith the already active context.docker/cli#3791 Non-existing contexts are now ignored when
docker context rm --forceis run.docker/cli#3812 Integers can now be overridden to
0in Compose files.docker/cli#3849
SIGINT(<Ctrl-c>) now passes through to running containers rather than causing the CLI to exit.docker/cli#3892 Improved the
docker port CONTAINERUX by sorting ports prior to printing.moby/moby#39812 Improvement to the API wherein
GET /containers/{id}/logsandPOST /containers/{id}/attachnow report which raw-stream format is in use by way of theContent-typeresponse header on API version >= 1.42.moby/moby#41636 Set default sandbox size for Windows layers to 127GB, and ensured that the
--storage-optsflag applies to all storage on Windows.moby/moby#41675 Removed the plugin section from the containerd configuration file (
/var/run/docker/containerd/containerd.toml).moby/moby#41842
nullmanifests are now rejected during tar import.moby/moby#41854 Added shim configuration for custom runtimes for plugins.
moby/moby#41935 Fixed an issue wherein container health checks did not resume when the daemon was restarted.
moby/moby#42273 Fixed an issue wherein quota was disabled on cleanup of the
btrfsdriver.moby/moby#42638 Accessible host devices can now be mounted in
--privilegedrootless containers.moby/moby#42676 Fixed the incorrect handling of
**/foorecursive wildcard directory patterns in.dockerignore.moby/moby#43103
docker
import --platform
can now mark an imported image as a foreign architecture.moby/moby#43131 The validation of CPU real-time options is now performed when the daemon starts, rather than being done separately for each individual container, which allows startup to fail earlier in the process.
moby/moby#43210 Close the
namesgeneratorpackage off from new additions.moby/moby#43322 The
containers/{id}/attach/wsAPI endpoint only attaches to the requested streams, as specified by thestdin,stdout, andstderrparameters on API version >= 1.42.moby/moby#43409 Fixed an issue wherein UDP traffic in containers did not work following container restart under sustained traffic.
moby/moby#43434 Added support for pulling images with custom amd64 micro-architecture feature levels, as supported by the latest versions of Go, GCC, LLVM, and other compilers.
moby/moby#43463 Improved validation of invalid JSON requests in the API.
moby/moby#43480 Mitigated the impact of slow
execstarts on health checks. Now, check timeout only applies to the duration that the health check command is running, and the time needed to start the command no longer counts against the timeout.moby/moby#43593, moby/moby#43622 Console
ttysize is set immediately on creation.moby/moby#43659 Fixed an issue wherein
overlay2mounts were not cleaned up following failed container starts, or daemon shutdowns.moby/moby#43675 Matched manifest list resolution with
containerd.moby/moby#43813
firewalld-enabled networking is now skipped when the daemon is running in rootless mode.moby/moby#43858 Fixed an issue wherein custom NAT networks were not re-created following daemon restart if they were missing on Windows.
moby/moby#43994 Fixed an issue wherein the container health-check process would not terminate at time out.
moby/moby#44237 Fixed an issue wherein restart policies and volume refs were not correctly restored when the
live-restorefeature is enabled.moby/moby#44259 Only anonymous volumes are now pruned by default on API version >= v1.42. To restore the previous setting, wherein named volumes were also included in pruning, pass the filter
all=true.moby/moby#42715 The API now supports concurrent calls to the
GET /system/dfendpoint.moby/moby#44831 Improved the reliability of the daemon dumping the stack when sent a
SIGQUIT, and exit with status code 2 onSIGQUIT.moby/moby#43294 Improved the reliability of
docker logs -fon Windows, and prevent newlines from being dropped in thelocallog driver.moby/moby#44856 Fixed an issue wherein a rare deadlock in the daemon occurred due to the buffering of container logs.
moby/moby#44834 Improved error handling in misc filesystem operations so that the daemon can start on a overlayfs backing filesystem.
moby/moby#44863 Fixed an issue wherein
--ipc=hostwas incorrectly handled whenever the daemon was run in rootless mode.moby/moby#44752 Fixed a long-standing set of issues wherein stale conntrack entries caused incorrect routing of UDP traffic for containers.
moby/moby#44633 Fixed an issue wherein half-registered containers were listed in the API, as well as a nil pointer de-reference and panic that were caused by the use of a partially registered container in API calls.
moby/moby#44845 Fixed an issue wherein the
DOCKER-USERip6tableschain was not created.moby/moby#44727 Fixed a failure to clean up iptables rules when the
ip6tablescommand is not available.moby/moby#44811 Fixed an issue wherein a number of iptables NAT rules were not cleaned up when reenabling the userland proxy.
moby/moby#44400 Fixed a process leak that can occur when a container start fails on Linux.
moby/moby#44725 Fixed an issue wherein the
CreatedAttime of a volume was reflecting initialization and not creation.docker/cli#3901, docker/cli#3904 Fixed an issue in a number of commands wherein the CLI incorrectly reported an incompatible server rather than an unreachable server.
docker/cli#2998 Fixed broken completion of volumes in Zsh.
docker/cli#3847 Improved the output of
docker contextwhen an invalid context is present.docker/cli#3973 Removed ANSI decoration of CLI help annotations when the output is not a TTY, and added a newline for readability.
docker/cli#3986 Added
docker container removeas an alias fordocker container rm.
GitHub milestones
The Github milestones offer full detail on the pull requests and changes as they correlate to the upstream Moby 23.0.0 and Moby 23.0.1 releases:
Major component versions
Version detail for the major components that comprise MCR 23.0.1 is presented in the table below:
Component |
Version |
|---|---|
Fipster (Go runtime) |
|
0.10.7-0.20230208155512-4f0ee09c40e2 |
|
Release Compatibility Matrix
MCR 23.0 Compatibility Matrix
Mirantis Container Runtime (MCR) enables containers to run efficiently on any substrate, powering business critical applications at leading companies worldwide.
Mirantis validates MCR for the operating system environments specified here, adhering to the MKE 3.x, MSR, and MCR Maintenance Lifecycle. Support for MCR is defined in the Mirantis Cloud Native Platform Subscription Services agreement.
Note
MCR 23.0.5 is the final 23.0.x version to support Ubuntu 18.04.x, as standard LTS support for the distribution ended on 2023-May-31.
MKE 3.5.x and 3.4.x do not support Windows Server 2022.
OS distributed versions not listed in the following matrix are not supported under Standard Support Subscriptions. For such versions, contact your Mirantis rep to discuss support options.
Caution
CentOS 8 entered EOL status as of 31-December-2021. For this reason, Mirantis no longer supports CentOS 8 for all versions of MCR. We encourage customers who are using CentOS 8 to migrate onto any one of the supported operating systems, as further bug fixes will not be forthcoming.
MCR |
Max. supported Client API |
Platform |
Versions |
|---|---|---|---|
23.0.16 |
1.42 |
Oracle Linux [1] |
9.3, 9.2, 9.1, 9.0, 8.6 |
RHEL |
9.5, 9.4, 9.3, 9.2, 9.1, 9.0, 8.10, 8.9 8.8, 8.7, 8.6, 8.5, 8.4, 8.3, 8.2, 8.1, 8.0 |
||
Rocky Linux |
9.2, 9.1, 9.0, 8.8, 8.7 |
||
SLES |
15 SP6 |
||
Ubuntu |
22.04.3, 20.04.6, 20.04.5, 20.04.4 [2], 20.04.3, 20.04.2, 20.04.1, 20.04.0 |
||
Microsoft Windows Enterprise Server |
2022, 2019 |
||
23.0.15 |
1.42 |
Oracle Linux [1] |
9.3, 9.2, 9.1, 9.0, 8.6 |
RHEL |
9.4, 9.3, 9.2, 9.1, 9.0, 8.10, 8.9, 8.8, 8.7, 8.6, 8.5, 8.4, 8.3, 8.2, 8.1, 8.0 |
||
Rocky Linux |
9.2, 9.1, 9.0, 8.8, 8.7 |
||
SLES |
15 SP6, 15 SP5 12 SP5 |
||
Ubuntu |
22.04.3, 20.04.6, 20.04.5, 20.04.4 [2], 20.04.3, 20.04.2, 20.04.1, 20.04.0 |
||
Microsoft Windows Enterprise Server |
2022, 2019 |
||
23.0.14 |
1.42 |
Oracle Linux [1] |
9.3, 9.2, 9.1, 9.0, 8,6, 7.9, 7.8 |
RHEL |
9.4, 9.3, 9.2, 9.1, 9.0, 8.10, 8.9, 8.8, 8.7, 8.6, 8.5, 8.4, 8.3, 8.2, 8.1, 8.0 |
||
Rocky Linux |
9.2, 9.1, 9.0, 8.8, 8.7 |
||
SLES |
15 SP5, 12 SP5 |
||
Ubuntu |
22.04.3, 20.04.6, 20.04.5, 20.04.4 [2], 20.04.3, 20.04.2, 20.04.1, 20.04.0 |
||
Microsoft Windows Enterprise Server |
2022, 2019 |
||
23.0.13 |
1.42 |
CentOS |
7.9.2009, 7.8.2003 |
Oracle Linux [1] |
9.3, 9.2, 9.1, 9.0, 8,6, 7.9, 7.8 |
||
RHEL |
9.3, 9.2, 9.1, 9.0, 8.10, 8.9, 8.8, 8.7, 8.6, 8.5, 8.4, 8.3, 8.2, 8.1, 8.0, 7.9, 7.8 |
||
Rocky Linux |
9.2, 9.1, 9.0, 8.8, 8.7, 8.6, 8.5 |
||
SLES |
15 SP5, 12 SP5 |
||
Ubuntu |
22.04.3, 20.04.6, 20.04.5, 20.04.4 [2], 20.04.3, 20.04.2, 20.04.1, 20.04.0 |
||
Microsoft Windows Enterprise Server |
2022, 2019 |
||
23.0.12 |
1.42 |
CentOS |
7.9.2009, 7.8.2003 |
Oracle Linux [1] |
9.2, 9.1, 9.0, 8.6, 7.9, 7.8 |
||
RHEL |
9.3, 9.2, 9.1, 9.0, 8.9, 8.8, 8.7, 8.6, 8.5, 8.4, 8.3, 8.2, 8.1, 8.0, 7.9, 7.8 |
||
Rocky Linux |
9.2, 9.1, 9.0, 8.8, 8.7 |
||
SLES |
15 SP5, 12 SP5 |
||
Ubuntu |
22.04.3, 20.04.6, 20.04.5, 20.04.4 [2], 20.04.3, 20.04.2, 20.04.1, 20.04.0 |
||
Microsoft Windows Enterprise Server |
2022, 2019 |
||
23.0.11 |
1.42 |
CentOS |
7.9.2009, 7.8.2003 |
Oracle Linux [1] |
9.2, 9.1, 9.0, 8.6, 7.9, 7.8 |
||
RHEL |
9.3, 9.2, 9.1, 9.0, 8.9, 8.8, 8.7, 8.6, 8.5, 8.4, 8.3, 8.2, 8.1, 8.0, 7.9, 7.8 |
||
Rocky Linux |
9.2, 9.1, 9.0, 8.8, 8.7, 8.6, 8.5 |
||
SLES |
15 SP5, 12 SP5 |
||
Ubuntu |
22.04.3, 20.04.6, 20.04.5, 20.04.4 [2], 20.04.3, 20.04.2, 20.04.1, 20.04.0 |
||
Microsoft Windows Enterprise Server |
2022, 2019 |
||
23.0.10 |
1.42 |
CentOS |
7.9.2009, 7.8.2003 |
Oracle Linux [1] |
9.2, 9.1, 9.0, 8.6, 7.9, 7.8 |
||
RHEL |
9.3, 9.2, 9.1, 9.0, 8.9, 8.8, 8.7, 8.6, 8.5, 8.4, 8.3, 8.2, 8.1, 8.0, 7.9, 7.8 |
||
Rocky Linux |
9.2, 9.1, 9.0, 8.8, 8.7, 8.6, 8.5 |
||
SLES |
15 SP5, 12 SP5 |
||
Ubuntu |
22.04.3, 20.04.6, 20.04.5, 20.04.4 [2], 20.04.3, 20.04.2, 20.04.1, 20.04.0 |
||
Microsoft Windows Enterprise Server |
2022, 2019 |
||
23.0.9-1 |
1.42 |
CentOS |
7.9.2009, 7.8.2003 |
Oracle Linux [1] |
9.2, 9.1, 9.0, 8.6, 7.9, 7.8 |
||
RHEL |
9.3, 9.2, 9.1, 9.0, 8.9, 8.8, 8.7, 8.6, 8.5, 8.4, 8.3, 8.2, 8.1, 8.0, 7.9, 7.8 |
||
Rocky Linux |
9.2, 9.1, 9.0, 8.8, 8.7, 8.6, 8.5 |
||
SLES |
15 SP5, 12 SP5 |
||
Ubuntu |
22.04.3, 20.04.6, 20.04.5, 20.04.4 [2], 20.04.3, 20.04.2, 20.04.1, 20.04.0 |
||
Microsoft Windows Enterprise Server |
2022, 2019 |
||
23.0.9 |
1.42 |
CentOS |
7.9.2009, 7.8.2003 |
Oracle Linux [1] |
9.2, 9.1, 9.0, 8.6, 7.9, 7.8 |
||
RHEL |
9.3, 9.2, 9.1, 9.0, 8.9, 8.8, 8.7, 8.6, 8.5, 8.4, 8.3, 8.2, 8.1, 8.0, 7.9, 7.8 |
||
Rocky Linux |
9.2, 9.1, 9.0, 8.8, 8.7, 8.6, 8.5 |
||
SLES |
15 SP5, 12 SP5 |
||
Ubuntu |
22.04.3, 20.04.6, 20.04.5, 20.04.4 [2], 20.04.3, 20.04.2, 20.04.1, 20.04.0 |
||
Microsoft Windows Enterprise Server |
2022, 2019 |
||
23.0.8 |
1.42 |
CentOS |
7.9.2009, 7.8.2003 |
Oracle Linux [1] |
9.2, 9.1, 9.0, 8.6, 7.9, 7.8 |
||
RHEL |
9.2, 9.1, 9.0, 8.8, 8.7, 8.6, 8.5, 8.4, 8.3, 8.2, 8.1, 8.0, 7.9, 7.8 |
||
Rocky Linux |
9.2, 9.1, 9.0, 8.8, 8.7, 8.6, 8.5 |
||
SLES |
15 SP5, 15 SP4, 12 SP5 |
||
Ubuntu |
22.04.3, 20.04.6, 20.04.5, 20.04.4 [2], 20.04.3, 20.04.2, 20.04.1, 20.04.0 |
||
Microsoft Windows Enterprise Server |
2022, 2019 |
||
23.0.7 |
1.42 |
CentOS |
7.9.2009, 7.8.2003 |
Oracle Linux [1] |
9.2, 9.1, 9.0, 8.6, 7.9, 7.8 |
||
RHEL |
9.2, 9.1, 9.0, 8.8, 8.7, 8.6, 8.5, 8.4, 8.3, 8.2, 8.1, 8.0, 7.9, 7.8 |
||
Rocky Linux |
9.2, 9.1, 9.0, 8.8, 8.7, 8.6, 8.5 |
||
SLES |
15 SP4, 12 SP5 |
||
Ubuntu |
22.04.3, 20.04.6, 20.04.5, 20.04.4 [2], 20.04.3, 20.04.2, 20.04.1, 20.04.0 |
||
Microsoft Windows Enterprise Server |
2022, 2019 |
||
23.0.6 |
1.42 |
CentOS |
7.9.2009, 7.8.2003 |
Oracle Linux [1] |
8.6, 7.9, 7.8 |
||
RHEL |
9.0, 8.8, 8.7, 8.6, 8.5, 8.4, 8.3, 8.2, 8.1, 8.0, 7.9, 7.8 |
||
Rocky Linux |
8.8, 8.7, 8.6, 8.5 |
||
SLES |
15 SP4, 12 SP5 |
||
Ubuntu |
20.04.6, 20.04.5, 20.04.4 [2], 20.04.3, 20.04.2, 20.04.1, 20.04.0 |
||
Microsoft Windows Enterprise Server |
2022, 2019, 2016 |
||
23.0.5 |
1.42 |
CentOS |
7.9.2009, 7.8.2003 |
Oracle Linux [1] |
8.6, 7.9, 7.8 |
||
RHEL |
9.0, 8.7, 8.6, 8.5, 8.4, 8.3, 8.2, 8.1, 8.0, 7.9, 7.8 |
||
Rocky Linux |
8.7, 8.6, 8.5 |
||
SLES |
15 SP4, 12 SP5 |
||
Ubuntu |
20.04.6, 20.04.5, 20.04.4 [2], 20.04.3, 20.04.2, 20.04.1, 20.04.0, 18.04.6, 18.04.5, 18.04.4, 18.04.3, 18.04.2, 18.04.1, 18.04.0 |
||
Microsoft Windows Enterprise Server |
2022, 2019, 2016 |
||
23.0.3 |
1.42 |
CentOS |
7.9.2009, 7.8.2003 |
Oracle Linux [1] |
8.6, 7.9, 7.8 |
||
RHEL |
9.0, 8.7, 8.6, 8.5, 8.4, 8.3, 8.2, 8.1, 8.0, 7.9, 7.8 |
||
Rocky Linux |
8.7, 8.6, 8.5 |
||
SLES |
15 SP4, 12 SP5 |
||
Ubuntu |
20.04.6, 20.04.5, 20.04.4 [2], 20.04.3, 20.04.2, 20.04.1, 20.04.0, 18.04.6, 18.04.5, 18.04.4, 18.04.3, 18.04.2, 18.04.1, 18.04.0 |
||
Microsoft Windows Enterprise Server |
2022, 2019, 2016 |
||
23.0.1 |
1.42 |
CentOS |
7.9.2009, 7.8.2003 |
Oracle Linux [1] |
8.6, 7.9, 7.8 |
||
RHEL |
9.0, 8.7, 8.6, 8.5, 8.4, 8.3, 8.2, 8.1, 8.0, 7.9, 7.8 |
||
Rocky Linux |
8.7, 8.6, 8.5 |
||
SLES |
15 SP4, 12 SP5 |
||
Ubuntu |
20.04.5, 20.04.4 [2], 20.04.3, 20.04.2, 20.04.1, 20.04.0, 18.04.6, 18.04.5, 18.04.4, 18.04.3, 18.04.2, 18.04.1, 18.04.0 |
||
Microsoft Windows Enterprise Server |
2022, 2019, 2016 |
MKE 3.x, MSR, and MCR Maintenance Lifecycle
The MKE, MSR, and MCR platform subscription provides software, support, and certification to enterprise development and IT teams that build and manage critical apps in production at scale. It provides a trusted platform for all apps which supply integrated management and security across the app lifecycle, comprised primarily of Mirantis Kubernetes Engine, Mirantis Secure Registry (MSR), and Mirantis Container Runtime (MCR).
Mirantis validates the MKE, MSR, and MCR platform for the operating system environments specified in the MCR compatibility matrix, adherring to the maintenance lifecycle detailed here. Support for the MKE, MSR, and MCR platform is defined in the Mirantis Cloud Native Platform Subscription Services agreement.
Detailed here are all currently supported product versions, as well as the product versions most recently deprecated. It can be assumed that all earlier product versions are at End of Life (EOL).
Important Definitions
“Major Releases” (X.y.z): Vehicles for delivering major and minor feature development and enhancements to existing features. They incorporate all applicable Error corrections made in prior Major Releases, Minor Releases, and Maintenance Releases.
“Minor Releases” (x.Y.z): Vehicles for delivering minor feature developments, enhancements to existing features, and defect corrections. They incorporate all applicable Error corrections made in prior Minor Releases, and Maintenance Releases.
“Maintenance Releases” (x.y.Z): Vehicles for delivering Error corrections that are severely affecting a number of customers and cannot wait for the next major or minor release. They incorporate all applicable defect corrections made in prior Maintenance Releases.
“End of Life” (EOL): Versions are no longer supported by Mirantis, updating to a later version is recommended.
GA to 12 months |
12 to 18 months |
18 to 24 months |
|---|---|---|
Full support |
Full support 1 |
Limited Support for existing installations 2 |
1 Software patches for critical bugs and security issues only; no feature enablement.
2 Software patches for critical security issues only.
Mirantis Kubernetes Engine (MKE)
3.9.z |
3.8.z |
|
|---|---|---|
General Availability (GA) |
2026-MAR-24 (3.9.0) |
2024-DEC-4 (3.8.0) |
End of Life (EOL) |
2028-MAR-24 |
2026-DEC-4 |
Release frequency |
x.y.Z every 8 weeks |
x.y.Z every 8 weeks |
Patch release content |
As needed:
|
As needed:
|
Supported lifespan |
2 years 1 |
2 years 1 |
1 Refer to the Support lifecycle table for details.
EOL MKE Versions
MKE Version |
EOL date |
|---|---|
2.0.z |
2017-AUG-16 |
2.1.z |
2018-FEB-07 |
2.2.z |
2019-NOV-01 |
3.0.z |
2020-APR-16 |
3.1.z |
2020-NOV-06 |
3.2.z |
2021-JUL-21 |
3.3.z |
2022-MAY-27 |
3.4.z |
2023-APR-11 |
3.5.z |
2023-NOV-22 |
3.6.z |
2023-OCT-13 |
3.7.z |
2025-AUG-29 |
Mirantis Secure Registry (MSR)
2.10.z |
2.9.z |
|
|---|---|---|
General Availability (GA) |
2026-JUL-07 (2.10.0) |
2021-APR-12 (2.9.0) |
End of Life (EOL) |
2028-JUL-07 |
2026-DEC-01 |
Release frequency |
x.y.Z every 8 weeks |
x.y.Z every 8 weeks |
Patch release content |
As needed:
|
As needed:
|
Supported lifespan |
2 years 1 |
2 years 1 |
1 Refer to the Support lifecycle table for details.
EOL MSR Versions
MSR Version |
EOL date |
|---|---|
2.1.z |
2017-AUG-16 |
2.2.z |
2018-FEB-07 |
2.3.z |
2019-FEB-15 |
2.4.z |
2019-NOV-01 |
2.5.z |
2020-APR-16 |
2.6.z |
2020-NOV-06 |
2.7.z |
2021-JUL-21 |
2.8.z |
2022-MAY-27 |
3.0.z |
2024-APR-20 |
3.1.z |
2025-SEP-27 |
Mirantis Container Runtime (MCR)
Enterprise 29.0 |
Enterprise 25.0 |
|
|---|---|---|
General Availability (GA) |
2026-MAR-24 (29.2.1) |
2024-DEC-04 (25.0.7) |
End of Life (EOL) |
2028-MAR-24 |
2026-DEC-04 |
Release frequency |
x.y.Z every 8 weeks |
x.y.Z every 8 weeks |
Patch release content |
As needed:
|
As needed:
|
Supported lifespan |
2 years 1 |
2 years 1 |
1 Refer to the Support lifecycle table for details.
EOL MCR Versions
MCR Version |
EOL date |
|---|---|
CSE 1.11.z |
2017-MAR-02 |
CSE 1.12.z |
2017-NOV-14 |
CSE 1.13.z |
2018-FEB-07 |
EE 17.03.z |
2018-MAR-01 |
Docker Engine - Enterprise v17.06 |
2020-APR-16 |
Docker Engine - Enterprise 18.03 |
2020-JUN-16 |
Docker Engine - Enterprise 18.09 |
2020-NOV-06 |
Docker Engine - Enterprise 19.03 |
2021-JUL-21 |
MCR 19.03.8+ |
2022-MAY-27 |
MCR 20.10.0+ |
2023-DEC-10 |
MCR 23.0.0+ |
2025-JUN-04 |
Release Cadence and Support Lifecycle
With the intent of improving the customer experience, Mirantis strives to offer maintenance releases for the Mirantis Container Runtime (MCR) software every six to eight weeks. Primarily, these maintenance releases will aim to resolve known issues and issues reported by customers, quash CVEs, and reduce technical debt. The version of each MCR maintenance release is reflected in the third digit position of the version number (as an example, for MCR 23.0 the most current maintenance release is MCR 23.0.19).
Regarding major releases, MCR is dependent on Docker Engine major releases upstream. Following such a release, the Mirantis support lifespan of the resulting major version of MCR will adhere to our legacy two year standard.
End of Life Date
For information on MCR version lifecycles, refer to the MKE 3.x, MSR, and MCR Maintenance Lifecycle.
As necessary, Mirantis may produce an MCR release between upstream releases. These so-called dash releases can contain hotfixes, packaging changes or depenency changes. In such cases, these dash releases replace the previous release of the same version (as an example, MCR 23.0.9-1 replaces MCR 23.0.9).
Note
In general, MCR dash releases for a particular patch version share the same OS and kernel compatibility.
The MCR team will make every effort to hold to the release cadence stated here. Customers should be aware, though, that development and release cycles can change, and without advance notice.
Technology Preview features
A Technology Preview feature provides early access to upcoming product innovations, allowing customers to experiment with the functionality and provide feedback.
Technology Preview features may be privately or publicly available and neither are intended for production use. While Mirantis will provide assistance with such features through official channels, normal Service Level Agreements do not apply.
As Mirantis considers making future iterations of Technology Preview features generally available, we will do our best to resolve any issues that customers experience when using these features.
During the development of a Technology Preview feature, additional components may become available to the public for evaluation. Mirantis cannot guarantee the stability of such features. As a result, if you are using Technology Preview features, you may not be able to seamlessly upgrade to subsequent product releases.
Mirantis makes no guarantees that Technology Preview features will graduate to generally available features.
QuickStart: MCR on Ubuntu
Use this QuickStart guide to quickly deploy Mirantis Container Runtime (MCR) to Ubuntu systems from the repository.
Introduction
MCR installations includes the following components:
MCR engine
MCR CLI
containerd
runc
After installing MCR, you will be able to:
Use Dockerfiles to build and run images as containers.
Share images using Docker Hub.
Run applications using Docker Compose.
The following diagram illustrates the workflow for installing MCR on Ubuntu:
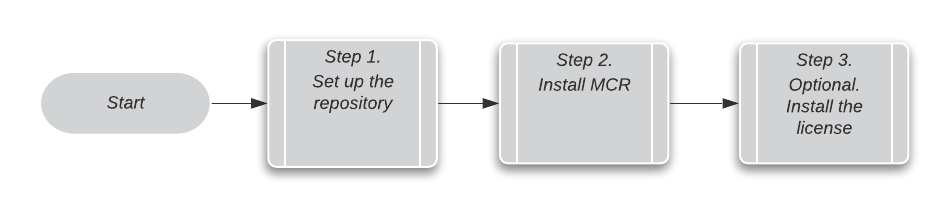
Set up the repository
To install MCR using the Mirantis repository you must first set up the repository on the host machine.
Note
MCR only supports x86_64/amd64.
Update the
aptpackage index:sudo apt-get update
Install packages that allow
aptto use a repository over HTTPS:sudo apt-get install \ apt-transport-https \ ca-certificates \ curl \ software-properties-common
Store
https://repos.mirantis.comin an environment variable:DOCKER_EE_URL="https://repos.mirantis.com"
Add a
$DOCKER_EE_VERSIONvariable into your environment.DOCKER_EE_VERSION=<mcr-version>
Add Docker’s official GPG key:
curl -fsSL "${DOCKER_EE_URL}/ubuntu/gpg" | sudo apt-key add -
Verify that you now have the key with the fingerprint
DD91 1E99 5A64 A202 E859 07D6 BC14 F10B 6D08 5F96by searching for the last eight characters of the fingerprint:sudo apt-key fingerprint 6D085F96 pub 4096R/0EBFCD88 2017-02-22 Key fingerprint = DD91 1E99 5A64 A202 E859 07D6 BC14 F10B 6D08 5F96 uid Docker Release (EE deb) <docker@docker.com> sub 4096R/6D085F96 2017-02-22
Use the following command to set up the stable repository:
sudo add-apt-repository \
  "deb [arch=$(dpkg --print-architecture)] $DOCKER_EE_URL/ubuntu \
  $(lsb_release -cs) \
  stable-$DOCKER_EE_VERSION"
Install MCR
Install the latest version of MCR and containerd:
sudo apt-get install docker-ee docker-ee-cli containerd.io
Note
To install a specific version of MCR:
sudo apt-get install docker-ee=<VERSION_STRING> docker-ee-cli=<VERSION_STRING> containerd.io
Start Docker:
sudo systemctl start docker
Verify that you installed MCR correctly:
sudo docker run hello-world
This command downloads a test image and runs it in a container. If successful, the command prints the following informational message and exits:
Hello from Docker!
This message shows that your installation appears to be working correctly.

To generate this message, Docker took the following steps:
 1. The Docker client contacted the Docker daemon.
 2. The Docker daemon pulled the "hello-world" image from the Docker Hub.
    (amd64)
 3. The Docker daemon created a new container from that image which runs the
    executable that produces the output you are currently reading.
 4. The Docker daemon streamed that output to the Docker client, which sent it
    to your terminal.

To try something more ambitious, you can run an Ubuntu container with:
 $ docker run -it ubuntu bash

Share images, automate workflows, and more with a free Docker ID:
 https://hub.docker.com/

For more examples and ideas, visit:
 https://docs.docker.com/get-started/
Install the license
An MCR license gives the user access to Mirantis Support. You can complete this guide and start using MCR right away, and install the license later.
To install the MCR license:
Purchase an MCR subscription or contact Mirantis for more information.
Follow the link to download your MCR license file found in the confirmation email you received after purchasing MCR from the Mirantis web store. If you cannot access your confirmation email, contact Mirantis.
Copy the file to the data root directory and name it
docker.lic. The default data root directory is/var/lib/docker.Restart MCR:
sudo systemctl restart docker
Verify the installation:
sudo docker info | grep -i license
What’s next
Refer to Install Mirantis Container Runtime for Ubuntu to learn about these additional installation topics:
Uninstall Mirantis Container Runtime (including old versions)
Begin using Docker Hub to find and share images.
Install Mirantis Kubernetes Engine (MKE) and Mirantis Secure Registry (MSR).
Learn about all the components of Mirantis Cloud Native Platform.
QuickStart: MCR on CentOS
Use this QuickStart guide to quickly deploy Mirantis Container Runtime (MCR) to CentOS systems from the repository.
Introduction
MCR installations includes the following components:
MCR engine
MCR CLI
containerd
runc
After installing MCR, you will be able to:
Use Dockerfiles to build and run images as containers.
Share images using Docker Hub.
Run applications using Docker Compose.
The following diagram illustrates the workflow for installing MCR on CentoOS:
Set up the repository
You only need to set up the repository once, after which you can install MCR
from the repository and upgrade as needed. MCR supports the latest version of
CentOS 64-bit running on x86_64.
Note
MCR supports the overlay2 storage drivers on CentOS. The following
limitations apply:
If you enable
selinux, MCR supportsoverlay2on CentoOS 7.4 and higher.If you disable
selinux, MCR supportsoverlay2on CentOS 7.2 and higher, with kernel version 3.10.0-693 and higher.
Remove any existing Docker repositories from
/etc/yum.repos.d/:sudo rm /etc/yum.repos.d/docker*.repo
Store
https://repos.mirantis.comin an environment variable:export DOCKERURL="https://repos.mirantis.com"
Store the value of
DOCKERURLusing ayumvariable in/etc/yum/vars/:sudo -E sh -c \ 'echo "$DOCKERURL/centos" > /etc/yum/vars/dockerurl'
Store your operating system version string (7) in
/etc/yum/vars/dockerosversion:sudo sh -c 'echo "7" > /etc/yum/vars/dockerosversion'
Install the
yum-utilsthat provides theyum-config-managerutility:sudo yum install -y yum-utils
Enable the extras RHEL repository to ensure access to the
container-selinuxpackage thatdocker-eerequires:sudo yum-config-manager --enable rhel-7-server-extras-rpms
sudo yum-config-manager --enable extras
sudo subscription-manager repos \
--enable=rhel-7-for-power-le-extras-rpms
sudo yum makecache fast
sudo yum -y install container-selinux
AWS and Azure require that you enable another repository. For AWS, refer to the official Red Hat Update Infrastructure (RHUI) documentation. For Azure, refer to the official Azure RHUI documentation.
Add the stable MCR repository:
sudo -E yum-config-manager \
--add-repo "$DOCKERURL/centos/docker-ee.repo"
Install MCR
Install the latest version of MCR and containerd:
sudo yum -y install docker-ee docker-ee-cli containerd.io
If prompted to accept the GPG key, verify that the fingerprint matches
77FE DA13 1A83 1D29 A418 D3E8 99E5 FF2E 7668 2BC9and accept it.Note
To install a specific version of MCR:
Download the three packages required for the desired MCR version from https://repos.mirantis.com/rhel/8/x86_64/stable-23.0/Packages/.
Run the following command to complete the MCR installation.
sudo yum -y install docker-ee-<version-string> \
docker-ee-cli-<version-string> containerd.io
Start Docker:
sudo systemctl start docker
Verify that you installed MCR correctly:
sudo docker run hello-world
This command downloads a test image and runs it in a container. If successful, it prints the following informational message and exits:
Hello from Docker!
This message shows that your installation appears to be working correctly.

To generate this message, Docker took the following steps:
 1. The Docker client contacted the Docker daemon.
 2. The Docker daemon pulled the "hello-world" image from the Docker Hub.
    (amd64)
 3. The Docker daemon created a new container from that image which runs the
    executable that produces the output you are currently reading.
 4. The Docker daemon streamed that output to the Docker client, which sent it
    to your terminal.

To try something more ambitious, you can run an Ubuntu container with:
 $ docker run -it ubuntu bash

Share images, automate workflows, and more with a free Docker ID:
 https://hub.docker.com/

For more examples and ideas, visit:
 https://docs.docker.com/get-started/
Install the license
An MCR license gives the user access to Mirantis Support. You can complete this guide and start using MCR right away, and install the license later.
To install the MCR license:
Purchase an MCR subscription or contact Mirantis for more information.
Follow the link to download your MCR license file found in the confirmation email you received after purchasing MCR from the Mirantis web store. If you cannot access your confirmation email, contact Mirantis.
Copy the file to the data root directory and name it
docker.lic. The default data root directory is/var/lib/docker.Restart MCR:
sudo systemctl restart docker
Verify the installation:
sudo docker info | grep -i license
What’s next
Refer to Install Mirantis Container Runtime for CentOS to learn about these additional installation topics:
Uninstall Mirantis Container Runtime (including old versions)
Begin using Docker Hub to find and share images.
Install Mirantis Kubernetes Engine (MKE) and Mirantis Secure Registry (MSR).
Learn about all the components of Mirantis Cloud Native Platform.
QuickStart: MCR on Oracle Linux
Use this QuickStart guide to quickly deploy Mirantis Container Runtime (MCR) to Oracle Linux systems from the repository.
Note
The documentation herein applies only to Oracle Linux 7. Mirantis does not support Oracle 8.
Introduction
MCR installations includes the following components:
MCR engine
MCR CLI
containerd
runc
After installing MCR, you will be able to:
Use Dockerfiles to build and run images as containers.
Share images using Docker Hub.
Run applications using Docker Compose.
The following diagram illustrates the workflow for installing MCR on Oracle Linux:
Set up the repository
Note
The documentation herein applies only to Oracle Linux 7. Mirantis does not support Oracle 8.
You only need to set up the repository once, after which you can install MCR from the repository and upgrade as needed.
MCR supports Oracle Linux 64-bit version 7.8 or later and Red Hat Compatible Kernel (RHCK) version 3.10.0-1127 or later.
Note
Mirantis recommends using fast storage, such as solid-state media.
Remove any existing Docker repositories from
/etc/yum.repos.d/:sudo rm /etc/yum.repos.d/docker*.repo
Store
https://repos.mirantis.comin an environment variable:export DOCKERURL="https://repos.mirantis.com"
Store the value of
DOCKERURLusing ayumvariable in/etc/yum/vars/:sudo -E sh -c \ 'echo "$DOCKERURL/oraclelinux" > /etc/yum/vars/dockerurl'
Install
yum-utilsto get theyum-config-managerutility:sudo yum install -y yum-utils
Enable the Oracle
ol7_addonsrepository to ensure that you have access to thecontainer-selinuxpackage thatdocker-eerequires:sudo yum-config-manager --enable ol7_addons
Add the stable MCR repository:
sudo -E yum-config-manager \
--add-repo \
"$DOCKERURL/oraclelinux/docker-ee.repo"
Install MCR
Note
The documentation herein applies only to Oracle Linux 7. Mirantis does not support Oracle 8.
Install the latest version of MCR and containerd:
sudo yum -y install docker-ee docker-ee-cli containerd.io
If prompted to accept the GPG key, verify that the fingerprint matches
77FE DA13 1A83 1D29 A418 D3E8 99E5 FF2E 7668 2BC9and accept it.Note
To install a specific version of MCR:
Download the three packages required for the desired MCR version from https://repos.mirantis.com/oraclelinux/7/x86_64/stable-23.0/Packages/.
Run the following command to complete the MCR installation.
sudo yum -y install docker-ee-<version-string> \
docker-ee-cli-<version-string> containerd.io
Start Docker:
sudo systemctl start docker
Verify that you installed MCR correctly:
sudo docker run hello-world
This command downloads a test image and runs it in a container. If successful, it prints the following informational message and exits:
Hello from Docker!
This message shows that your installation appears to be working correctly.

To generate this message, Docker took the following steps:
 1. The Docker client contacted the Docker daemon.
 2. The Docker daemon pulled the "hello-world" image from the Docker Hub.
    (amd64)
 3. The Docker daemon created a new container from that image which runs the
    executable that produces the output you are currently reading.
 4. The Docker daemon streamed that output to the Docker client, which sent it
    to your terminal.

To try something more ambitious, you can run an Ubuntu container with:
 $ docker run -it ubuntu bash

Share images, automate workflows, and more with a free Docker ID:
 https://hub.docker.com/

For more examples and ideas, visit:
 https://docs.docker.com/get-started/
Install the license
An MCR license gives the user access to Mirantis Support. You can complete this guide and start using MCR right away, and install the license later.
To install the MCR license:
Purchase an MCR subscription or contact Mirantis for more information.
Follow the link to download your MCR license file found in the confirmation email you received after purchasing MCR from the Mirantis web store. If you cannot access your confirmation email, contact Mirantis.
Copy the file to the data root directory and name it
docker.lic. The default data root directory is/var/lib/docker.Restart MCR:
sudo systemctl restart docker
Verify the installation:
sudo docker info | grep -i license
What’s next
Refer to Install Mirantis Container Runtime for Oracle Linux to learn about these additional installation topics:
Begin using Docker Hub to find and share images
Install Mirantis Kubernetes Engine (MKE) and Mirantis Secure Registry (MSR)
Learn about other components of Mirantis Cloud Native Platform
QuickStart: MCR on RHEL
Use this QuickStart guide to quickly deploy Mirantis Container Runtime (MCR) to Red Hat Enterprise Linux (RHEL) systems from the repository.
Introduction
MCR installations includes the following components:
MCR engine
MCR CLI
containerd
runc
After installing MCR, you will be able to:
Use Dockerfiles to build and run images as containers.
Share images using Docker Hub.
Run applications using Docker Compose.
The following diagram illustrates the workflow for installing MCR on RHEL:
Set up the repository
You only need to set up the repository once, after which you can install MCR from the repository and upgrade as needed. MCR supports RHEL 64-bit version 7.4 and higher running on x86_64.
Note
MCR supports the overlay2 storage drivers on RHEL. The following
limitations apply:
If you enable
selinux, MCR supportsoverlay2on RHEL 7.4 and higher (OverlayFS).If you disable
selinux, MCR supportsoverlay2on RHEL 7.2 and higher, with kernel version 3.10.0-693 and higher.
Set up the repository for RHEL 7
Remove existing Docker repositories from
/etc/yum.repos.d/:sudo rm /etc/yum.repos.d/docker*.repo
Store
https://repos.mirantis.comin an environment variable:export DOCKERURL="https://repos.mirantis.com"
Store the value of
DOCKERURLusing ayumvariable in/etc/yum/vars/:sudo -E sh -c 'echo "$DOCKERURL/rhel" > /etc/yum/vars/dockerurl'
Store your OS version string in
/etc/yum/vars/dockerosversion. Use7or include the minor version starting with7.2:sudo sh -c 'echo "<version>" > /etc/yum/vars/dockerosversion'
Install the
yum-utilsthat provides theyum-config-managerutility:sudo yum install -y yum-utils
Enable the extras RHEL repository to ensure access to the
container-selinuxpackage thatdocker-eerequires:sudo yum-config-manager --enable rhel-7-server-extras-rpms
sudo yum-config-manager --enable extras
sudo subscription-manager repos \
--enable=rhel-7-for-power-le-extras-rpms
sudo yum makecache fast
sudo yum -y install container-selinux
Enable another repository for AWS and Azure:
sudo yum-config-manager --enable rhel-7-server-rhui-extras-rpms
sudo yum-config-manager --enable rhui-rhel-7-server-rhui-extras-rpms
Add the stable MCR repository:
sudo -E yum-config-manager \
--add-repo \
"$DOCKERURL/rhel/docker-ee.repo"
Set up the repository for RHEL 8
Remove existing Docker repositories from
/etc/yum.repos.d/:sudo rm /etc/yum.repos.d/docker*.repo
Store
https://repos.mirantis.comin an environment variable.export DOCKERURL="https://repos.mirantis.com"
Store the value of
DOCKERURLusing ayumvariable in/etc/yum/vars/:sudo -E sh -c 'echo "$DOCKERURL/rhel" > /etc/yum/vars/dockerurl'
Store your OS version string in
/etc/yum/vars/dockerosversion. Use8:sudo sh -c 'echo "<version>" > /etc/yum/vars/dockerosversion'
Install the
yum-utilsthat provides theyum-config-managerutility:sudo yum install -y yum-utils
Add the stable MCR repository:
sudo -E yum-config-manager \
--add-repo \
"$DOCKERURL/rhel/docker-ee.repo"
Install MCR
Install the latest version of MCR and containerd:
sudo yum -y install docker-ee docker-ee-cli containerd.io
If prompted to accept the GPG key, verify that the fingerprint matches
77FE DA13 1A83 1D29 A418 D3E8 99E5 FF2E 7668 2BC9and accept it.Note
To install a specific version of MCR:
Download the three packages required for the desired MCR version from https://repos.mirantis.com/rhel/8/x86_64/stable-23.0/Packages/.
Run the following command to complete the MCR installation.
sudo yum -y install docker-ee-<version-string> \
docker-ee-cli-<version-string> containerd.io
Start Docker:
sudo systemctl start docker
Verify that you installed MCR correctly:
sudo docker run hello-world
This command downloads a test image and runs it in a container. If successful, it prints the following informational message and exits:
Hello from Docker!
This message shows that your installation appears to be working correctly.

To generate this message, Docker took the following steps:
 1. The Docker client contacted the Docker daemon.
 2. The Docker daemon pulled the "hello-world" image from the Docker Hub.
    (amd64)
 3. The Docker daemon created a new container from that image which runs the
    executable that produces the output you are currently reading.
 4. The Docker daemon streamed that output to the Docker client, which sent it
    to your terminal.

To try something more ambitious, you can run an Ubuntu container with:
 $ docker run -it ubuntu bash

Share images, automate workflows, and more with a free Docker ID:
 https://hub.docker.com/

For more examples and ideas, visit:
 https://docs.docker.com/get-started/
Install the license
An MCR license gives the user access to Mirantis Support. You can complete this guide and start using MCR right away, and install the license later.
To install the MCR license:
Purchase an MCR subscription or contact Mirantis for more information.
Follow the link to download your MCR license file found in the confirmation email you received after purchasing MCR from the Mirantis web store. If you cannot access your confirmation email, contact Mirantis.
Copy the file to the data root directory and name it
docker.lic. The default data root directory is/var/lib/docker.Restart MCR:
sudo systemctl restart docker
Verify the installation:
sudo docker info | grep -i license
What’s next
Refer to Install Mirantis Container Runtime for Red Hat Enterprise Linux to learn about these additional installation topics:
Begin using Docker Hub to find and share images
Install Mirantis Kubernetes Engine (MKE) and Mirantis Secure Registry (MSR).
Learn about other components of Mirantis Cloud Native Platform.