Introduction
This documentation provides information on how to deploy Mirantis Container Runtime (MCR). The documentation is intended to help operators to understand the core concepts of the product.
The information provided in this documentation set is being constantly improved and amended based on the feedback and kind requests from the consumers of MCR.
Product Overview
Mirantis Container Runtime (MCR) enables you to power your business-critical applications with the industry-leading enterprise container engine. You can run containers on any platform with a fully supported and highly secure container runtime. MCR provides the core functionality and security compliance needed to enable your container orchestration solution of choice with certified proven support for both Kubernetes and Swarm. The most common use cases include:
- Container orchestration solution
Organisations often have unique container orchestration requirements and may choose to utilise alternative systems to manage their containers. MCR provides freedom to select the best orchestration solution for your needs whilst still ensuring you have a secure, trusted, and supported container runtime to run your mission-critical workloads.
- Secure and validated containers
The challenges in ensuring that the software supply chain is secure does not stop at the container orchestration solution. The key part of securing your container solution is ensuring that only validated and trusted containers can be deployed and run. MCR combined with Mirantis Secure Registry (MSR) gives you the ability to validate and sign your container images to ensure that only approved images can be run in your environment.
- Secure validated encryption
Regulated industries need to meet federal regulations to ensure that appropriate levels of encryption are enabled. MCR provides FIPS 140-2 Validated cryptography ensuring that you meet the highest standards necessary to comply with the federal requirements.
- Multiple operating systems and infrastructures
With the drive towards multi-cloud and hybrid cloud, computing organisations need to support multiple operating systems on multiple platforms. MCR is certified to run on multiple operating systems, including CentOS, RHEL, Ubuntu, and Windows, for consistent runtime regardless of the platform.
Reference Architecture
The Mirantis Container Runtime (MCR) Reference Architecture is a work in progress, the intent of which is to keep MCR users apprised of the technical details that pertain to the differences between MCR and Docker Engine.
Storage driver compatibility
overlay2 is the only storage driver supported by MCR
25.0, with the exception of btrfs, which MCR
supports on SLES.
Deployment Guide
Mirantis Container Runtime (MCR) is a client-server application with these major components:
A server which is a type of long-running program called a daemon process (the dockerd command).
A REST API which specifies interfaces that programs can use to talk to the daemon and instruct it what to do.
A command line interface (CLI) client (the docker command).
MCR can be installed on several Linux distros as well as on Windows.
Note
MCR is derived from the Moby project, an open framework created by Docker Inc. As such, most of the product commands and setup instruction are identical to those for Docker Engine.
Install MCR on Linux distros
FIPS 140-2 cryptographic module support
Federal Information Processing Standards (FIPS) Publication 140-2 is a United States Federal security requirement for cryptographic modules.
A variant of MCR that makes use of a FIPS 140-2 certified cryptographic module
is available for supported Linux distros. You can obtain this FIPS-mode MCR
variant in the stable-25.0/fips update channel. All FIPS-mode variants of
the software components have version numbers that contain the +fips
identifier as a suffix.
To confirm that a FIPS-mode version of MCR is installed, confirm that the
docker info command lists fips under Security Options:
Security Options:
 fips
Install Mirantis Container Runtime for Oracle Linux
Warning
Mirantis Container Runtime (MCR) does not support the Oracle Linux Unbreakable Enterprise Kernel (UEK).
You can install Mirantis Container Runtime (MCR) either through the use of a repository, or by downloading and installing RPM packages.
Install and upgrade MCR from a repository
Mirantis recommends that you install MCR from our Docker repository using DNF, a tool for RPM-based distributions that works with your repositories to manage dependencies and provide automatic updates.
Note
It is not necessary to uninstall older versions of Docker or Mirantis Container Runtime prior to upgrading as package conflicts are resolved automatically by DNF.
Set up the repository
You only need to set the repository up once. After doing so, you can install MCR from the repo and repeatedly upgrade the software as necessary.
Create or modify the
/etc/yum.repos.d/docker-ee.repofile to contain the following:[mirantis] name=Mirantis Container Runtime baseurl=https://repos.mirantis.com/oraclelinux/$releasever/$basearch/<update-channel> enabled=1 gpgcheck=1 gpgkey=https://repos.mirantis.com/oraclelinux/gpg module_hotfixes=true
Note
$releaseverand$basearchare repo variables that must be placed into the/etc/yum.repos.d/docker-ee.repofile exactly as written.The final
baseurlpath segment is the update channel, which determines which MCR releases are available for installation and upgrade. The value for the latest MCR 25.0.x patch isstable-25.0and the value for the latest MCR 25.0.x patch with the FIPS-mode variant isstable-25.0/fips.
(Optional) To install a specific version of Mirantis Container Runtime 25.0, which Mirantis recommends for production systems, edit <update-channel> in the
baseurlparameter of the/etc/yum.repos.d/docker-ee.repofile to the version you want to pin.Example, for the MCR 25.0.7 non-FIPS version:
baseurl=https://repos.mirantis.com/oraclelinux/$releasever/$basearch/stable-25.0.7
Example, for the MCR 25.0.7 FIPS version:
baseurl=https://repos.mirantis.com/oraclelinux/$releasever/$basearch/stable-25.0.7/fips
Note
To ascertain which 25.0.x versions are available for pinning:
In your browser, go to https://repos.mirantis.com.
Navigate to directory for your Linux OS, and within that directory navigate to the sub-directory for your OS architecture. For example, for an Oracle Linux 9 system on an x86_64 architecture you will go to
https://repos.mirantis.com/oraclelinux/9/x86_64/.
Install from the repository
Run the following command to install MCR from the repository:
sudo dnf install docker-ee
If you are prompted to accept the GPG key, first verify that the key has the
fingerprint 77FE DA13 1A83 1D29 A418 D3E8 99E5 FF2E 7668 2BC9.
Upgrade from the repository
Run dnf upgrade to keep your MCR installation up to date with the latest MCR release that is available in the update channel you selected during the repository setup.
Install and upgrade MCR from a package
If for some reason you cannot use the repository MCR install method, you can
perform manual installation with the .rpm package files for
your release. Be aware, though, that you will need to download new packages
each time you want to upgrade MCR.
Install with a package
Download the packages for your Oracle Linux distribution, the links for which are available in the MCR release notes.
Install MCR.
sudo dnf install path/to/downloaded/packages/*.rpm
Upgrade from a package
Download the newer
.rpmpackages for your Oracle Linux version.Upgrade MCR.
sudo dnf install path/to/downloaded/packages/*.rpm
Initial setup
The Docker service is not started automatically at MCR installation. The
docker group is created, but without any users added to the group.
Configure Docker to start at boot up and start Docker.
sudo systemctl enable --now docker.service
Run the
hello-worldimage to verify that MCR is correctly installed. This command downloads a test image, runs it in a container, prints an informational message, and exits:sudo docker run hello-world
Important
Use sudo to run docker commands. For information on how to allow
non-privileged users to run docker commands, refer to the official Docker
documentation Manage Docker as a non-root user.
Uninstall Mirantis Container Runtime
Uninstall the Mirantis Container Runtime package:
sudo dnf remove docker-ee
Delete all images, containers, and volumes, as these are not automatically removed from your host:
sudo rm -rf /var/lib/docker
Delete all other Docker-related resources:
sudo rm -rf /run/docker /var/run/docker /etc/docker
Manually delete any edited configuration files.
Install Mirantis Container Runtime for Red Hat Enterprise Linux
You can install Mirantis Container Runtime (MCR) either through the use of a repository, or by downloading and installing RPM packages.
Install and upgrade MCR from a repository
Mirantis recommends that you install MCR from our Docker repository using DNF, a tool for RPM-based distributions that works with your repositories to manage dependencies and provide automatic updates.
Note
It is not necessary to uninstall older versions of Docker or Mirantis Container Runtime prior to upgrading as package conflicts are resolved automatically by DNF.
Set up the repository
You only need to set the repository up once. After doing so, you can install MCR from the repo and repeatedly upgrade the software as necessary.
Create or modify the
/etc/yum.repos.d/docker-ee.repofile to contain the following:[mirantis] name=Mirantis Container Runtime baseurl=https://repos.mirantis.com/rhel/$releasever/$basearch/<update-channel> enabled=1 gpgcheck=1 gpgkey=https://repos.mirantis.com/rhel/gpg module_hotfixes=true
Note
$releaseverand$basearchare repo variables that must be placed into the/etc/yum.repos.d/docker-ee.repofile exactly as written.The final
baseurlpath segment is the update channel, which determines which MCR releases will be available for installation and upgrade. The value for the latest MCR 25.0.x patch isstable-25.0and the value for the latest MCR 25.0.x patch with the FIPS-mode variant isstable-25.0/fips.
(Optional) To install a specific version of Mirantis Container Runtime 25.0, which Mirantis recommends for production systems, edit <update-channel> in the
baseurlparameter of the/etc/yum.repos.d/docker-ee.repofile to the version you want to pin.Example, for the MCR 25.0.7 non-FIPS version:
baseurl=https://repos.mirantis.com/rhel/$releasever/$basearch/stable-25.0.7
Example, for the MCR 25.0.7 FIPS version:
baseurl=https://repos.mirantis.com/rhel/$releasever/$basearch/stable-25.0.7/fips
Note
To ascertain which 25.0.x versions are available for pinning:
In your browser, go to https://repos.mirantis.com.
Navigate to directory for your Linux OS, and within that directory navigate to the sub-directory for your OS architecture. For example, for an RHEL 9 system on an x86_64 architecture you will go to
https://repos.mirantis.com/rhel/9/x86_64/.
Install from the repository
Run the following command to install MCR from the repository:
sudo dnf install docker-ee
If you are prompted to accept the GPG key, first verify that the key has the
fingerprint 77FE DA13 1A83 1D29 A418 D3E8 99E5 FF2E 7668 2BC9.
Upgrade from the repository
Run dnf upgrade to keep your MCR installation up to date with the latest MCR release that is available in the update channel you selected during the repository setup.
Install and upgrade MCR from a package
If for some reason you cannot use the repository MCR install method, you can
perform manual installation with the .rpm package files for
your release. Be aware, though, that you will need to download new packages
each time you want to upgrade MCR.
Install with a package
Download the packages for your RHEL distribution, the links for which are available in the MCR release notes.
Install MCR.
sudo dnf install path/to/downloaded/packages/*.rpm
Upgrade from a package
Download the newer
.rpmpackages for your RHEL version.Upgrade MCR.
sudo dnf install path/to/downloaded/packages/*.rpm
Initial setup
The Docker service is not started automatically at MCR installation. The
docker group is created, but without any users added to the group.
Configure Docker to start at boot up and start Docker.
sudo systemctl enable --now docker.service
Run the
hello-worldimage to verify that MCR is correctly installed. This command downloads a test image, runs it in a container, prints an informational message, and exits:sudo docker run hello-world
Important
Use sudo to run docker commands. For information on how to allow
non-privileged users to run docker commands, refer to the official Docker
documentation Manage Docker as a non-root user.
Uninstall Mirantis Container Runtime
Uninstall the Mirantis Container Runtime package:
sudo dnf remove docker-ee
Delete all images, containers, and volumes, as these are not automatically removed from your host:
sudo rm -rf /var/lib/docker
Delete all other Docker-related resources:
sudo rm -rf /run/docker /var/run/docker /etc/docker
Manually delete any edited configuration files.
Install Mirantis Container Runtime for Rocky Linux
You can install Mirantis Container Runtime (MCR) either through the use of a repository, or by downloading and installing RPM packages.
Install and upgrade MCR from a repository
Mirantis recommends that you install MCR from our Docker repository using DNF, a tool for RPM-based distributions that works with your repositories to manage dependencies and provide automatic updates.
Note
It is not necessary to uninstall older versions of Docker or Mirantis Container Runtime prior to upgrading as package conflicts are resolved automatically by DNF.
Set up the repository
You only need to set the repository up once. After doing so, you can install MCR from the repo and repeatedly upgrade the software as necessary.
Create or modify the
/etc/yum.repos.d/docker-ee.repofile to contain the following:[mirantis] name=Mirantis Container Runtime baseurl=https://repos.mirantis.com/rocky/$releasever/$basearch/<update-channel> enabled=1 gpgcheck=1 gpgkey=https://repos.mirantis.com/rocky/gpg module_hotfixes=true
(Optional) To install a specific version of Mirantis Container Runtime 25.0, which Mirantis recommends for production systems, edit <update-channel> in the
baseurlparameter of the/etc/yum.repos.d/docker-ee.repofile to the version you want to pin.Example, for the MCR 25.0.7 non-FIPS version:
baseurl=https://repos.mirantis.com/rocky/$releasever/$basearch/stable-25.0.7
Example, for the MCR 25.0.7 FIPS version:
baseurl=https://repos.mirantis.com/rocky/$releasever/$basearch/stable-25.0.7/fips
Note
To ascertain which 25.0.x versions are available for pinning:
In your browser, go to https://repos.mirantis.com.
Navigate to directory for your Linux OS, and within that directory navigate to the sub-directory for your OS architecture. For example, for an Rocky Linux 9 system on an x86_64 architecture you will go to
https://repos.mirantis.com/rocky/9/x86_64/.
Note
$releaseverand$basearchare repo variables that must be placed into the/etc/yum.repos.d/docker-ee.repofile exactly as written.The final
baseurlpath segment is the update channel, which determines which MCR releases will be available for installation and upgrade. The value for the latest MCR 25.0.x patch isstable-25.0and the value for the latest MCR 25.0.x patch with the FIPS-mode variant isstable-25.0/fips.
Install from the repository
Run the following command to install MCR from the repository:
sudo dnf install docker-ee
If you are prompted to accept the GPG key, first verify that the key has the
fingerprint 77FE DA13 1A83 1D29 A418 D3E8 99E5 FF2E 7668 2BC9.
Upgrade from the repository
Run dnf upgrade to keep your MCR installation up to date with the latest MCR release that is available in the update channel you selected during the repository setup.
Install and upgrade MCR from a package
If for some reason you cannot use the repository MCR install method, you can
perform manual installation with the .rpm package files for
your release. Be aware, though, that you will need to download new packages
each time you want to upgrade MCR.
Install with a package
Download the packages for your Rocky Linux distribution, the links for which are available in the MCR release notes.
Install MCR.
sudo dnf install path/to/downloaded/packages/*.rpm
Upgrade from a package
Download the newer
.rpmpackages for your Rocky Linux version.Upgrade MCR.
sudo dnf install path/to/downloaded/packages/*.rpm
Initial setup
The Docker service is not started automatically at MCR installation. The
docker group is created, but without any users added to the group.
Configure Docker to start at boot up and start Docker.
sudo systemctl enable --now docker.service
Run the
hello-worldimage to verify that MCR is correctly installed. This command downloads a test image, runs it in a container, prints an informational message, and exits:sudo docker run hello-world
Important
Use sudo to run docker commands. For information on how to allow
non-privileged users to run docker commands, refer to the official Docker
documentation Manage Docker as a non-root user.
Uninstall Mirantis Container Runtime
Uninstall the Mirantis Container Runtime package:
sudo dnf remove docker-ee
Delete all images, containers, and volumes, as these are not automatically removed from your host:
sudo rm -rf /var/lib/docker
Delete all other Docker-related resources:
sudo rm -rf /run/docker /var/run/docker /etc/docker
Manually delete any edited configuration files.
Install Mirantis Container Runtime for SLES
Warning
Mirantis Container Runtime (MCR) is not supported on OpenSUSE.
You can install Mirantis Container Runtime (MCR) either through the use of a repository, or by downloading and installing RPM packages.
Install and upgrade MCR from a repository
Mirantis recommends that you install MCR from our Docker repository using Zypper, SUSE Linux Enterprise’s package manager. This method provides a level of automation with the MCR dependencies installation and updates automation.
Note
It is not necessary to uninstall older versions of Docker or Mirantis Container Runtime prior to upgrading as package conflicts are resolved automatically by Zypper.
Set up the repository
You only need to set the repository up once. After doing so, you can install MCR from the repo and repeatedly upgrade the software as necessary.
Add the repository to Zypper:
sudo zypper addrepo --refresh
'https://repos.mirantis.com/sles/$releasever_major/$basearch/<update-channel>'
mirantis
Note
The
$releasever_majorandja$basearchmmyare repo variables that must be passed verbatim to the :command:`zypper`command without being expanded by your shell.The final path segment of the repo URL is the update channel, which determines which MCR releases will be available for installation and upgrade. The value for the latest MCR 25.0.x patch is
stable-25.0and the value for the latest MCR 25.0.x patch with the FIPS-mode variant isstable-25.0/fips.
Import the GPG key from the repository:
sudo rpm --import https://repos.mirantis.com/sles/gpg
(Optional) To install a specific version of Mirantis Container Runtime 25.0, which Mirantis recommends for production systems, specify the precise MCR version you want to pin as the <update-channel> in the repo URL.
Example, for the MCR 25.0.7 non-FIPS version:
baseurl=https://repos.mirantis.com/sles/$releasever/$basearch/stable-25.0.7
Example, for the MCR 25.0.7 FIPS version:
baseurl=https://repos.mirantis.com/sles/$releasever/$basearch/stable-25.0.7/fips
Note
To ascertain which 25.0.x versions are available for pinning:
In your browser, go to https://repos.mirantis.com.
Navigate to directory for your Linux OS, and within that directory navigate to the sub-directory for your OS architecture. For example, for an SLES 15 system on an x86_64 architecture you will go to
https://repos.mirantis.com/sles/15/x86_64/.
If the repository URL is already configured to
mirantis, you must change the URL to contain the exact MCR version that you want to pin.Remove the
mirantisnamed URL:sudo zypper removerepo mirantis
Recreate the repo URL with the pinned MCR version:
sudo zypper addrepo --refresh
'https://repos.mirantis.com/sles/$releasever_major/$basearch/<update-channel>'
mirantis
Install from the repository
Run the following command to install MCR from the repository:
sudo zypper install docker-ee
If you are prompted to accept the GPG key, verify first that the key has the
fingerprint 77FE DA13 1A83 1D29 A418 D3E899E5 FF2E 7668 2BC9.
Upgrade from the repository
Run zypper update to keep your MCR installation up to date with the latest MCR release that is available in the update channel you selected during the repository setup.
Install and upgrade MCR from a package
If for some reason you cannot use the repository MCR install method, you can
perform manual installation with the .rpm package files for
your release. Be aware, though, that you will need to download new packages
each time you want to upgrade MCR.
Download the official Mirantis GPG key.
Download the SLES packages, the links for which are available in the MCR release notes.
Import the official Mirantis GPG key:
sudo rpm --import path/to/mirantis/gpg
Install MCR.
sudo zypper install path/to/downloaded/packages/*.rpm
Upgrade from a package
Download the newer
.rpmpackages for your SLES version.Upgrade MCR.
sudo zypper install path/to/downloaded/packages/*.rpm
Initial setup
The Docker service is not started automatically at MCR installation. The
docker group is created, but without any users added to the group.
Configure Docker to start at boot up and start Docker.
sudo systemctl enable --now docker.service
Run the
hello-worldimage to verify that MCR is correctly installed. This command downloads a test image, runs it in a container, prints an informational message, and exits:sudo docker run hello-world
Important
Use sudo to run docker commands. For information on how to allow
non-privileged users to run docker commands, refer to the official Docker
documentation Manage Docker as a non-root user.
Uninstall Mirantis Container Runtime
Uninstall the Mirantis Container Runtime package:
sudo zypper remove docker-ee
Delete all images, containers, and volumes, as these are not automatically removed from your host:
sudo rm -rf /var/lib/docker
Delete all other Docker-related resources:
sudo rm -rf /run/docker /var/run/docker /etc/docker
Manually delete any edited configuration files.
At start up, Docker creates a DOCKER iptables chain. The SUSE firewall may block access to this chain, however, which can prevent you from running containers with published ports. In such cases, errors may present, such as:
WARNING: IPv4 forwarding is disabled. Networking will not work.
docker: Error response from daemon: driver failed programming external
        connectivity on endpoint adoring_ptolemy
        (0bb5fa80bc476f8a0d343973929bb3b7c039fc6d7cd30817e837bc2a511fce97):
        (iptables failed: iptables --wait -t nat -A DOCKER -p tcp -d 0/0 --dport 80 -j DNAT --to-destination 172.17.0.2:80 ! -i docker0: iptables: No chain/target/match by that name.
 (exit status 1)).
If such errors do present, adjust the start-up script order to make it so that the firewall starts before Docker starts, and so that Docker stops before the firewall stops. For more information, refer to the official SLES systemd daemon documentation.
Miratis recommends that you use the overlay2 storage driver, which is the
default for all new MCR installations. This applies even when
/var/lib/docker is on a btrfs filesystem.
MCR provides the btrfs storage driver for purposes of compatibility with
existing deployments. MCR automatically uses the btrfs storage driver
if it detects the presence of existing images in /var/lib/docker that
were stored with the btrfs driver.
Install Mirantis Container Runtime for Ubuntu
You can install Mirantis Container Runtime (MCR) either through the use of a repository, or by downloading and installing DEB packages.
Install and upgrade MCR from a repository
Mirantis recommends that you install MCR from our Docker repository using APT, the Ubuntu package manager. This method provides a level of automation with the MCR dependencies installation and updates automation.
Note
It is not necessary to uninstall older versions of Docker or Mirantis Container Runtime prior to upgrading as package conflicts are resolved automatically by APT.
Set up the repository
You only need to set the repository up once. After doing so, you can install MCR from the repo and repeatedly upgrade the software as necessary.
Install the necessary packages for setting up the repository:
sudo apt update && sudo apt install curl gnupg
Import the GPG key:
sudo gpg --batch --yes \
  --output /usr/share/keyrings/mirantis-archive-keyring.gpg --dearmor \
  <<< $(curl -fsSL https://repos.mirantis.com/ubuntu/gpg)
Verify that the GPG key has the fingerprint
DD91 1E99 5A64 A202 E859 07D6 BC14 F10B 6D08 5F96:$ gpg --show-keys --with-fingerprint --keyid-format=short \ /usr/share/keyrings/mirantis-archive-keyring.gpg
Expected output:
pub   rsa4096/6D085F96 2017-02-22 [SCEA]
     Key fingerprint = DD91 1E99 5A64 A202 E859  07D6 BC14 F10B 6D08 5F96
uid                    Docker Release (EE deb) <docker@docker.com>
sub   rsa4096/91A29FA3 2017-02-22 [S]
Add the repository to your
sources.list. To do this, create a text file in/etc/apt/sources.list.d/mirantis.sources:Types: deb URIs: https://repos.mirantis.com/ubuntu Suites: <value-depends-on-Ubuntu-version> Architectures: amd64 Components: <determines-update-channel> Signed-by: /usr/share/keyrings/mirantis-archive-keyring.gpg
Note
The
Suitesparameter setting isjammyfor Ubuntu 22.04 andfocalfor Ubuntu 20.04.The
Componentsparameter setting sets the update channel, which determines which MCR releases will be available for installation and upgrade. The value for the latest MCR 25.0.x patch isstable-25.0and the value for the latest MCR 25.0.x patch with the FIPS-mode variant isstable-25.0/fips.
(Optional) To install a specific version of Mirantis Container Runtime 25.0, which Mirantis recommends for production systems, edit the
Componentsparameter of themirantis.sourcesfile to the version you want to pin.Example, for the MCR 25.0.7 non-FIPS version:
Components: 25.0.7
Example, for the MCR 25.0.7 FIPS version:
Components: 25.0.7/fips
Note
To ascertain which 25.0.x versions are available for pinning:
In your browser, go to https://repos.mirantis.com.
Navigate to directory for your Linux OS, and within that directory navigate to the sub-directory for your OS architecture. For example, for an Ubuntu Jammy system you will go to
https://repos.mirantis.com/ubuntu/dists/jammy/.
Install from the repository
Run the following command to install MCR from the repository:
sudo apt update && sudo apt install docker-ee
Any existing MCR installation is replaced.
Upgrade from the repository
Run apt update && apt upgrade to keep your MCR installation up to date with the latest MCR release that is available in the update channel you selected during the repository setup.
Install and upgrade MCR from a package
If for some reason you cannot use the repository MCR install method, you can
perform manual installation with the .deb package files for
your release. Be aware, though, that you will need to download new packages
each time you want to upgrade MCR.
Install from a package
Download the
.debpackages for your Ubuntu version from the release-notes.Install MCR.
sudo apt install /path/to/downloaded/packages/*.deb
Upgrade from a package
Download the newer
.debpackages for your Ubuntu version.Upgrade MCR.
sudo apt install /path/to/downloaded/packages/*.deb
Initial setup
On installation, the Docker service starts automatically and is configured to
start thereafter at boot up. The docker group is created, but without any
users added to the group.
Run the hello-world image to verify that MCR is correctly installed. This
command downloads a test image, runs it in a container, prints an informational
message, and exits:
sudo docker run hello-world
Important
Use sudo to run docker commands. For information on how to allow
non-privileged users to run docker commands, refer to the official Docker
documentation Manage Docker as a non-root user.
Uninstall Mirantis Container Runtime
Uninstall the Mirantis Container Runtime package.
sudo apt purge docker-ee
Delete all images, containers, and volumes, as these are not automatically removed from your host:
sudo rm -rf /var/lib/docker
Delete all other Docker-related resources:
sudo rm -rf /run/docker /var/run/docker /etc/docker
Manually delete any edited configuration files.
Run MCR as a non-root user
MCR nodes in rootless mode cannot belong to a MKE cluster.
For information on rootless mode installation and configuration, refer to the Docker documentation Run the Docker daemon as a non-root user (Rootless mode).
Install MCR on Windows Servers
Mirantis Container Runtime (MCR) enables native Docker containers on Windows Server. The Mirantis Container Runtime installation package includes everything you need to run Docker on Windows Server. This topic describes pre-install considerations, and how to download and install Mirantis Container Runtime.
Note
Refer to the MCR 25.0 Compatibility Matrix for information on which Windows Server versions are supported.
System requirements
Windows OS CPU and RAM requirements that must be met are specified in the Windows Server Requirements.
Install MCR with an Internet connection
Mirantis provides an installation script to ease MCR installation on a Windows Server machine. The script uses default values, thus allowing it to be run without configuration. You can, however, override the default values with script parameters and env variables. Parameter values take precedence over env variables. Both take precedence over inbuilt default values.
The installation script must be executed from an elevated command prompt. If you want to change the default daemon values, ensure that you have the alternative cofigurations and the related collateral in place prior to executing the script. For example, if you want to enable TLS, store the certificates and write the daemon configuration file before invoking the script.
Obtain the installation script for MCR for Windows Server at https://get.mirantis.com/install.ps1.
(Optional): Allow downloaded script files to run in the current session
Set-ExecutionPolicy -ExecutionPolicy RemoteSigned -Force -Scope Process;
Run the installation script.
If a system restart is required, the installer will display a warning. In this case, reboot the machine to complete the installation.
Note
The installation script installs a numerically higher version by default. The latest tag, however, explicitly denotes the binary that was last pushed, which may not be a numerically higher version.
Test your MCR installation. You can do this by verifying that the Docker CLI is functioning properly:
docker version
docker info
FIPS 140-3 cryptographic module support
Federal Information Processing Standards (FIPS) Publication 140-3 is a United States Federal security requirement for cryptographic modules.
A variant of MCR that makes use of a FIPS 140-3 certified cryptographic module
is available for Windows Server. You can obtain this FIPS-mode MCR variant in
the stable-25.0/fips channel. The install script downloads MCR from the
stable-25.0/fips channel by default whenever the Windows host is running
in FIPS mode.
To install FIPS-mode MCR on a system that is not in FIPS mode, pass the
-Channel stable-25.0/fips option to install.ps1.
Note
FIPS 140-3 is only supported in MCR. MKE and MSR currently do not support FIPS 140-3.
Hint
To check that the Windows host is running in FIPS mode, run the following command in PowerShell:
[System.Security.Cryptography.Cryptoconfig]::AllowOnlyFipsAlgorithms
The host is running in FIPS mode if the command prints True.
To confirm that a FIPS-mode version of MCR is installed, confirm that the
docker info command lists fips under Security Options:
Security Options:
 fips
Install MCR offline
If your hardware is air-gapped you can still install MCR. To do so, download the installer and copy the files to the air-gapped machine (the default installation assumes that the zipped files and script are in the same location).
On any Internet connected system, go to https://get.mirantis.com/install.ps1 to obtain the MCR for Windows Server installation script.
(Optional): Allow the downloaded script files to run in the current session.
Set-ExecutionPolicy -ExecutionPolicy RemoteSigned -Force -Scope Process;
Run the installation script with the
-DownloadOnlyparameter. As per the parameter name, this action only downloads the zip file (no installation is performed)..\<installation-script> -DownloadOnly
Copy the installation script and the installation zip file over to the air-gapped machine and run the install with the
-Offlineparameter..\<installation-script> -Offline
If a system restart is required, the installer will display a warning. In this case, reboot the machine and log in to complete the installation.
Install a specific version
Use the following three parameters separately or in tandem to install a specific version of MCR for Windows Server.
Caution
MCR does not support using earlier versions of containerd than the version with which it is released. For supported containerd versions, refer to the Major component versions section of the required MCR version in rn-23-01.
.\install.ps1 -Channel
.\install.ps1 -ContainerdVersion
.\install.ps1 -DockerVersion
For example, the installation script will always use the latest GA.
For parameter descriptions, refer to Install script usage.
Update MCR
To update MCR to the most recent release, download the latest copy of the installation script and rerun the installation steps.
Obtain the installation script for MCR for Windows Server at https://get.mirantis.com/install.ps1.
(Optional): Allow downloaded script files to run in the current session.
Set-ExecutionPolicy -ExecutionPolicy RemoteSigned -Force -Scope Process
Run the installation script.
Install script usage
The installation script uses the parameters detailed below.
Parameter |
Description |
|---|---|
.PARAMETER DownloadUrl |
[Alternately specified by $Env:DOWNLOAD_URL] Specifies an alternative repository in which to download container runtime packages. |
.PARAMETER Channel |
[Alternately specified by $Env:CHANNEL]
Specifies which channel to use for picking the binaries. Default:
|
.PARAMETER DockerVersion |
[Alternately specified by $Env:DOCKER_VERSION] Specifies the version number for the DockerEE binaries to install. The latest version is the default. |
.PARAMETER ContainerdVersion |
[Alternately specified by $Env:CONTAINERD_VERSION] Specifies the version number for the containerd binaries to install The latest version is the default. |
.PARAMETER DryRun |
If specified, list different steps to use without actually invoking those steps. |
.PARAMETER Uninstall |
If specified, uninstalls all packages. This includes
unregistering the corresponding services and removing paths
for the package from the registry.
All other script parameters (except |
.PARAMETER Ver |
Print version info for the script and exit. |
.PARAMETER NoServiceStarts |
If specified, services are not started on successful install. By default, all services installed by the script are left in a running state before exit. |
.PARAMETER DestPath |
Path to the directory under which binaries will be installed. Default: %PROGRAMDATA% |
.PARAMETER OfflinePackagesPath |
The folder for airgap/offline scenarios. For use when the
offline or |
.PARAMETER Offline |
Install packages in offline/airgap mode. By default, the
current directory is used to locate previously
downloaded packages, a setting that can be overridden by using
the |
.PARAMETER DownloadOnly |
Download and save packages for later offline/airgap install. |
.PARAMETER EngineOnly |
Skip all steps except those related to MCR. |
Install script notes
The script supports airgap functionality by providing access to download packages while online, as well as to install those selfsame packages while offline.
For downloads, ensure that the script has access to the internet. Use
the -DownloadOnly parameter. By default, the script will use the current
directory to store the packages after download, a setting that can be
changed by specifying the path explicitly with the -OfflinePackagesPath
parameter.
For offline/airgap install, use the -Offline parameter. By
default, the script searches for pacakages in the current directory, a
setting that can be changed by specifying the -OfflinePackagesPath
parameter.
While downloading using -DownloadOnly parameter, confirm that the
download path is accessible to the script, especially if you run the
script without administrative rights.
The following is required so that the script can be invoked with named
parameters (for example, -ContainerdVersion 1.3.4...). If a parameter is
used, its type is checked by powershell - we give a higher precedence to the
parameters specified in this manner versus the same value specified by env
vars.
Parameters received at invocation time. Some of these values are merged with values specified by env vars - see reconcileParams. Others are used as-is.
Disable MCR telemetry
Refer to Configure telemetry for information on how to disable the telemetry function in MCR.
Uninstall MCR
Use the following commands to remove MCR from a Windows Server.
Leave any active Docker Swarms.
docker swarm leave --force
Prune container data.
docker system prune -all
Run the installation script using the
uninstallflag to remove MCR from the system.
Install the license
Warning
Users are not authorized to run MCR without a valid license. For more information, refer to Mirantis Agreements and Terms.
For MCR to recognize your license, you must apply your customer license file at runtime.
To make MCR aware of your license and entitlement, perform the following for each node that will host MCR:
Download the license file.
If you purchased a license from the Mirantis Store, the license file is available through a link in your confirmation email. Otherwise, contact Mirantis Sales and Support to gain access to the file.
Locate the daemon data directory.
The default daemon data directory is
/var/lib/dockeron Linux and%PROGRAMDATA%\dockeron Windows. The location of the directory may be different, however, if the daemon data directory path was previously reconfigured in thedata-rootproperty in thedaemon.jsonfile or through the passing of the --data-root flag during MCR start up.Copy the license file to the daemon data directory and name it
docker.licThe license must be readable by the account/user that runs the docker daemon.
Note
Whenever an MKE license is applied to an MKE cluster, the license is also applied to all MCR nodes in the cluster. The inverse is not true, though, so MKE users should apply their license through the MKE web UI to bypass having to apply the license to individual MCR nodes.
Configure telemetry
By default, MCR automatically records and transmits data to Mirantis for monitoring and analysis purposes. The data collected provides the Mirantis Customer Success Organization with information that helps us to better understand the operational use of MCR by our customers. It also provides key feedback in the form of product usage statistics, which enable our product teams to enhance Mirantis products and services.
To disable the telemetry function, set
features.telemetrytofalsein yourdaemon.jsonfile.Note
The
daemon.jsonfile is located at/etc/docker/daemon.jsonon Linux systems and at%PROGRAMDATA%\docker\config\daemon.jsonon Windows systems.
{"features":{"telemetry":false}}
Important
You can only disable the telemetry function for MCR instances to which a valid license has been applied. Once the applied license expires, MCR resumes telemetry transmission to Mirantis.
To re-enable the telemetry function, change the setting to
trueor remove it entirely.To apply configuration changes following an edit of the
daemon.jsonfile, you must restart the daemon or reload its configuration.To send the telemetry, verify that
dockerdis able to resolveapi.segment.ioand create a TCP (HTTPS) connection on port443.
Use MCR with Kubernetes
Customers who use MCR with Kubernetes directly (without MKE) must use a
plugin maintained by Kubernetes called dockershim for Kubernetes 1.23 and
below or a plugin maintained by Mirantis called cri-docker (included in
MCR) for Kubernetes 1.24 and above.
To configure cri-docker:
systemctl enable cri-docker.service
Use MCR with Docker Swarm
Mirantis Container Runtime (MCR) supports the use of Docker Swarm.
The following Docker documentation topics offer detailed information that can help you to run MCR in swarm mode:
Install optional components
You can install optional components for use with MCR, such as alternative runtime solutions and Docker plugins.
Use alternative container runtimes
You can deploy alternative OCI Container Runtimes as a replacement for runC, the default runtime for MCR. Such alternative runtime solutions include all of the code necessary to interact with system features related to containers.
crun
crun is an OCI container runtime that is written in C. A drop-in replacement for runC, the MCR default container runtime, crun has a smaller binary size, can be faster than runC, and requires less memory.
Install crun
Note
Though it is not installed by default, crun is available through the Mirantis package repository that you use to install MCR.
Once you have added your Mirantis repository, run the crun-ee package.
To install crun on an Ubuntu distro:
sudo apt-get install crun-ee
To install crun on an RHEL distro:
sudo dnf install crun-ee
Configure crun
To set crun as your container runtime, edit the configuration file as follows:
{
  "runtimes": {
    "crun": {
      "path": "/usr/bin/crun"
    }
  }
}
Once crun is configured, you can start containers with crun as the runtime argument:
docker run --runtime crun hello-world
For detailed crun use information, refer to the official crun documentation.
Docker Compose plugin
Available as of MCR 25.0.10
Docker Compose is a plugin for the Docker CLI. Once installed, the plugin
provides access to docker compose subcommands in the CLI.
The docker compose plugin is packaged and available on Mirantis’ repos as
docker-compose-plugin-ee in both FIPS and non-FIPS builds. You can install
the plugin using the package manager as follows:
RHEL, Oracle Linux, Rocky Linux, SLES:
sudo dnf install docker-compose-plugin-ee
Ubuntu:
sudo apt-get install docker-compose-plugin-ee
Security
Several Docker resources are available which cover the basics of Mirantis Container Runtime security, including:
Docker Security Documentation describes the fundamentals, such as namespaces and control groups, the attack surface of the Docker daemon, and other kernel security features.
CIS Docker Community Edition Benchmark details the various security-related options in MCR.
Docker Bench Security is a script that audits your configuration of MCR against the CIS Benchmark.
Antivirus and antimalware
When antivirus and antimalware software products scan files in use by MCR,
these files can lock in a way that causes Docker commands to hang or causes
orphaned snapshots to leak disk space. To circumvent these problems, you can
add the Docker data directory to the software’s exclusion list, which is by
default /var/lib/docker on Linux systems and %ProgramData%\docker on
Windows Server systems. As a result of this action, though, viruses or malware
in local Docker images, writable layers of containers, or volumes will go
undetected.
Note
If you choose to exclude the Docker data directory from background virus scanning, Mirantis recommends that you schedule recurring tasks for stopping MCR, for scanning the data directory, and for restarting MCR. Make sure to stagger these recurring tasks, though, as running them in sync can cause a system outage.
Docker Content Trust
When transferring data among networked systems, trust is a central concern. In particular, when communicating over an untrusted medium such as the internet, it is critical to ensure the integrity and the publisher of all the data a system operates on. You use Docker Engine to push and pull images to a public or private registry. Docker Content Trust (DCT) gives you the ability to verify both the integrity and the publisher of all the data received from a registry over any channel.
Docker Content Trust provides the ability to use digital signatures for data sent to and received from remote Docker registries. These signatures allow client-side or runtime verification of the integrity and publisher of specific image tags.
Through DCT, image publishers can sign their images and image consumers can verify the signatures of the images they pull. Publishers could be individuals or organizations manually signing their content or automated software supply chains signing content as part of their release process.
Image tags and DCT
An individual image record has the following identifier:
[REGISTRY_HOST[:REGISTRY_PORT]/]REPOSITORY[:TAG]
A particular image REPOSITORY can have multiple tags. For example,
latest and 3.1.2 are both tags on the mongo image. An image
publisher can build an image and tag combination many times changing the image
with each build.
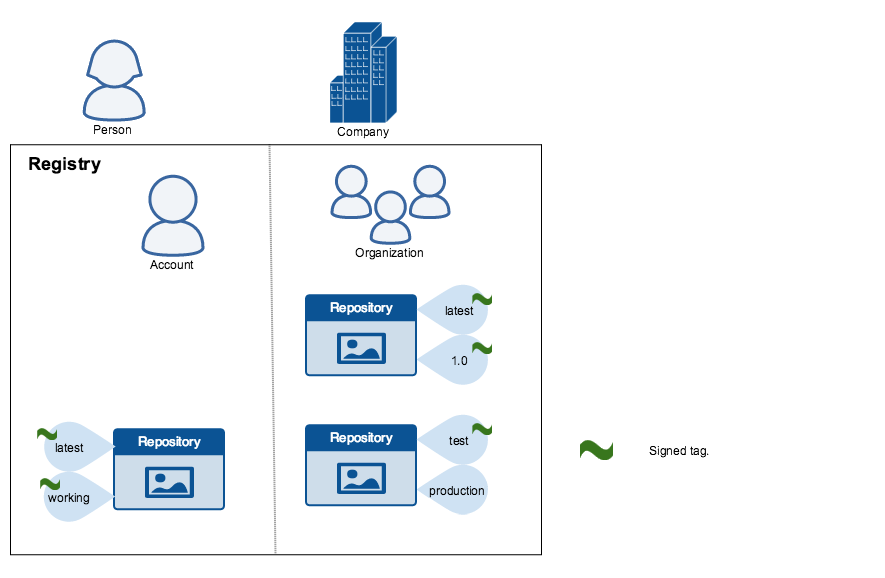
DCT is associated with the TAG portion of an image. Each image repository
has a set of keys that image publishers use to sign an image tag. Image
publishers have discretion on which tags they sign.
An image repository can contain an image with one tag that is signed and
another tag that is not. For example, consider the Mongo image repository. The latest tag could be unsigned
while the 3.1.6 tag could be signed. It is the responsibility of the image
publisher to decide if an image tag is signed or not. In this representation,
some image tags are signed, others are not:
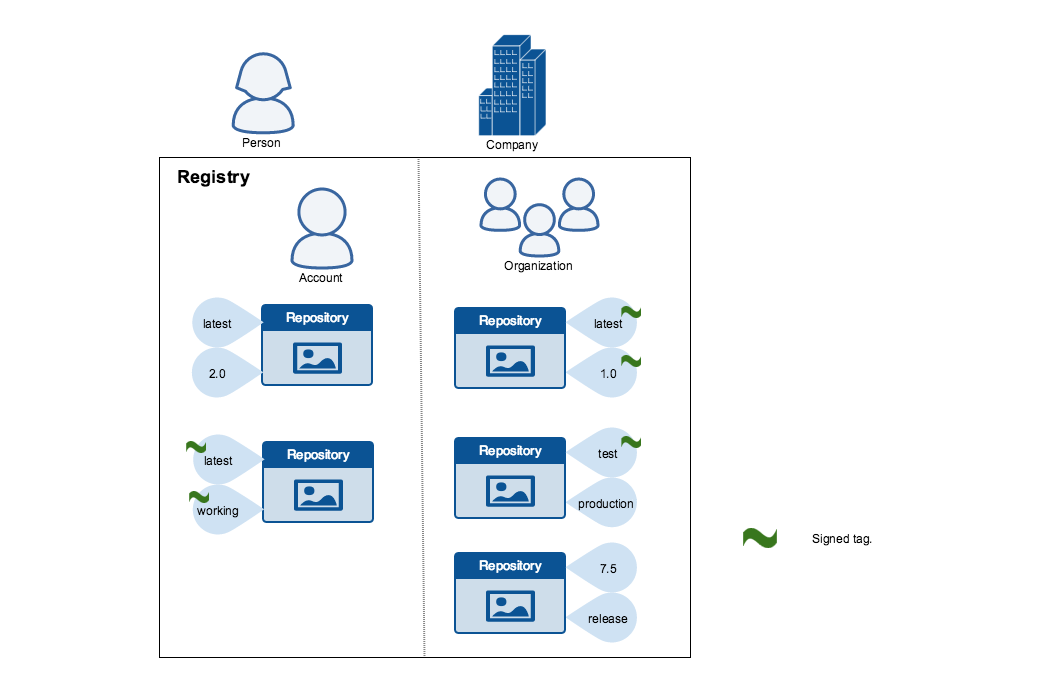
Publishers can choose to sign a specific tag or not. As a result, the content
of an unsigned tag and that of a signed tag with the same name may not match.
For example, a publisher can push a tagged image someimage:latest and sign
it. Later, the same publisher can push an unsigned someimage:latest image.
This second push replaces the last unsigned tag latest but does not affect
the signed latest version. The ability to choose which tags they can sign
allows publishers to iterate over the unsigned version of an image before
officially signing it.
Image consumers can enable DCT to ensure that images they use are signed. If a consumer enables DCT, they can only pull, run, or build with trusted images. Enabling DCT is a bit like applying a “filter” to your registry. Consumers “see” only signed image tags while the less desirable, unsigned image tags are “invisible” to them.
To the consumer who has not enabled DCT, nothing changes with regard to how they work with Docker images. Every image is visible regardless of whether it is signed or not.
Docker Content Trust Keys
Trust for an image tag is managed through the use of signing keys. A key set is created when an operation using DCT is first invoked. A key set consists of the following classes of keys:
an offline key that is the root of DCT for an image tag
repository or tagging keys that sign tags
server-managed keys such as the timestamp key, which provides freshness security guarantees for your repository
The following image depicts the various signing keys and their relationships:
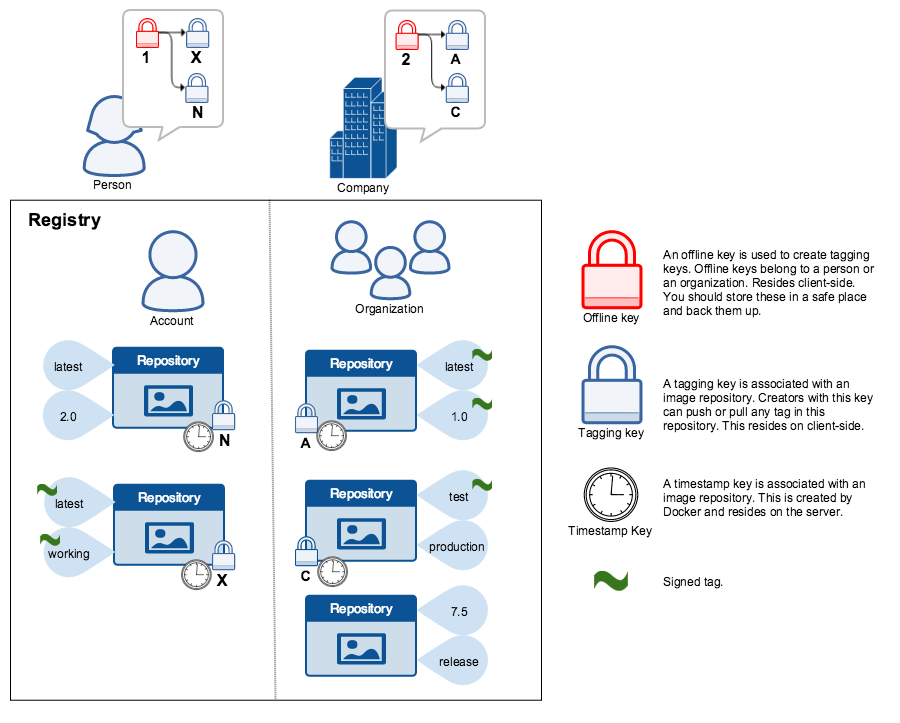
Warning
Once lost, the root key is not recoverable.
You should back up the root key somewhere safe. Given that it is only required to create new repositories, you should store it offline in hardware. For details on securing, and backing up your keys, make sure you read Manage keys for content trust.
Signing Images with Docker Content Trust
Within the Docker CLI, you can sign and push a container image with the $ docker trust command syntax. This is built on top of the Notary feature set, more information for which can be found in the Notary Github Repository.
A prerequisite for signing an image is a container image Registry with a Notary server attached, such as a Mirantis Secure Registry or Docker Hub. Instructions for standing up a self-hosted environment can be found in the Docker official documentation, Deploy Notary Server with Compose.
A delegation key pair is required to sign a container image. These keys can be generated locally using $ docker trust key generate or generated by a certificate authority. If you are using Mirantis Kubernetes Engine, the Client Bundle provides adequate keys for a delegation.
To sign images with Docker Content Trust:
Add the delegation private key to the local Docker trust repository, which by default is stored in
~/.docker/trust/.If you are generating delegation keys with $ docker trust key generate, the private key is automatically added to the local trust store.
If you are importing a separate key, such as one from a MKE Client Bundle, you must use the $ docker trust key load command:
$ docker trust key generate jeff
Generating key for jeff...
Enter passphrase for new jeff key with ID 9deed25:
Repeat passphrase for new jeff key with ID 9deed25:
Successfully generated and loaded private key. Corresponding public key
available: /home/ubuntu/Documents/mytrustdir/jeff.pub
If you have an existing key, run the following command:
$ docker trust key load key.pem --name jeff
Loading key from "key.pem"...
Enter passphrase for new jeff key with ID 8ae710e:
Repeat passphrase for new jeff key with ID 8ae710e:
Successfully imported key from key.pem
Add the delegation public key to the Notary server. Each delegation key in Notary is specific to a particular image repository. If this is the first time you are adding a delegation to that repository, this command will also initiate the repository, using a local Notary canonical root key. To understand more about initiating a repository, and the role of delegations, refer to the official Docker documentation, Delegations for content trust.
$ docker trust signer add --key cert.pem jeff msr.example.com/admin/demo
Adding signer "jeff" to msr.example.com/admin/demo...
Enter passphrase for new repository key with ID 10b5e94:
Use the delegation private key to sign a particular tag and push the signature up to the registry.
$ docker trust sign msr.example.com/admin/demo:1
Signing and pushing trust data for local image msr.example.com/admin/demo:1, may overwrite remote trust data
The push refers to repository [msr.example.com/admin/demo]
7bff100f35cb: Pushed
1: digest: sha256:3d2e482b82608d153a374df3357c0291589a61cc194ec4a9ca2381073a17f58e size: 528
Signing and pushing trust metadata
Enter passphrase for signer key with ID 8ae710e:
Successfully signed msr.example.com/admin/demo:1
Alternatively, once the keys have been imported an image can be pushed with the $ docker push command:
$ export DOCKER_CONTENT_TRUST=1

$ docker push msr.example.com/admin/demo:1
The push refers to repository [msr.example.com/admin/demo:1]
7bff100f35cb: Pushed
1: digest: sha256:3d2e482b82608d153a374df3357c0291589a61cc194ec4a9ca2381073a17f58e size: 528
Signing and pushing trust metadata
Enter passphrase for signer key with ID 8ae710e:
Successfully signed msr.example.com/admin/demo:1
To view remote trust data for a tag or repository:
Run the $ docker trust inspect command to view remote trust data for a tag or a repository:
$ docker trust inspect --pretty msr.example.com/admin/demo:1

Signatures for msr.example.com/admin/demo:1

SIGNED TAG          DIGEST                                                             SIGNERS
1                   3d2e482b82608d153a374df3357c0291589a61cc194ec4a9ca2381073a17f58e   jeff

List of signers and their keys for msr.example.com/admin/demo:1

SIGNER              KEYS
jeff                8ae710e3ba82

Administrative keys for msr.example.com/admin/demo:1

  Repository Key:    10b5e94c916a0977471cc08fa56c1a5679819b2005ba6a257aa78ce76d3a1e27
  Root Key:  84ca6e4416416d78c4597e754f38517bea95ab427e5f95871f90d460573071fc
To remove remote trust data for a tag:
Run the $ docker trust revoke command to remove remote trust data for a tag:
$ docker trust revoke msr.example.com/admin/demo:1
Enter passphrase for signer key with ID 8ae710e:
Successfully deleted signature for msr.example.com/admin/demo:1
Runtime Enforcement with Docker Content Trust
Note
Runtime enforcement is a feature that is exclusive to MCR. It is not available in Moby or Docker CE.
The implementation is separate from the
only run signed imagesfeature of Mirantis Kubernetes Engine.
Docker Content Trust within the Mirantis Container Runtime prevents a user from using a container image from an untrusted source. It will also prevent a user from building a container image from a base layer from an untrusted source. Trusted sources can include Official Docker Images, found on the Docker Hub or User trusted sources, with repositories and tags signed with the commands detailed in Signing Images with Docker Content Trust.
Engine Signature Verification prevents the following:
$ docker container run of an unsigned or altered image.
$ docker pull of an unsigned or altered image.
$ docker build where the FROM image is not signed or is not scratch.
Note
The implicit pulls and runs performed by worker nodes for a Swarm service on $ docker service create and $ docker service update are also verified. Tag resolution of services requires that all nodes in the Swarm including managers have content trust enabled and similarly configured.
DCT does not verify that the filesystem of a running container has not been altered from what was in the image. For example, it does not prevent a container from writing to the filesystem, once the container is running. Moreover, it does not prevent the image filesystem from being altered on the disk of a Docker host. DCT will also not prevent unsigned images from being imported, loaded, or created.
Enabling DCT within the Mirantis Container Runtime
DCT is controlled by the Docker Engine configuration file, which by default is
located at /etc/docker/daemon.json. For more information on the
configuration file, refer to the official docker documentation, Daemon
configuration file.
Note
The configuration can be set only on Linux machines.
The content-trust section is based around a mode option that
instructs the engine on whether to enforce signed images, and a
trust-pinning section that instructs the engine on which sources to trust.
Mode can take one of three values: disabled, permissive, or
enforced.
disabledVerification is not active and the remainder of the content-trust related configuration is ignored. This is the default value if
modeis not specified.permissiveVerification will be performed, while failures are only logged. Images that cannot be verified successfully can still be pulled and run. This configuration is intended for testing of changes related to
content-trust. The results of the signature verification are displayed in the MCR daemon logs.enforcedContent trust is enforced, thus an image that cannot be verified successfully is not pulled or run.
{
    "content-trust": {
        "mode": "<variable-type>"
    }
}
Official Docker images
Note
The IDs of all Notary root keys that are used to verify Docker Official Images are embedded in MCR.
If you want to configure MCR so that only Docker Official Images can be used, you can configure your daemon to do so using the embedded key IDs:
{
  "content-trust": {
    "trust-pinning": {
      "official-library-images": true
    },
    "mode": "enforced"
  }
}
User-signed images
There are two options for trust pinning user-signed images: Notary Canonical Root Key ID and Notary Root key ID.
Notary canonical root key ID
The Notary Canonical Root Key ID, or DCT Root Key, describes only the root key
used to sign a repository, or rather its respective keys. This is the root key
on the host that originally signed the repository, such as your workstation. It
can be retrieved from the workstation that signed the repository through
$ grep -r "root" ~/.docker/trust/private/ (assuming your trust data
is at ~/.docker/trust/*). It is expected that this canonical ID has
initiated multiple image repositories (mymsr/user1/image1 and
mymsr/user1/image2).
Retrieve root ID:
$ grep -r "root" ~/.docker/trust/private
/home/ubuntu/.docker/trust/private/0b6101527b2ac766702e4b40aa2391805b70e5031c04714c748f914e89014403.key:role:
root
Use a canonical ID. In the example that follows, the canonical ID has signed two repos,
mymsr/user1/repo1andmymsr/user1/repo2. Note that wildcards are allowed.{ "content-trust": { "trust-pinning": { "root-keys": { "mymsr/user1/*": [ "0b6101527b2ac766702e4b40aa2391805b70e5031c04714c748f914e89014403" ] } }, "mode": "enforced" } }
Notary root key ID
The Notary Root key ID, or DCT Certificate ID, describes the same as the Notary
Canonical Root Key ID; the ID is unique per repository. For example,
mymsr/user1/image1 and mymsr/usr1/image2 will each have a unique
certificate ID. A certificate ID can be retrieved through a $ docker
trust inspect command, labeled as a root-key, referring back to the
Notary key name. This is designed for when different users are signing their
own repositories, such as when there is no central signing server. As a
cert-id is more granular, it would take priority if a conflict occurs over
a root ID.
Retrieve root ID:
$ docker trust inspect mymsr/user1/repo1 | jq -r '.[].AdministrativeKeys[] | select(.Name=="Root") | .Keys[].ID'
9430d6e31e3b3e240957a1b62bbc2d436aafa33726d0fcb50addbf7e2dfa2168
Use cert IDs by specifying two repositories with their DCT root ID.
 {
   "content-trust": {
     "trust-pinning": {
       "cert-ids": {
          "mymsr/user1/repo1": [
            "9430d6e31e3b3e240957a1b62bbc2d436aafa33726d0fcb50addbf7e2dfa2168"
          ],
          "mymsr/user2/repo1": [
            "544cf09f294860f9d5bc953ad80b386063357fd206b37b541bb2c54166f38d08"
          ]
       }
     },
     "mode": "enforced"
   }
}
Using DCT in an offline environment
If your engine is unable to communicate to the registry, DCT can be enabled to
trust cached signature data. This is configured through the
allow-expired-cached-trust-data option.
{
  "content-trust": {
    "trust-pinning": {
      "official-library-images": true,
      "root-keys": {
        "mymsr/user1/*": [
          "0b6101527b2ac766702e4b40aa2391805b70e5031c04714c748f914e89014403"
        ]
      },
      "cert-ids": {
        "mymsr/user2/repo1": [
          "9430d6e31e3b3e240957a1b62bbc2d436aafa33726d0fcb50addbf7e2dfa2168"
        ],
      }
    },
    "mode": "enforced",
    "allow-expired-cached-trust-data": true
  }
}
Client Enforcement with Docker Content Trust
Content trust is disabled by default in the Docker Client. To enable it, set
the DOCKER_CONTENT_TRUST environment variable to 1. This prevents users
from working with tagged images unless they contain a signature.
When DCT is enabled in the Docker client, docker CLI commands that operate
on tagged images must either have content signatures or explicit content
hashes. The commands that operate with DCT are:
push
build
create
pull
run
For example, with DCT enabled a docker pull someimage:latest command
only succeeds if someimage:latest is signed. However, an operation with an
explicit content hash always succeeds as long as the hash exists:
$ docker pull msr.example.com/user/image:1
Error: remote trust data does not exist for msr.example.com/user/image: msr.example.com does not have trust data for msr.example.com/user/image

$ docker pull msr.example.com/user/image@sha256:d149ab53f8718e987c3a3024bb8aa0e2caadf6c0328f1d9d850b2a2a67f2819a
sha256:ee7491c9c31db1ffb7673d91e9fac5d6354a89d0e97408567e09df069a1687c1: Pulling from user/image
ff3a5c916c92: Pull complete
a59a168caba3: Pull complete
Digest: sha256:ee7491c9c31db1ffb7673d91e9fac5d6354a89d0e97408567e09df069a1687c1
Status: Downloaded newer image for msr.example.com/user/image@sha256:ee7491c9c31db1ffb7673d91e9fac5d6354a89d0e97408567e09df069a1687c1
Secure MCR on Windows
Mirantis Container Runtime (MCR), which is derived from Docker Moby, is a foundational component for running containerized workloads on Windows. While containers inherently provide process isolation, additional layers of security are necessary to protect against exploitation.
The information herein places strong emphasis on the securing of both the host Windows system and the container runtime itself. Among the topics covered are Windows Group Policy configurations, OS settings that directly tie to security enhancement, and advanced runtime-specific measures.
Safeguard the Windows host operating system
The security of the Windows host directly impacts the safety of the containers that run on it. Hardening the operating system is the first step to securing MCR.
Advanced Group Policy Configurations
Group Policy is a critical tool for enforcing security configurations across the host environment. Advanced settings for securing Windows are offered below:
Account policies
Set password policies to enforce complexity, expiration, and minimum length:
From the Search bar, run
gpedit.msc.Navigate to Computer Configuration > Windows Settings > Security Settings > Account Policies > Password Policy.
Set Minimum password length to 14 characters and enable Password must meet complexity requirements..
Configure Account lockout threshold to 5 failed attempts.
Logon restrictions
Limit local and remote logon rights to specific administrative accounts:
Navigate to Computer Configuration > Windows Settings > Security Settings > Local Policies > User Rights Assignment.
Assign Deny log on locally to unauthorized groups, and restrict Allow log on through Remote Desktop Services.
Restrict Access to System Tools
Block access to registry editing tools and command-line interpreters for non-administrative users using Software Restriction Policies or AppLocker:
Navigate to guilabel:Computer Configuration > Windows Settings > Security Settings > Application Control Policies > AppLocker > Executable Rules > Create new rule.
Input the following as a rule:
- Deny
- Select users or groups
- Select "Path"
- Paths for registry editing tools:
  - %windir%\regedit.exe
  - %windir%\system32\regedt32.exe

  Paths for command-line interpreters:
  - %windir%\system32\cmd.exe
  - %windir%\system32\windowspowershell\v1.0\powershell.exe
Adjust Local Security Policy
The Local Security Policy tool provides granular controls over system security. Mirantis recommends that you disable NTLM authentication and secure anonymous access
Disable NTLM Authentication
To enforce the use of Kerberos for authentication to reduce susceptibility to pass-the-hash attacks:
Navigate to Local Policies > Security Options > Network security: Restrict NTLM: NTLM Authentication in this domain > Deny All > Apply.
Secure Anonymous Access
Navigate to Local Policies > Security Options and enable:
Harden File System and Registry Permissions
To prevent unauthorized tampering, restrict access to all critical system directories, for example C:WindowsSystem32:
Open File Explorer and navigate to C:Windows.
Right-click on the
System32folder and select Properties.Go to the Security tab and click on Advanced >Tab Auditing > Flag “Replace all child object auditing entries with inheritable auditing entries from this object.
Click on Disable inheritance.
Use Access Control Lists (ACLs)) to secure sensitive registry keys:
icacls "HKEY_LOCAL_MACHINE\SYSTEM\ControlSet001\Services\docker" /deny "Users:(F)"
Use the Registry Editor, as it is forbidden to use icacls by way of the CLI.
Network Security Enhancements
Host-Based Firewall Rules
Configure Windows Defender Firewall to block all inbound traffic by default and to only allow explicitly defined traffic into container endpoints:
New-NetFirewallRule -DisplayName "Deny All Inbound" -Direction Inbound -Action Block
IPsec Policies
Implement IPsec rules to secure network traffic:
Access the Windows Advanced Firewall MMC snap-in to configure IPsec for container-to-host communications.
Open firewall settings by way of CLI
wf.msc.Go to Connection Security Rules > New Rule..(Depending on the application and its traffic).
For DNS Security, deploy DNSSEC to authenticate DNS responses and mitigate DNS spoofing. DNS server must be installed.
DNS Security
Deploy DNSSEC to authenticate DNS responses and to mitigate DNS spoofing.
Secure Boot and Credential Guard
Enable Secure Boot, which ensures that only signed OS components load during startup, by running msinfo32.exe.
Check Secure Boot State under System Summary.
Enable Credential Guard, to isolate secrets using virtualization-based security, by way of Group Policy. #. Navigate to :guilabel:Computer Configuration > Administrative Templates > System > Device Guard. #. Click on Turn on Virtualization Based Security. #. Click on Enabled. #. Click Apply.
Enhance security for MCR
MCR inherits many strengths from Docker Moby, while also sharing the vulnerabilities of that product. Securing MCR requires thoughtful configuration and operational rigor.
Runtime-Specific Security Features
Process Isolation
Use Windows Server process isolation for compatibility while ensuring system isolation:
docker run --isolation=process <container>
Hyper-V Isolation
Use Hyper-V isolation:or added security, especially when running untrusted workloads:
docker run --isolation=hyperv <container>
Immutable Infrastructure
Configure containers to run in read-only mode.
Image Security
Digitally Sign Images
Implement Docker Content Trust (DCT) to enforce signed images:
$env:DOCKER_CONTENT_TRUST=1
Scan Images for Vulnerabilities
Use scanning tools such as Trivy or native Mirantis tools to identify vulnerabilities:
trivy image <image>
Restrict Container Privileges
Drop Capabilities
Reduce the attack surface of the container by dropping unnecessary privileges:
docker run --cap-drop=ALL --cap-add=NET_ADMIN <container>
Note
The following applies for Windows server 2022:
docker run --cap-drop=ALL <container>
docker run --cap-add=ALL <container>
Limit Resource Consumption
Prevent resource starvation attacks by capping memory and CPU usage:
docker run --memory="512m" --cpus="1" <container>
Secure Docker Daemon Communication
Enable TLS
Configure the Docker daemon to require TLS for all communications by
generating certificates and configuring the daemon.json file as follows:
{
  "tls": true,
  "tlsverify": true,
  "tlscacert": "C:\\DockerCers\\ca.pem",
  "tlscert": "C:\\DockerCerts\\server-cert.pem",
  "tlskey": "C:\\DockerCerts\\server-key.pem",
  "hosts": ["tcp://0.0.0.0:2376"]
}
Restrict Daemon Access
Use Access Control Lists (ACLs) to restrict access to the Docker named pipe (npipe://).
Operational best practices
Best practices for securing MCR on Windows fall into three general areas:
Continuous monitoring
Centralized logging
Regular vulnerability assessment
Continuous monitoring
Deploy monitoring tools, such as Prometheus to collect metrics and Grafana for visualization. You can use these tools to monitor resource utilization and detect anomalies in real-time.
Centralized logging
Implement logging drivers for centralized log management:
{
  "log-driver": "syslog",
  "log-opts": {
    "syslog-address": "tcp://<log-server>:514"
  }
}
Regular vulnerability assessment
Scan the host system and container workloads for vulnerabilities regularly, using such tools as Nessus and Microsoft Defender ATP.
Open Source Components and Licenses
Click any product component license below to download a text file of that license to your local system.
Get Support
Mirantis Container Runtime (MCR) subscriptions provide access to prioritized support for designated contacts from your company, agency, team, or organization. MCR service levels are based on your subscription level and the cloud or cluster that you designate in your technical support case. Our support offerings are described on the Enterprise-Grade Cloud Native and Kubernetes Support page. You may inquire about Mirantis support subscriptions by using the contact us form.
The CloudCare Portal is the primary way
that Mirantis interacts with customers who are experiencing technical
issues. Access to the CloudCare Portal requires prior authorization by your
company, agency, team, or organization, and a brief email verification step.
After Mirantis sets up its backend systems at the start of the support
subscription, a designated administrator at your company, agency, team, or
organization, can designate additional contacts. If you have not already
received and verified an invitation to our CloudCare Portal, contact your local
designated administrator, who can add you to the list of designated contacts.
Most companies, agencies, teams, and organizations have multiple designated
administrators for the CloudCare Portal, and these are often the persons most
closely involved with the software. If you do not know who your
local designated administrator is, or you are having problems accessing the
CloudCare Portal, you may also send an email to Mirantis support at
support@mirantis.com.
Once you have verified your contact details and changed your password, you and all of your colleagues will have access to all of the cases and resources purchased. Mirantis recommends that you retain your Welcome to Mirantis email, because it contains information on how to access the CloudCare Portal, guidance on submitting new cases, managing your resources, and other related issues.
We encourage all customers with technical problems to use the knowledge base, which you can access on the Knowledge tab of the CloudCare Portal. We also encourage you to review the MKE product documentation and release notes prior to filing a technical case, as the problem may already be fixed in a later release or a workaround solution provided to a problem experienced by other customers.
One of the features of the CloudCare Portal is the ability to associate cases with a specific MKE cluster. These are referred to in the Portal as “Clouds”. Mirantis pre-populates your customer account with one or more Clouds based on your subscription(s). You may also create and manage your Clouds to better match how you use your subscription.
Mirantis also recommends and encourages customers to file new cases based on a specific Cloud in your account. This is because most Clouds also have associated support entitlements, licenses, contacts, and cluster configurations. These greatly enhance the ability of Mirantis to support you in a timely manner.
You can locate the existing Clouds associated with your account by using the Clouds tab at the top of the portal home page. Navigate to the appropriate Cloud and click on the Cloud name. Once you have verified that the Cloud represents the correct MKE cluster and support entitlement, you can create a new case via the New Case button near the top of the Cloud page.
One of the key items required for technical support of most MKE cases is the support bundle. This is a compressed archive in ZIP format of configuration data and log files from the cluster. There are several ways to gather a support bundle, each described in the paragraphs below. After you obtain a support bundle, you can upload the bundle to your new technical support case by following the instructions in the Mirantis knowledge base, using the Detail view of your case.
Obtain a full-cluster support bundle using the MKE web UI
Log in to the MKE web UI as an administrator.
In the left-side nagivation panel, navigate to <user name> and click Support Bundle.
It may take several minutes for the download to complete.
Note
The default name for the generated support bundle file is
docker-support-<cluster-id>-YYYYmmdd-hh_mm_ss.zip. Mirantis suggests that you not alter the file name before submittal to the customer portal. However, if necessary, you can add a custom string betweendocker-supportand<cluster-id>, as in:docker-support-MyProductionCluster-<cluster-id>-YYYYmmdd-hh_mm_ss.zip.Submit the support bundle to Mirantis by clicking Share support bundle on the success prompt that displays when the support bundle finishes downloading.
Note
Mirantis uses the support bundles you submit for product improvement purposes. Be aware, though that these submissions are not sent directly to the Mirantis Customer Support team that is assigned to the particular issue.
Fill in the Jira feedback dialog, and click Submit.
Obtain a single-node support bundle using the CLI
Use SSH to log into a node and run:
MKE_VERSION=$((docker container inspect ucp-proxy \
--format '{{index .Config.Labels "com.docker.ucp.version"}}' \
2>/dev/null || echo -n 3.8.0)|tr -d [[:space:]])

docker container run --rm \
  --name ucp \
  -v /var/run/docker.sock:/var/run/docker.sock \
  --log-driver none \
  mirantis/ucp:${MKE_VERSION} \
  support > \
  docker-support-${HOSTNAME}-$(date +%Y%m%d-%H_%M_%S).tgz
Important
If SELinux is enabled, include the following additional flag:
--security-opt label=disable.
Note
The CLI-derived support bundle only contains logs for the node on which you are running the command. If your MKE cluster is highly available, collect support bundles from all manager nodes.
Use PowerShell to obtain a support bundle
Run the following command on Windows worker nodes to collect the support information and automatically place it in a zip file:
$MKE_SUPPORT_DIR = Join-Path -Path (Get-Location) -ChildPath 'dsinfo'
$MKE_SUPPORT_ARCHIVE = Join-Path -Path (Get-Location) -ChildPath $('docker-support-' + (hostname) + '-' + (Get-Date -UFormat "%Y%m%d-%H_%M_%S") + '.zip')
$MKE_PROXY_CONTAINER = & docker container ls --filter "name=ucp-proxy" --format "{{.Image}}"
$MKE_REPO = if ($MKE_PROXY_CONTAINER) { ($MKE_PROXY_CONTAINER -split '/')[0] } else { 'mirantis' }
$MKE_VERSION = if ($MKE_PROXY_CONTAINER) { ($MKE_PROXY_CONTAINER -split ':')[1] } else { '3.6.0' }
docker container run --name windowssupport `
-e UTILITY_CONTAINER="$MKE_REPO/ucp-containerd-shim-process-win:$MKE_VERSION" `
-v \\.\pipe\docker_engine:\\.\pipe\docker_engine `
-v \\.\pipe\containerd-containerd:\\.\pipe\containerd-containerd `
-v 'C:\Windows\system32\winevt\logs:C:\eventlogs:ro' `
-v 'C:\Windows\Temp:C:\wintemp:ro' $MKE_REPO/ucp-dsinfo-win:$MKE_VERSION
docker cp windowssupport:'C:\dsinfo' .
docker rm -f windowssupport
Compress-Archive -Path $MKE_SUPPORT_DIR -DestinationPath $MKE_SUPPORT_ARCHIVE
Release Notes
Important
Mirantis Container Runtime 25.0 follows the version numbering scheme of the upstream Moby and Docker CLI projects. Mirantis may skip upstream versions released in short succession, though, and opt instead to release a patch that contains the content of all upstream versions released in the intervening period since the previous MCR 25.0 patch release.
Users running MSR 2.9.16 or earlier must upgrade to MSR 2.9.17 or later before upgrading to MCR 25.0.
Patch release of MCR 25.0.16, which introduces the following bug fixes and improvements:
Fipster (Go runtime)
go1.26.2
Patch release of MCR 25.0.15, which introduces the following bug fixes and improvements:
Fipster (Go runtime)
1.25.7Fixed an issue wherein encrypted overlay networks were not passing traffic to containers on v28 and older Engines. Encrypted overlay networks will no longer pass traffic to containers on v29.2.0 thru v29.0.0, v28.2.2, v25.0.14 or v25.0.13.
Fixed a regression wherein established network connections could be disrupted during the container shutdown grace period.
Patch release of MCR 25.0.14, which introduces the following features and improvements:
Addition of option to disable weak TLS ciphers.
Fipster (Go runtime)
go1.24.8m1Fixed an issue wherein swarm manager nodes crashed daily, with “assignment to entry in nil map” panic, linked to the telemetry 24h heartbeat.
Patch release of MCR 25.0.13, which introduces the following features and improvements:
Inclusion of FIPS 140-3 compliant cryptographic module.
When applicable, alert of unlicensed dameon state through the CLI
Note
Includes the 25.0.13.1 hotfix, as of 16-September-2025.
Patch release of MCR 25.0.12, which introduces the following features and improvements:
Fipster (Go runtime)
go1.23.10m1New metrics, including:
cdisruntimesdefault_runtimeseccomp_countapparmor_countselinux_countno_new_privileges_count
Patch release of MCR 25.0.11, which introduces the following features and improvements:
Fipster (Go runtime)
go1.23.9-m1New metrics, including:
image_pullsimage_pulls_startedimage_pull_bytes
The MCR 25.0.10 patch release focuses on the delivery of CVE and bug fixes.
Patch release of MCR 25.0.x, which introduces the following features and improvements:
Support of crun as an alternative OCI runtime.
Patch release of MCR 25.0.x, which introduces the following features and improvements:
Introduction of MCR 25.0.x version pinned streams, to ensure that the software does not automatically upgrade during regular system package updates.
Addition of CLI flags for swarm service Seccomp, AppArmor, and no-new-privileges.
Initial release of MCR 25.0.x, which introduces the following features and improvements:
Alternative OCI Runtimes
Container Device Interface (CDI) support
OpenTelemetry tracing
Overhaul of release versioning and packaging
FIPS changes
Changes to MCR telemetry
25.0.16
Release date |
Name |
Upstream release |
|---|---|---|
2026-MAY-13 |
MCR 25.0.16 |
Moby 25.0.16 and Docker CLI 25.0.7 |
Changelog
MCR 25.0.16 comprises the Moby 25.0.16 upstream release.
Changes specific to MCR
Fipster (Go runtime)
go1.26.2
Changes from upstream
Resolution of the following CVEs:
GitHub milestones
The GitHub milestones offer full detail on the pull requests and changes as they correlate to the upstream Moby 25.0.16 release:
Major component versions
Version detail for the major components that comprise MCR 25.0.16 is presented in the table below:
Component |
Upstream Version |
Mirantis Version |
|---|---|---|
25.0.16m1 |
||
25.0.7m9 |
||
1.7.31m1 |
||
1.4.2m1 |
||
– |
||
0.12.1m2 |
||
Fipster (Go runtime) |
go1.26.2 |
|
– |
||
– |
||
Docker Compose CLI plugin |
2.40.3 |
2.40.3m1 |
Platform test detail
Platform |
Kernel tested |
|---|---|
RHEL 9.6 |
5.14.0-570.106.1.el9_6.x86_64 |
RHEL 8.10 |
4.18.0-553.120.1.el8_10.x86_64 |
Rocky 8.10 |
4.18.0-553.el8_10.x86_64 |
SLES15 SP7 |
6.4.0-150700.53.40-default |
Ubuntu 24.04 |
6.17.0-1012-aws |
Ubuntu 22.04 |
6.8.0-1053-aws |
Windows 2022 Core |
10.0 20348 |
Windows 2019 Core |
10.0 17763 |
25.0.15
Release date |
Name |
Upstream release |
|---|---|---|
2026-MAR-09 |
MCR 25.0.15 |
Moby 25.0.15 and Docker CLI 25.0.7 |
Changelog
MCR 25.0.15 comprises the Moby 25.0.15 upstream release.
Changes specific to MCR
Fipster (Go runtime)
1.25.7
Changes from upstream
moby/moby#51963 Fixed an issue wherein encrypted overlay networks were not passing traffic to containers on v28 and older Engines. Encrypted overlay networks will no longer pass traffic to containers on v29.2.0 through v29.0.0, v28.2.2, v25.0.14 or v25.0.13.
moby/moby#51844 Fixed a regression wherein established network connections could be disrupted during the container shutdown grace period.
In addition, a number of bugs and network instabilities have been fixed since the previous Moby issue. For the complete list of changes and pull requests upstream, refer to the Github milestones that follow.
GitHub milestones
The GitHub milestones offer full detail on the pull requests and changes as they correlate to the upstream Moby 25.0.12 release:
Major component versions
Version detail for the major components that comprise MCR 25.0.15 is presented in the table below:
Component |
Upstream Version |
Mirantis Version |
|---|---|---|
25.0.15m1 |
||
25.0.7m9 |
||
1.7.30m1 |
||
1.4.0m1 |
||
– |
||
0.12.1m1 |
||
Fipster (Go runtime) |
go1.25.7 |
|
libcrypto3-mirantis (FIPS SSL) |
– |
3.5.4 |
– |
||
– |
||
Docker Compose CLI plugin |
2.40.0 |
2.40.0m1 |
crun |
1.26 |
1.26 |
Platform test detail
Platform |
Kernel tested |
|---|---|
Oracle Linux 9.6 |
5.14.0-570.51.1.0.1.el9_6.x86_64 |
Oracle Linux 9 |
5.14.0-570.62.1.0.1.el9_6.x86_64 |
RHEL 10.0 |
6.12.0-124.39.1.el10_1.x86_64 |
RHEL 9.7 |
5.14.0-611.24.1.el9_7.x86_64 |
RHEL 9.6 |
5.14.0-570.58.1.el9_6.x86_64 |
RHEL 9.4 |
5.14.0-427.96.1.el9_4.x86_64 |
RHEL 8.10 |
4.18.0-553.81.1.el8_10.x86_64 |
Rocky 9.6 |
5.14.0-570.17.1.el9_6.x86_64 |
Rocky 8.10 |
4.18.0-553.el8_10.x86_64 |
SLES15 SP6 |
6.4.0-150600.23.73-default |
Ubuntu 24.04 |
6.14.0-1016-aws |
Ubuntu 22.04 |
6.8.0-1040-aws |
Windows 2022 Core |
10.0 20348 (20348.2849.amd64fre.fe_release_svc_prod1.241101-1732) |
Windows 2019 Core |
10.0 17763 (17763.1.amd64fre.rs5_release.180914-1434) |
25.0.14
Release date |
Name |
Upstream release |
|---|---|---|
2025-OCT-30 |
MCR 25.0.14 |
Moby 25.0.14 and Docker CLI 25.0.7 |
Changelog
MCR 25.0.14 comprises the Moby 25.0.14 upstream release.
Hotfix 25.0.14.2
The 25.0.14.2 build adds back features that were present in MCR 25.0.14.0, which were mistakenly dropped in MCR 25.0.14.1.
Customers should use MCR 25.0.14.2 rather than 25.0.14.1, specifically customers who require functionality related to the removal of insecure TLS ciphers and license-related notifications.
Hotfix 25.0.14.1
Installation of MCR 25.0.13.1+fips or MCR 25.0.14.1+fips on Windows requires
get.mirantis.com/install.ps1v1.0.27.Users who have not applied an MCR license will no longer receive CLI alerts of the unlicensed state of their daemon.
Resolution of the following CVEs:
Known Issue: The FIPS variant of the containerd debug tool ctr crashes when pulling from TLS 1.3 repositories.
Changes specific to MCR
Addition of an option to disable weak TLS ciphers.
Set the environment variable
DOCKER_DISABLE_WEAK_CIPHERSfor the dockerd process totrueto restrict the daemon to a modern, secure subset of cipher suites. Doing this disables known weak ciphers, such as CBC-mode ciphers, which are already disabled in later upstream releases of the Docker Engine. To ensure compatibility with later upgrades, this option is not available as a config or CLI flag.Fipster (Go runtime)
go1.24.8m1Fixes CVEs present in older Go versions.
Updates FIPS package
libcrypto3-mirantisto 3.5.4, to accommodate the version upgrade.
Fixed an issue wherein swarm manager nodes crashed daily, with “assignment to entry in nil map” panic, linked to the telemetry 24h heartbeat.
Changes from upstream
A considerable number of bugs and network instabilities have been fixed since the previous Moby issue, due to significant refactoring and rewriting of parts of libnetwork. For the complete list of changes and pull requests upstream, refer to the Github milestones that follow.
GitHub milestones
The GitHub milestones offer full detail on the pull requests and changes as they correlate to the upstream Moby 25.0.12 release:
Major component versions
Version detail for the major components that comprise MCR 25.0.14 is presented in the table below:
Component |
Upstream Version |
Mirantis Version |
|---|---|---|
25.0.14m1 |
||
25.0.7m9 |
||
1.7.28m2 |
||
1.2.5m5 |
||
– |
||
0.12.1m1 |
||
Fipster (Go runtime) |
go1.24.8m1 |
|
libcrypto3-mirantis (FIPS SSL) |
– |
3.5.4 |
– |
||
– |
||
Docker Compose CLI plugin |
2.40.2 |
2.40.0m1 |
crun |
1.24 |
1.24 |
Platform test detail
Platform |
Kernel tested |
|---|---|
Oracle Linux 9.6 |
5.14.0-570.51.1.0.1.el9_6.x86_64 |
Oracle Linux 9 |
5.14.0-570.62.1.0.1.el9_6.x86_64 |
RHEL 9.6 |
5.14.0-570.58.1.el9_6.x86_64 |
RHEL 9.4 |
5.14.0-427.96.1.el9_4.x86_64 |
RHEL 8.10 |
4.18.0-553.81.1.el8_10.x86_64 |
Rocky 9.6 |
5.14.0-570.17.1.el9_6.x86_64 |
Rocky 8.10 |
4.18.0-553.el8_10.x86_64 |
SLES15 SP6 |
6.4.0-150600.23.73-default |
Ubuntu 24.04 |
6.14.0-1016-aws |
Ubuntu 22.04 |
6.8.0-1040-aws |
Windows 2022 Core |
10.0 20348 (20348.2849.amd64fre.fe_release_svc_prod1.241101-1732) |
Windows 2019 Core |
10.0 17763 (17763.1.amd64fre.rs5_release.180914-1434) |
25.0.13
Release date |
Name |
Upstream release |
|---|---|---|
2025-SEPT-03 |
MCR 25.0.13 |
Moby 25.0.12 and Docker CLI 25.0.7 |
Changelog
MCR 25.0.13 comprises the Moby 25.0.13 upstream release.
Hotfix 25.0.13.1
Fixed an issue wherein panics occurred on Swarm manager nodes when they transmitted telemetry data. This fix relates to Linux only; Windows is unaffected.
Changes specific to MCR
MCR now ships with a FIPS 140-3 compliant cryptographic module.
Beginning with MCR 25.0.13, Windows users running MCR in FIPS mode must have the cryptographic module installed. This module is automatically installed when you use the install.ps1 installer, or you can download it as an .msi package from the Mirantis repository.
Users who do not have an MCR license now receive an alert by way of the CLI of the unlicensed state of their daemon.
Changes from upstream
A considerable number of bugs and network instabilities have been fixed since the previous Moby issue, due to significant refactoring and rewriting of parts of libnetwork. For the complete list of changes and pull requests upstream, refer to the Github milestones that follow.
Known issues
[FIELD-7861] Swarm manager nodes crash daily, with “assignment to entry in nil map” panic, linked to the telemetry 24h heartbeat. To resolve the issue, upgrade to MCR 25.0.13.1.
GitHub milestones
The GitHub milestones offer full detail on the pull requests and changes as they correlate to the upstream Moby 25.0.12 release:
Major component versions
Version detail for the major components that comprise MCR 25.0.13 is presented in the table below:
Component |
Upstream Version |
Mirantis Version |
|---|---|---|
25.0.13m2 |
||
25.0.7m8 |
||
1.7.28m1 |
||
1.2.5m4 |
||
– |
||
0.12.1m1 |
||
Fipster (Go runtime) |
go1.23.10m1 |
|
– |
||
– |
||
Docker Compose CLI plugin |
2.39.2 |
2.39.2m1 |
crun |
1.23.1 |
1.23.1 |
25.0.12
Release date |
Name |
Upstream release |
|---|---|---|
2025-JULY-14 |
MCR 25.0.12 |
Moby 25.0.12 and Docker CLI 25.0.7 |
Changelog
MCR 25.0.12 comprises the Moby 25.0.12 upstream release.
Changes specific to MCR
MCR contains the following component additions and updates:
Fipster (Go runtime)
go1.23.10m1Metrics additions:
Metric name
Description
cdisMetric that indicates if the CDI feature flag is enabled. Boolean value.
runtimesAn object that lists the number of containers that are using each runtime.
default_runtimeMetric that offers a string with the configured default runtime.
seccomp_countMetric that presents the number of Swarm services that use their own seccomp profile.
apparmor_countMetric that presents the number of Swarm services that use their own apparmor profile.
selinux_countMetric that presents the number of Swarm services that use their own selinux context.
no_new_privileges_countMetric that presents the number of Swarm services with the
no_new_privilegesflag enabled.
Changes from upstream
The upstream pull requests detailed in the sections that follow are those that pertain to the MCR product. For the complete list of changes and pull requests upstream, refer to the GitHub milestones.
What is new
The MCR 25.0.12 patch release focuses on the delivery of CVE and bug fixes.
Bug fixes
Moby
moby/moby#50056 daemon: restore: migrate deprecated fluentd-async-connect
moby/moby#50230 libnetwork: fix flaky Swarm service DNS
moby/swarmkit manager: fix task scheduler infinite loop
Known issues
[FIELD-7861] Swarm manager nodes crash daily, with “assignment to entry in nil map” panic, linked to the telemetry 24h heartbeat. To resolve the issue, upgrade to MCR 25.0.13.1.
GitHub milestones
The GitHub milestones offer full detail on the pull requests and changes as they correlate to the upstream Moby 25.0.12 release:
Major component versions
Version detail for the major components that comprise MCR 25.0.12 is presented in the table below:
Component |
Upstream Version |
Mirantis Version |
|---|---|---|
25.0.12m1 |
||
25.0.7m6 |
||
1.7.27m3 |
||
1.2.5m4 |
||
– |
||
0.12.1m1 |
||
Fipster (Go runtime) |
go1.23.10m1 |
|
– |
||
– |
||
Docker Compose CLI plugin |
2.38.1 |
2.38.1m1 |
crun |
1.19.1 |
1.19.1 |
25.0.11
Release date |
Name |
Upstream release |
|---|---|---|
2025-JUN-04 |
MCR 25.0.11 |
Moby 25.0.11 and Docker CLI 25.0.7 |
Changelog
MCR 25.0.11 comprises the Moby 25.0.11 upstream release.
Changes specific to MCR
MCR contains the following component additions and updates:
Fipster (Go runtime)
go1.23.9-m1Metrics additions:
Metric name
Description
image_pullsMetric that reports the count of image pulls that have been completed, grouped by
successorfailure.image_pulls_startedMetric that reports the count of image pulls in progress. The count is obtained by subtracting the
image_pullscount.image_pull_bytesMetric that reports the count of total bytes that have been downloaded by image pulls.
Changes from upstream
The upstream pull requests detailed in the sections that follow are those that pertain to the MCR product. For the complete list of changes and pull requests upstream, refer to the GitHub milestones.
What is new
The MCR 25.0.11 patch release focuses on the delivery of CVE and bug fixes.
Bug fixes
GitHub milestones
The GitHub milestones offer full detail on the pull requests and changes as they correlate to the upstream Moby 25.0.11 release:
Major component versions
Version detail for the major components that comprise MCR 25.0.11 is presented in the table below:
Component |
Upstream Version |
Mirantis Version |
|---|---|---|
25.0.10m1 |
||
25.0.7m5 |
||
1.7.27m2 |
||
1.2.5m3 |
||
– |
||
0.12.1m1 |
||
Fipster (Go runtime) |
go1.23.9m1 |
|
– |
||
– |
||
Docker Compose CLI plugin |
2.36.0 |
2.36.0m1 |
crun |
1.19.1 |
1.19.1 |
25.0.10
Release date |
Name |
Upstream release |
|---|---|---|
2025-APR-22 |
MCR 25.0.10 |
Moby 25.0.10 and Docker CLI 25.0.7 |
Changelog
MCR 25.0.10 comprises the Moby 25.0.10 upstream release.
Changes specific to MCR
MCR contains the following component additions and updates:
Fipster (Go runtime)
go1.23.8-m1Docker Compose CLI plugin
2.34.0m1
Changes from upstream
The upstream pull requests detailed in the sections that follow are those that pertain to the MCR product. For the complete list of changes and pull requests upstream, refer to the GitHub milestones.
What is new
The MCR 25.0.10 patch release focuses on the delivery of CVE and bug fixes. In addition, the MCR 25.0.10 release includes the Docker Compose plugin to the Docker CLI.
Security
github.com/golang-jwt/jwt
Fix CVE-2025-30204: Fix asymmetric resource consumption with JSON Web Tokens.
golang.org/x/net/http/httpproxy
Fix CVE-2025-22870: Proxy, http/httpproxy: do not mismatch IPv6 zone ids against hosts.
openssl
Fix CVE-2024-13176: Adds a constant-time implementation of ECDSA, to mitigate a potential side-channel vulnerability.
Fix CVE-2024-9143: Adds additional checking of elliptic curve parameters.
Fix CVE-2024-5535: Adds handling a situation when calling the OpenSSL API function SSL_select_next_proto with an empty supported client protocols buffer may cause a crash or memory contents to be sent to the peer.
containerd
Fix GHSA-265r-hfxg-fhmg: Fix integer overflow in User ID handling.
Bug fixes
containerd
containerd/containerd#11538 Update image type checks to avoid unnecessary logs for attestations
GitHub milestones
The GitHub milestones offer full detail on the pull requests and changes as they correlate to the upstream Moby 25.0.10 release:
Major component versions
Version detail for the major components that comprise MCR 25.0.10 is presented in the table below:
Component |
Upstream Version |
Mirantis Version |
|---|---|---|
25.0.10m1 |
||
25.0.10m1 |
||
1.7.27m1 |
||
1.2.5m1 |
||
– |
||
0.12.1m1 |
||
Fipster (Go runtime) |
go1.23.8m1 |
|
– |
||
– |
||
Docker Compose CLI plugin |
2.34.0 |
2.34.0m1 |
25.0.9
Release date |
Name |
Upstream release |
|---|---|---|
2025-MAR-10 |
MCR 25.0.9 |
Moby 25.0.9 and Docker CLI 25.0.9 |
Changelog
MCR 25.0.9 comprises the Moby 25.0.9 upstream release.
Changes specific to MCR
MCR contains the following component additions and updates:
crun support added as an alternative OCI runtime.
Fipster (Go runtime)
go1.22.12-m1
Changes from upstream
The upstream pull requests detailed in the sections that follow are those that pertain to the MCR product. For the complete list of changes and pull requests upstream, refer to the GitHub milestones.
What is new
The MCR 25.0.9 patch release focuses on the delivery of CVE and bug fixes.
Security
go net/http: Fix CVE-2024-45336, The HTTP client drops sensitive headers after following a cross-domain redirect.
go crypto/x509: Fix CVE-2024-45341, A certificate with a URI which has a IPv6 address with a zone ID may incorrectly satisfy a URI name constraint that applies to the certificate chain.
golang.org/x/net: Fix CVE-2024-45338, Non-linear parsing of case-insensitive content in golang.org/x/net/html
Bug fixes
containerd
containerd/ttrpc#175 Fix race between serve and immediate shutdown on the server
containerd/ttrpc#171 Reject oversized messages from the sender
containerd/containerd#11306 Fix fatal concurrency error in port forwarding
containerd/containerd#11250 Fix console TTY leak in runc shim
containerd/containerd#11326 Fix initial sync race when registering NRI plugins
runc
opencontainers/runc#4612 Set the DeviceAllow property before DevicePolicy
GitHub milestones
The GitHub milestones offer full detail on the pull requests and changes as they correlate to the upstream Moby 25.0.9 release:
Major component versions
Version detail for the major components that comprise MCR 25.0.9 is presented in the table below:
Component |
Upstream Version |
Mirantis Version |
|---|---|---|
25.0.9m1 |
||
25.0.9m1 |
||
1.7.26m1 |
||
1.2.5m1 |
||
– |
||
0.12.1m1 |
||
Fipster (Go runtime) |
go1.22.12m1 |
|
– |
||
– |
25.0.8
Release date |
Name |
Upstream release |
|---|---|---|
2025-JAN-27 |
MCR 25.0.8 |
Moby 25.0.8 and Docker CLI 25.0.7 |
Changelog
MCR 25.0.8 comprises the Moby 25.0.8 upstream release.
Changes specific to MCR
Introduction of MCR 25.0.x version pinned streams, to ensure that the software does not automatically upgrade during regular system package updates. This new function is useful for maintaining compatibility with a particular version of the runtime, especially in production environments in which updates have the potential to break dependencies or workflows.
Added CLI flags for swarm service Seccomp, AppArmor, and no-new-privileges.
Changes from upstream
The upstream pull requests detailed in the sections that follow are those that pertain to the MCR product. For the complete list of changes and pull requests upstream, refer to the GitHub milestones.
What is new
moby/moby#5698 Addition of CLI flags for swarm service Seccomp, AppArmor, and no-new-privileges.
Bug fixes
Moby
moby/moby#49112 libnetwork/drivers/bridge: setupIPChains: fix defer checking wrong err
moby/moby#49029 Dockerd rootless: make {/etc,/var/run}/cdi available
moby/moby#49011 c8d/tag: Don’t log a warning if the source image is not dangling
moby/moby#48928 daemon: use OwnCgroupPath in withCgroups
moby/moby#48920 vendor: http://github.com/golang-jwt/jwt/v4@v4.5.1
moby/moby#48787 volume/mounts: fix anonymous volume not being labeled
containerd
containerd/containerd#11223 Fix ip_pref configuration option
containerd/containerd#11216 bump GitHub - containerd/continuity: A transport-agnostic, filesystem metadata manifest system from 0.4.2 to 0.4.4
containerd/containerd#11178 deps: update Sub-repositories - Go Packages
containerd/containerd#11184 Fix proto conflicts and update to 1.8 API
containerd/containerd#11099 Fix panic due to nil dereference cgroups v2
containerd/containerd#11032 Fix retry logic and concurrency issue with http fallback
containerd/containerd#10913 local: avoid writing to content root on readonly store
containerd/containerd#10859 Add After=dbus.service to containerd.service
containerd/containerd#10814 Fix “invalid metric type” error message for cgroup v1
GitHub milestones
The GitHub milestones offer full detail on the pull requests and changes as they correlate to the upstream Moby 25.0.8 release:
Major component versions
Version detail for the major components that comprise MCR 25.0.8 is presented in the table below:
Component |
Upstream Version |
Mirantis Version |
|---|---|---|
25.0.8m2 |
||
25.0.7m2 |
||
1.7.25m1 |
||
1.2.4m1 |
||
– |
||
0.12.1m1 |
||
Fipster (Go runtime) |
go1.22.9m1 |
|
– |
||
– |
25.0.7
Release date |
Name |
Upstream release |
|---|---|---|
2024-DEC-04 |
MCR 25.0.7 |
Moby 25.0.7 and Docker CLI 25.0.7 |
Highlights
Enhancement |
Detail |
|---|---|
Alternative OCI Runtimes |
MCR now incorporates upstream changes that allow for alternative OCI runtimes with cri-dockerd. Thus, users can now create containers with compatible alternative runtimes, such as Kata or gVisor. |
Container Device Interface (CDI) support |
MCR now supports the Container Device Interface (CDI) on Linux platforms, which allows for the automation of a copious amount of device configuration through the use of spec files. Note CDI is an experimental feature that must be manually enabled through the setting of the feature flag in the daemon.json file. |
OpenTelemetry tracing |
MCR supports tracing through Engine API requests using OpenTelemetry, allowing for the configuration of OpenTelemetry through the use of its common environment variables. For information on how to use this feature, refer to the official OpenTelemetry documentation. |
Changelog
MCR 25.0.7 comprises the Moby 25.0.7 upstream release. In addition, changes are included for the interceding upstream 24.0 release, for which there was no MCR release.
Changes specific to MCR
Overhaul of release versioning and packaging
Greater emphasis and differentiation is now placed on Product Version versus Major component versions. Product Version is based on the upstream engine release version, but is distinct from it.
Major Linux releases are no longer published to the
stablechannel and must instead be installed from their major version specific channel. This change greatly reduces the chance of performing accidental upgrades between major releases.MCR 25.0.7 is installed from the
stable-25.0channel.Windows releases continue to be published to the
stablechannel.
MCR components are built from soft-forks of upstream projects, which combine an upstream software release with patches that Mirantis maintains. Such components can be identified by a software version in which the patch version indicator is followed by the character
mand another number. This is the m-revision, the revision of the Mirantis patch set for the given upstream release of the software.Note
Several software components are built from unmodified upstream sources. These components use the upstream version directly, and can be identified by their lack of an m-revision component.
FIPS changes
All MCR 25.0.x releases are provided in two types.
The FIPS-mode MCR type always operates in a FIPS 140-2 compliant mode.
The non-FIPS MCR type cannot be configured to operate in a FIPS 140-2 compliant mode of operation.
Installing the FIPS-mode MCR type requires the use of a FIPS channel, which for MCR 25.0.7 is
stable-25.0/fips. A similar pattern will persist through future MCR releases.FIPS binaries can be identified by
+fipsin the package or software version. Some packages, such asrunc, do not have a specific+fipsversion, while some packages, such as containerd shims, contain non-+fipsbinaries. This is both normal and expected, as+fipsversions are built only for packages that use cryptography.
MCR telemetry changes
Users can no longer disable telemetry for MCR instancees that are unlicensed. This includes cases wherein the license is expired or malformed. In the event that the user has configured telemetry to be disabled, MCR will ignore the configuration and print an ERROR level message to the daemon logs.
Changes from upstream
The upstream pull requests detailed in the sections that follow are those that pertain to the MCR product. For the complete list of changes and pull requests upstream, refer to the GitHub milestones.
What is new
moby/moby#43735, other moby/moby pull requests Introduce experimental support for containerd as the content store (replacing the existing storage drivers).
Notice
Though this feature is present in the upstream, it is not a supported MCR feature.
docker/cli#4073 The
--hostCLI flag now supports a path component in assh://host address, allowing the use of an alternate socket path without configuration on the remote host.docker/cli#4180 The
docker infoCLI command now reports a version and platform field.moby/moby#43197 Introduce the daemon flag
--default-network-optto configure options for newly created networks.moby/moby#44562 Restrict access to
AF_VSOCKin thesocket(2)family of syscalls in the default seccomp profile.docker/cli#4156, moby/moby#45025 Introduce support for setting OCI runtime annotations on containers.
moby/moby#45032 Alternative runtimes can now be configured in
daemon.json, enabling runtime names to be aliased and options to be passed.moby/moby#45198 The
docker-initbinary will now be discovered in FHS-compliant libexec directories, in addition to thePATH.moby/moby#45320 API: Surface the daemon-level
--no-new-privilegesinGET /info.moby/moby#45652, moby/moby#45579 Add OpenTelemetry tracing.
moby/moby#45134, docker/cli#4510, moby/moby#46004 Add support for CDI devices under Linux.
moby/moby#40894, docker/cli#4405, moby/moby#45965 Add an additional interval to be used by health checks during the container start period.
moby/moby#45737 Add a
--log-formatflag todockerdto control the logging format: text (default) or JSON.moby/moby#45278, moby/moby#46037 Add support for recursive read-only mounts.
moby/moby#46577 Add support for filtering images based on timestamp with
docker image ls --filter=until=<timestamp>.
Removed
docker/cli#4204
docker infono longer reportsIndexServiceAddress.moby/moby#44684, moby/moby#44802 libnetwork: Remove fallback code for obsolete kernel versions.
moby/moby#44965 libnetwork: Remove unused code related to classic Swarm.
moby/moby#45281 libnetwork: Remove usage of the
xt_u32kernel module from encrypted Swarm overlay networks.moby/moby#45097 Remove support for BuildKit’s deprecated
buildinfoin favor of standard provenance attestations.moby/moby#45368 Remove the deprecated
overlay2.override_kernel_checkstorage driver option.moby/moby#45500 Remove workarounds for obsolete versions of
apparmor_parserfrom the AppArmor profiles.moby/moby#45068 API:
GET /images/jsonno longer represents empty RepoTags and RepoDigests as<none>:<none>/<none>@<none>. Empty arrays are returned instead on API >= 1.43.docker/cli#4302 Remove CLI completions for storage drivers removed in the 24.0 major release.
moby/moby#45469 API: Remove VirtualSize field for the
GET /images/jsonandGET /images/{id}/jsonendpoints.docker/cli#4366 Remove deprecated orchestrator options.
moby/moby#45484 Remove the
--oom-score-adjustdaemon option.docker/cli#4281 Remove warning for deprecated
~/.dockercfgfile.moby/moby#46925 Remove
logentrieslogging driver.
Deprecated
Deprecate API versions older than 1.24. Deprecation notice
Deprecate
IsAutomatedfield andis-automatedfilter fordocker search. Deprecation noticemoby/moby#46939 API: Deprecate
ContainerandContainerConfigproperties for/images/{id}/json(docker image inspect).
Bug fixes and enhancements
docker/cli#4214 The
docker stackcommand no longer validates thebuildsection of Compose files.moby/moby#43739 Fix lingering healthcheck processes after timeout is reached.
moby/moby#44285 Reduce the overhead of container startup when using the
overlay2storage driver.moby/moby#44503 API: Handle multiple
before=andsince=filters inGET /images.moby/moby#44664 Fix numerous bugs in the embedded DNS resolver implementation used by user-defined networks.
moby/moby#45494 Add
execDurationfield to the map of event attributes.moby/swarmkit#3121, moby/moby#45291 Swarm-level networks can now be created with the Windows
internal,l2bridge, andnatdrivers.moby/moby#45573 Fix an issue where DNS query NXDOMAIN replies from external servers were forwarded to the client as SERVFAIL.
moby/moby#45562 Fix an issue where
docker pull --platformwould reportNo such imageregarding another tag pointing to the same image.moby/moby#45571 Fix an issue where insecure registry configuration would be forgotten during config reload.
moby/moby#45568 API: Fix an issue where
POST /commitdid not accept empty request body.moby/moby#45620 Fix builds potentially failing with
exit code: 4294967295when performing many concurrent build stages.moby/moby#45810 Fix a Swarm CSI issue where the Topology field was not propagated into NodeCSIInfo.
moby/moby#45703, moby/swarmkit#3122, moby/swarmkit#3128 Fix failures to add new Swarm managers caused by a very large raft log.
moby/moby#45824
name_to_handle_at(2)is now always allowed in the default seccomp profile.moby/moby#45637 Fix an issue that prevented encrypted Swarm overlay networks from working on ports other than the default (4789).
moby/moby#45643 Fix an exception caused by attaching a terminal to an exec with a non-existent command.
moby/moby#45790 Fix host-gateway with BuildKit by passing the IP as a label (also requires docker/buildx#1894).
moby/moby#45774 Fix an issue where
POST /containers/{id}/stopwould forcefully terminate the container when the request was canceled, instead of waiting until the specified timeout for a ‘graceful’ stop.moby/moby#45746 Improve compatibility with non-runc container runtimes by more correctly setting resource constraint parameters in the OCI config.
moby/moby#45747, rootless-containers/rootlesskit#369 Fix an issue caused by overlapping subuid/subgid ranges in certain configurations (e.g. LDAP) in rootless mode.
moby/moby#45856 Greatly reduce CPU and memory usage while populating the Debug section of
GET /info.docker/cli#4393 Fix an issue where debug information was not correctly printed during docker info when only the client is in debug mode.
docker/cli#4395 Fix issues related to hung connections when connecting to hosts over an SSH connection.
docker/cli#4423 Properly report errors parsing volume specifications from the command line.
docker/cli#4450 Fix a panic caused when
auths: nullis found in the CLI config file.moby/moby#46137 Warn when pulling Docker Image Format v1, and Docker Image manifest version 2, schema 1 images from all registries.
moby/moby#46366 Fix live-restore of volumes with custom volume options.
moby/moby#46214 Fix network isolation iptables rules preventing IPv6 Neighbor Solicitation packets from being exchanged between containers.
moby/moby#46215 Fix
dockerd.exe --register-servicenot working when the binary is in the current directory on Windows.docker/cli#4500 Add a hint suggesting the use of a PAT to
docker loginagainst Docker Hub.docker/cli#4517 Improve shell startup time for users of Bash completion for the CLI.
docker/cli#4508 Improve the speed of some commands by skipping
GET /_pingwhen possible.docker/cli#4512 Fix credential scopes when using a PAT to
docker manifest inspectan image on Docker Hub.docker/cli#4544 Fix
docker eventsnot supporting--format=json.moby/moby#46703 Write overlay2 layer metadata atomically.
moby/moby#46564 Fix “Rootful-in-Rootless” Docker-in-Docker on systemd version 250 and later.
moby/moby#44395 Fix
dockerd-rootless-setuptools.shwhen username contains a backslash.moby/moby#46651 Fix a bug that would prevent network sandboxes to be fully deleted when stopping containers with no network attachments and when
dockerd
--bridge=none
is used.moby/moby#46700 Fix data corruption with zstd output.
moby/moby#46406 Fix the conditions under which the container’s MAC address is applied.
moby/moby#46448 Improve the performance of the stats collector.
moby/moby#46857 Live restore: Containers with auto remove (
docker run --rm) are no longer forcibly removed on engine restart.moby/moby#46352 API: Fix error message for invalid policies at
ValidateRestartPolicy.moby/moby#45847 API: Update
/infoendpoint to use singleflight.docker/cli#4346 Add an error message for when specifying a Dockerfile filename with
-f, and also usingstdin.docker/cli#4419 Add support for
mac-addressandlink-local-ipfields in--networklong format.moby/moby#45906 Add support for specifying multiple
--networkflags withdocker container createanddocker run.moby/moby#46455 Automatically enable IPv6 on a network when an IPv6 subnet is specified.
moby/moby#46790 Add support for overlay networks over IPv6 transport.
moby/moby#43980 Configuration reloading is now more robust: if there’s an error during the configuration reload process, no configuration changes are applied.
moby/moby#47051 Live restore: containers that are live-restored will now be given another health-check start period when the daemon restarts.
moby/moby#47044 Container health status is flushed to disk less frequently, reducing wear on flash storage.
moby/moby#46251 Ensure network names are unique.
moby/moby#46471 Ensure that overlay2 layer metadata is correct.
moby/moby#46515 Fix
Downloadingprogress message on image pull.moby/moby#46183 Fix
NetworkConnectandContainerCreatewith improved data validation, and return all validation errors at once.moby/moby#46446 Fix
com.docker.network.host_ipv4option when IPv6 and ip6tables are enabled.moby/moby#46213 Fix daemon’s
cleanupContainerif containerd is stopped.moby/moby#46146 Fix returning incorrect HTTP status codes for libnetwork errors.
moby/moby#46034 Fix various issues with images/json API filters and image list.
moby/moby#46863 CIFS volumes now resolves FQDN correctly.
moby/moby#47000 Improve validation of the
userland-proxy-pathdaemon configuration option. Validation now happens during daemon startup, instead of producing an error when starting a container with port-mapping.moby/moby#46406 Set the MAC address of container’s interface when network mode is a short network ID.
moby/moby#45917 Sort unconsumed build arguments before display in build output.
moby/moby#44598 The
docker image savetarball output is now OCI compliant.moby/moby#45280 The daemon no longer appends
ACCEPTrules to the end of theINPUTiptables chain for encrypted overlay networks. Depending on firewall configuration, a rule may be needed to permit incoming encrypted overlay network traffic.moby/moby#45464 Unpacking layers with extended attributes onto an incompatible filesystem will now fail instead of silently discarding extended attributes.
moby/moby#45887 Update daemon MTU option to BridgeConfig and display warning on Windows.
moby/moby#45759 Validate IPAM config when creating a network. Automatically fix networks created prior to this release where
--ip-rangeis larger than--subnet.moby/moby#46603 Containers connected only to internal networks will now have no default route set, making the
connectsyscall fail-fast.moby/moby#47136 Fix an issue in detecting whether a remote build context is a Git repository.
moby/moby#47163 Swarm: Fixed
start_intervalnot being passed to the container config.moby/moby#47304 Ensure that a generated MAC address is not restored when a container is restarted, but a configured MAC address is preserved.
moby/moby#47294 Fix
docker save <image>@<digest>producing an OCI archive with index without manifests.moby/moby#47323 Fix a bug where trying to install a plugin using a digest revision would cause a panic.
moby/moby#47243 Fix an issue with the
journaldlog driver preventing container logs from being followed correctly with systemd version 255.moby/moby#47341 seccomp: Update the builtin seccomp profile to include syscalls added in kernel v5.17 - v6.7 to align the profile with the profile used by containerd.
moby/moby#47307, moby/moby#47337 Windows: Fix cache not being used when building images based on Windows versions older than the host’s version.
moby/moby#47466 Fix
docker startfailing when used with--checkpointmoby/moby#47393 API: To preserve backwards compatibility, make read-only mounts non-recursive by default when using older clients (API versions < v1.44).
moby/moby#47451 API:
GET /images/{id}/jsonomits theCreatedfield (previously it was0001-01-01T00:00:00Z) if theCreatedfield was missing from the image config.moby/moby#47387 API: Populate a missing
Createdfield inGET /images/{id}/jsonwith0001-01-01T00:00:00Zfor API versions <= 1.43.moby/moby#47470 API: Fix a regression that caused API socket connection failures to report an API version negotiation failure instead.
moby/moby#47527 Fix multiple parallel docker build runs leaking disk space.
moby/moby#47589 CVE-2024-29018: Do not forward requests to external DNS servers for a container that is only connected to an ‘internal’ network. Previously, requests were forwarded if the host’s DNS server was running on a loopback address, like systemd’s 127.0.0.53.
GitHub milestones
The GitHub milestones offer full detail on the pull requests and changes as they correlate to the upstream Moby 24.0 and 25.0 releases.
Major component versions
Version detail for the major components that comprise MCR 25.0.7 is presented in the table below:
Component |
Upstream Version |
Mirantis Version |
|---|---|---|
25.0.7m1 |
||
25.0.7m1 |
||
1.7.23m1 |
||
1.5.15m1 |
||
– |
||
0.12.1m1 |
||
Fipster (Go runtime) |
– |
|
– |
||
– |
Release Compatibility Matrix
MCR 25.0 Compatibility Matrix
Mirantis Container Runtime (MCR) enables containers to run efficiently on any substrate, powering business critical applications at leading companies worldwide.
Mirantis validates MCR for the operating system environments specified here, adhering to the MKE 3.x, MSR, and MCR Maintenance Lifecycle. Support for MCR is defined in the Mirantis Cloud Native Platform Subscription Services agreement.
Note
Users running MSR 2.9.16 or earlier must upgrade to MSR 2.9.17 or later before upgrading to MCR 25.0.x.
MKE 3.5.x and 3.4.x do not support Windows Server 2022.
OS distributed versions not listed in the following matrix are not supported under Standard Support Subscriptions. For such versions, contact your Mirantis rep to discuss support options.
MCR |
Max. supported Client API |
Platform |
Versions |
|---|---|---|---|
25.0.15 |
1.44 |
Oracle Linux [1] |
10.0, 9.7, 9.6, 9.3, 9.2, 9.1, 9.0, 8,6 |
RHEL |
10.0, 9.7, 9.6, 9.5, 9.4, 9.3 9.2, 9.1, 9.0, 8.10, 8.9. 8.8, 8.7, 8.6, 8.5, 8.4, 8.3, 8.2, 8.1, 8.0 |
||
Rocky Linux |
10.0, 9.7, 9.2, 9.1, 9.0, 8.10, 8.9, 8.8, 8.7 |
||
SLES |
15 SP6 |
||
Ubuntu |
24.04.2, 22.04.3 |
||
Microsoft Windows Enterprise Server |
2022, 2019 |
||
25.0.14 / 25.0.14.1/ 25.0.14.2 |
1.44 |
Oracle Linux [1] |
9.6, 9.3, 9.2, 9.1, 9.0, 8,6 |
RHEL |
9.6, 9.5, 9.4, 9.3, 9.2, 9.1, 9.0, 8.10, 8.9. 8.8, 8.7, 8.6, 8.5, 8.4, 8.3, 8.2, 8.1, 8.0 |
||
Rocky Linux |
9.2, 9.1, 9.0, 8.10, 8.9, 8.8, 8.7 |
||
SLES |
15 SP6 |
||
Ubuntu |
24.04.2, 22.04.3 |
||
Microsoft Windows Enterprise Server |
2022, 2019 |
||
25.0.13 / 25.0.13.1 |
1.44 |
Oracle Linux [1] |
9.3, 9.2, 9.1, 9.0, 8,6 |
RHEL |
9.6, 9.5, 9.4, 9.3, 9.2, 9.1, 9.0, 8.10, 8.9. 8.8, 8.7, 8.6, 8.5, 8.4, 8.3, 8.2, 8.1, 8.0 |
||
Rocky Linux |
9.2, 9.1, 9.0, 8.10, 8.9, 8.8, 8.7 |
||
SLES |
15 SP6 |
||
Ubuntu |
24.04.2, 22.04.3 |
||
Microsoft Windows Enterprise Server |
2022, 2019 |
||
25.0.12 |
1.44 |
Oracle Linux [1] |
9.3, 9.2, 9.1, 9.0, 8,6 |
RHEL |
9.5, 9.4, 9.3, 9.2, 9.1, 9.0, 8.10, 8.9 8.8, 8.7, 8.6, 8.5, 8.4, 8.3, 8.2, 8.1, 8.0 |
||
Rocky Linux |
9.2, 9.1, 9.0, 8.10, 8.9, 8.8, 8.7 |
||
SLES |
15 SP6 |
||
Ubuntu |
24.04.2, 22.04.3, 20.04.6, 20.04.5, 20.04.4 [2], 20.04.3, 20.04.2, 20.04.1, 20.04.0 |
||
Microsoft Windows Enterprise Server |
2022, 2019 |
||
25.0.11 |
1.44 |
Oracle Linux [1] |
9.3, 9.2, 9.1, 9.0, 8,6 |
RHEL |
9.5, 9.4, 9.3, 9.2, 9.1, 9.0, 8.10, 8.9 8.8, 8.7, 8.6, 8.5, 8.4, 8.3, 8.2, 8.1, 8.0 |
||
Rocky Linux |
9.2, 9.1, 9.0, 8.10, 8.9, 8.8, 8.7 |
||
SLES |
15 SP6 |
||
Ubuntu |
24.04.2, 22.04.3, 20.04.6, 20.04.5, 20.04.4 [2], 20.04.3, 20.04.2, 20.04.1, 20.04.0 |
||
Microsoft Windows Enterprise Server |
2022, 2019 |
||
25.0.10 |
1.44 |
Oracle Linux [1] |
9.3, 9.2, 9.1, 9.0, 8,6 |
RHEL |
9.5, 9.4, 9.3, 9.2, 9.1, 9.0, 8.10, 8.9 8.8, 8.7, 8.6, 8.5, 8.4, 8.3, 8.2, 8.1, 8.0 |
||
Rocky Linux |
9.2, 9.1, 9.0, 8.10, 8.9, 8.8, 8.7 |
||
SLES |
15 SP6 |
||
Ubuntu |
24.04.2, 22.04.3, 20.04.6, 20.04.5, 20.04.4 [2], 20.04.3, 20.04.2, 20.04.1, 20.04.0 |
||
Microsoft Windows Enterprise Server |
2022, 2019 |
||
25.0.9 |
1.44 |
Oracle Linux [1] |
9.3, 9.2, 9.1, 9.0, 8,6 |
RHEL |
9.5, 9.4, 9.3, 9.2, 9.1, 9.0, 8.10, 8.9 8.8, 8.7, 8.6, 8.5, 8.4, 8.3, 8.2, 8.1, 8.0 |
||
Rocky Linux |
9.2, 9.1, 9.0, 8.10, 8.9, 8.8, 8.7 |
||
SLES |
15 SP6 |
||
Ubuntu |
22.04.3, 20.04.6, 20.04.5, 20.04.4 [2], 20.04.3, 20.04.2, 20.04.1, 20.04.0 |
||
Microsoft Windows Enterprise Server |
2022, 2019 |
||
25.0.8 |
1.44 |
Oracle Linux [1] |
9.3, 9.2, 9.1, 9.0, 8,6 |
RHEL |
9.5, 9.4, 9.3, 9.2, 9.1, 9.0, 8.10, 8.9 8.8, 8.7, 8.6, 8.5, 8.4, 8.3, 8.2, 8.1, 8.0 |
||
Rocky Linux |
9.2, 9.1, 9.0, 8.10, 8.9, 8.8, 8.7 |
||
SLES |
15 SP6 |
||
Ubuntu |
22.04.3, 20.04.6, 20.04.5, 20.04.4 [2], 20.04.3, 20.04.2, 20.04.1, 20.04.0 |
||
Microsoft Windows Enterprise Server |
2022, 2019 |
||
25.0.7 |
1.44 |
Oracle Linux [1] |
9.3, 9.2, 9.1, 9.0, 8,6 |
RHEL |
9.5, 9.4, 9.3, 9.2, 9.1, 9.0, 8.10, 8.9 8.8, 8.7, 8.6, 8.5, 8.4, 8.3, 8.2, 8.1, 8.0 |
||
Rocky Linux |
9.2, 9.1, 9.0, 8.10, 8.9, 8.8, 8.7 |
||
SLES |
15 SP6, 15 SP5 |
||
Ubuntu |
22.04.3, 20.04.6, 20.04.5, 20.04.4 [2], 20.04.3, 20.04.2, 20.04.1, 20.04.0 |
||
Microsoft Windows Enterprise Server |
2022, 2019 |
MKE 3.x, MSR, and MCR Maintenance Lifecycle
The MKE, MSR, and MCR platform subscription provides software, support, and certification to enterprise development and IT teams that build and manage critical apps in production at scale. It provides a trusted platform for all apps which supply integrated management and security across the app lifecycle, comprised primarily of Mirantis Kubernetes Engine, Mirantis Secure Registry (MSR), and Mirantis Container Runtime (MCR).
Mirantis validates the MKE, MSR, and MCR platform for the operating system environments specified in the MCR compatibility matrix, adherring to the maintenance lifecycle detailed here. Support for the MKE, MSR, and MCR platform is defined in the Mirantis Cloud Native Platform Subscription Services agreement.
Detailed here are all currently supported product versions, as well as the product versions most recently deprecated. It can be assumed that all earlier product versions are at End of Life (EOL).
Important Definitions
“Major Releases” (X.y.z): Vehicles for delivering major and minor feature development and enhancements to existing features. They incorporate all applicable Error corrections made in prior Major Releases, Minor Releases, and Maintenance Releases.
“Minor Releases” (x.Y.z): Vehicles for delivering minor feature developments, enhancements to existing features, and defect corrections. They incorporate all applicable Error corrections made in prior Minor Releases, and Maintenance Releases.
“Maintenance Releases” (x.y.Z): Vehicles for delivering Error corrections that are severely affecting a number of customers and cannot wait for the next major or minor release. They incorporate all applicable defect corrections made in prior Maintenance Releases.
“End of Life” (EOL): Versions are no longer supported by Mirantis, updating to a later version is recommended.
GA to 12 months |
12 to 18 months |
18 to 24 months |
|---|---|---|
Full support |
Full support 1 |
Limited Support for existing installations 2 |
1 Software patches for critical bugs and security issues only; no feature enablement.
2 Software patches for critical security issues only.
Mirantis Kubernetes Engine (MKE)
3.9.z |
3.8.z |
|
|---|---|---|
General Availability (GA) |
2026-MAR-24 (3.9.0) |
2024-DEC-4 (3.8.0) |
End of Life (EOL) |
2028-MAR-24 |
2026-DEC-4 |
Release frequency |
x.y.Z every 8 weeks |
x.y.Z every 8 weeks |
Patch release content |
As needed:
|
As needed:
|
Supported lifespan |
2 years 1 |
2 years 1 |
1 Refer to the Support lifecycle table for details.
EOL MKE Versions
MKE Version |
EOL date |
|---|---|
2.0.z |
2017-AUG-16 |
2.1.z |
2018-FEB-07 |
2.2.z |
2019-NOV-01 |
3.0.z |
2020-APR-16 |
3.1.z |
2020-NOV-06 |
3.2.z |
2021-JUL-21 |
3.3.z |
2022-MAY-27 |
3.4.z |
2023-APR-11 |
3.5.z |
2023-NOV-22 |
3.6.z |
2023-OCT-13 |
3.7.z |
2025-AUG-29 |
Mirantis Secure Registry (MSR)
2.10.z |
2.9.z |
|
|---|---|---|
General Availability (GA) |
2026-JUL-07 (2.10.0) |
2021-APR-12 (2.9.0) |
End of Life (EOL) |
2028-JUL-07 |
2026-DEC-01 |
Release frequency |
x.y.Z every 8 weeks |
x.y.Z every 8 weeks |
Patch release content |
As needed:
|
As needed:
|
Supported lifespan |
2 years 1 |
2 years 1 |
1 Refer to the Support lifecycle table for details.
EOL MSR Versions
MSR Version |
EOL date |
|---|---|
2.1.z |
2017-AUG-16 |
2.2.z |
2018-FEB-07 |
2.3.z |
2019-FEB-15 |
2.4.z |
2019-NOV-01 |
2.5.z |
2020-APR-16 |
2.6.z |
2020-NOV-06 |
2.7.z |
2021-JUL-21 |
2.8.z |
2022-MAY-27 |
3.0.z |
2024-APR-20 |
3.1.z |
2025-SEP-27 |
Mirantis Container Runtime (MCR)
Enterprise 29.0 |
Enterprise 25.0 |
|
|---|---|---|
General Availability (GA) |
2026-MAR-24 (29.2.1) |
2024-DEC-04 (25.0.7) |
End of Life (EOL) |
2028-MAR-24 |
2026-DEC-04 |
Release frequency |
x.y.Z every 8 weeks |
x.y.Z every 8 weeks |
Patch release content |
As needed:
|
As needed:
|
Supported lifespan |
2 years 1 |
2 years 1 |
1 Refer to the Support lifecycle table for details.
EOL MCR Versions
MCR Version |
EOL date |
|---|---|
CSE 1.11.z |
2017-MAR-02 |
CSE 1.12.z |
2017-NOV-14 |
CSE 1.13.z |
2018-FEB-07 |
EE 17.03.z |
2018-MAR-01 |
Docker Engine - Enterprise v17.06 |
2020-APR-16 |
Docker Engine - Enterprise 18.03 |
2020-JUN-16 |
Docker Engine - Enterprise 18.09 |
2020-NOV-06 |
Docker Engine - Enterprise 19.03 |
2021-JUL-21 |
MCR 19.03.8+ |
2022-MAY-27 |
MCR 20.10.0+ |
2023-DEC-10 |
MCR 23.0.0+ |
2025-JUN-04 |
Release Cadence and Support Lifecycle
With the intent of improving the customer experience, Mirantis strives to offer maintenance releases for the Mirantis Container Runtime (MCR) software every six to eight weeks. Primarily, these maintenance releases will aim to resolve known issues and issues reported by customers, quash CVEs, and reduce technical debt. The version of each MCR maintenance release is reflected in the third digit position of the version number (as an example, for MCR 23.0 the most current maintenance release is MCR 25.0.15).
Regarding major releases, MCR is dependent on Docker Engine major releases upstream. Following such a release, the Mirantis support lifespan of the resulting major version of MCR will adhere to our legacy two year standard.
End of Life Date
For information on MCR version lifecycles, refer to the MKE 3.x, MSR, and MCR Maintenance Lifecycle.
As necessary, Mirantis may produce an MCR release between upstream releases. These so-called dash releases can contain hotfixes, packaging changes or depenency changes. In such cases, these dash releases replace the previous release of the same version (as an example, MCR 23.0.9-1 replaces MCR 23.0.9).
Note
In general, MCR dash releases for a particular patch version share the same OS and kernel compatibility.
The MCR team will make every effort to hold to the release cadence stated here. Customers should be aware, though, that development and release cycles can change, and without advance notice.
Technology Preview features
A Technology Preview feature provides early access to upcoming product innovations, allowing customers to experiment with the functionality and provide feedback.
Technology Preview features may be privately or publicly available and neither are intended for production use. While Mirantis will provide assistance with such features through official channels, normal Service Level Agreements do not apply.
As Mirantis considers making future iterations of Technology Preview features generally available, we will do our best to resolve any issues that customers experience when using these features.
During the development of a Technology Preview feature, additional components may become available to the public for evaluation. Mirantis cannot guarantee the stability of such features. As a result, if you are using Technology Preview features, you may not be able to seamlessly upgrade to subsequent product releases.
Mirantis makes no guarantees that Technology Preview features will graduate to generally available features.
QuickStart: MCR on Ubuntu
Use this QuickStart guide to quickly deploy Mirantis Container Runtime (MCR) to Ubuntu systems from the repository.
Introduction
MCR installations includes the following components:
MCR engine
MCR CLI
containerd
runc
After installing MCR, you will be able to:
Use Dockerfiles to build and run images as containers.
Share images using Docker Hub.
Run applications using Docker Compose.
The following diagram illustrates the workflow for installing MCR on Ubuntu:
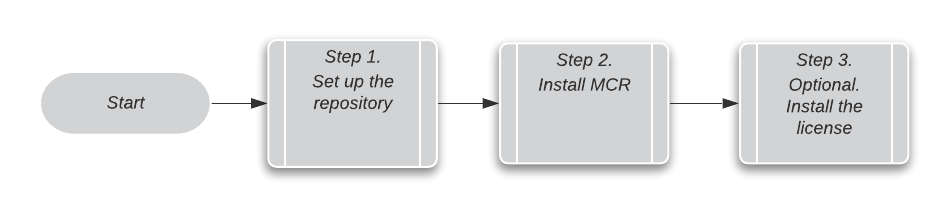
Set up the repository
To install MCR using the Mirantis repository you must first set up the repository on the host machine.
Note
MCR only supports x86_64/amd64.
Install the packages:
$ sudo apt update && sudo apt install curl gnupg
Add the official Docker GPG key:
$ sudo gpg --batch --yes \
  --output /usr/share/keyrings/mirantis-archive-keyring.gpg --dearmor \
  <<< $(curl -fsSL https://repos.mirantis.com/ubuntu/gpg)
Verify that the GPG key has the fingerprint
DD91 1E99 5A64 A202 E859 07D6 BC14 F10B 6D08 5F96:$ gpg --show-keys --with-fingerprint --keyid-format=short \ /usr/share/keyrings/mirantis-archive-keyring.gpg
Expected output:
pub   rsa4096/6D085F96 2017-02-22 [SCEA]
     Key fingerprint = DD91 1E99 5A64 A202 E859  07D6 BC14 F10B 6D08 5F96
uid                    Docker Release (EE deb) <docker@docker.com>
sub   rsa4096/91A29FA3 2017-02-22 [S]
Add the repository to your
sources.list. To do this, create a text file in/etc/apt/sources.list.d/mirantis.sources:Types: deb URIs: https://repos.mirantis.com/ubuntu Suites: <value-depends-on-Ubuntu-version> Architectures: amd64 Components: stable-25.0 Signed-by: /usr/share/keyrings/mirantis-archive-keyring.gpg
Note
The
Suitesparameter setting isjammyfor Ubuntu 22.04 andfocalfor Ubuntu 20.04.
Install MCR
Install the latest version of MCR:
$ sudo apt update && sudo apt install docker-ee
The Docker daemon will start.
Run the
hello-worldimage to verify that MCR is correctly installed. This command downloads a test image, runs it in a container, prints an informational message, and exits:$ sudo docker run hello-world
Expected output:
Hello from Docker!
This message shows that your installation appears to be working correctly.

To generate this message, Docker took the following steps:
 1. The Docker client contacted the Docker daemon.
 2. The Docker daemon pulled the "hello-world" image from the Docker Hub.
    (amd64)
 3. The Docker daemon created a new container from that image which runs
    the executable that produces the output you are currently reading.
 4. The Docker daemon streamed that output to the Docker client, which
    sent it to your terminal.

To try something more ambitious, you can run an Ubuntu container with:
 $ docker run -it ubuntu bash

Share images, automate workflows, and more with a free Docker ID:
 https://hub.docker.com/

For more examples and ideas, visit:
 https://docs.docker.com/get-started/
Install the license
An MCR license gives the user access to Mirantis Support. You can complete this guide and start using MCR right away, and install the license later.
To install the MCR license:
Purchase an MCR subscription or contact Mirantis for more information.
Follow the link to download your MCR license file found in the confirmation email you received after purchasing MCR from the Mirantis web store. If you cannot access your confirmation email, contact Mirantis.
Copy the file to the data root directory and name it
docker.lic. The default data root directory is/var/lib/docker.Verify the installation:
sudo docker info --format '{{.ProductLicense}}'
What’s next
Refer to Install Mirantis Container Runtime for Ubuntu to learn about these additional installation topics:
ubuntu-package-install
ubuntu-upgrade
Uninstall Mirantis Container Runtime (including old versions)
Begin using Docker Hub to find and share images.
Install Mirantis Kubernetes Engine (MKE) and Mirantis Secure Registry (MSR).
Learn about all the components of Mirantis Cloud Native Platform.
QuickStart: MCR on Oracle Linux
Use this QuickStart guide to quickly deploy Mirantis Container Runtime (MCR) to Oracle Linux systems from the repository.
Note
The documentation herein applies only to Oracle Linux 7. Mirantis does not support Oracle 8.
Introduction
MCR installations includes the following components:
MCR engine
MCR CLI
containerd
runc
After installing MCR, you will be able to:
Use Dockerfiles to build and run images as containers.
Share images using Docker Hub.
Run applications using Docker Compose.
The following diagram illustrates the workflow for installing MCR on Oracle Linux:
Set up the repository
To install MCR using the Mirantis repository you must first set up the repository on the host machine.
Note
MCR supports Oracle Linux on the x86_64 platform with Red Hat Compatible Kernel (RHCK).
Next, create or modify the /etc/yum.repos.d/docker-ee.repo file to contain
the following:
[mirantis]
name=Mirantis Container Runtime
baseurl=https://repos.mirantis.com/oraclelinux/$releasever/$basearch/stable-25.0
enabled=1
gpgcheck=1
gpgkey=https://repos.mirantis.com/oraclelinux/gpg
module_hotfixes=true
Note
$releasever and $basearch are repo variables
that must be placed into the /etc/yum.repos.d/docker-ee.repo file
exactly as written.
Install MCR
Run the following command to install the latest verison of MCR from the repository:
$ sudo dnf install docker-ee
If you are prompted to accept the GPG key, first verify that the key has the fingerprint
77FE DA13 1A83 1D29 A418 D3E8 99E5 FF2E 7668 2BC9.Start Docker:
$ sudo systemctl start docker.service
Run the
hello-worldimage to verify that MCR is correctly installed. This command downloads a test image, runs it in a container, prints an informational message, and exits:$ sudo docker run hello-world
Expected output:
Hello from Docker!
This message shows that your installation appears to be working correctly.

To generate this message, Docker took the following steps:
 1. The Docker client contacted the Docker daemon.
 2. The Docker daemon pulled the "hello-world" image from the Docker Hub.
    (amd64)
 3. The Docker daemon created a new container from that image which runs
    the executable that produces the output you are currently reading.
 4. The Docker daemon streamed that output to the Docker client, which
    sent it to your terminal.

To try something more ambitious, you can run an Ubuntu container with:
 $ docker run -it ubuntu bash

Share images, automate workflows, and more with a free Docker ID:
 https://hub.docker.com/

For more examples and ideas, visit:
 https://docs.docker.com/get-started/
Install the license
An MCR license gives the user access to Mirantis Support. You can complete this guide and start using MCR right away, and install the license later.
To install the MCR license:
Purchase an MCR subscription or contact Mirantis for more information.
Follow the link to download your MCR license file found in the confirmation email you received after purchasing MCR from the Mirantis web store. If you cannot access your confirmation email, contact Mirantis.
Copy the file to the data root directory and name it
docker.lic. The default data root directory is/var/lib/docker.Verify the installation:
sudo docker info --format '{{.ProductLicense}}'
What’s next
Refer to Install Mirantis Container Runtime for Oracle Linux to learn about these additional installation topics:
oracle-package-install
oracle-upgrade-repo
oracle-upgrade-package
uninstall-mcr
Begin using Docker Hub to find and share images
Install Mirantis Kubernetes Engine (MKE) and Mirantis Secure Registry (MSR)
Learn about other components of Mirantis Cloud Native Platform
QuickStart: MCR on RHEL
Use this QuickStart guide to quickly deploy Mirantis Container Runtime (MCR) to Red Hat Enterprise Linux (RHEL) systems from the repository.
Introduction
MCR installations includes the following components:
MCR engine
MCR CLI
containerd
runc
After installing MCR, you will be able to:
Use Dockerfiles to build and run images as containers.
Share images using Docker Hub.
Run applications using Docker Compose.
The following diagram illustrates the workflow for installing MCR on RHEL:
Set up the repository
To install MCR using the Mirantis repository, you must first set up the repository on the host machine.
Note
MCR supports Red Hat Enterprise Linux (RHEL) on the x86_64 platform.
Create or modify the /etc/yum.repos.d/docker-ee.repo file to contain
the following:
[mirantis]
name=Mirantis Container Runtime
baseurl=https://repos.mirantis.com/rhel/$releasever/$basearch/stable-25.0
enabled=1
gpgcheck=1
gpgkey=https://repos.mirantis.com/rhel/gpg
module_hotfixes=true
Note
$releasever and $basearch are repo variables
that must be placed into the /etc/yum.repos.d/docker-ee.repo file
exactly as written.
Install MCR
Run the following command to install the latest version of MCR from the repository:
$ sudo dnf install docker-ee
If you are prompted to accept the GPG key, first verify that the key has the fingerprint
77FE DA13 1A83 1D29 A418 D3E8 99E5 FF2E 7668 2BC9.Start Docker:
$ sudo systemctl start docker.service
Run the
hello-worldimage to verify that MCR is correctly installed. This command downloads a test image, runs it in a container, prints an informational message, and exits:$ sudo docker run hello-world
Expected output:
Hello from Docker!
This message shows that your installation appears to be working correctly.

To generate this message, Docker took the following steps:
 1. The Docker client contacted the Docker daemon.
 2. The Docker daemon pulled the "hello-world" image from the Docker Hub.
    (amd64)
 3. The Docker daemon created a new container from that image which runs
    the executable that produces the output you are currently reading.
 4. The Docker daemon streamed that output to the Docker client, which
    sent it to your terminal.

To try something more ambitious, you can run an Ubuntu container with:
 $ docker run -it ubuntu bash

Share images, automate workflows, and more with a free Docker ID:
 https://hub.docker.com/

For more examples and ideas, visit:
 https://docs.docker.com/get-started/
Install the license
An MCR license gives the user access to Mirantis Support. You can complete this guide and start using MCR right away, and install the license later.
To install the MCR license:
Purchase an MCR subscription or contact Mirantis for more information.
Follow the link to download your MCR license file found in the confirmation email you received after purchasing MCR from the Mirantis web store. If you cannot access your confirmation email, contact Mirantis.
Copy the file to the data root directory and name it
docker.lic. The default data root directory is/var/lib/docker.Verify the installation:
sudo docker info --format '{{.ProductLicense}}'
What’s next
Refer to Install Mirantis Container Runtime for Red Hat Enterprise Linux to learn about these additional installation topics:
FIPS 140-2-support
rhel-package-install
rhel-repo-upgrade
rhel-package-upgrade
Begin using Docker Hub to find and share images
Install Mirantis Kubernetes Engine (MKE) and Mirantis Secure Registry (MSR).
Learn about other components of Mirantis Cloud Native Platform.