Introduction
This documentation provides information on how to deploy and operate a Mirantis Secure Registry (MSR). The documentation is intended to help operators to understand the core concepts of the product. The documentation provides sufficient information to deploy and operate the solution.
The information provided in this documentation set is being constantly improved and amended based on the feedback and kind requests from the consumers of MSR.
Product Overview
Mirantis Secure Registry (MSR) is a solution that enables enterprises to store and manage their container images on-premise or in their virtual private clouds. Built-in security enables you to verify and trust the provenance and content of your applications and ensure secure separation of concerns. Using MSR, you meet security and regulatory compliance requirements. In addition, the automated operations and integration with CI/CD speed up application testing and delivery. The most common use cases for MSR include:
- Helm charts repositories
Deploying applications to Kubernetes can be complex. Setting up a single application can involve creating multiple interdependent Kubernetes resources, such as pods, services, deployments, and replica sets. Each of these requires manual creation of a detailed YAML manifest file as well. This is a lot of work and time invested. With Helm charts (packages that consist of a few YAML configuration files and some templates that are rendered into Kubernetes manifest files) you can save time and install the software you need with all the dependencies, upgrade, and configure it.
- Automated development
Easily create an automated workflow where you push a commit that triggers a build on a CI provider, which pushes a new image into your registry. Then, the registry fires off a webhook and triggers deployment on a staging environment, or notifies other systems that a new image is available.
- Secure and vulnerable free images
When an industry requires applications to comply with certain security standards to meet regulatory compliances, your applications are as secure as the images that run those applications. To ensure that your images are secure and do not have any vulnerabilities, track your images using a binary image scanner to detect components in images and identify associated CVEs. In addition, you may also run image enforcement policies to prevent vulnerable or inappropriate images from being pulled and deployed from your registry.
Reference Architecture
The Mirantis Secure Registry (MSR) Reference Architecture provides comprehensive technical information on MSR, including component particulars, infrastructure specifications, and networking and volumes detail.
Introduction to MSR
Mirantis Secure Registry (MSR) is an enterprise-grade image storage solution. Installed behind a firewall, either on-premises or on a virtual private cloud, MSR provides a secure environment where users can store and manage their images.
The advantages of MSR include the following:
- Image and job management
MSR has a web-based user interface used for browsing images and auditing repository events. With the web UI, you can see which Dockerfile lines produced an image and, if security scanning is enabled, a list of all of the software installed in that image and any Common Vulnerabilities and Exposures (CVEs). You can also audit jobs with the web UI.
MSR can serve as a continuous integration and continuous delivery (CI/CD) component, in the building, shipping, and running of applications.
- Availability
MSR is highly available through the use of multiple replicas of all containers and metadata. As such, MSR will continue to operate in the event of machine failure, thus allowing for repair.
- Efficiency
MSR can reduce the bandwidth used when pulling images by caching images closer to users. In addition, MSR can clean up unreferenced manifests and layers.
- Built-in access control
As with Mirantis Kubernetes Engine (MKE), MSR uses role-based access control (RBAC), which allows you to manage image access, either manually, with LDAP, or with Active Directory.
- Security scanning
A security scanner is built into MSR, which can be used to discover the versions of the software that is in use in your images. This tool scans each layer and aggregates the results, offering a complete picture of what is being shipped as a part of your stack. Most importantly, as the security scanner is kept up-to-date by tapping into a periodically updated vulnerability database, it is able to provide unprecedented insight into your exposure to known security threats.
- Image signing
MSR ships with Notary, which allows you to sign and verify images using Docker Content Trust.
Components
Mirantis Secure Registry (MSR) is a containerized application that runs on a Mirantis Kubernetes Engine cluster. After deploying MSR, you can use your Docker CLI client to log in, push, and pull images. For high availability, you can deploy multiple MSR replicas, one on each MKE worker node.
All MSR replicas run the same set of services, and changes to the configuration of one is replica is automatically propagated to other replicas.
Installing MSR on a node starts the containers that are detailed in the following table:
Name |
Description |
|---|---|
|
Executes the MSR business logic, serving the MSR web application and API. |
|
Manages MSR authentication. |
|
Runs cleanup jobs in the background. |
|
Receives HTTP and HTTPS requests and proxies those requests to other MSR components. By default, the container listens to host ports 80 and 443. |
|
Receives, validates, and serves Content Trust metadata, and is consulted when pushing to or pulling from MSR with Content Trust enabled. |
|
Performs server-side timestamp and snapshot signing for Content Trust metadata. |
|
Implements pull and push functionality for Docker images and manages the storage of images. |
|
Serves as a database for persisting repository metadata. |
|
Stores security scanning data. |
Important
Do not use the MSR components in your applications, as they are for internal MSR use only.
System requirements
Mirantis Secure Registry can be installed on-premises or on the cloud. Before installing, be sure your infrastructure has these requirements.
You can install MSR on-premises or on a cloud provider. To install MSR, all nodes must:
Be a worker node managed by MKE (Mirantis Kubernetes Engine)
Have a fixed hostname
Minimum requirements:
16GB of RAM for nodes running MSR
4 vCPUs for nodes running MSR
25GB of free disk space
Recommended production requirements:
32GB of RAM for nodes running MSR
4 vCPUs for nodes running MSR
100GB of free disk space
Note that Windows container images are typically larger than Linux ones and for this reason, you should consider provisioning more local storage for Windows nodes and for MSR setups that will store Windows container images.
When the image scanning feature is used, we recommend that you have at least 32 GB of RAM. As developers and teams push images into MSR, the repository grows over time. As such, you should regularly inspect RAM, CPU, and disk usage on MSR nodes, and increase resources whenever resource saturation is seen to occur on a regular basis.
Networks
MSR creates the dtr-ol network at the time of installation. This
network allows for communication between MSR components running on different
nodes, for the purpose of MSR data replication.
When installing MSR on a node, make sure the following ports are open on that node:
Port |
Direction |
Purpose |
|---|---|---|
80/tcp |
in |
Web app and API client access to MSR. |
443/tcp |
in |
Web app and API client access to MSR. |
You can configure these ports during MSR installation.
Volumes
MSR uses these named volumes for persisting data:
Volume name |
Description |
|---|---|
dtr-ca-<replica_id> |
Root key material for the MSR root CA that issues certificates |
dtr-notary-<replica_id> |
Certificate and keys for the Notary components |
dtr-postgres-<replica_id> |
Vulnerability scans data |
dtr-registry-<replica_id> |
Docker images data, if MSR is configured to store images on the local filesystem |
dtr-rethink-<replica_id> |
Repository metadata |
dtr-nfs-registry-<replica_id> |
Docker images data, if MSR is configured to store images on NFS |
You can customize the volume driver used for these volumes, by creating the volumes before installing MSR. During the installation, MSR checks which volumes don’t exist in the node, and creates them using the default volume driver.
By default, the data for these volumes can be found at
/var/lib/docker/volumes/<volume-name>/_data.
Storage
By default, Mirantis Secure Registry stores images on the filesystem of the node where it is running, but you should configure it to use a centralized storage backend.
MSR supports the following storage systems:
Persistent volume |
|
Cloud storage providers |
|
Note
Deploying MSR to Windows nodes is not supported.
MSR Web UI
The product formerly known as Docker Trusted Registry (DTR) is now Mirantis Secure Registry (MSR).
MSR has a web UI where you can manage settings and user permissions.
You can push and pull images using the standard Docker CLI client or other tools that can interact with a Docker registry.
Rule engine
MSR uses a rule engine to evaluate policies, such as tag pruning and image enforcement.
The rule engine supports the following operators:
|
|
Note
The matches operator conforms subject fields to a user-provided regular
expression (regex). The regex for matches must follow the specification
in the official Go documentation: Package syntax.
Each of the following policies uses the rule engine:
Installation Guide
Targeted to deployment specialists and QA engineers, the MSR Installation Guide provides the detailed information and procedures you need to install and configure Mirantis Secure Registry (MSR).
Preconfigure MKE
When installing or backing up MSR on a Mirantis Kubernetes Engine (MKE) cluster, administrators must be able to deploy containers on MKE manager nodes or MSR nodes. Take the following steps to enable this setting:
Log in to the MKE web UI.
In the left-side navigation panel, navigate to <user name> > Admin Settings > Orchestration.
Scroll down to Container Scheduling and toggle the slider next to Allow administrators to deploy containers on MKE managers or nodes running MSR.
If MSR administrators are unable to deploy on MKE manager nodes or MSR nodes, the MSR installation or backup will fail with the following error message:
Error response from daemon: {"message":"could not find any nodes on which the container could be created"}
Install MSR online
Mirantis Secure Registry (MSR) is a containerized application that runs on a swarm managed by Mirantis Kubernetes Engine (MKE). It can be installed on-premises or on a cloud-based infrastructure.
Prerequisite steps
Verify that your infrastructure meets the MSR system requirements.
Update Mirantis Container Runtime (MCR) to the latest version. For details, refer to the section of the MCR installation guide that corresponds with your operating system.
Upgrade MKE to the latest version.
Note
MKE and MSR must be installed on different nodes, due to the potential for resource and port conflicts. Install MSR on worker nodes that will be managed by MKE. Note also that MSR cannot be installed on a standalone MCR.
Install MSR
Log in to the MKE web UI as an administrator.
In the left-side navigation panel, navigate to <user name> > Admin Settings > Mirantis Secure Registry.
Optional. Provide an external URL for MSR.
Select the MKE worker node where you want to install MSR.
Optional. Enable any of the following options, as required:
Assign an MSR replica ID
Disable TLS CA certificate for MKE
Use a PEM-encoded TLS CA certificate for MKE
A Docker CLI command used to install MSR will display. For example:
docker run -it --rm \
  registry.mirantis.com/msr/dtr:2.10.0 install \
  --dtr-external-url <msr.example.com> \
  --ucp-node <mke-node-name> \
  --ucp-username admin \
  --ucp-url <mke-url>
Optional. To run a load balancer that uses HTTP for health probes over port
80or443, temporarily reconfigure it to use TCP over a known open port and enter the load balancer IP address as the value of--dtr-external-url. Once MSR is installed, you can reconfigure the load balancer to meet your requirements.Run the MSR install command on any node that is both connected to the MKE cluster and running MCR. Running the installation command in interactive TTY (or
-it) mode will prompt you for any required additional information.Note
MSR will not be installed on the node where you run the install command. MSR will be installed on the MKE worker defined by the
--ucp-nodeflag.To install a different version of MSR, replace
2.10.0with the required version of MSR in the provided command.MSR is deployed with self-signed certificates by default, so MKE might not be able to successfully pull images from MSR. Use the optional
--dtr-external-url <msr-domain>:<port>flag during installation or during a reconfiguration to automatically reconfigure MKE to trust MSR.You can enable browser authentication using client certificates at install time. This bypasses the MSR login page and hides the logout button, thus overriding the requirement that you log in with a user name and password.
Verify that MSR is installed by logging in to the MKE web UI and then navigating to <user name> > Admin Settings > Mirantis Secure Registry. A successful installation will display the MSR fully qualified domain name (FQDN).
Note
MKE modifies
/etc/docker/certs.dfor each host and adds the MSR CA certificate. MKE can then pull images from MSR because MCR for each node in the MKE swarm has been configured to trust MSR.Optional. Reconfigure your load balancer back to your desired protocol and port.
Verify MSR after installation
Log in to the MKE web UI.
From the left-side navigation panel, select Shared Resources > Stacks . You should see MSR listed as a stack.
Verify that the MSR web UI is accessible by navigating either to your MSR IP address or FQDN in a browser window.
Note
Be sure to prefix the IP address or FQDN with
https://or your browser may not load the web UI.
Configure MSR
Configure the certificates used for TLS communication:
Log in to the MSR web UI.
From the left-side navigation panel, navigate to System and select the General tab.
Scroll down to Domain & Proxies and select Show TLS settings.
Enter your TLS information and click Save.
Configure the storage backend to store your Docker images:
Log in to the MSR web UI.
From the left-side navigation panel, navigate to System and select the Storage tab.
Configure the storage settings as required.
To configure MSR using the CLI, refer to the CLI reference documentation.
Join replicas to the cluster (optional)
To make MSR highly available, you can add additional replicas to your MSR cluster. Adding more replicas allows you to load-balance requests across all replicas, thus enabling MSR to continue working if a replica fails.
For high-availability, you should set 3 or 5 MSR replicas. The replica nodes must be managed by the same MKE.
To join replicas to your MSR cluster:
Run the join command, as in the following example:
docker run -it --rm \
  registry.mirantis.com/msr/dtr:2.10.0 join \
  --ucp-node <mke-node-name> \
  --ucp-insecure-tls
Important
The
<mke-node-name>following the--ucp-nodeflag is the target node to install the MSR replica. This is not the MKE manager URL.When you join a replica to an MSR cluster, you need to specify the ID of a replica that is already part of the cluster. You can find an existing replica ID by navigating to the Shared Resources > Stacks page in the MKE web UI.
Verify that all replicas are running:
Log in to the MKE web UI.
Select Shared Resources > Stacks. All replicas will display.
Install MSR offline
To install MSR on an offline host, you must first use a separate computer with an Internet connection to download a single package with all the images and then copy that package to the host where you will install MSR. Once the package is on the host and loaded, you can install MSR offline as described in Install MSR online.
To install MSR offline:
Download the required MSR package:
Using one of the following links:
Using the following command with the package URL:
wget <package-url> -O dtr.tar.gz
Copy the MSR package to the host machine:
scp dtr.tar.gz <user>@<host>
Use SSH to log in to the host where you transferred the package.
Load the MSR images from the
dtr.tar.gzfile:docker load -i dtr.tar.gz
Follow the instructions in Install MSR online.
Optional. Disable outgoing connections in the MSR web UI Admin Settings. MSR makes outgoing connections for the following tasks:
Analytics reporting
New version notifications
Online license verification
Vulnerability scanning database updates
Obtain the license
After you install MSR, download your new MSR license and apply it using the MSR web UI.
Warning
Users are not authorized to run MSR without a valid license. For more information, refer to Mirantis Agreements and Terms.
To download your MSR license:
Open an email from Mirantis Support with the subject Welcome to Mirantis’ CloudCare Portal and follow the instructions for logging in.
If you did not receive the CloudCare Portal email, you likely have not yet been added as a Designated Contact and should contact your Designated Administrator.
In the top navigation bar, click Environments.
Click the Cloud Name associated with the license you want to download.
Scroll down to License Information and click the License File URL. A new tab opens in your browser.
Click View file to download your license file.
To update your license settings in the MSR web UI:
Log in to your MSR instance as an administrator.
In the left-side navigation panel, click Settings.
On the General tab, click Apply new license. A file browser dialog displays.
Navigate to where you saved the license key (
.lic) file, select it, and click Open. MSR automatically updates with the new settings.
Uninstall MSR
Uninstalling MSR is a simple matter of removing all data associated with each replica. To do this, run the destroy command once per replica:
docker run -it --rm \
  registry.mirantis.com/msr/dtr:2.10.0 destroy \
  --ucp-insecure-tls
Each time you run the destroy command, the system will prompt you for the MKE URL, your MKE credentials, and the name of the replica you want to destroy.
Operations Guide
The MSR Operations Guide provides the detailed information you need to store and manage images on-premises or in a virtual private cloud, to meet security or regulatory compliance requirements.
Access MSR
Configure your Mirantis Container Runtime
By default Mirantis Container Runtime uses TLS when pushing and pulling images to an image registry like Mirantis Secure Registry (MSR).
If MSR is using the default configurations or was configured to use self-signed certificates, you need to configure your Mirantis Container Runtime to trust MSR. Otherwise, when you try to log in, push to, or pull images from MSR, you’ll get an error:
docker login msr.example.org

x509: certificate signed by unknown authority
The first step to make your Mirantis Container Runtime trust the certificate authority used by MSR is to get the MSR CA certificate. Then you configure your operating system to trust that certificate.
Add CA certificate to configure your host
macOS
In your browser navigate to https://<msr-url>/ca to download the TLS
certificate used by MSR. Then add that certificate to macOS
Keychain.
After adding the CA certificate to Keychain, restart Docker Desktop for Mac.
Windows
In your browser navigate to https://<msr-url>/ca to download the TLS
certificate used by MSR. Open Windows Explorer, right-click the file
you’ve downloaded, and choose Install certificate.
Then, select the following options:
Store location: local machine
Check place all certificates in the following store
Click Browser, and select Trusted Root Certificate Authorities
Click Finish
Learn more about managing TLS certificates.
After adding the CA certificate to Windows, restart Docker Desktop for Windows.
Ubuntu/ Debian
# Download the MSR CA certificate
sudo curl -k https://<msr-domain-name>/ca -o /usr/local/share/ca-certificates/<msr-domain-name>.crt
# Refresh the list of certificates to trust
sudo update-ca-certificates
# Restart the Docker daemon
sudo service docker restart
RHEL/ CentOS
# Download the MSR CA certificate
sudo curl -k https://<msr-domain-name>/ca -o /etc/pki/ca-trust/source/anchors/<msr-domain-name>.crt
# Refresh the list of certificates to trust
sudo update-ca-trust
# Restart the Docker daemon
sudo /bin/systemctl restart docker.service
Boot2Docker
Log into the virtual machine with ssh:
docker-machine ssh <machine-name>
Create the
bootsync.shfile, and make it executable:sudo touch /var/lib/boot2docker/bootsync.sh sudo chmod 755 /var/lib/boot2docker/bootsync.sh
Add the following content to the
bootsync.shfile. You can use nano or vi for this.#!/bin/sh cat /var/lib/boot2docker/server.pem >> /etc/ssl/certs/ca-certificates.crt
Add the MSR CA certificate to the
server.pemfile:curl -k https://<msr-domain-name>/ca | sudo tee -a /var/lib/boot2docker/server.pem
Run
bootsync.shand restart the Docker daemon:sudo /var/lib/boot2docker/bootsync.sh sudo /etc/init.d/docker restart
Log into MSR
To validate that your Docker daemon trusts MSR, try authenticating against MSR.
docker login msr.example.org
Where to go next
Configure your Notary client
Configure your Notary client as described in Delegations for content trust.
Use a cache
Mirantis Secure Registry can be configured to have one or more caches. This allows you to choose from which cache to pull images from for faster download times.
If an administrator has set up caches, you can choose which cache to use when pulling images.
In the MSR web UI, navigate to your Account, and check the Content Cache options.
Once you save, your images are pulled from the cache instead of the central MSR.
Manage access tokens
You can create and distribute access tokens in MSR that grant users access at specific permission levels.
Access tokens are associated with a particular user account. They take on the permissions of that account when in use, adjusting automatically to any permissions changes that are made to the associated user account.
Note
Regular MSR users can create access tokens that adopt their own account permissions, while administrators can create access tokens that adopt the account permissions of any account they choose, including the admin account.
Access tokens are of use in building CI/CD pipelines and other integrations, as you can issue separate tokens for each integration and henceforth deactivate or delete such tokens at any time. You can also use access tokens to generate a temporary password for a user who is locked out of their account.
Note
To monitor users login events, enable the auditAuthLogsEnabled parameter
in the /settings API endpoint:
curl -k -u admin:$TOKEN -X POST "https://host:port/api/v0/meta/settings" \
-H "accept: application/json" \
-H "Content-Type: application/json" \
-d "{ \"auditAuthLogsEnabled\": true}"
Create an access token
Log in to the MSR web UI as the user whose permissions you want associated with the token.
In the left-side navigation panel, navigate to <user name> > Profile.
Select the Access Tokens tab.
Click New access token.
Add a description for the new token. You can, for example, describe the purpose of the token or illustrate a use scenario.
Click Create. The token will temporarily display. Once you click Done, you will never again be able to see the token.
Modify an access token
Although you cannot view the access token itself following its initial display, you can give it a new description, deactivate, or delete the token.
To give an access token a new description:
Select the View details link associated with the required access token.
Enter a new description in the Description field.
Click Save.
To deactivate an access token:
Select View details next to the required access token.
Slide the Is active toggle to the left.
Click Save.
To delete an access token:
Select the checkbox associated with the access token you want to delete.
Click Delete.
Type
deletein the pop-up window and click OK.
Use an access token
You can use an access token anywhere you need an MSR password.
Examples:
You can pass your access token to the
--passwordor-poption when logging in from your Docker CLI client:docker login dtr.example.org --username <username> --password <token>
You can pass your access token to an MSR API endpoint to list the repositories to which the associated user has access:
curl --silent --insecure --user <username>:<token> dtr.example.org/api/v0/repositories
Configure MSR
Add a custom TLS certificate
Mirantis Secure Registry (MSR) services are exposed using HTTPS by default, which ensures encrypted communications between clients and your trusted registry. If you do not pass a PEM-encoded TLS certificate during installation, MSR generates a self-signed certificate, which can lead to an insecure site warning whenever you access MSR through a browser. In addition, MSR includes an HTTP Strict Transport Security (HSTS) header in all API responses, which can cause your browser not to load the MSR web UI.
You can configure MSR to use your own TLS certificates, so that it is automatically trusted by your browsers and client tools. You can also enable user authentication using the client certificates provided by your organization Public Key Infrastructure (PKI).
You can upload your own TLS certificates and keys using the MSR web UI, or you can pass them as CLI options during installation or whenever you reconfigure your MSR instance.
To replace the server certificates using the MSR web UI:
Log in at
https://<msr-url>.In the left-side navigation panel, navigate to System and scroll down to Domain & Proxies.
Enter your MSR domain name and upload or copy and paste the certificate information:
Certificate information
Description
Load balancer/public address
The domain name for accessing MSR.
TLS private key
The server private key.
TLS certificate chain
The server certificate and any intermediate public certificates from your certificate authority (CA). The certificate must be valid for the MSR public address and have SANs for all addresses that are used to reach the MSR replicas, including load balancers.
TLS CA
The root CA public certificate.
Click Save.
At this point, if you have added certificates issued by a globally trusted CA, any web browser or client tool should trust MSR. If you are using an internal CA, you must configure the client systems to trust that CA.
To replace the server certificates using the CLI:
Refer to install and reconfigure for TLS certificate options and usage information.
Enable single sign-on
MSR and MKE share users by default, but the applications have distinct web UIs that each require separate authentication. You can, however, configure MSR to use single sign-on with MKE.
Note
Once you configure MSR to use single sign-on, you must create an access token to interact with MSR using the CLI.
Enable at install time
Include --dtr-external-url <msr-url> in the MSR install command, where
<msr-url> is the MSR fully qualified domain name (FQDN) or a load
balancer, if one is in use:
docker run --rm -it \
registry.mirantis.com/msr/dtr install \
--dtr-external-url <msr-url> \
--dtr-cert "$(cat cert.pem)" \
--dtr-ca "$(cat dtr_ca.pem)" \
--dtr-key "$(cat key.pem)" \
--ucp-url <mke-url> \
--ucp-username <user name> \
--ucp-ca "$(cat ucp_ca.pem)"
When you navigate to the MSR web UI, you will be redirected to the MKE log in page for authentication. After authentication, you will be directed back to the MSR web UI.
Enable after install time
To enable single sign-on using the MSR web UI:
Log in to the MSR web UI.
In the left-side navigation panel, navigate to System.
On the General tab, scroll down to Domains & Proxies.
In the Load Balancer / Public Address field, enter the MSR FQDN or load balancer IP address, if one is in use. This is the URL where users will be redirected once they are logged in.
Click Save.
Scroll down to Single Sign-On and slide the toggle that is next to Automatically redirect users to MKE for login.
To enable single sign-on using the CLI:
Run the following reconfigure command:
docker run --rm -it \
registry.mirantis.com/msr/dtr reconfigure \
--dtr-external-url <msr-url> \
--dtr-cert "$(cat cert.pem)" \
--dtr-ca "$(cat dtr_ca.pem)" \
--dtr-key "$(cat key.pem)" \
--ucp-url <mke-url>  \
--ucp-username <user name> \
--ucp-ca "$(cat ucp_ca.pem)"
Enable read-only mode
Before performing any maintenance or configuration changes, place the MSR in read-only mode. This ensures data consistency and prevents unwanted modifications during these operations. To enable read-only mode, run the following command:
curl -u <username>:$TOKEN -X POST "https://<msr-url>/api/v0/meta/settings" -H "accept: application/json" -H "content-type: application/json" -d "{ \"readOnlyRegistry\": true }"
Disable MSR telemetry
By default, MSR automatically records and transmits data to Mirantis through an encrypted channel for monitoring and analysis purposes. The data collected provides the Mirantis Customer Success Organization with information that helps Mirantis to better understand the operational use of MSR by our customers. It also provides key feedback in the form of product usage statistics, which assists our product teams in making enhancements to Mirantis products and services.
Caution
To send MSR telemetry, the container runtime and the jobrunner
container must be able to resolve api.segment.io and create a TCP
(HTTPS) connection on port 443.
To disable telemetry for MSR:
Log in to the MSR web UI as an administrator.
Click System in the left-side navigation panel to open the System page.
Click the General tab in the details pane.
Scroll down in the details pane to the Analytics section.
Toggle the Send data slider to the left.
Configure external storage
By default, MSR uses the local file system of the node where it is running to store your Docker images. You can, though, configure MSR to use an external storage backend, for improved performance or high availability.
Configure MSR image storage
If your MSR deployment has a single replica, you can continue to use the local file system to store your Docker images. If, though, your MSR deployment has multiple replicas, make sure that they are all using the same storage backend for high availability.
Whenever a user pulls an image, the MSR node serving the request needs to have access to that image.
Configure storage backends
To configure the storage backend, log in to the MSR web UI as an administrator, and in the left-side navigation panel navigate to System > Storage.
The storage configuration details pane presents the most common configuration
options. You can, however, upload your own configuration file in .yml,
.yaml, or .txt format.
Configure MSR for local file systems
By default, MSR creates a volume named dtr-registry-<replica-id> to store
your images using the local file system. You can customize the name and path of
the volume by using
registry.mirantis.com/msr/dtr install --dtr-storage-volume
or registry.mirantis.com/msr/dtr reconfigure
--dtr-storage-volume.
Important
To deploy MSR with high availability, you must use a centralized storage backends to ensure that all MSR replicas can access the same set of images.
To verify the amount of space your images are using in the local file system:
Connect to the MSR node through SSH.
Obtain the path to the volume:
docker volume inspect dtr-registry-<replica-id>
Verify the disk usage:
sudo du -hs \
$(dirname $(docker volume inspect --format '{{.Mountpoint}}' dtr-registry-<msr-replica>))
Note
You can configure your MSR replicas to store images on an NFS partition, thus allowing all replicas to share the same storage backend.
Deploy MSR on NFS
You can configure MSR to store Docker images in a Network File System (NFS) directory.
Note
Changing storage backends involves initializing a new metadata store, rather than reusing an existing volume, which facilitates online garbage collection.
Prepare your environment
Verify that the NFS server has the correct configuration.
Verify that the NFS server has a fixed IP address.
Verify that all hosts that are running MSR have the correct NFS libraries.
Verify that the hosts can connect to the NFS server by listing the directories exported by your NFS server:
showmount -e <nfsserver>
Mount one of the exported directories:
mkdir /tmp/mydir && sudo mount -t nfs <nfs server>:<directory> /tmp/mydir
Configure NFS for MSR
You can configure MSR to use an NFS directory at install time:
docker run -it --rm registry.mirantis.com/msr/dtr install \
  --nfs-storage-url <nfs-storage-url> \
  <other options>
Use the format nfs://<nfs server>/<directory> for the NFS storage URL.
To support NFS v4, you can specify additional options when running the
install command with the --nfs-storage-url
option.
Note
When you join replicas to an MSR cluster, the replicas pick up your storage configuration, and thus it is not necessary to respecify the configuration.
Reconfigure MSR to use NFS
Use the --storage-migrated option with the reconfigure command to indicate the migration status of your storage data during a reconfigure.
To reconfigure MSR to use an NFSv4 volume as a storage backend:
docker run --rm -it \
  registry.mirantis.com/msr/dtr reconfigure \
  --ucp-url <mke_url> \
  --ucp-username <mke_username> \
  --nfs-storage-url <msr-registry-nf>
  --async-nfs
  --storage-migrated
To reconfigure MSR to stop using NFS storage, leave the --nfs-storage-url option blank:
docker run -it --rm registry.mirantis.com/msr/dtr reconfigure \
  --nfs-storage-url ""
Configure MSR for S3-compatible cloud storage providers
You can configure MSR to store Docker images on Amazon S3 or any other file servers with an S3-compatible API, such as Cleversafe or Minio.
Amazon S3 and compatible services store files in buckets, and users have permissions to read, write, and delete files from those buckets. When you integrate MSR with Amazon S3, MSR sends all read and write operations to the S3 bucket so that the images are persisted in that location.
Prepare your environment
Create a bucket on Amazon S3 as described in the Creating a bucket official AWS documentation.
Note
To ensure fast pulls and pushes, create the S3 bucket in the region that is closest to the servers on which you are running MSR.
MSR supports the following S3 regions:
us-east-1
us-east-2
us-west-1
us-west-2
eu-west-1
eu-west-2
eu-central-1
ap-south-1
ap-southeast-1
ap-southeast-2
ap-northeast-1
ap-northeast-2
sa-east-1
cn-north-1
us-gov-west-1
ca-central-1
Create a new IAM user specifically for the MSR integration, applying an IAM policy that restricts the user to the following permissions:
Bucket access
Read, write, and delete files
Example user policy:
{
   "Version": "2012-10-17",
   "Statement": [
      {
            "Effect": "Allow",
            "Action": "s3:ListAllMyBuckets",
            "Resource": "arn:aws:s3:::*"
      },
      {
            "Effect": "Allow",
            "Action": [
               "s3:ListBucket",
               "s3:GetBucketLocation",
               "s3:ListBucketMultipartUploads"
            ],
            "Resource": "arn:aws:s3:::<bucket-name>"
      },
      {
            "Effect": "Allow",
            "Action": [
               "s3:PutObject",
               "s3:GetObject",
               "s3:DeleteObject",
               "s3:ListBucketMultipartUploads"
            ],
            "Resource": "arn:aws:s3:::<bucket-name>/*"
      }
   ]
}
Configure MSR
Log in to the MSR web UI as an administrator.
Navigate to System > Storage in the left-side navigation panel.
Select the Amazon S3 option in the details pane.
Adjust the S3 Settings.
Toggle the Send data slider to the right to configure MSR to redirect clients each time a pull operation occurs.
Enter the pertinent information into the provided fields.
Field
Description
AWS Region Name
AWS region that hosts your S3 bucket.
S3 Bucket Name
Name of the S3 bucket in which the images are stored.
Region Endpoint
Endpoint name for the AWS region that hosts your S3 bucket.
Root Directory
Path to the location in the S3 bucket within which the images are stored.
Access key
AWS access key to use to access the S3 bucket.
Note
If you are using an IAM policy, leave the AWS access key field empty.
Secret Key
AWS secret key you can use to access the S3 bucket.
Note
If you are using an IAM policy, leave the AWS secret key field empty.
Click Show advanced settings.
Toggle the Signature version 4 auth slider to the right to configure MSR to authenticate requests with AWS signature version 4.
Toggle the Use HTTPS slider to the right to configure MSR to secure all requests using the HTTPS protocol.
Toggle the Skip TLS slider to the right to configure MSR to encrypt all traffic and not to verify the TLS certificate in use by the storage backend.
If pertinent, in the Root CA Certificate field, enter the public key certificate of the root certificate authority that issued the storage backend certificate.
Click Submit to validate the configuration settings and save the changes.
Configure your clients
Whenever you push or pull an image using MSR, the software redirects the requests to the storage backend.
If MSR is configured for TLS verification and the TLS certificate in use by your storage backend is not globally trusted, you must configure all Mirantis Container Runtime instances that push or pull from MSR to trust that certificate.
If MSR is configured to skip TLS verification, you must also configure all Mirantis Container Runtime instances that push or pull from MSR to skip TLS verification. To do this, add MSR to the list of insecure registries when starting Docker.
Restore MSR with S3
To restore MSR using your previously configured S3 settings, use the restore command with the --dtr-use-default-storage option to maintain your metadata.
Migrate to a new storage backend
Your metadata store and your storage both persist when you migrate your data to a new storage backend. MSR requires the new storage backend to contain an exact copy of the data for the prior configuration. If you do not meet the requirement you must reinitialize the storage using the --reinitialize-storage option with the dtr reconfigure command, which initializes a new metadata store and erases your existing tags.
As a best practice, you should always move, back up, and restore MSR storage backends together with your metadata.
To migrate data to a new storage backend:
Disable garbage collection:
Log in to the MSR web UI.
From the left-side menu, navigate to System > Garbage Collection.
Select Never Disable garbage collection to ensure that any blobs referenced in the backup you create will persist.
Important
Garbage collection must remain disabled throughout metadata backup and the migration of your storage data.
Click Save.
Migrate the contents of your current storage backend to the new one.
Restore MSR from your backup, specifying your new storage backend.
Run the garbage collection operation to address any dangling blobs:
curl -u <username>:$TOKEN -X POST "https://<msr-url>/api/v0/jobs" -H "accept: application/json" -H "content-type: application/json" -d "{ \"action": \"onlinegc_blobs\" }"
Upon success of your data migration, you will receive a 202 Accepted
response with a job id and other related details.
If you have a longer maintenance window, you can perform a simpler version of data migration:
Put MSR in read-only mode:
curl -u <username>:$TOKEN -X POST "https://<msr-url>/api/v0/meta/settings" -H "accept: application/json" -H "content-type: application/json" -d "{ \"readOnlyRegistry\": true }"
Upon success, you will receive a
202 Acceptedresponse.Migrate the contents of your current storage backend to the new one.
Reconfigure MSR using the reconfigure command with the --storage-migrated option to preserve your existing tags. For reconfigure command usage details, refer to registry.mirantis.com/msr/dtr reconfigure.
Set up high availability
Mirantis Secure Registry is designed to scale horizontally as your usage increases. You can increase the number of replicas for each of the resources that MSR deploys.
Note
Additional replicas make MSR more tolerant to failure, but be aware that performance degradation can result from having too many replicas in your RethinkDB cluster.
All MSR replicas run the same set of services, and changes to their configuration are automatically propagated to other replicas.
When sizing your MSR installation for high availability, Mirantis recommends the following best practices:
Do not scale RethinkDB with only two replicas.
Caution
RethinkDB cannot tolerate a failure with an even number of replicas.
MSR replicas
Failures tolerated
1
0
3
1
5
2
7
3
Address failed replicas quickly, as the number of failures your cluster can tolerate decreases whenever a replica is offline.
High availability prerequisites
High availability on MKE and MSR requires:
Three dedicated nodes on which to install MKE with high availability.
Three dedicated nodes on which to install MSR with high availability.
The number of nodes you deem necessary for running your containers and applications.
That MSR replicas are configured to share the same object storage.
Join additional MSR replicas
To add replicas to an existing MSR deployment:
Use SSH to log into any MKE node.
Run the MSR join command:
docker run -it --rm \
  registry.mirantis.com/msr/dtr join \
  --ucp-node <mke-node-hostname> \
  --ucp-insecure-tls
The --ucp-insecure-tls option permits the certificates that are in use by MKE.
If you are running a load balancer, add the new MSR replica to the load balancing pool.
Remove existing replicas
To remove an MSR replica from your deployment:
Use SSH to log into any node that is already a part of MKE.
Run the MSR remove command:
docker run -it --rm \
registry.mirantis.com/msr/dtr remove \
--ucp-insecure-tls
As a result, you will be prompted for the following data:
- Existing replica id
The ID of any healthy MSR replica in the cluster.
- Replica id
The ID of the MSR replica you want to remove, which can be the ID of an unhealthy replica.
- MKE username and password
The administrator credentials for MKE.
Important
If you are load balancing user requests across multiple MSR replicas, be sure to remove this replica from the load balancing pool.
Use a load balancer
With a load balancer, users can access MSR using a single domain name.
Once you have achieved high availability by joining multiple MSR replica nodes, you can configure a load balancer to balance user requests across those replicas. The load balancer detects when a replica fails and immediately stops forwarding requests to it, thus ensuring that the failure goes unnoticed by users.
MSR does not provide a load balancing service. You must use either an on-premises or cloud-based load balancer to balance requests across multiple MSR replicas.
Important
Additional steps are needed to use the same load balancer with both MSR and MKE. For more information, refer to Configure a load balancer in the MKE documentation.
Verify cluster health
MSR exposes several endpoints that you can use to assess the health of an MSR replica:
/_pingVerifies whether the MSR replica is healthy. This is useful for load balancing and other automated health check tasks. This endpoint is unauthenticated.
/nginx_statusReturns the number of connections handled by the MSR NGINX front end.
/api/v0/meta/cluster_statusReturns detailed information about all MSR replicas.
You can use the unauthenticated /_ping endpoint on each MSR replica,
to check the health status of the replica and whether it should remain in the
load balancing pool or not.
The /_ping endpoint returns a JSON object for the replica being
queried that takes the following form:
{
  "Error": "<error-message>",
  "Healthy": true
}
A response of "Healthy": true indicates that the replica is suitable for
taking requests. It also signifies that the HTTP status code is 200.
An unhealthy replica will return 503 as the status code and populate
"Error" with more details on any of the following services:
Storage container (MSR)
Authorization (Garant)
Metadata persistence (RethinkDB)
Content trust (Notary)
Note that the purpose of the /_ping endpoint is to check the health of a
single replica. To obtain the health of every replica in a cluster, you must
individually query each replica.
Load balance MSR
Configure your load balancer for MSR, using the pertinent example below:
user  nginx;
   worker_processes  1;

   error_log  /var/log/nginx/error.log warn;
   pid        /var/run/nginx.pid;

   events {
      worker_connections  1024;
   }

   stream {
      upstream dtr_80 {
         server <MSR_REPLICA_1_IP>:80  max_fails=2 fail_timeout=30s;
         server <MSR_REPLICA_2_IP>:80  max_fails=2 fail_timeout=30s;
         server <MSR_REPLICA_N_IP>:80   max_fails=2 fail_timeout=30s;
      }
      upstream dtr_443 {
         server <MSR_REPLICA_1_IP>:443 max_fails=2 fail_timeout=30s;
         server <MSR_REPLICA_2_IP>:443 max_fails=2 fail_timeout=30s;
         server <MSR_REPLICA_N_IP>:443  max_fails=2 fail_timeout=30s;
      }
      server {
         listen 443;
         proxy_pass dtr_443;
      }

      server {
         listen 80;
         proxy_pass dtr_80;
      }
   }
global
      log /dev/log    local0
      log /dev/log    local1 notice

   defaults
         mode    tcp
         option  dontlognull
         timeout connect 5s
         timeout client 50s
         timeout server 50s
         timeout tunnel 1h
         timeout client-fin 50s
   ### frontends
   # Optional HAProxy Stats Page accessible at http://<host-ip>:8181/haproxy?stats
   frontend dtr_stats
         mode http
         bind 0.0.0.0:8181
         default_backend dtr_stats
   frontend dtr_80
         mode tcp
         bind 0.0.0.0:80
         default_backend dtr_upstream_servers_80
   frontend dtr_443
         mode tcp
         bind 0.0.0.0:443
         default_backend dtr_upstream_servers_443
   ### backends
   backend dtr_stats
         mode http
         option httplog
         stats enable
         stats admin if TRUE
         stats refresh 5m
   backend dtr_upstream_servers_80
         mode tcp
         option httpchk GET /_ping HTTP/1.1\r\nHost:\ <MSR_FQDN>
         server node01 <MSR_REPLICA_1_IP>:80 check weight 100
         server node02 <MSR_REPLICA_2_IP>:80 check weight 100
         server node03 <MSR_REPLICA_N_IP>:80 check weight 100
   backend dtr_upstream_servers_443
         mode tcp
         option httpchk GET /_ping HTTP/1.1\r\nHost:\ <MSR_FQDN>
         server node01 <MSR_REPLICA_1_IP>:443 weight 100 check check-ssl verify none
         server node02 <MSR_REPLICA_2_IP>:443 weight 100 check check-ssl verify none
         server node03 <MSR_REPLICA_N_IP>:443 weight 100 check check-ssl verify none
{
      "Subnets": [
         "subnet-XXXXXXXX",
         "subnet-YYYYYYYY",
         "subnet-ZZZZZZZZ"
      ],
      "CanonicalHostedZoneNameID": "XXXXXXXXXXX",
      "CanonicalHostedZoneName": "XXXXXXXXX.us-west-XXX.elb.amazonaws.com",
      "ListenerDescriptions": [
         {
               "Listener": {
                  "InstancePort": 443,
                  "LoadBalancerPort": 443,
                  "Protocol": "TCP",
                  "InstanceProtocol": "TCP"
               },
               "PolicyNames": []
         }
      ],
      "HealthCheck": {
         "HealthyThreshold": 2,
         "Interval": 10,
         "Target": "HTTPS:443/_ping",
         "Timeout": 2,
         "UnhealthyThreshold": 4
      },
      "VPCId": "vpc-XXXXXX",
      "BackendServerDescriptions": [],
      "Instances": [
         {
               "InstanceId": "i-XXXXXXXXX"
         },
         {
               "InstanceId": "i-XXXXXXXXX"
         },
         {
               "InstanceId": "i-XXXXXXXXX"
         }
      ],
      "DNSName": "XXXXXXXXXXXX.us-west-2.elb.amazonaws.com",
      "SecurityGroups": [
         "sg-XXXXXXXXX"
      ],
      "Policies": {
         "LBCookieStickinessPolicies": [],
         "AppCookieStickinessPolicies": [],
         "OtherPolicies": []
      },
      "LoadBalancerName": "ELB-MSR",
      "CreatedTime": "2017-02-13T21:40:15.400Z",
      "AvailabilityZones": [
         "us-west-2c",
         "us-west-2a",
         "us-west-2b"
      ],
      "Scheme": "internet-facing",
      "SourceSecurityGroup": {
         "OwnerAlias": "XXXXXXXXXXXX",
         "GroupName":  "XXXXXXXXXXXX"
      }
   }
Deploy your load balancer:
# Create the nginx.conf file, then
# deploy the load balancer

docker run --detach \
--name dtr-lb \
--restart=unless-stopped \
--publish 80:80 \
--publish 443:443 \
--volume ${PWD}/nginx.conf:/etc/nginx/nginx.conf:ro \
nginx:stable-alpine
# Create the haproxy.cfg file, then
# deploy the load balancer

docker run --detach \
--name dtr-lb \
--publish 443:443 \
--publish 80:80 \
--publish 8181:8181 \
--restart=unless-stopped \
--volume ${PWD}/haproxy.cfg:/usr/local/etc/haproxy/haproxy.cfg:ro \
haproxy:1.7-alpine haproxy -d -f /usr/local/etc/haproxy/haproxy.cfg
Configure your load balancer to:
Load balance TCP traffic on ports 80 and 443.
Not terminate HTTPS connections.
Not buffer requests.
Correctly forward the
HostHTTP header.Not include a timeout for idle connections, or set the timeout to more than 10 minutes.
Set up security scanning
For MSR to perform security scanning, you must have a running deployment of Mirantis Secure Registry (MSR), administrator access, and an MSR license that includes security scanning.
Before you can set up security scanning, you must verify that your Docker ID
can access and download your MSR license from DockerHub. If you are using a
license that is associated with an organization account, verify that your
Docker ID is a member of the Owners team, as only members of that team can
download license files for an organization. If you are using a license
associated with an individual account, no additional action is needed.
Note
To verify that your MSR license includes security scanning:
Log in to the MSR web UI.
In the left-side navigation panel, click System and navigate to the Security tab.
If the Enable Scanning toggle displays, the license includes security scanning.
To learn how to obtain and install your MSR license, refer to Obtain the license.
Enable MSR security scanning
Log in to the MSR web UI as an administrator.
In the left-side navigation panel, click System and navigate to the Security tab.
Slide the Enable Scanning toggle to the right.
Set the security scanning mode by selecting either Online or Offline.
Online mode:
Online mode downloads the latest vulnerability database from a Docker server and installs it.
To enable online security scanning, click Sync Database now.
Offline mode:
Offline mode requires that you manually perform the following steps.
Download the most recent CVE database.
Be aware that the example command specifies default values. It instructs the container to output the database file to the
~/Downloadsdirectory and configures the volume to map from the local machine into the container. If the destination for the database is in a separate directory, you must define an additional volume. For more information, refer to the table that follows this procedure.docker run -it --rm \ -v ${HOME}/Downloads:/data \ -e CVE_DB_URL_ONLY=false \ -e CLOBBER_FILE=false \ -e DATABASE_OUTPUT="/data" \ -e DATABASE_SCHEMA=3 \ -e DEBUG=false \ -e VERSION_ONLY=false \ mirantis/get-dtr-cve-db:latestClick Select Database and open the downloaded CVE database file.
Set repository scanning mode
Two image scanning modes are available:
- On push
The image is re-scanned (1) on each
docker pushto the repository and (2) when a user withwriteaccess clicks the Start Scan links or the Scan button.- Manual
The image is scanned only when a user with
writeaccess clicks the Start Scan links or Scan button.
By default, new repositories are set to scan On push, and any repositories that existed before scanning was enabled are set to Manual.
To change the scanning mode for an individual repository:
Verify that you have
writeoradminaccess to the repository.Navigate to the repository, and click the Settings tab.
Scroll down to the Image scanning section.
Select the desired scanning mode.
Update the CVE scanning database
MSR security scanning indexes the components in your MSR images and compares them against a CVE database. This database is routinely updated with new vulnerability signatures, and thus MSR must be regularly updated with the latest version to properly scan for all possible vulnerabilities. After updating the database, MSR matches the components in the new CVE reports to the indexed components in your images, and generates an updated report.
Note
MSR users with administrator access can learn when the CVE database was last updated by accessing the Security tab in the MSR System page.
Update CVE database in online mode
In online mode, MSR security scanning monitors for updates to the vulnerability database, and downloads them when available.
To ensure that MSR can access the database updates, verify that the host can
access both https://license.mirantis.com and
https://dss-cve-updates.mirantis.com/ on port 443 using HTTPS.
MSR checks for new CVE database updates every day at 3:00 AM UTC. If an update is available, it is automatically downloaded and applied, without interrupting any scans in progress. Once the update is completed, the security scanning system checks the indexed components for new vulnerabilities.
To set the update mode to online:
Log in to the MSR web UI as an administrator.
In the left-side navigation panel, click System and navigate to the Security tab.
Click Online.
Your choice is saved automatically.
Note
To check immediately for a CVE database update, click Sync Database now.
Update CVE database in offline mode
When connection to the update server is not possible, you can update it
manually. Download the CVE database as a .tar file from the
Mirantis CVE database archive.
Then load the file into your MSR instance by following the installation
instructions.
To set the update mode to offline:
Log in to the MSR web UI as an administrator.
In the left-side navigation panel, click System and navigate to the Security tab.
Select Offline
Click Select Database and open the downloaded CVE database file.
MSR installs the new CVE database and begins checking the images that are already indexed for components that match new or updated vulnerabilities.
Caches
The time needed to pull and push images is directly influenced by the distance between your users and the geographic location of your MSR deployment. This is because the files need to traverse the physical space and cross multiple networks. You can, however, deploy MSR caches at different geographic locations, to add greater efficiency and shorten user wait time.
With MSR caches you can:
Accelerate image pulls for users in a variety of geographical regions.
Manage user permissions from a central location.
MSR caches are inconspicuous to your users, as they will continue to log in and pull images using the provided MSR URL address.
When MSR receives a user request, it first authenticates the request and verifies that the user has permission to pull the requested image. Assuming the user has permission, they then receive an image manifest that contains the list of image layers to pull and which directs them to pull the images from a particular cache.
When your users request image layers from the indicated cache, the cache pulls these images from MSR and maintains a copy. This enables the cache to serve the image layers to other users without having to retrieve them again from MSR.
Note
Avoid using caches if your users need to push images faster or if you want to implement region-based RBAC policies. Instead, deploy multiple MSR clusters and apply mirroring policies between them. For further details, refer to Promotion policies and monitoring.
MSR cache prerequisites
Before deploying an MSR cache in a datacenter:
Obtain access to the Kubernetes cluster that is running MSR in your data center.
Join the nodes into a cluster.
Dedicate one or more worker nodes for running the MSR cache.
Obtain TLS certificates with which to secure the cache.
Configure a shared storage system, if you want the cache to be highly available.
Configure your firewall rules to ensure that your users have access to the cache through your chosen port.
Note
For illustration purposes only, the MSR cache documentation details caches that are exposed on port 443/TCP using an ingress controller.
MSR cache deployment scenario
MSR caches running in different geographic locations can provide your users with greater efficiency and shorten the amount of time required to pull images from MSR.
Consider a scenario in which you are running an MSR instance that is installed in the United States, with a user base that includes developers located in the United States, Asia, and Europe. The US-based developers can pull their images from MSR quickly, however those working in Asia and Europe have to contend with unacceptably long wait times to pull the same images. You can address this issue by deploying MSR caches in Asia and Europe, thus reducing the wait time for developers located in those areas.
The described MSR cache scenario requires three datacenters:
US-based datacenter, running MSR configured for high availability
Asia-based datacenter, running an MSR cache that is configured to fetch images from MSR
Europe-based datacenter, running an MSR cache that is configured to fetch images from MSR
For information on datacenter configuration, refer to MSR cache prerequisites.
Deploy an MSR cache with Swarm
Note
The MSR on Swarm deployment detailed herein assumes that you have a running MSR deployment and that you have provisioned multiple nodes and joined them into a swarm.
You will deploy your MSR cache as a Docker service, thus ensuring that Docker automatically schedules and restarts the service in the event of a problem.
You manage the cache configuration using a Docker configuration and the TLS certificates using Docker secrets. This setup enables you to securely manage the node configurations for the node on which the cache is running.
Prepare the cache deployment
Important
To ensure MSR cache functionality, Mirantis highly recommends that you deploy the cache on a dedicated node.
Label the cache node
To target your deployment to the cache node, you must first label that node. To do this, SSH into a manager node of the swarm within which you want to deploy the MSR cache.
docker node update --label-add dtr.cache=true <node-hostname>
Note
If you are using MKE to manage that swarm, use a client bundle to configure your Docker CLI client to connect to the swarm.
Configure the MSR cache
Following cache preparation, you will have the following file structure on your workstation:
├── docker-stack.yml
├── config.yml          # The cache configuration file
└── certs
    ├── cache.cert.pem  # The cache public key certificate
    ├── cache.key.pem   # The cache private key
    └── dtr.cert.pem    # MSR CA certificate
With the configuration detailed herein, the cache fetches image layers from MSR and keeps a local copy for 24 hours. After that, if a user requests that image layer, the cache re-fetches it from MSR.
The cache is configured to persist data inside its container. If something goes wrong with the cache service, Docker automatically redeploys a new container, but previously cached data is not persisted. You can customize the storage parameters, if you want to store the image layers using a persistent storage backend.
Also, the cache is configured to use port 443. If you are already using that port in the swarm, update the deployment and configuration files to use another port. Remember to create firewall rules for the port you choose.
Note
If you are using Mirantis Kubernetes Engine (MKE), you normally need to select a port different from 443. Additionally, ensure the port is different from any used by MSR, whether the default port 443 or a custom one.
Edit the docker-stack.yml file
With a single command, you can deploy the cache using the docker-stack.yml
file, which you mount into the container.
Edit the sample MSR cache configuration file that follows to fit your environment:
version: "3.3"
services:
  cache:
    image: registry.mirantis.com/msr/dtr-content-cache:<MSR Version>
    entrypoint:
      - "/start.sh"
      - "/config.yml"
    ports:
      - 443:443
    deploy:
      replicas: 1
      placement:
        constraints: [node.labels.dtr.cache == true]
      restart_policy:
        condition: on-failure
    configs:
      - config.yml
    secrets:
      - dtr.cert.pem
      - cache.cert.pem
      - cache.key.pem
configs:
  config.yml:
    file: ./config.yml
secrets:
  dtr.cert.pem:
    file: ./certs/dtr.cert.pem
  cache.cert.pem:
    file: ./certs/cache.cert.pem
  cache.key.pem:
    file: ./certs/cache.key.pem
Edit the config.yml file
You configure the MSR cache using a configuration file that you mount into the container.
Edit the sample MSR cache configuration file that follows to fit your environment, entering the relevant external MSR cache, worker node, or external loadbalancer FQDN. Once configured, the cache fetches image layers from MSR and maintains a local copy for 24 hours. If a user requests the image layer after that period, the cache re-fetches it from MSR.
version: 0.1
log:
  level: info
storage:
  delete:
    enabled: true
  filesystem:
    rootdirectory: /var/lib/registry
http:
  addr: '0.0.0.0:443'
  secret: generate-random-secret
  host: 'https://<cache-url>'
  tls:
    certificate: /run/secrets/cache.cert.pem
    key: /run/secrets/cache.key.pem
middleware:
  registry:
    - name: downstream
      options:
        blobttl: 24h
        upstreams:
          - https://<msr-url>:<msr-port>
        cas:
          - /run/secrets/dtr.cert.pem
Create the MSR cache certificates
To deploy the MSR cache with a TLS endpoint, you must generate a TLS certificate and key from a certificate authority.
Be aware that to expose the MSR cache through a node port or a host port, you must use a Node FQDN (Fully Qualified Domain Name) as a SAN in your certificate.
Create the MSR cache certificates:
Acquire your TLS certificate and key files.
Note
You can use a previously created CA signed SSL certificate, or you can create a new one. [1]
Create a directory called
certsand place in it the newly created certificate for your MSR cache.Configure the cert pem files, as detailed below:
pem file
Content to add
cache.cert.pemAdd the public key certificate for the cache. If the certificate has been signed by an intermediate certificate authority, append its public key certificate at the end of the file.
cache.key.pemAdd the unencrypted private key for the cache.
dtr.cert.pemThe cache communicates with MSR using TLS. If you have customized MSR to use TLS certificates issued by a globally trusted certificate authority, the cache automatically trusts MSR. If, though, you are using the default MSR configuration, or MSR is using TLS certificates signed by your own certificate authority, you need to configure the cache to trust MSR, and edit the
daemon.jsonfile to allow for insecure registries.Add the MSR CA certificate to the
certs/dtr.cert. pemfile:curl -sk https://<msr-url>/ca > certs/dtr.cert.pem
Modify the
daemon.jsonfile to include:"insecure-registries" : "<msraddress:portnumber>"
Deploy the cache
Run the following command to deploy the cache:
docker stack deploy --compose-file docker-stack.yml dtr-cache
Verify the successful deployment of the cache:
docker stack ps dtr-cache
Docker should display the dtr-cache stack as running.
Register the cache with MSR.
You must configure MSR to recognize the cache. Use the
POST
/api/v0/content_caches
API to do this, by way of the MSR interactive API documentation.Access the MSR web UI.
Select API docs from the top-right menu.
Navigate to
POST /api/v0/content_cachesand click to expand it.
Type the following into the body field:
{
"name": "region-asia",
"host": "https://<cache-url>:<cache-port>"
}
Click Try it out! to make the API call.
Configure your user account.
In the MSR web UI, navigate to your Account, click the Settings tab, and edit the Content Cache settings to the newly deployed cache.
Note
To set up user accounts for multiple users simultaneously, use the
/api/v0/accounts/{username}/settingsAPI endpoint.Henceforth, you will be using the cache whenever you pull images.
Test the cache.
Verify that the cache is functioning properly:
Push an image to MSR.
Verify that the cache is configured to your user account.
Delete the image from your local system.
Pull the image from MSR.
Check the logs to verify that the cache is serving your request:
docker service logs --follow dtr-cache_cache
Issues with TLS authentication are the most common causes of cache misconfiguration, including:
MSR not trusting the cache TLS certificates.
The cache not trusting MSR TLS certificates.
Your machine not trusting MSR or the cache.
You can use the logs to troubleshoot cache misconfigurations.
Clean up sensitive files, such as private keys for the cache, by running the following command:
rm -rf certs
Deploy an MSR cache with Kubernetes
Note
The MSR with Kubernetes deployment detailed herein assumes that you have a running MSR deployment.
When you establish the MSR cache as a Kubernetes deployment, you ensure that Kubernetes will automatically schedule and restart the service in the event of a problem.
You manage the cache configuration with a Kubernetes Config Map and the TLS certificates with Kubernetes secrets. This setup enables you to securely manage the configurations of the node on which the cache is running.
Prepare the cache deployment
Following cache preparation, you will have the following file structure on your workstation:
├── dtrcache.yaml
├── config.yaml
└── certs
    ├── cache.cert.pem
    ├── cache.key.pem
    └── dtr.cert.pem
- dtrcache.yaml
The YAML file that allows you to deploy the cache with a single command.
- config.yaml
The cache configuration file.
- certs
The certificates subdirectory.
- cache.cert.pem
The cache public key certificate, including any intermediaries.
- cache.key.pem
The cache private key.
- dtr.cert.pem
The MSR CA certificate.
Create the MSR cache certificates
To deploy the MSR cache with a TLS endpoint you must generate a TLS certificate and key from a certificate authority.
The manner in which you expose the MSR cache changes the Storage Area Networks (SANs) that are required for the certificate. For example:
To deploy the MSR cache with an ingress object you must use an external MSR cache address that resolves to your ingress controller as part of your certificate.
To expose the MSR cache through a Kubernetes Cloud Provider, you must have the external load balancer address as part of your certificate.
To expose the MSR cache through a Node port or a host port you must use a Node FQDN (Fully Qualified Domain Name) as a SAN in your certificate.
Create the MSR cache certificates:
Acquire your TLS certificate and key files.
Note
You can use a previously created CA signed SSL certificate, or you can create a new one. [1]
Create a directory called
certs.In the
certsdirectory, place the newly created certificate for your MSR cache.Place the certificate authority in the
certsdirectory, including any intermediate certificate authorities of the certificate from your MSR deployment. If your MSR deployment uses cert-manager, use kubectl to source this from the main MSR deployment.kubectl get secret msr-nginx-ca-cert -o go-template='{{ index .data "ca.crt" | base64decode }}'
Note
If cert-manager is not in use, you must provide your custom nginx.webtls
certificate.
Configure the MSR cache
The MSR cache takes its configuration from a configuration file that you mount into the container.
The cache is configured to use port 443. If you are already using that port in the swarm, update the deployment and configuration files to use another port. Remember to create firewall rules for the port you choose.
Note
If you are using Mirantis Kubernetes Engine (MKE), you normally need to select a port different from 443. Additionally, ensure the port is different from any used by MSR, whether the default port 443 or a custom one.
You can edit the following MSR cache configuration file for your environment, entering the relevant external MSR cache, worker node, or external loadbalancer FQDN. Once you have configured the cache it fetches image layers from MSR and maintains a local copy for 24 hours. If a user requests the image layer after that period, the cache fetches it again from MSR.
cat > config.yaml <<EOF
version: 0.1
log:
  level: info
storage:
  delete:
    enabled: true
  filesystem:
    rootdirectory: /var/lib/registry
http:
  addr: 0.0.0.0:443
  secret: generate-random-secret
  host: https://<external-fqdn-dtrcache> # Could be MSR Cache / Loadbalancer / Worker Node external FQDN
  tls:
    certificate: /certs/cache.cert.pem
    key: /certs/cache.key.pem
middleware:
  registry:
      - name: downstream
        options:
          blobttl: 24h
          upstreams:
            - https://<msr-url> # URL of the Main MSR Deployment
          cas:
            - /certs/msr.cert.pem
EOF
By default, the cache stores image data inside its container. Thus, if something goes wrong with the cache service and Kubernetes deploys a new Pod, cached data is not persisted. The data is not lost, however, as it persists in the primary MSR.
Note
Kubernetes persistent volumes or persistent volume claims must be in use to provide persistent backend storage capabilities for the cache.
Define Kubernetes resources
The Kubernetes manifest file you use to deploy the MSR cache is independent from how you choose to expose the MSR cache within your environment.
cat > dtrcache.yaml <<EOF
apiVersion: apps/v1
kind: Deployment
metadata:
  name: dtr-cache
  namespace: dtr
spec:
  replicas: 1
  selector:
    matchLabels:
      app: dtr-cache
  template:
    metadata:
      labels:
        app: dtr-cache
      annotations:
       seccomp.security.alpha.kubernetes.io/pod: docker/default
    spec:
      containers:
        - name: dtr-cache
          image: registry.mirantis.com/msr/dtr-content-cache:<MSR Version>
          command: ["bin/sh"]
          args:
            - start.sh
            - /config/config.yaml
          ports:
          - name: https
            containerPort: 443
          volumeMounts:
          - name: dtr-certs
            readOnly: true
            mountPath: /certs/
          - name: dtr-cache-config
            readOnly: true
            mountPath: /config
      volumes:
      - name: dtr-certs
        secret:
          secretName: dtr-certs
      - name: dtr-cache-config
        configMap:
          defaultMode: 0666
          name: dtr-cache-config
EOF
Create Kubernetes resources
To create the Kubernetes resources, you must have the kubectl command line tool configured to communicate with your Kubernetes cluster, through either a Kubernetes configuration file or an MKE client bundle.
Note
The documentation herein assumes that you have the necessary file structure on your workstation.
To create the Kubernetes resources:
Create a Kubernetes namespace to logically separate all of the MSR cache components:
kubectl create namespace msr
Create the Kubernetes Secrets that contain the MSR cache TLS certificates and a Kubernetes ConfigMap that contains the MSR cache configuration file:
kubectl -n msr create secret generic msr-certs \
  --from-file=certs/msr.cert.pem \
  --from-file=certs/cache.cert.pem \
  --from-file=certs/cache.key.pem

kubectl -n msr create configmap msr-cache-config \
  --from-file=config.yaml
Create the Kubernetes deployment:
kubectl create -f msrcache.yaml
Review the running Pods in your cluster to confirm successful deployment:
kubectl -n msr get pods
Optional. Troubleshoot your deployment:
kubectl -n msr describe pods <pods>

and / or
`kubectl -n msr logs <pods>
Expose the MSR Cache
To provide external access to your MSR cache you must expose the cache Pods.
Important
Expose your MSR cache through only one external interface.
To ensure TLS certificate validity, you must expose the cache through the same interface for which you previously created a certificate.
Kubernetes supports several methods for exposing a service, based on your infrastructure and your environment. Detail is offered below for the NodePort method and the Ingress Controllers method.
NodePort method
Add a worker node FQDN to the TLS certificate at the start and access the MSR cache through an exposed port on a worker node FQDN.
cat > dtrcacheservice.yaml <<EOF
apiVersion: v1
kind: Service
metadata:
  name: dtr-cache
  namespace: dtr
spec:
  type: NodePort
  ports:
  - name: https
    port: 443
    targetPort: 443
    protocol: TCP
  selector:
    app: dtr-cache
EOF

kubectl create -f dtrcacheservice.yaml
Run the following command to determine the port on which you have exposed the MSR cache:
kubectl -n dtr get services
Test the external reachability of your MSR cache. To do this, use
curlto hit the API endpoint, using both the external address of a worker node and the NodePort:curl -X GET https://<workernodefqdn>:<nodeport>/v2/_catalog {"repositories":[]}
Ingress Controllers method
In the ingress controller exposure scheme, you expose the MSR cache through an ingress object.
Create a DNS rule in your environment to resolve an MSR cache external FQDN address to the address of your ingress controller. In addition, specify at the start the same MSR cache external FQDN within the MSR cache certificate.
cat > dtrcacheingress.yaml <<EOF
apiVersion: networking.k8s.io/v1
kind: Ingress
metadata:
  name: dtr-cache
  namespace: dtr
  annotations:
    nginx.ingress.kubernetes.io/ssl-passthrough: "true"
    nginx.ingress.kubernetes.io/secure-backends: "true"
spec:
  tls:
  - hosts:
    - <external-msr-cache-fqdn> # Replace this value with your external MSR Cache address
  rules:
  - host: <external-msr-cache-fqdn> # Replace this value with your external MSR Cache address
    http:
      paths:
      - pathType: Prefix
        path: "/cache"
        backend:
          service:
            name: dtr-cache
            port:
              number: 443
EOF

kubectl create -f dtrcacheingress.yaml
Test the external reachability of your MSR cache. To do this, use
curlto hit the API endpoint. The address should be the one you have previously defined in the service definition file.
curl -X GET https://external-msr-cache-fqdn/v2/_catalog
{"repositories":[]}
See also
The official Kubernetes documentation on Publishing services - service types.
Configure caches for high availability
To ensure that your MSR cache is always available to users and is highly performant, configure it for high availability.
You will require the following to deploy MSR caches with high availability:
Multiple nodes, one for each cache replica
A load balancer
Shared storage system that has read-after-write consistency
With high availability, Mirantis recommends that you configure the replicas to store data using a shared storage system. MSR cache deployment is the same, though, regardless of whether you are deploying a single replica or multiple replicas.
When using a shared storage system, once an image layer is cached, any replica is able to serve it to users without having to fetch a new copy from MSR.
MSR caches support the following storage systems:
Alibaba Cloud Object Storage Service
Amazon S3
Azure Blob Storage
Google Cloud Storage
NFS
Openstack Swift
Note
If you are using NFS as a shared storage system, ensure read-after-write consistency by verifying that the shared directory is configured with:
/dtr-cache *(rw,root_squash,no_wdelay)
In addition, mount the NFS directory on each node where you will deploy an MSR cache replica.
To configure caches for high availability:
Use SSH to log in to a manager node of the cluster on which you want to deploy the MSR cache. If you are using MKE to manage that cluster, you can also use a client bundle to configure your Docker CLI client to connect to the cluster.
Label each node that is going to run the cache replica:
docker node update --label-add dtr.cache=true <node-hostname>
Create the cache configuration files by following the instructions for deploying a single cache replica. Be sure to adapt the
storageobject, using the configuration options for the shared storage of your choice.Deploy a load balancer of your choice to balance requests across your set of replicas.
MSR cache configuration
MSR caches are based on Docker Registry, and use the same configuration file
format. The MSR cache extends the Docker Registry configuration file format,
though, introducing a new middleware called downstream with three
configuration options: blobttl, upstreams, and cas:
middleware:
  registry:
      - name: downstream
        options:
          blobttl: 24h
          upstreams:
            - <Externally-reachable address for upstream registry or content cache in format scheme://host:port>
          cas:
            - <Absolute path to next-hop upstream registry or content cache
              CA certificate in the container's filesystem>
The following table offers detail specific to MSR caches for each parameter:
Parameter |
Required |
Description |
|---|---|---|
|
no |
The TTL (Time to Live) value for blobs in the cache, offered as a positive integer and suffix denoting a unit of time. Valid values:
Note If the suffix is omitted, the system interprets the value as nanoseconds. If blobttl is configured, |
|
no |
An optional list of absolute paths to PEM-encoded CA certificates of upstream registries or content caches. |
|
yes |
A list of externally-reachable addresses for upstream registries of content caches. If you specify more than one host, it will pull from registries in a round-robin fashion. |
Garbage collection
Mirantis Secure Registry (MSR) supports garbage collection, the automatic cleanup of unused image layers. You can configure garbage collection to occur at regularly scheduled times, as well as set a specific duration for the process.
Garbage collection first identifies and marks unused image layers, then subsequently deletes the layers that have been marked.
Schedule garbage collection
Log in to the MSR web UI.
In the left-side navigation panel, navigate to System and select the Garbage collection tab.
Set the duration for the garbage collection job:
Until done
For <number> minutes
Never
Set the garbage collection schedule:
Custom cron schedule (
<hour, date, month, day>)Daily at midnight UTC
Every Saturday at 1AM UTC
Every Sunday at 1AM UTC
Do not repeat
Click either Save & Start or Save. Save & Start runs the garbage collection job immediately and Save runs the job at the next scheduled time.
At the scheduled start time, verify that garbage collection has begun by navigating to the Job Logs tab.
How garbage collection works
In conducting garbage collection, MSR performs the following actions in sequence:
Establishes a cutoff time.
Marks each referenced manifest file with a timestamp. When manifest files are pushed to MSR, they are also marked with a timestamp.
Sweeps each manifest file that does not have a timestamp after the cutoff time.
Deletes the file if it is never referenced, meaning that no image tag uses it.
Repeats the process for blob links and blob descriptors.
Each image stored in MSR is comprised of the following files:
The image filesystem, which consists of a list of unioned image layers.
A configuration file, which contains the architecture of the image along with other metadata.
A manifest file, which contains a list of all the image layers and the configuration file for the image.
MSR tracks these files in its metadata store, using RethinkDB, doing so in a
content-addressable manner in which each file corresponds to a cryptographic
hash of the file content. Thus, if two image tags hold exactly the same
content, MSR only stores the content once, which makes hash collisions nearly
impossible even when image tag names differ. For example, if wordpress:4.8
and wordpress:latest have the same content, MSR will only store that
content once. If you delete one of these tags, the other will remain intact.
As a result, when you delete an image tag, MSR cannot delete the underlying files as it is possible that other tags also use the same underlying files.
Create a new repository when pushing an image
By default, MSR only allows users to push images to repositories that already exist, and for which the user has write privileges. Alternatively, you can configure MSR to create a new private repository when an image is pushed.
To create a new repository when pushing an image:
Log in to the MSR web UI.
In the left-side navigation panel, click Settings and scroll down to Repositories.
Slide the Create repository on push toggle to the right.
Push an image to a non-existing repository:
curl --user <admin-user>:<password> \
--request POST "<msr-url>/api/v0/meta/settings" \
--header "accept: application/json" \
--header "content-type: application/json" \
--data "{ \"createRepositoryOnPush\": true}"
Pushing an image to a non-existing repository will create a new repository using the following naming convention:
Non-admin users:
<user-name>/<repository>Admin users:
<organization>/<repository>
Use a web proxy
Mirantis Secure Registry (MSR) makes outgoing connections to check for new versions, automatically renew its license, and update its vulnerability database. If MSR cannot access the Internet, you must manually apply any updates.
One option to keep your environment secure while still allowing MSR access to the Internet is to use a web proxy. If you have an HTTP or HTTPS proxy, you can configure MSR to use it. To avoid downtime, you should do this configuration outside business peak hours.
To configure MSR for web proxy use:
Log in as an administrator to a node where MSR is deployed.
Reconfigure MSR to use a web proxy:
docker run -it --rm \
  registry.mirantis.com/msr/dtr reconfigure \
  --http-proxy http://<domain>:<port> \
  --https-proxy https://<domain>:<port> \
  --ucp-insecure-tls
If the web proxy requires authentication, submit your user name and password:
docker run -it --rm \
  registry.mirantis.com/msr/dtr reconfigure \
  --http-proxy username:password@<domain>:<port> \
  --https-proxy username:password@<domain>:<port> \
  --ucp-insecure-tls
Note
MSR does not display the password portion of the URL when it is presented in the MSR UI.
Verify that your web proxy is properly configured:
Log in to the MSR web UI.
In the left-side navigation panel, navigate to System.
Scroll down to Domains & Proxies and review the values of HTTP proxy and HTTPS proxy.
Manage applications
In addition to storing individual and multi-architecture container images and plugins, MSR supports the storage of applications as their own distinguishable type.
Applications include the following two tags:
Image |
Tag |
Type |
Under the hood |
|---|---|---|---|
Invocation |
|
Container image represented by OS and architecture. For example, |
Uses Mirantis Container Runtime. The Docker daemon is responsible for building and pushing the image. Includes scan results for the invocation image. |
Application with bundled components |
|
Application |
Uses the application client to build and push the image. Includes scan results for the bundled components. Docker App is an experimental Docker CLI feature. |
Use docker app push to push your applications to MSR. For more information, refer to Docker App in the official Docker documentation.
View application vulnerabilities
Log in to the MSR web UI.
In the left-side navigation panel, click Repositories.
Select the desired repository and click the Tags tab.
Click View details on the <app-tag> or <app-tag>-invoc row.
Limitations
You cannot sign an application as the Notary signer cannot sign Open Container Initiative (OCI) indices.
Scanning-based policies do not take effect until after all images bundled in the application have been scanned.
Docker Content Trust (DCT) does not work for applications and multi-architecture images, which have the same underlying structure.
Parity with existing repository and image features
The following repository and image management events also apply to applications:
Manage images
Create a repository
MSR requires that you create the image repository before pushing any images to the registry.
To create an image repository:
Log in to the MSR web UI.
In the left-side navigation panel, select Repositories.
Click New repository.
Select the required namespace and enter the name for your repository using only lowercase letters, numbers, underscores, and hyphens.
Select whether your repository is public or private:
Public repositories are visible to all users, but can only be modified by those with write permissions.
Private repositories are visible only to users with repository permissions.
Optional. Click Show advanced settings:
Select On to make tags immutable, and thus unable to be overwritten.
Select On push to configure images to be scanned automatically when they are pushed to MSR. You will also be able to scan them manually.
Click Create.
Note
To enable tag pruning, refer to Set a tag limit. This feature requires that tag immutability is turned off at the repository level.
Image names in MSR
MSR image names must have the following characteristics:
The organization and repository names both must have fewer than 56 characters.
The complete image name, which includes the domain, organization, and repository name, must not exceed 255 characters.
When you tag your images for MSR, they must take the following form:
<msr-domain-name>/<user-or-org>/<repository-name>.For example,
https://127.0.0.1/admin/nginx.
Multi-architecture images
While it is possible to enable the just-in-time creation of multi-architecture image repositories when creating a repository using the API, Mirantis does not recommend using this option, as it will cause Docker Content Trust to fail along with other issues. To manage Docker image manifests and manifest lists, instead use the experimental command docker manifest.
Review repository information
The MSR web UI has an Info page for each repository that includes the following sections:
A
READMEfile, which is editable by admin users.The docker pull command for pulling the images contained in the given repository. To learn more about pulling images, refer to Pull and push images.
The permissions associated with the user who is currently logged in.
To view the Info section:
Log in to the MSR web UI.
In the left-side navigation panel, click Repositories.
Select the required repository by clicking the repository name rather than the namespace name that precedes the /.
The Info tab displays by default.
To view the repository events that your permissions level has access to, hover over the question mark next to the permissions level that displays under Your permission.
Note
Your permissions list may include repository events that are not displayed in the Activity tab. Also, it is not an exhaustive list of the event types that are displayed in your activity stream. To learn more about repository events, refer to Audit repository events.
Pull and push images
Just as with Docker Hub, interactions with MSR consist in the following:
docker login <msr-url> authenticates the user on MSR
docker pull <image>:<tag> pulls an image from MSR
docker push <image>:<tag> pushes an image to MSR
Pull an image
Note
It is only necessary to authenticate using docker login before pulling a private image.
If you need to pull a private image, log in to MSR:
docker login <registry-host-name>
Pull the required image:
docker pull <registry-host-name>/<namespace>/<repository>:<tag>
Push an image
Before you can push an image to MSR, you must create a repository and tag your image.
Create a repository for the required image.
Tag the image using the host name, namespace, repository name, and tag:
docker tag <image-name> <registry-host-name>/<namespace>/<repository>:<tag>
Log in to MSR:
docker login <registry-host-name>
Push the image to MSR:
docker push <registry-host-name>/<namespace>/<repository>:<tag>
Verify that the image successfully pushed:
Log in to the MSR web UI.
In the left-side navigation panel, click Repositories.
Select the relevant repository.
Navigate to the Tags tab.
Verify that the required tag is listed on the page.
Windows image limitations
The base layers of the Microsoft Windows base images have redistribution restrictions. When you push a Windows image to MSR, Docker only pushes the image manifest and the layers that are above the Windows base layers. As a result:
When a user pulls a Windows image from MSR, the Windows base layers are automatically fetched from Microsoft.
Because MSR does not have access to the image base layers, it cannot scan those image layers for vulnerabilities. The Windows base layers are, however, scanned by Docker Hub.
On air-gapped or similarly limited systems, you can configure Docker to push
Windows base layers to MSR by adding the following line to
C:\ProgramData\docker\config\daemon.json:
"allow-nondistributable-artifacts": ["<msr-host-name>:<msr-port>"]
Caution
For production environments, Mirantis does not recommend configuring Docker to push Windows base layers to MSR.
Delete images
Note
If your MSR instance uses image signing, you will need to remove any trust data on the image before you can delete it. For more information, refer to Delete signed images.
To delete an image:
Log in to the MSR web UI.
In the left-side navigation panel, select Repositories.
Click the relevant repository and navigate to the Tags tab.
Select the check box next to the tags that you want to delete.
Click Delete.
Alternatively, you can delete every tag for a particular image by deleting the relevant repository.
To delete a repository:
Click the required repository and navigate to the Settings tab.
Scroll down to Delete repository and click Delete.
Scan images for vulnerabilities
Mirantis Secure Registry (MSR) has the ability to scan images for security vulnerabilities contained in the US National Vulnerability Database. Security scan results are reported for each image tag contained in a repository.
Security scanning is available as an add-on to MSR. If security scan results are not available on your repositories, your organization may not have purchased the security scanning feature or it may be disabled. Administrator permissions are required to enable security scanning on your MSR instance.
Important
During scanning images for security vulnerabilities, MSR temporarily
extracts the contents of your images to disk. If malware is contained in
these images, external scanners may wrongly attribute that malware
to MSR. The key indication of this is the detection of malware in the
dtr-jobrunner container in /tmp/findlib-workdir-*.
To prevent any recurrence of the issue, Mirantis recommends configuring
the run-time scanner to exclude files found in the MSR dtr-jobrunner
containers in /tmp, or more specifically, if wildcards can be used,
in /tmp/findlib-workdir-*.
Security scan process
Scans run on demand when you initiate them in the MSR web UI or automatically when you push an image to the registry.
Scanning process
MSR image scanning occurs in a service known as the dtr-jobrunner
container. To scan an image, MSR:
Extracts a copy of the image layers from the backend storage.
Extracts the files from the layer into a working directory inside the
dtr-jobrunnercontainer.Executes the scanner against the files in this working directory, collecting a series of scanning data.
Once the scanning data is collected, the working directory for the layer is removed.
Binary scan
The scanner first performs a binary scan on each layer of the image, identifies the software components in each layer, and indexes the SHA of each component in a bill-of-materials. A binary scan evaluates the components on a bit-by-bit level, so vulnerable components are discovered even if they are statically linked or use a different name.
The scan then compares the SHA of each component against the US National Vulnerability Database that is installed on your MSR instance. When this database is updated, MSR verifies whether the indexed components have newly discovered vulnerabilities.
Layers excluded from scanning
MSR has the ability to scan both Linux and Windows images. However, because Docker defaults to not pushing foreign image layers for Windows images, MSR does not scan those layers. If you want MSR to scan your Windows images, configure Docker to always push image layers, and it will scan the non-foreign layers.
Scan images
Note
Only users with write access to a repository can manually start a scan. Users with read-only access can, however, view the scan results.
Security scan on push
By default, a security scan runs automatically when you push an image to the registry.
To view the results of a security scan:
Log in to the MSR web UI.
In the left-side navigation panel, select Repositories.
Click the required repository and select the Tags tab.
Click View details on the required tag.
Manual scanning
You can manually start a scan for images in repositories that you have
write access to.
To manually scan an image:
Log in to the MSR web UI.
In the left-side navigation panel, select Repositories.
Click the required repository and select the Tags tab.
Click Start a scan on the required image tag.
To review the scan results, click View details.
Change the scanning mode
You can change the scanning mode for each individual repository at any time. You might want to disable scanning in either of the following scenarios:
You are pushing an image repeatedly during troubleshooting and do not want to waste resources on rescanning.
A repository contains legacy code that is not used or updated frequently.
Note
To change an individual repository scanning mode, you must have write or
administrator access to the repository.
To change the scanning mode:
Log in to the MSR web UI.
In the left-side navigation panel, select Repositories.
Click the required repository and select the Settings tab.
Scroll down to Image scanning and under Scan on push, select either On push or Manual.
Review security scan results
Once MSR has run a security scan for an image, you can view the results.
Scan summaries
A summary of the results displays next to each scanned tag on the repository Tags tab, and presents in one of the following ways:
If the scan did not find any vulnerabilities, the word Clean displays in green.
If the scan found vulnerabilities, the severity level, Critical, Major, or Minor, displays in red or orange with the number of vulnerabilities. If the scan could not detect the version of a component, the vulnerabilities are reported for all versions of the component.
Detailed report
To view the full scanning report, click View details for the required image tag.
The top of the resulting page includes metadata about the image including the SHA, image size, last push date, user who initiated the push, security scan summary, and the security scan progress.
The scan results for each image include two different modes so you can quickly view details about the image, its components, and any vulnerabilities found:
The Layers view lists the layers of the image in the order that they are built by the Dockerfile.
This view can help you identify which command in the build introduced the vulnerabilities, and which components are associated with that command. Click a layer to see a summary of its components. You can then click on a component to switch to the Component view and obtain more details about the specific item.
Note
The layers view can be long, so be sure to scroll down if you do not immediately see the reported vulnerabilities.
The Components view lists the individual component libraries indexed by the scanning system in order of severity and number of vulnerabilities found, with the most vulnerable library listed first.
Click an individual component to view details on the vulnerability it introduces, including a short summary and a link to the official CVE database report. A single component can have multiple vulnerabilities, and the scan report provides details on each one. In addition, the component details include the license type used by the component, the file path to the component in the image, and the number of layers that contain the component.
Note
The CVE count presented in the scan summary of an image with multiple layers may differ from the count obtained through summation of the CVEs for each individual image component. This is because the scan summary performs a summation of the CVEs in every layer of the image, and a component may be present in more than one layer of an image.
What to do next
If you find that an image in your registry contains vulnerable components, you can use the linked CVE scan information in each scan report to evaluate the vulnerability and decide what to do.
If you discover vulnerable components, you should verify whether there is an updated version available where the security vulnerability has been addressed. If necessary, you can contact the component maintainers to ensure that the vulnerability is being addressed in a future version or a patch update.
If the vulnerability is in a base layer, such as an operating system, you might not be able to correct the issue in the image. In this case, you can switch to a different version of the base layer, or you can find a less vulnerable equivalent.
You can address vulnerabilities in your repositories by updating the images to use updated and corrected versions of vulnerable components or by using a different component that offers the same functionality. When you have updated the source code, run a build to create a new image, tag the image, and push the updated image to your MSR instance. You can then re-scan the image to confirm that you have addressed the vulnerabilities.
Override a vulnerability
MSR security scanning sometimes reports image vulnerabilities that you know have already been fixed. In such cases, it is possible to hide the vulnerability warning.
Note
Only MSR administrators can override layer vulnerabilities.
To override a vulnerability:
Log in to the MSR web UI as an administrator.
In the left-side navigation panel, select Repositories.
Navigate to the required repository and click View details.
To review the vulnerabilities associated with each component in the image, click the Components tab.
Select the component with the vulnerability you want to ignore, navigate to the vulnerability, and click Hide.
Once dismissed, the vulnerability is hidden system-wide and will no longer be reported as a vulnerability on affected images with the same layer IDs or digests. In addition, MSR will not re-evaluate the promotion policies that have been set up for the repository.
To re-evaluate the promotion policy for the affected image:
After hiding a particular vulnerability, you can re-evaluate the promotion policy for the affected image.
Log in to the MSR web UI.
In the left-side navigation panel, select Repositories.
Navigate to the required repository and click View details.
Click Promote.
Scanner reporting
You can review and submit the vulnerability scanning results to Mirantis Customer Support to help with the troubleshooting process.
Possible scanner report issues include:
Scanner crashes
Improperly extracted containers
Improperly detected components
Incorrectly matched backport
Vulnerabilities improperly matched to components
Vulnerability false positives
Export a scanner report
Log in to the MSR web UI.
In the left-side navigation panel, select Repositories.
Click the required repository and select the Tags tab.
Navigate to the required image and click View details.
Click Export Report and select:
Export as JSON to use for support and diagnostics.
Export as CSV to use for further processing by Windows or Linux shell scripts.
Find the report as either
scannerReport.json``or
``scannerReport.txt
in your browser downloads directory.
Submit a scanner report
You can send a scanner report directly to Mirantis Customer Support to help the group in their troubleshooting efforts.
To send a scanner report directly to Mirantis Customer Support:
Log in to the MSR web UI.
Navigate to View Details and click Components.
Click Show layers affected for the layer you want to report.
Click Report Issue. A pop-up window displays with the fields detailed in the following table:
Field
Description
Component
Automatically filled out and not editable. If the information is incorrect, make a note in the Additional info field.
Reported version or date
Automatically filled out and not editable. If the information is incorrect, make a note in the Additional info field.
Report layer
Indicate the image or image layer. Options include: Omit layer, Include layer, Include image.
False Positive(s)
Optional. Select from the drop-down menu all CVEs you suspect are false positives. Toggle the False Positive(s) control to edit the field.
Missing Issue(s)
Optional. List CVEs you suspect are missing from the report. Enter CVEs in the format
CVE-yyyy-####orCVE-yyyy-#####and separate each CVE with a comma. Toggle the Missing Issue(s) control to edit the field.Incorrect Component Version
Optional. Enter any incorrect component version information in the Missing Issue(s) field. Toggle the Incorrect Component Version control to edit the field.
Additional info
Optional. Indicate anything else that does not pertain to other fields. Toggle the Additional info control to edit this field.
Fill out the fields in the pop-up window and click Submit.
MSR generates a JSON-formatted scanner report, which it bundles into a file together with the scan data. This file downloads to your local drive, at which point you can share it as needed with Mirantis Customer Support.
Important
To submit a scanner report along with the associated image, bundle the items
into a .tgz file and include that file in a Mirantis Customer
Support ticket.
To download the relevant image:
docker save <msr-address>/<user>/<image-name>:tag <image-name>.tar
To bundle the report and image as a .tgz file:
tar -cvzf scannerIssuesReport.tgz <image-name>.tar scannerIssuesReport.json
Sign images
Mirantis Secure Registry (MSR) supports two image-signing mechanisms. Cosign is the current recommended approach, while Docker Content Trust (DCT) is deprecated.
Mechanism |
Status |
Recommended use |
|---|---|---|
Recommended |
All new and existing signing workflows on MSR 2.10. |
|
Deprecated |
MSR 2.9 environments with existing DCT signatures that have not yet migrated to Cosign. |
Sign images with Cosign
Mirantis Secure Registry (MSR) natively supports Cosign, providing a seamless way to store and manage signed images. Cosign allows you to sign image tags on the client side, giving consumers a way to verify the integrity of your images.
Because Cosign signatures are stored directly in the registry as standard OCI artifacts, MSR does not require a dedicated signing server. All cryptographic signing operations are performed entirely on the client side using the Cosign CLI. After the client generates the signature, it is pushed directly to your MSR repository alongside the image.
Cosign integrates with container workflows and allows you to configure
repositories, manage keys, and sign images using the cosign sign command.
Upgrade from MSR 2.9
When upgrading from MSR 2.9 to MSR 2.10, MSR provides a conditional backward-compatibility path for Docker Content Trust (DCT) to ensure your existing workflows do not break while you plan your migration to Cosign.
The upgrade behavior depends entirely on whether you have active DCT signatures in your MSR 2.9 environment:
For more details about DCT usage, refer to Sign images with Docker Content Trust.
Initial local setup
Before you can use Cosign, you must complete local setup.
Install Cosign CLI
To begin signing and verifying images, install the Cosign CLI tool on your local machine. Detailed setup instructions for various operating systems can be found in the official Sigstore Cosign Installation Guide.
Configure CA certificates
You can skip this section and move on to Sign images that MKE can trust, if:
Your CA certificate is issued by a well-know root CA.
Your MSR is installed on the local machine and is configured as an insecure registry, although this is mostly a development and test configuration.
If the MSR is configured with a self-signed CA certificate, you must configure
the machine that runs the cosign or docker commands to trust the CA ,
certificate as detailed below.
Caution
If your remote MSR is configured as an insecure registry (using self-signed
certificates or plain HTTP), you must explicitly configure the Cosign client
to allow the connection. Cosign can respect the insecure-registries settings
defined in your Docker daemon.json file.
Alternatively, if you add the self-signed MSR CA certificate directly to
your operating system’s trusted root certificate store, the host will be
marked as secure and Cosign will communicate with it automatically without
requiring any extra insecure registry flags or daemon.json
configuration.
To configure your machine to trust a self-signed CA:
Create a certificate directory for the MSR host in the Docker configuration directory:
export MSR=<registry-hostname>
mkdir -p ~/.docker/certs.d/${MSR}
Download the MSR CA certificate into the newly created directory:
curl -ks https://$MSR/ca > ~/.docker/certs.d/${MSR}/ca.crt
Restart the Docker daemon.
Verify that you do not receive certificate errors when accessing MSR using the Docker CLI by running
docker login ${MSR}.Create a symlink between the
certs.dandtlsdirectories:ln -s certs.d ~/.docker/tls
To configure your machine to trust a self-signed CA for Cosign CLI:
Download the MSR CA certificate into the host’s certificate directory:
export MSR=<registry-hostname>
curl -ks https://$MSR/ca > /usr/local/share/ca-certificates/msr-ca.crt
Update the certificates:
$ sudo update-ca-certificates
Log in to MSR using the Docker CLI or the Cosign CLI:
Docker CLI:
$ docker login <MSR_URL> -u <username> -p <password>
Cosign CLI:
$ cosign login <MSR_URL> -u <username> -p <password>
Image signing and verification scenarios
Cosign offers a flexible architecture that integrates with a wide variety of cryptographic workflows. The examples on this page represent the most common image signing scenarios used within Mirantis Secure Registry (MSR).
Because Cosign supports many alternative signing methods, see the official Cosign documentation for a complete list of deployment scenarios and advanced configurations.
Sign with a self-managed key pair
This is the standard approach for managing your own cryptographic keys. You generate a private/public key pair locally, use the private key to sign the image, and use the public key to verify it. For more information, see the Sigstore documentation on self-managed keys.
Run the following command to generate a
cosign.key(private key) andcosign.pub(public key). You are prompted to enter a password to protect the private key:$ cosign generate-key-pair
Authenticate your container client to MSR, then use your private key to sign the target image tag. Cosign automatically pushes the signature artifact to your MSR repository:
$ cosign sign --key cosign.key \
    msr.example.com/marketing/nginx:v1
Verify the integrity and origin of the image using your public key:
$ cosign verify --key cosign.pub \
    msr.example.com/marketing/nginx:v1
Sign in an air-gapped environment
Cosign can operate in secure, offline, or air-gapped data centers because it does not depend on public internet services — such as the Fulcio or Rekor transparency logs — to function.
Before you begin, verify the following prerequisites:
The client machine running the Cosign CLI must have direct network access to the MSR instance.
If MSR uses a self-signed CA, the client machine must trust the MSR CA certificate in its OS trust store, or you must configure the registry under
insecure-registriesin the Dockerdaemon.jsonfile.Public transparency log uploads must be explicitly bypassed because there is no internet access to reach them.
Note
In an air-gapped environment, use the --tlog-upload=false flag
with all Cosign commands to prevent contact with public
transparency logs.
Sign and push the image:
$ cosign sign --key cosign.key --tlog-upload=false \
    msr.example.com/secure-zone/alpine:latest
Verify the signature:
$ cosign verify --key cosign.pub --tlog-upload=false \
    msr.example.com/secure-zone/alpine:latest
Sign images with attestations
Attestations allow you to append authenticated metadata — such as vulnerability scan reports, build provenance, or SBOMs — directly to your container images. This metadata can later be evaluated by admission controllers.
For information on enforcing attestation policies at deployment time, see the Sigstore Policy Controller documentation.
Attest a predicate file containing build details or scan results to the image. Adjust
--typeto match your attestation predicate format:$ cosign attest --key cosign.key --type custom \ --predicate scan-results.json \ msr.example.com/dev/api-service:v2
Verify that the attestation exists and is valid:
$ cosign verify-attestation --key cosign.pub --type custom \
    msr.example.com/dev/api-service:v2
For more information on attestations, see the Cosign attestation overview.
Sign with identity-based signing using OIDC
Cosign supports keyless signing, which eliminates the challenges of managing long-lived cryptographic keys. Instead of generating and storing permanent keys, Cosign uses an OpenID Connect (OIDC) identity token from a trusted identity provider (IdP) to obtain a short-lived signing certificate from Sigstore’s Fulcio Certificate Authority.
This scenario is commonly used in automated CI/CD environments such as GitHub Actions, GitLab CI, or cloud providers using workload identity.
Sign and push the image. When you run this command interactively, Cosign opens a browser to complete an OIDC authorization challenge. In CI/CD pipelines, Cosign automatically detects the ambient OIDC token from the runner environment, or you can supply one explicitly using the
--identity-tokenflag:$ cosign sign --identity-token="$OIDC_TOKEN" msr.example.com/production/web-app:v1
Verify the signature. Because no public key file exists, specify the expected OIDC provider issuer URL and the identity embedded in the certificate, such as a developer’s email address or a CI/CD workflow path:
$ cosign verify \
    --certificate-identity="deploy-service@company.iam.gserviceaccount.com" \
    --certificate-oidc-issuer="https://accounts.google.com" \
    msr.example.com/production/web-app:v1
For more information on keyless signing, see the Cosign keyless signing overview.
Sign images that MKE can trust
Mirantis Kubernetes Engine (MKE) can be configured to enforce signature verification, ensuring that only images signed by trusted entities can be deployed on your cluster.
Because Cosign signatures are standard OCI artifacts stored directly inside Mirantis Secure Registry (MSR), you can use the cryptographic user keys provided in your MKE client bundle to sign images. This allows MKE to confirm that a deployment came from an authorized user or team identity.
Prerequisites
Complete the following steps before you start signing images:
Install the Cosign CLI on your local machine.
Confirm that your local machine has network access to MSR and log in to the registry:
$ docker login msr.example.com
Download an MKE client bundle for the user identity that will sign the images. The bundle contains the cryptographic user certificates (
cert.pemandkey.pem) recognized by MKE’s RBAC engine.
Import your MKE bundle keys into Cosign
Cosign can use your existing client bundle keys, but they must first
be converted into Cosign’s expected format. Navigate to the directory
containing your unzipped MKE client bundle and run the
import-key-pair command:
$ # Verify your bundle files are present
$ ls cert.pem key.pem
$ # Import the MKE private key into Cosign format
$ cosign import-key-pair --key key.pem
When prompted, enter and confirm a password. This generates two files in your current working directory:
import-cosign.key— the encrypted private key used to sign images.import-cosign.pub— the public key used for verification.
For more details on key management utilities, see Importing Key Pairs in the official Sigstore documentation.
Sign the image tag
To sign your container image using your imported MKE-associated key, run:
$ cosign sign --key import-cosign.key \
    msr.example.com/marketing/nginx:v1
Cosign prompts for the password you set during the import step, then pushes the cryptographic signature directly to your MSR repository alongside your image manifest.
Enforce signature verification in MKE 3
TechPreview
Warning
This feature is not yet available. It is planned for a future MKE 3 update following the MSR 2.10.0 release. Confirm feature availability in your MKE version before attempting configuration.
After your images are signed using identities known to MKE, configure your cluster to block unsigned images:
Log in to the MKE web interface as an administrator.
Navigate to Admin > Admin Settings > Cosign (formerly Docker Content Trust).
Toggle the enforcement policy and supply the required verification parameters so that only verified images can be scheduled onto the cluster.
With this policy active, any attempt to deploy a workload using an unsigned image or an image signed by an untrusted key is rejected by MKE.
Note
If your MSR instance uses a self-signed CA, confirm that your
local machine trusts the MSR CA, or configure the registry under
insecure-registries in the Docker daemon.json file so that
Cosign can connect to MSR to push signatures.
Delete signed images
In Mirantis Secure Registry (MSR), Cosign signatures are stored as
standard OCI artifacts. When you delete a primary container image tag
(for example, app:latest), MSR performs a cascade deletion to
clean up the repository and prevent orphaned signature data,
automatically removing the following related Cosign artifact tags:
Tag-based artifacts:
<tag>.sig(the image signature) and<tag>.att(any associated image attestations).Digest-based artifacts: If no other non-Cosign tags in the repository point to the underlying image digest, MSR also removes
sha256-<hex>,sha256-<hex>.sig, andsha256-<hex>.att.
After this workflow completes, the primary image tag and all corresponding Cosign signature data are purged from MSR storage.
Delete a signature without deleting the image
You may need to strip a signature from an image, for example, to invalidate a bad deployment pipeline stage, while keeping the original container image tag intact. Because Cosign signatures are stored as individual OCI tags, you can remove them independently using the MSR Tag DELETE API:
DELETE /api/v0/repositories/<namespace>/<repo>/tags/sha256-<imageDigestHex>.sig
Removing the signature tag reverts the image cosignSigned status
to false in the MSR catalog. The image remains in the repository
as an unsigned artifact. For more details, see the API Reference.
Deletion caveats
While Cosign does not prevent you from removing an image or its signature, a deletion request to MSR can still fail due to the following system constraints:
If an image has both DCT/Notary and Cosign signatures attached, the legacy Notary signature triggers a
409 Conflicterror. You must clear the Notary metadata before deleting.If the target repository has an immutable tags policy enabled, tag deletions are blocked regardless of the signing method used.
You must have write or administrative access in the MKE Role-Based Access Control engine for the target namespace to perform a deletion.
Delete legacy Docker Content Trust
In Mirantis Secure Registry (MSR), Docker Content Trust (DCT) and its underlying Notary server and signer infrastructure are deprecated. If you upgraded from MSR 2.9 with active signatures, the legacy Notary stack is preserved for backward compatibility.
After you migrate your image-signing pipelines to Cosign, administrators can permanently remove the legacy Notary stack, including all legacy trust data, signing databases, and system containers, from the MSR web UI or using the MSR administrative API.
Warning
Disabling Notary is a permanent, destructive action that tears down the Notary subsystem and deletes all existing DCT signatures and trust repositories. The Notary stack cannot be re-enabled after removal. Verify that all required images have been re-signed with Cosign before proceeding.
Delete Notary with the MSR web UI
Log in to the MSR web interface as a system administrator.
In the left navigation menu, go to Admin Settings and locate the Signatures Management section.
Verify that the current status displays as Enabled, then click Disable Notary.
When the confirmation prompt appears, type
deleteinto the text field and click Confirm to proceed. If you type the confirmation word incorrectly, the prompt reappears. Click Cancel to stop the operation without making any changes.Wait for the process to complete. The button displays Disabling Notary… while the system is in a decommissioning state.
After the Notary infrastructure has been removed from your cluster, the button displays Notary Disabled and a success notification confirms the removal.
Delete Notary with the MSR administrative API
The MSR administrative API provides two endpoints for checking Notary status and triggering its removal.
Check current Notary status
Before you disable Notary, verify the current system state:
GET /api/v0/admin/notary/status
A 200 OK response indicates that Notary is active. The response
includes a count of repositories that contain legacy trust metadata:
{
  "state": "enabled",
  "reposWithTrustData": 14
}
Disable the Notary infrastructure
To initiate the asynchronous teardown job, send an authorized request to the disable endpoint:
POST /api/v0/admin/notary/disable
The endpoint returns the following HTTP response codes:
202 Accepted— The decommission job has started or is already running. The response body returns a job ID to track progress:{ "state": "decommissioning", "jobId": "job-abc-123-xyz" }
200 OK— The legacy stack has already been fully removed. This endpoint is idempotent; repeated calls after completion return a success no-op:{ "state": "disabled" }
400 Bad Request— The request failed preconditions; for example, if signature data exists but required validation parameters are missing.403 Forbidden— The authenticated user does not have system administrator privileges.
While the endpoint returns 202 Accepted, poll
GET /api/v0/admin/notary/status every few seconds until the
state transitions to disabled.
For more details, see the API Reference.
Sign images with Docker Content Trust
Deprecated
Mirantis Secure Registry (MSR) ships with both the Notary server and the Notary signer, thus providing the required components for using Docker Content Trust (DCT). DCT allows you to sign image tags, giving consumers a way to verify the integrity of your images.
MSR implements DCT using a combination of server and client semantics. The notary containers comprise the server side and are deployed by default with every MSR installation. Operations on the client side are performed with a combination of docker trust and notary commands and operate on data that resides in the local trust store that these tools maintain. Changes are then pushed from the local store to the Notary server so that they are available with MSR.
As they are part of MSR, the Notary and the Registry servers are accessed through a front-end proxy, with both components sharing the MKE RBAC (Role-based Access Control) Engine. As such, you do not require additional Docker client configuration to use DCT.
DCT is integrated with the Docker CLI and allows you to configure repositories, add signers, and sign images using the docker trust command.
Note
If the MSR certificate authority (CA) is self-signed, you must configure the
machine running the docker trust command to trust the MSR CA. To
do this, create a $HOME/.docker/tls/ folder and place the MSR CA file
in it. For example:
mkdir -p $HOME/.docker/tls/msr.example.com curl -k -o
$HOME/.docker/tls/msr.example.com/msr-ca.crt https://msr.example.com/ca
Initial local setup
Deprecated
Before you can use Docker Content Trust (DCT), you must complete local setup.
Enable DCT
DCT is active on the server, but must be opted in to by any Docker client
who wants to use it. This is done by setting the DOCKER_CONTENT_TRUST
environment variable. It must be enabled whenever DCT is used locally.
export DOCKER_CONTENT_TRUST=1
Configure CA certificates
You can skip this section and move on to Sign images that MKE can trust, if:
Your CA certificate is issued by a well-know root CA.
Your MSR is installed on the local machine and is configured as an insecure registry, although this is mostly a development and test configuration.
If the MSR is configured with a self-signed CA certificate, you must configure the machine that runs the docker trust commands to trust the CA , certificate as detailed below.
Caution
It is not possible to use DCT with a remote MSR that is set up as an insecure registry in the Docker daemon configuration. This is because the Docker client does not use the server daemon for Notary operations, but instead communicates directly with the MSR Notary service. The client does not read the insecure registry configuration from the server, and there is no way to configure the client for insecure registries.
To configure your machine to trust a self-signed CA:
Create a certificate directory for the MSR host in the Docker configuration directory:
export MSR=<registy-hostname>
mkdir -p ~/.docker/certs.d/${MSR}
Download the MSR CA certificate into the newly created directory:
curl -ks https://$MSR/ca > ~/.docker/certs.d/${MSR}/ca.crt
Restart the Docker daemon.
Verify that you do not receive certificate errors when accessing MSR using the Docker CLI by running
docker login ${MSR}.Create a symlink between the
certs.dandtlsdirectories:ln -s certs.d ~/.docker/tls
Sign images that MKE can trust
Deprecated
A key MKE feature prevents the deployment of untrusted images on the cluster,
the use of which requires you to sign and push images to your MSR. To tie the
signed images back to MKE, you must sign the images with the private keys of
the MKE users. From an MKE client bundle, use key.pem as your private key,
and cert.pem as your public key on an x509 certificate.
To sign images in a way that MKE can trust, you must:
Download a client bundle for the user account you want to use for signing the images.
Add the user’s private key to the trust store of your machine.
Initialize trust metadata for the repository.
Delegate signing for that repository to the MKE user.
Sign the image.
In the example scenario that follows, the nginx image is pulled from
Docker Hub, tagged as msr.example.com/dev/nginx:1, pushed to MSR,
and signed in a way that is trusted by MKE.
Download and extract an MKE client bundle into your local directory.
Load the private key into the local Docker trust store
(~/.docker/trust):$ docker trust key load --name <user> key.pem
Example output:
Loading key from "key.pem"...
Enter passphrase for new <user> key with ID a453196:
Repeat passphrase for new <user> key with ID a453196:
Successfully imported key from key.pem
Initiate trust metadata for an MSR repository.
If you have not already done so, navigate to the MSR web UI and create a repository for your image. This example uses the
nginxrepository in theprodnamespace.As part of initiating the repository, the public key of the MKE user must be added to the Notary server as a signer for the repository. You will be prompted for passphrases to protect the keys, and you should make a note of these passphrases.
$ docker trust signer add --key cert.pem <user> msr.example.com/prod/nginx
Adding signer "<user>" to msr.example.com/prod/nginx...
Initializing signed repository for msr.example.com/prod/nginx...
Enter passphrase for root key with ID 4a72d81:
Enter passphrase for new repository key with ID e0d15a2:
Repeat passphrase for new repository key with ID e0d15a2:
Successfully initialized "msr.example.com/prod/nginx"
Successfully added signer: <user> to msr.example.com/prod/nginx
Inspect the trust metadata of the repository to ensure that the user has been added.
$ docker trust inspect --pretty msr.example.com/prod/nginx

No signatures for msr.example.com/prod/nginx

List of signers and their keys for msr.example.com/prod/nginx

SIGNER              KEYS
<user>                927f30366699

Administrative keys for msr.example.com/prod/nginx

  Repository Key:       e0d15a24b7...540b4a2506b
  Root Key:             b74854cb27...a72fbdd7b9a
Sign the image tag. The following steps include downloading the image from Docker Hub, tagging the image for the user’s MSR repository, pushing the image to the user’s repository, and signing the tag with the user’s key.
$ docker pull nginx:latest

$ docker tag nginx:latest msr.example.com/prod/nginx:1

$ docker trust sign msr.example.com/prod/nginx:1
Signing and pushing trust data for local image msr.example.com/prod/nginx:1, may overwrite remote trust data
The push refers to repository [msr.example.com/prod/nginx]
6b5e2ed60418: Pushed
92c15149e23b: Pushed
0a07e81f5da3: Pushed
1: digest: sha256:5b49c8e2c890fbb0a35f6050ed3c5109c5bb47b9e774264f4f3aa85bb69e2033 size: 948
Signing and pushing trust metadata
Enter passphrase for <user> key with ID 927f303:
Successfully signed msr.example.com/prod/nginx:1
Inspect the trust metadata to ensure that the image tag has been signed.
$ docker trust inspect --pretty msr.example.com/prod/nginx:1

Signatures for msr.example.com/prod/nginx:1

SIGNED TAG          DIGEST                   SIGNERS
1                   5b49c8e2c8...90fbb2033   <user>

List of signers and their keys for msr.example.com/prod/nginx:1

SIGNER              KEYS
<user>                927f30366699

Administrative keys for msr.example.com/prod/nginx:1

  Repository Key:       e0d15a24b74...96540b4a2506b
  Root Key:             b74854cb27c...1ea72fbdd7b9a
Alternatively, you can review the signed image from the MSR web UI.
Add a delegation
Deprecated
You have the option to sign an image using multiple user keys. For example, in the event that an image must be signed by both a member of the Security team and a member of the Development team.
To add a delegation:
The procedure herein assumes that the original user is a member of the Development team, and thus you only need to add a Security team member.
Obtain a signing key pair for the Security team user. Refer to Initial local setup for more information.
Add the private key of the Security team member to the local Docker Container Trust store.
docker trust key load --name <security-team-member-name> key.pem
The system prompts you for the user key password, as shown in the example output:
Loading key from "key.pem"...
Enter passphrase for new <security-team-member-name> key with ID 5ac7d9a: <security-team-member-password>
Repeat passphrase for new <security-team-member-name> key with ID 5ac7d9a: <security-team-member-password>
Successfully imported key from key.pem
Upload the Security team member public key to the Notary server.
docker trust signer add --key cert.pem <security-team-member-name> <registry-host-name>/<namespace>/<repository>
The system prompts you for the repository key password, as shown in the example output:
Adding signer "<security-team-member-name>" to <registry-host-name>/<namespace>/<repository>...
Enter passphrase for repository key with ID e0d15a2: <repository-password>
Successfully added signer: <security-team-member-name> to <registry-host-name>/<namespace>/<repository>
Sign the image as the Security team member.
docker trust sign <registry-host-name>/<namespace>/<repository>:<tag>
The system prompts you for the Development team member key password and the Security team member key password, as shown in the example output:
Signing and pushing trust metadata for <registry-host-name>/<namespace>/<repository>:<tag>
Existing signatures for tag 1 digest 5b49c8e2c890fbb0a35f6050ed3c5109c5bb47b9e774264f4f3aa85bb69e2033 from:
<development-team-member-name>
Enter passphrase for <development-team-member-name> key with ID 927f303: <development-team-member-password>
Enter passphrase for <security-team-member-name> key with ID 5ac7d9a: <security-team-member-password>
Successfully signed <registry-host-name>/<namespace>/<repository>:<tag>
Review the repository trust metadata to verify that the image is signed by both users:
docker trust inspect --pretty <registry-host-name>/<namespace>/<repository>
Example output:
Signatures for <registry-host-name>/<namespace>/<repository>:<tag>

SIGNED TAG     DIGEST                                                            SIGNERS
1              5b49c8e2c89...5bb69e2033  <development-team-member-name>, <security-team-member-name>

List of signers and their keys for <registry-host-name>/<namespace>/<repository>:<tag>

SIGNER                             KEYS
<development-team-member-name>     927f30366699
<security-team-member-name>        5ac7d9af7222

Administrative keys for <registry-host-name>/<namespace>/<repository>:<tag>

  Repository Key:       e0d15a24b741ab049470298734397afbea539400510cb30d3b996540b4a2506b
  Root Key:     b74854cb27cc25220ede4b08028967d1c6e297a759a6939dfef1ea72fbdd7b9a
Delete trust data
Deprecated
You must remove the trust metadata using the Notary CLI before you can delete any repositories that contain trust metadata.
Run the following command to initiate trust metadata deletion:
notary delete <registry-host-name>/<namespace>/<repository> --remote
Note
If you do not include the
--remoteflag, Notary deletes local cached content but does not delete data from the Notary server.Example output:
Deleting trust data for <registry-host-name>/<namespace>/<repository>
Enter username: <user-name>
Enter password: <password>
When prompted by the system, enter your username and password, then press Enter to complete the delete operation.
Example output:
Successfully deleted local and remote trust data for <registry-host-name>/<namespace>/<repository>
Delete signed images
Deprecated
Before you can delete signed images, you must first identify the roles that signed the images and remove the trust data for each of those roles.
To identify the roles that signed an image:
Determine the roles that are trusted to sign the image:
Configure your Notary client, as described in the official Docker documentation, Delegations for content trust.
List the trusted roles:
notary delegation list <registry-host-name>/<namespace>/<repository>
Example output:
ROLE                PATHS             KEY IDS                  THRESHOLD
----                -----             -------                  ---------
targets/releases    "" <all paths>    c3470c45cefde5...2ea9bc8    1
targets/qa          "" <all paths>    c3470c45cefde5...2ea9bc8    1
For each role listed, identify whether it signed the image:
notary list <registry-host-name>/<namespace>/<repository> --roles <role-name>
To remove trust data for a role:
Note
Only users with private keys that have the required roles can remove trust data for a role.
For each role that signed the image, remove the trust data for that role:
notary remove <registry-host-name>/<namespace>/<repository> <tag> \
--roles <role-name> --publish
The image displays as unsigned once the trust data has been removed for all of the roles that signed the image. At this point, you can delete the image.
Using Docker Content Trust with a Remote MKE Cluster
Deprecated
For more advanced deployments, you may want to share one Mirantis Secure Registry across multiple Mirantis Kubernetes Engines. However, customers wanting to adopt this model alongside the Only Run Signed Images MKE feature, run into problems as each MKE operates an independent set of users.
Docker Content Trust (DCT) gets around this problem, since users from a remote MKE are able to sign images in the central MSR and still apply runtime enforcement.
In the following example, we will connect MSR managed by MKE cluster 1 with a remote MKE cluster which we are calling MKE cluster 2, sign the image with a user from MKE cluster 2, and provide runtime enforcement within MKE cluster 2. This process could be repeated over and over, integrating MSR with multiple remote MKE clusters, signing the image with users from each environment, and then providing runtime enforcement in each remote MKE cluster separately.
Note
Before attempting this guide, familiarize yourself with Docker Content Trust and Only Run Signed Images on a single MKE. Many of the concepts within this guide may be new without that background.
Prerequisites
Cluster 1, running UCP 3.0.x or higher, with a DTR 2.5.x or higher deployed within the cluster.
Cluster 2, running UCP 3.0.x or higher, with no MSR node.
Nodes on Cluster 2 need to trust the Certificate Authority which signed MSR’s TLS Certificate. This can be tested by logging on to a cluster 2 virtual machine and running
curl https://msr.example.com.The MSR TLS Certificate needs to be properly configured, ensuring that the Loadbalancer/Public Address field has been configured, with this address included within the certificate.
A machine with the Docker Client (CE 17.12 / EE 1803 or newer) installed, as this contains the relevant docker trust commands.
Registering MSR with a remote Mirantis Kubernetes Engine
As there is no registry running within cluster 2, by default MKE will not know where to check for trust data. Therefore, the first thing we need to do is register MSR within the remote MKE in cluster 2. When you normally install MSR, this registration process happens by default to a local MKE, or cluster 1.
Note
The registration process allows the remote MKE to get signature data from MSR, however this will not provide Single Sign On (SSO). Users on cluster 2 will not be synced with cluster 1’s MKE or MSR. Therefore when pulling images, registry authentication will still need to be passed as part of the service definition if the repository is private. See the Kubernetes example.
To add a new registry, retrieve the Certificate Authority (CA) used to
sign the MSR TLS Certificate through the MSR URL’s /ca endpoint.
$ curl -ks https://msr.example.com/ca > dtr.crt
Next, convert the MSR certificate into a JSON configuration file for registration within the MKE for cluster 2.
You can find a template of the dtr-bundle.json below. Replace the
host address with your MSR URL, and enter the contents of the MSR CA
certificate between the new line commands \n and \n.
Note
JSON Formatting
Ensure there are no line breaks between each line of the MSR CA certificate within the JSON file. Use your favorite JSON formatter for validation.
$ cat dtr-bundle.json
{
  "hostAddress": "msr.example.com",
  "caBundle": "-----BEGIN CERTIFICATE-----\n<contents of cert>\n-----END CERTIFICATE-----"
}
Now upload the configuration file to cluster 2’s MKE through the MKE API
endpoint, /api/config/trustedregistry_. To authenticate against the
API of cluster 2’s MKE, we have downloaded an MKE client bundle,
extracted it in the current directory, and will reference the keys for
authentication.
$ curl --cacert ca.pem --cert cert.pem --key key.pem \
    -X POST \
    -H "Accept: application/json" \
    -H "Content-Type: application/json" \
    -d @dtr-bundle.json \
    https://cluster2.example.com/api/config/trustedregistry_
Navigate to the MKE web interface to verify that the JSON file was imported successfully, as the MKE endpoint will not output anything. Select Admin > Admin Settings > Mirantis Secure Registry. If the registry has been added successfully, you should see the MSR listed.
Additionally, you can check the full MKE configuration
file within cluster 2’s MKE. Once downloaded, the
ucp-config.toml file should now contain a section called [registries]
$ curl --cacert ca.pem --cert cert.pem --key key.pem https://cluster2.example.com/api/ucp/config-toml > ucp-config.toml
If the new registry isn’t shown in the list, check the
ucp-controller container logs on cluster 2.
Signing an image in MSR
We will now sign an image and push this to MSR. To sign images we need a
user’s public private key pair from cluster 2. It can be found in a
client bundle, with key.pem being a private key and cert.pem
being the public key on an X.509 certificate.
First, load the private key into the local Docker trust store
(~/.docker/trust). The name used here is purely metadata to help
keep track of which keys you have imported.
$ docker trust key load --name cluster2admin key.pem
Loading key from "key.pem"...
Enter passphrase for new cluster2admin key with ID a453196:
Repeat passphrase for new cluster2admin key with ID a453196:
Successfully imported key from key.pem
Next initiate the repository, and add the public key of cluster 2’s user as a signer. You will be asked for a number of passphrases to protect the keys. Keep note of these passphrases, and see [Docker Content Trust documentation] (/engine/security/trust/trust_delegation/#managing-delegations-in-a-notary-server) to learn more about managing keys.
$ docker trust signer add --key cert.pem cluster2admin msr.example.com/admin/trustdemo
Adding signer "cluster2admin" to msr.example.com/admin/trustdemo...
Initializing signed repository for msr.example.com/admin/trustdemo...
Enter passphrase for root key with ID 4a72d81:
Enter passphrase for new repository key with ID dd4460f:
Repeat passphrase for new repository key with ID dd4460f:
Successfully initialized "msr.example.com/admin/trustdemo"
Successfully added signer: cluster2admin to msr.example.com/admin/trustdemo
Finally, sign the image tag. This pushes the image up to MSR, as well as signs the tag with the user from cluster 2’s keys.
$ docker trust sign msr.example.com/admin/trustdemo:1
Signing and pushing trust data for local image msr.example.com/admin/trustdemo:1, may overwrite remote trust data
The push refers to repository [dtr.olly.dtcntr.net/admin/trustdemo]
27c0b07c1b33: Layer already exists
aa84c03b5202: Layer already exists
5f6acae4a5eb: Layer already exists
df64d3292fd6: Layer already exists
1: digest: sha256:37062e8984d3b8fde253eba1832bfb4367c51d9f05da8e581bd1296fc3fbf65f size: 1153
Signing and pushing trust metadata
Enter passphrase for cluster2admin key with ID a453196:
Successfully signed msr.example.com/admin/trustdemo:1
Within the MSR web interface, you should now be able to see your newly pushed tag with the Signed text next to the size.
You could sign this image multiple times if required, whether it’s multiple teams from the same cluster wanting to sign the image, or you integrating MSR with more remote MKEs so users from clusters 1, 2, 3, or more can all sign the same image.
Troubleshooting
If the image is stored in a private repository within MSR, you need to pass credentials to the Orchestrator as there is no SSO between cluster 2 and MSR. See the relevant Kubernetes documentation for more details.
Example Errors
Image or trust data does not exist
image or trust data does not exist for msr.example.com/admin/trustdemo:1
This means something went wrong when initiating the repository or signing the image, as the tag contains no signing data.
Image did not meet required signing policy
Error response from daemon: image did not meet required signing policy

msr.example.com/admin/trustdemo:1: image did not meet required signing policy
This means that the image was signed correctly, however the user who signed the image does not meet the signing policy in cluster 2. This could be because you signed the image with the wrong user keys.
MSR URL must be a registered trusted registry
Error response from daemon: msr.example.com must be a registered trusted registry. See 'docker run --help'.
This means you have not registered MSR to work with a remote MKE instance yet, as outlined in Registering MSR with a remote Mirantis Kubernetes Engine.
Manage jobs
Job queue
Mirantis Secure Registry (MSR) uses a job queue to schedule batch jobs. Jobs are added to a cluster-wide job queue, and then consumed and executed by a job runner within MSR.
All MSR replicas have access to the job queue, and have a job runner component that can get and execute work.
How it works
When a job is created, it is added to a cluster-wide job queue and
enters the waiting state. When one of the MSR replicas is ready to
claim the job, it waits a random time of up to 3 seconds to give
every replica the opportunity to claim the task.
A replica claims a job by adding its replica ID to the job. That way,
other replicas will know the job has been claimed. Once a replica claims
a job, it adds that job to an internal queue, which in turn sorts the
jobs by their scheduledAt time. Once that happens, the replica
updates the job status to running, and starts executing it.
The job runner component of each MSR replica keeps a
heartbeatExpiration entry on the database that is shared by all
replicas. If a replica becomes unhealthy, other replicas notice the
change and update the status of the failing worker to dead. Also,
all the jobs that were claimed by the unhealthy replica enter the
worker_dead state, so that other replicas can claim the job.
Job types
MSR runs periodic and long-running jobs. The following is a complete list of jobs you can filter for via the user interface or the API.
Job status
Jobs can have one of the following status values:
Audit jobs with the web interface
As of DTR 2.2, admins were able to view and audit jobs within the software using the API. MSR 2.6 enhances those capabilities by adding a Job Logs tab under System settings on the user interface. The tab displays a sortable and paginated list of jobs along with links to associated job logs.
Prerequisite
Job Queue
View jobs list
To view the list of jobs within MSR, do the following:
Navigate to
https://<msr-url>and log in with your MKE credentials.Select System from the left-side navigation panel, and then click Job Logs. You should see a paginated list of past, running, and queued jobs. By default, Job Logs shows the latest
10jobs on the first page.Specify a filtering option. Job Logs lets you filter by:
Action
Worker ID (the ID of the worker in an MSR replica that is responsible for running the job)
Optional: Click Edit Settings on the right of the filtering options to update your Job Logs settings.
Job details
The following is an explanation of the job-related fields displayed in
Job Logs and uses the filtered online_gc action from above.
View job-specific logs
To view the log details for a specific job, do the following:
Click View Logs next to the job’s Last Updated value. You will be redirected to the log detail page of your selected job.
Notice how the job
IDis reflected in the URL while theActionand the abbreviated form of the jobIDare reflected in the heading. Also, the JSON lines displayed are job-specific MSR container logs.Enter or select a different line count to truncate the number of lines displayed. Lines are cut off from the end of the logs.
Audit jobs with the API
Overview
This covers troubleshooting batch jobs via the API and was introduced in DTR 2.2. Starting in MSR 2.6, admins have the ability to audit jobs using the web interface.
Prerequisite
Job Queue
Job capacity
Each job runner has a limited capacity and will not claim jobs that
require a higher capacity. You can see the capacity of a job runner via
the GET /api/v0/workers endpoint:
{
  "workers": [
    {
      "id": "000000000000",
      "status": "running",
      "capacityMap": {
        "scan": 1,
        "scanCheck": 1
      },
      "heartbeatExpiration": "2017-02-18T00:51:02Z"
    }
  ]
}
This means that the worker with replica ID 000000000000 has a
capacity of 1 scan and 1 scanCheck. Next, review the list of
available jobs:
{
  "jobs": [
    {
      "id": "0",
      "workerID": "",
      "status": "waiting",
      "capacityMap": {
        "scan": 1
      }
    },
    {
       "id": "1",
       "workerID": "",
       "status": "waiting",
       "capacityMap": {
         "scan": 1
       }
    },
    {
     "id": "2",
      "workerID": "",
      "status": "waiting",
      "capacityMap": {
        "scanCheck": 1
      }
    }
  ]
}
If worker 000000000000 notices the jobs in waiting state above,
then it will be able to pick up jobs 0 and 2 since it has the
capacity for both. Job 1 will have to wait until the previous scan
job, 0, is completed. The job queue will then look like:
{
  "jobs": [
    {
      "id": "0",
      "workerID": "000000000000",
      "status": "running",
      "capacityMap": {
        "scan": 1
      }
    },
    {
       "id": "1",
       "workerID": "",
       "status": "waiting",
       "capacityMap": {
         "scan": 1
       }
    },
    {
     "id": "2",
      "workerID": "000000000000",
      "status": "running",
      "capacityMap": {
        "scanCheck": 1
      }
    }
  ]
}
You can get a list of jobs via the GET /api/v0/jobs/ endpoint. Each
job looks like:
{
    "id": "1fcf4c0f-ff3b-471a-8839-5dcb631b2f7b",
    "retryFromID": "1fcf4c0f-ff3b-471a-8839-5dcb631b2f7b",
    "workerID": "000000000000",
    "status": "done",
    "scheduledAt": "2017-02-17T01:09:47.771Z",
    "lastUpdated": "2017-02-17T01:10:14.117Z",
    "action": "scan_check_single",
    "retriesLeft": 0,
    "retriesTotal": 0,
    "capacityMap": {
          "scan": 1
    },
    "parameters": {
          "SHA256SUM": "1bacd3c8ccb1f15609a10bd4a403831d0ec0b354438ddbf644c95c5d54f8eb13"
    },
    "deadline": "",
    "stopTimeout": ""
}
The JSON fields of interest here are:
id: The ID of the jobworkerID: The ID of the worker in an MSR replica that is running this jobstatus: The current state of the jobaction: The type of job the worker will actually performcapacityMap: The available capacity a worker needs for this job to run
Cron jobs
Several of the jobs performed by MSR are run in a recurrent schedule.
You can see those jobs using the GET /api/v0/crons endpoint:
{
  "crons": [
    {
      "id": "48875b1b-5006-48f5-9f3c-af9fbdd82255",
      "action": "license_update",
      "schedule": "57 54 3 * * *",
      "retries": 2,
      "capacityMap": null,
      "parameters": null,
      "deadline": "",
      "stopTimeout": "",
      "nextRun": "2017-02-22T03:54:57Z"
    },
    {
      "id": "b1c1e61e-1e74-4677-8e4a-2a7dacefffdc",
      "action": "update_db",
      "schedule": "0 0 3 * * *",
      "retries": 0,
      "capacityMap": null,
      "parameters": null,
      "deadline": "",
      "stopTimeout": "",
      "nextRun": "2017-02-22T03:00:00Z"
    }
  ]
}
The schedule field uses a cron expression following the
(seconds) (minutes) (hours) (day of month) (month) (day of week)
format. For example, 57 54 3 * * * with cron ID
48875b1b-5006-48f5-9f3c-af9fbdd82255 will be run at 03:54:57 on
any day of the week or the month, which is 2017-02-22T03:54:57Z in
the example JSON response above.
Enable auto-deletion of job logs
Mirantis Secure Registry has a global setting for auto-deletion of job logs which allows them to be removed as part of garbage collection. MSR admins can enable auto-deletion of repository events in MSR 2.6 based on specified conditions which are covered below.
In your browser, navigate to
https://<msr-url>and log in with your MKE credentials.Select System on the left-side navigation panel, which will display the Settings page by default.
Scroll down to Job Logs and turn on Auto-Deletion.
Specify the conditions with which a job log auto-deletion will be triggered.
MSR allows you to set your auto-deletion conditions based on the following optional job log attributes:
Name
Description
Example
Age
Lets you remove job logs which are older than your specified number of hours, days, weeks or months
2 monthsMax number of events
Lets you specify the maximum number of job logs allowed within MSR.
100If you check and specify both, job logs will be removed from MSR during garbage collection if either condition is met. You should see a confirmation message right away.
Click Start Deletion if you’re ready. Read more about Garbage collection if you’re unsure about this operation.
Navigate to System > Job Logs to confirm that
onlinegc_joblogshas started.
Note
When you enable auto-deletion of job logs, the logs will be permanently deleted during garbage collection.
Manage users
Create and manage teams
You can extend a user’s default permissions by granting them individual permissions in other image repositories, by adding the user to a team. A team defines the permissions a set of users have for a set of repositories.
To create a new team, go to the MSR web UI, and navigate to the Organizations page. Then click the organization where you want to create the team.
Navigate to the Teams tab, click the New team button, and give the team a name.
Add users to a team
Once you have created a team, click the team name, to manage its settings. The first thing we need to do is add users to the team. Click the Add Member button and add users to the team.
Manage team permissions
The next step is to define the permissions this team has for a set of repositories. Navigate to the Repositories tab, and click the Add repository button.
Choose the repositories this team has access to, and what permission levels the team members have.
Three permission levels are available:
Permission level |
Description |
|---|---|
Read only |
View repository and pull images. |
Read & Write |
View repository, pull and push images. |
Admin |
Manage repository and change its settings, pull and push images. |
Delete a team
If you’re an organization owner, you can delete a team in that organization. Navigate to the Team, choose the Settings tab, and click Delete.
Create and manage organizations
When a user creates a repository, only that user has permissions to make changes to the repository.
For team workflows, where multiple users have permissions to manage a set of common repositories, create an organization. By default, MSR has one organization called ‘docker-datacenter’, that is shared between MSR and MKE.
To create a new organization, navigate to the MSR web UI, and go to the Organizations page.
Click the New organization button, and choose a meaningful name for the organization.
Repositories owned by this organization will contain the organization name, so to pull an image from that repository, you’ll use:
docker pull <msr-domain-name>/<organization>/<repository>:<tag>
Click Save to create the organization, and then click the organization to define which users are allowed to manage this organization. These users will be able to edit the organization settings, edit all repositories owned by the organization, and define the user permissions for this organization.
For this, click the Add user button, select the users that you want to grant permissions to manage the organization, and click Save. Then change their permissions from ‘Member’ to Org Owner.
Permission levels
Mirantis Secure Registry allows you to define fine-grain permissions over image repositories.
Administrators
Users are shared across MKE and MSR. When you create a new user in Mirantis Kubernetes Engine, that user becomes available in MSR and vice versa. When you create a trusted admin in MSR, the admin has permissions to manage:
Users across MKE and MSR
MSR repositories and settings
MKE resources and settings
Team permission levels
With Teams you can define the repository permissions for a set of users (read, read-write, and admin).
Repository operation |
read |
read-write |
admin |
|---|---|---|---|
View/browse |
x |
x |
x |
Pull |
x |
x |
x |
Push |
x |
x |
|
Start a scan |
x |
x |
|
Delete tags |
x |
x |
|
Edit description |
x |
||
Set public or private |
x |
||
Manage user access |
x |
||
Delete repository |
x |
Note
Team permissions are additive. When a user is a member of multiple teams, they have the highest permission level defined by those teams.
Overall permissions
Permission level |
Description |
|---|---|
Anonymous or unauthenticated Users |
Can search and pull public repositories. |
Authenticated Users |
Can search and pull public repos, and create and manage their own repositories. |
Team Member |
Everything a user can do, plus the permissions granted by the team the user is a member of.. |
Organization Owner |
Can manage repositories and teams for the organization. |
Admin |
Can manage anything across MKE and MSR. |
Manage webhooks
You can configure MSR to automatically post event notifications to a webhook URL of your choosing. This lets you build complex CI and CD pipelines with your Docker images.
Webhook types
To subscribe to the webhook events for a repository or namespace you must have admin rights for the particular component. For example, a “foo/bar” repository admin may subscribe to its tag push events, whereas an MSR admin can subscribe to any event.
Event type |
Scope |
Access level |
Availability |
|---|---|---|---|
Tag pushed to repository
TAG_PUSH |
Individual repositories |
Repository admin |
Web UI and API |
Tag pulled from repository
TAG_PULL |
Individual repositories |
Repository admin |
Web UI and API |
Tag deleted from repository
TAG_DELETE |
Individual repositories |
Repository admin |
Web UI and API |
Manifest pushed to repository
MANIFEST_PUSH |
Individual repositories |
Repository admin |
Web UI and API |
Manifest pulled from repository
MANIFEST_PULL |
Individual repositories |
Repository admin |
Web UI and API |
Manifest deleted from repository
MANIFEST_DELETE |
Individual repositories |
Repository admin |
Web UI and API |
Security scan completed
SCAN_COMPLETED |
Individual repositories |
Repository admin |
Web UI and API |
Security scan failed
SCAN_FAILED |
Individual repositories |
Repository admin |
Web UI and API |
Image promoted from repository
PROMOTION |
Individual repositories |
Repository admin |
Web UI and API |
Image mirrored from repository
PUSH_MIRRORING |
Individual repositories |
Repository admin |
Web UI and API |
Image mirrored from remote repository
POLL_MIRRORING |
Individual repositories |
Repository admin |
Web UI and API |
Repository created, updated, or deleted
REPO_CREATEDREPO_UPDATEDREPO_DELETED |
Namespace, organizations |
Namespace, organization owners |
API only |
Security scanner update completed
SCANNER_UPDATE_COMPLETED |
Global |
MSR admin |
API only |
Manage repository webhooks using web UI
You must have admin privileges to the repository to create a webhook or edit any aspect of an existing webhook.
Create a webhook for your repository
In your browser, navigate to
https://<msr-url>and log in with your credentials.Select Repositories from the left-side navigation panel, and then click the name of the repository that you want to view. Note that you will have to click the repository name following the
/after the specific namespace for your repository.Select the Webhooks tab, and click New Webhook.
From the drop-down list, select the event that will trigger the webhook.
Set the URL that will receive the JSON payload.
Validate the integration by clicking the Test button next to the Webhook URL field. If the integration is working, you will receive a JSON payload at the URL you specified for the event type notification you selected.
Example output:
{
  "type": "TAG_PUSH",
  "createdAt": "2019-05-15T19:39:40.607337713Z",
  "contents": {
    "namespace": "foo",
    "repository": "bar",
    "tag": "latest",
    "digest": "sha256:b5bb9d8014a0f9b1d61e21e796d78dccdf1352f23cd32812f4850b878ae4944c",
    "imageName": "foo/bar:latest",
    "os": "linux",
    "architecture": "amd64",
    "author": "",
    "pushedAt": "2015-01-02T15:04:05Z"
  },
  "location": "/repositories/foo/bar/tags/latest"
}
Expand guilabel:Show advanced settings.
Paste the TLS certificate associated with your webhook URL into the TLS Cert field.
Note
For testing purposes, you can test your TLS certificate over HTTP rather than HTTPS.
Click Create to save the webhook. Once saved, your webhook is active and starts sending POST notifications whenever your selected event type is triggered.
As a repository admin, you can add or delete a webhook at any point. Additionally, you can create, view, and delete webhooks for your organization or trusted registry using the API.
Manage repository webhooks using API
Triggering notifications
Refer to Webhook types for a list of events that can trigger notifications through the API.
From the MSR web interface, click API on the bottom left-side navigation panel to explore the API resources and endpoints. Click Execute to send your API request. Your MSR hostname serves as the base URL for your API requests.
API curl requests
Use curl to send HTTP or HTTPS API requests. Note that you must
specify skipTLSVerification: true on your request to test the
webhook endpoint over HTTP.
Example curl request:
curl -u test-user:$TOKEN -X POST "https://msr-example.com/api/v0/webhooks" -H "accept: application/json" -H "content-type: application/json" -d "{ \"endpoint\": \"https://webhook.site/441b1584-949d-4608-a7f3-f240bdd31019\", \"key\": \"maria-testorg/lab-words\", \"skipTLSVerification\": true, \"type\": \"TAG_PULL\"}"
Example JSON response:
{
  "id": "b7bf702c31601efb4796da59900ddc1b7c72eb8ca80fdfb1b9fecdbad5418155",
  "type": "TAG_PULL",
  "key": "maria-testorg/lab-words",
  "endpoint": "https://webhook.site/441b1584-949d-4608-a7f3-f240bdd31019",
  "authorID": "194efd8e-9ee6-4d43-a34b-eefd9ce39087",
  "createdAt": "2019-05-22T01:55:20.471286995Z",
  "lastSuccessfulAt": "0001-01-01T00:00:00Z",
  "inactive": false,
  "tlsCert": "",
  "skipTLSVerification": true
}
Subscribe to events
To subscribe to events, send a POST request to /api/v0/webhooks
with the following JSON payload:
Example usage:
{
  "type": "TAG_PUSH",
  "key": "foo/bar",
  "endpoint": "https://example.com"
}
You must supply a “key” to scope a particular webhook event to a repository or a namespace/organization. If you are an MSR admin, you can omit the “key”, in which case a POST event notification of the specified type will be triggered for all MSR repositories and namespaces.
Receive a payload
When your specified event type occurs, MSR will send a POST request to the given endpoint with a JSON-encoded payload that has the following wrapper:
{
  "type": "...",
  "createdAt": "2012-04-23T18:25:43.511Z",
  "contents": {...}
}
Key |
Description |
|---|---|
|
Applies to the event type received at the specified subscription endpoint. |
|
Refers to the payload of the event itself. Each event is
different, therefore the structure of the JSON object in |
Test payload subscriptions
Before subscribing to an event, you can view and test your endpoints
using fake data. To send a test payload, send a POST request to
/api/v0/webhooks/test with the following payload:
{
  "type": "...",
  "endpoint": "https://www.example.com/"
}
Change type to the event type that you want to receive. MSR will
then send an example payload to your specified endpoint. The example
payload sent is always the same.
Manage content structure using API
Comments after (//) are for informational purposes only, and the
example payloads have been clipped for brevity.
Repository event content structure
Tag push
{
  "namespace": "",    // (string) namespace/organization for the repository
  "repository": "",   // (string) repository name
  "tag": "",          // (string) the name of the tag just pushed
  "digest": "",       // (string) sha256 digest of the manifest the tag points to (e.g. "sha256:0afb...")
  "imageName": "",    // (string) the fully-qualified image name including MSR host used to pull the image (e.g. 10.10.10.1/foo/bar:tag)
  "os": "",           // (string) the OS for the tag's manifest
  "architecture": "", // (string) the architecture for the tag's manifest
  "author": "",       // (string) the username of the person who pushed the tag
  "pushedAt": "",     // (string) JSON-encoded timestamp of when the push occurred
  ...
}
Tag delete
{
  "namespace": "",    // (string) namespace/organization for the repository
  "repository": "",   // (string) repository name
  "tag": "",          // (string) the name of the tag just deleted
  "digest": "",       // (string) sha256 digest of the manifest the tag points to (e.g. "sha256:0afb...")
  "imageName": "",    // (string) the fully-qualified image name including MSR host used to pull the image (e.g. 10.10.10.1/foo/bar:tag)
  "os": "",           // (string) the OS for the tag's manifest
  "architecture": "", // (string) the architecture for the tag's manifest
  "author": "",       // (string) the username of the person who deleted the tag
  "deletedAt": "",     // (string) JSON-encoded timestamp of when the delete occurred
  ...
}
Manifest push
{
  "namespace": "",    // (string) namespace/organization for the repository
  "repository": "",   // (string) repository name
  "digest": "",       // (string) sha256 digest of the manifest (e.g. "sha256:0afb...")
  "imageName": "",    // (string) the fully-qualified image name including MSR host used to pull the image (e.g. 10.10.10.1/foo/bar@sha256:0afb...)
  "os": "",           // (string) the OS for the manifest
  "architecture": "", // (string) the architecture for the manifest
  "author": "",       // (string) the username of the person who pushed the manifest
  ...
}
Manifest delete
{
  "namespace": "",    // (string) namespace/organization for the repository
  "repository": "",   // (string) repository name
  "digest": "",       // (string) sha256 digest of the manifest (e.g. "sha256:0afb...")
  "imageName": "",    // (string) the fully-qualified image name including MSR host used to pull the image (e.g. 10.10.10.1/foo/bar@sha256:0afb...)
  "os": "",           // (string) the OS for the manifest
  "architecture": "", // (string) the architecture for the manifest
  "author": "",       // (string) the username of the person who deleted the manifest
  "deletedAt": "",    // (string) JSON-encoded timestamp of when the delete occurred
  ...
}
Security scan completed
{
  "namespace": "",    // (string) namespace/organization for the repository
  "repository": "",   // (string) repository name
  "tag": "",          // (string) the name of the tag scanned
  "imageName": "",    // (string) the fully-qualified image name including MSR host used to pull the image (e.g. 10.10.10.1/foo/bar:tag)
  "scanSummary": {
    "namespace": "",          // (string) repository's namespace/organization name
    "repository": "",         // (string) repository name
    "tag": "",                // (string) the name of the tag just pushed
    "critical": 0,            // (int) number of critical issues, where CVSS >= 7.0
    "major": 0,               // (int) number of major issues, where CVSS >= 4.0 && CVSS < 7
    "minor": 0,               // (int) number of minor issues, where CVSS > 0 && CVSS < 4.0
    "last_scan_status": 0,    // (int) enum; see scan status section
    "check_completed_at": "", // (string) JSON-encoded timestamp of when the scan completed
    ...
  }
}
Security scan failed
{
  "namespace": "",    // (string) namespace/organization for the repository
  "repository": "",   // (string) repository name
  "tag": "",          // (string) the name of the tag scanned
  "imageName": "",    // (string) the fully-qualified image name including MSR host used to pull the image (e.g. 10.10.10.1/foo/bar@sha256:0afb...)
  "error": "",        // (string) the error that occurred while scanning
  ...
}
Namespace-specific event structure
Repository event (created/updated/deleted)
{
  "namespace": "",    // (string) repository's namespace/organization name
  "repository": "",   // (string) repository name
  "event": "",        // (string) enum: "REPO_CREATED", "REPO_DELETED" or "REPO_UPDATED"
  "author": "",       // (string) the name of the user responsible for the event
  "data": {}          // (object) when updating or creating a repo this follows the same format as an API response from /api/v0/repositories/{namespace}/{repository}
}
Global event structure
Security scanner update complete
{
  "scanner_version": "",
  "scanner_updated_at": "", // (string) JSON-encoded timestamp of when the scanner updated
  "db_version": 0,          // (int) newly updated database version
  "db_updated_at": "",      // (string) JSON-encoded timestamp of when the database updated
  "success": <true|false>   // (bool) whether the update was successful
  "replicas": {             // (object) a map keyed by replica ID containing update information for each replica
    "replica_id": {
      "db_updated_at": "",  // (string) JSON-encoded time of when the replica updated
      "version": "",        // (string) version updated to
      "replica_id": ""      // (string) replica ID
    },
    ...
  }
}
Security scan status codes
0: Failed. An error occurred checking an image’s layer
1: Unscanned. The image has not yet been scanned
2: Scanning. Scanning in progress
3: Pending: The image will be scanned when a worker is available
4: Scanned: The image has been scanned but vulnerabilities have not yet been checked
5: Checking: The image is being checked for vulnerabilities
6: Completed: The image has been fully security scanned
View and manage subscriptions
Comments after (//) are for informational purposes only, and the
example payloads have been clipped for brevity.
View all subscriptions
To view existing subscriptions send a GET /api/v0/webhooks request.
The response depends on your user type:
MSR admins receives every webhook configured for the MSR.
Regular users receive their current subscriptions across every namespace/organization and repository.
Example API response:
[
  {
    "id": "",        // (string): UUID of the webhook subscription
    "type": "",      // (string): webhook event type
    "key": "",       // (string): the individual resource this subscription is scoped to
    "endpoint": "",  // (string): the endpoint to send POST event notifications to
    "authorID": "",  // (string): the user ID responsible for creating the subscription
    "createdAt": "", // (string): JSON-encoded datetime when the subscription was created
  },
  ...
]
View subscriptions for a particular resource
To view the subscriptions for a resource you must first have admin rights for that resource. After which, you can send requests for all subscriptions from a particular API endpoint. The response will include data for all resource users.
To view all webhook subscriptions for a repository, run:
GET /api/v0/repositories/{namespace}/{repository}/webhooksTo view all webhook subscriptions for a namespace/organization, run:
GET /api/v0/repositories/{namespace}/webhooks
Delete a subscription
You can delete a subscription if you are an MSR repository admin or an admin of the resource associated with the event subscription. Regular users, however, can only delete subscriptions for the repositories they manage.
To delete a webhook subscription, send a DELETE /api/v0/webhooks/{id}
request, replacing {id} with the ID of the webhook subscription you intend
to delete.
Manage repository events
Audit repository events
Starting in DTR 2.6, each repository page includes an Activity tab which displays a sortable and paginated list of the most recent events within the repository. This offers better visibility along with the ability to audit events. Event types listed vary according to your repository permission level. Additionally, MSR admins can enable auto-deletion of repository events as part of maintenance and cleanup.
In the following section, we will show you how to view and audit the list of events in a repository. We will also cover the event types associated with your permission level.
View List of Events
As of DTR 2.3, admins were able to view a list of MSR events using the API. MSR 2.6 enhances that feature by showing a permission-based events list for each repository page on the web interface. To view the list of events within a repository, do the following:
Navigate to
https://<msr-url>and log in with your MSR credentials.Select Repositories from the left-side navigation panel, and then click on the name of the repository that you want to view. Note that you will have to click on the repository name following the
/after the specific namespace for your repository.Select the Activity tab. You should see a paginated list of the latest events based on your repository permission level. By default, Activity shows the latest
10events and excludes pull events, which are only visible to repository and MSR admins.If you’re a repository or an MSR admin, uncheck Exclude pull to view pull events. This should give you a better understanding of who is consuming your images.
To update your event view, select a different time filter from the drop-down list.
Activity Stream
The following table breaks down the data included in an event and uses
the highlighted Create Promotion Policy event as an example.
Event detail |
Description |
Example |
|---|---|---|
Label |
Friendly name of the event. |
|
Repository |
This will always be the repository in review following the
|
|
Tag |
Tag affected by the event, when applicable. |
|
SHA |
The digest value for ``CREATE` operations such as creating a new image tag or a promotion policy. |
|
Type |
Event type. Possible values are: |
|
Initiated by |
The actor responsible for the event. For user-initiated events, this
will reflect the user ID and link to that user’s profile. For image
events triggered by a policy – pruning, pull / push mirroring, or
promotion – this will reflect the relevant policy ID except for manual
promotions where it reflects |
|
Date and Time |
When the event happened in your configured time zone. |
|
Event Audits
Given the level of detail on each event, it should be easy for MSR and security admins to determine what events have taken place inside of MSR. For example, when an image which shouldn’t have been deleted ends up getting deleted, the security admin can determine when and who initiated the deletion.
Event Permissions
Repository event |
Description |
Minimum permission level |
|---|---|---|
Push |
Refers to |
Authenticated users |
Scan |
Requires security scanning to be set
up by an MSR admin.
Once enabled, this will display as a |
Authenticated users |
Promotion |
Refers to a |
Repository admin |
Delete |
Refers to “Delete Tag” events. Learn more about Delete images. |
Authenticated users |
Pull |
Refers to “Get Tag” events. Learn more about Pull an image. |
Repository admin |
Mirror |
Refers to |
Repository admin |
Create repo |
Refers to |
Authenticated users |
Where to go next
Enable Auto-Deletion of Repository Events
Mirantis Secure Registry has a global setting for repository event auto-deletion. This allows event records to be removed as part of garbage collection. MSR administrators can enable auto-deletion of repository events in DTR 2.6 based on specified conditions which are covered below.
In your browser, navigate to
https://<msr-url>and log in with your admin credentials.Select System from the left-side navigation panel, which displays the Settings page by default.
Scroll down to Repository Events and turn on Auto-Deletion.
Specify the conditions with which an event auto-deletion will be triggered.
MSR allows you to set your auto-deletion conditions based on the following optional repository event attributes:
Name |
Description |
Example |
|---|---|---|
Age |
Lets you remove events older than your specified number of hours, days, weeks or months. |
|
Max number of events |
Lets you specify the maximum number of events allowed in the repositories. |
|
If you check and specify both, events in your repositories will be removed during garbage collection if either condition is met. You should see a confirmation message right away.
Click Start Deletion if you are ready.
Navigate to System > Job Logs to confirm that
onlinegc_eventshas happened.
Where to go next
Promotion policies and monitoring
Promotion policies overview
Mirantis Secure Registry allows you to automatically promote and mirror images based on a policy. In MSR 2.7, you have the option to promote applications with the experimental docker app CLI addition. Note that scanning-based promotion policies do not take effect until all application-bundled images have been scanned. This way you can create a Docker-centric development pipeline.
You can mix and match promotion policies, mirroring policies, and webhooks to create flexible development pipelines that integrate with your existing CI/CD systems.
Promote an image using policies
One way to create a promotion pipeline is to automatically promote images to another repository.
You start by defining a promotion policy that’s specific to a repository. When someone pushes an image to that repository, MSR checks if it complies with the policy you set up and automatically pushes the image to another repository.
Learn how to promote an image using policies.
Mirror images to another registry
You can also promote images between different MSR deployments. This not only allows you to create promotion policies that span multiple MSRs, but also allows you to mirror images for security and high availability.
You start by configuring a repository with a mirroring policy. When someone pushes an image to that repository, MSR checks if the policy is met, and if so pushes it to another MSR deployment or Docker Hub.
Learn how to mirror images to another registry.
Mirror images from another registry
Another option is to mirror images from another MSR deployment. You configure a repository to poll for changes in a remote repository. All new images pushed into the remote repository are then pulled into MSR.
This is an easy way to configure a mirror for high availability since you won’t need to change firewall rules that are in place for your environments.
Promote an image using policies
Mirantis Secure Registry allows you to create image promotion pipelines based on policies.
In this example we will create an image promotion pipeline such that:
Developers iterate and push their builds to the
dev/websiterepository.When the team creates a stable build, they make sure their image is tagged with
-stable.When a stable build is pushed to the
dev/websiterepository, it will automatically be promoted toqa/websiteso that the QA team can start testing.
With this promotion policy, the development team doesn’t need access to the QA repositories, and the QA team doesn’t need access to the development repositories.
Configure your repository
Once you’ve created a repository, navigate to the repository page on the MSR web interface, and select the Promotions tab.
Note
Only administrators can globally create and edit promotion policies. By default users can only create and edit promotion policies on repositories within their user namespace.
Click New promotion policy, and define the image promotion criteria.
MSR allows you to set your promotion policy based on the following image attributes:
Now you need to choose what happens to an image that meets all the criteria.
Select the target organization or namespace and repository where the image is going to be pushed. You can choose to keep the image tag, or transform the tag into something more meaningful in the destination repository, by using a tag template.
In this example, if an image in the dev/website is tagged with a
word that ends in “stable”, MSR will automatically push that image to
the qa/website repository. In the destination repository the image
will be tagged with the timestamp of when the image was promoted.
Everything is set up! Once the development team pushes an image that
complies with the policy, it automatically gets promoted. To confirm,
select the Promotions tab on the dev/website repository.
You can also review the newly pushed tag in the target repository by
navigating to qa/website and selecting the Tags tab.
Where to go next
Mirror images to another registry
Mirantis Secure Registry allows you to create mirroring policies for a repository. When an image gets pushed to a repository and meets the mirroring criteria, MSR automatically pushes it to a repository in a remote Mirantis Secure Registry or Hub registry.
This not only allows you to mirror images but also allows you to create image promotion pipelines that span multiple MSR deployments and datacenters.
Available since MSR 3.1.8
Similarly, Helm charts can also be mirrored between MSR instances. This capability ensures consistent availability and management of Helm charts across multiple MSR environments. Furthermore, Helm charts can be mirrored and pushed to Docker Hub repositories, which enables integration with external sources.
Create a mirroring policy
In this example we will create an image mirroring policy such that:
Developers iterate and push their builds to
msr-example.com/dev/websitethe repository in the MSR deployment dedicated to development.When the team creates a stable build, they make sure their image is tagged with
-stable.When a stable build is pushed to
msr-example.com/dev/website, it will automatically be pushed toqa-example.com/qa/website, mirroring the image and promoting it to the next stage of development.
With this mirroring policy, the development team does not need access to the QA cluster, and the QA team does not need access to the development cluster.
You need to have permissions to push to the destination repository in order to set up the mirroring policy.
Configure your repository connection
Once you have created a repository, navigate to the repository page on the web interface, and select the Mirrors tab.
Click New mirror to define where the image will be pushed if it meets the mirroring criteria.
Under Mirror direction, choose Push to remote registry. Specify the following details:
Field |
Description |
|---|---|
Registry type |
You can choose between Mirantis Secure Registry and
Docker Hub. If you choose MSR, enter your MSR URL.
Otherwise, Docker Hub defaults to
|
Username and password or access token |
Your credentials in the remote repository you wish to push to. To use an access token instead of your password, see authentication token. |
Repository |
Enter the |
Show advanced settings |
Enter the TLS details for the remote repository or check
Skip TLS verification. If the MSR remote repository is
using self-signed TLS certificates or certificates signed by your own
certificate authority, you also need to provide the public key
certificate for that CA. You can retrieve the certificate by accessing
|
Note
Make sure the account you use for the integration has permissions to write to the remote repository.
Click Connect to test the integration.
In this example, the image gets pushed to the qa/example repository
of an MSR deployment available at qa-example.com using a service
account that was created just for mirroring images between repositories.
Next, set your push triggers. MSR allows you to set your mirroring policy based on the following image attributes:
Name |
Description |
Example |
|---|---|---|
Tag name |
Whether the tag name equals, starts with, ends with, contains, is one of, or is not one of your specified string values |
Copy image to remote repository if Tag name ends in |
Component |
Whether the image has a given component and the component name equals, starts with, ends with, contains, is one of, or is not one of your specified string values |
Copy image to remote repository if Component name starts with |
Vulnerabilities |
Whether the image has vulnerabilities – critical, major, minor, or all – and your selected vulnerability filter is greater than or equals, greater than, equals, not equals, less than or equals, or less than your specified number |
Copy image to remote repository if Critical vulnerabilities = |
License |
Whether the image uses an intellectual property license and is one of or not one of your specified words |
Copy image to remote repository if License name = |
You can choose to keep the image tag, or transform the tag into something more meaningful in the remote registry by using a tag template.
In this example, if an image in the dev/website repository is tagged
with a word that ends in stable, MSR will automatically push that
image to the MSR deployment available at qa-example.com. The image
is pushed to the qa/example repository and is tagged with the
timestamp of when the image was promoted.
Everything is set up! Once the development team pushes an image that
complies with the policy, it automatically gets promoted to
qa/example in the remote trusted registry at qa-example.com.
Metadata persistence
When an image is pushed to another registry using a mirroring policy, scanning and signing data is not persisted in the destination repository.
If you have scanning enabled for the destination repository, MSR is going to scan the image pushed. If you want the image to be signed, you need to do it manually.
Where to go next
Mirror images from another registry
Mirantis Secure Registry allows you to set up a mirror of a repository by constantly polling it and pulling new image tags as they are pushed. This ensures your images are replicated across different registries for high availability. It also makes it easy to create a development pipeline that allows different users access to a certain image without giving them access to everything in the remote registry.
To mirror a repository, start by creating a repository in the MSR deployment that will serve as your mirror. Previously, you were only able to set up pull mirroring from the API. Starting in DTR 2.6, you can also mirror and pull from a remote MSR or Docker Hub repository.
Available since MSR 3.1.8
In addition to mirroring images, Helm charts can also be mirrored between MSR instances. This capability ensures consistent availability and management of Helm charts across multiple MSR environments. Furthermore, MSR supports the mirroring and pulling of Helm charts from Docker Hub repositories, which enables integration with external sources.
Pull mirroring on the web interface
To get started, navigate to https://<msr-url> and log in with your
MKE credentials.
Select Repositories in the left-side navigation panel, and then
click on the name of the repository that you want to view. Note that you will
have to click on the repository name following the / after the specific
namespace for your repository.
Next, select the Mirrors tab and click New mirror. On the New mirror page, choose Pull from remote registry.
Specify the following details:
Field |
Description |
|---|---|
Registry type |
You can choose between Mirantis Secure Registry and
Docker Hub. If you choose MSR, enter your MSR URL.
Otherwise, Docker Hub defaults to
|
Username and password or access token |
Your credentials in the remote repository you wish to poll from. To use an access token instead of your password, see authentication token. |
Repository |
Enter the |
Show advanced settings |
Enter the TLS details for the remote repository or check
|
After you have filled out the details, click Connect to test the integration.
Once you have successfully connected to the remote repository, new buttons appear:
Click Save to mirror future tag, or;
To mirror all existing and future tags, click Save & Apply instead.
Pull mirroring on the API
There are a few different ways to send your MSR API requests. To explore the different API resources and endpoints from the web interface, click API on the bottom left-side navigation panel.
Search for the endpoint:
POST /api/v0/repositories/{namespace}/{reponame}/pollMirroringPolicies
Click Try it out and enter your HTTP request details.
namespace and reponame refer to the repository that will be poll
mirrored. The boolean field, initialEvaluation, corresponds to
Save when set to false and will only mirror images created
after your API request. Setting it to true corresponds to
Save & Apply which means all tags in the remote repository will
be evaluated and mirrored. The other body parameters correspond to the
relevant remote repository details that you can see on the MSR web
interface. As a best practice,
use a service account just for this purpose. Instead of providing the
password for that account, you should pass an authentication
token.
If the MSR remote repository is using self-signed certificates or
certificates signed by your own certificate authority, you also need to
provide the public key certificate for that CA. You can get it by
accessing https://<msr-domain>/ca. The remoteCA field is
optional for mirroring a Docker Hub repository.
Click Execute. On success, the API returns an HTTP 201
response.
Review the poll mirror job log
Once configured, the system polls for changes in the remote repository
and runs the poll_mirror job every 15 minutes. On success, the
system will pull in new images and mirror them in your local repository.
Starting in DTR 2.6, you can filter for poll_mirror jobs to review
when it was last ran. To manually trigger the job and force pull
mirroring, use the POST /api/v0/jobs API endpoint and specify
poll_mirror as your action.
curl -X POST "https:/<msr-url>/api/v0/jobs" -H "accept: application/json" -H "content-type: application/json" -d "{ \"action\": \"poll_mirror\"}"
See Manage jobs to learn more about job management within MSR.
Where to go next
Template reference
When defining promotion policies you can use templates to dynamically name the tag that is going to be created.
Important
Whenever an image promotion event occurs, the MSR timestamp for the event is in UTC (Coordinated Universal Time). That timestamp, however, is converted by the browser and presents in the user’s time zone. Inversely, if a time-based tag is applied to a target image, MSR captures it in UTC but cannot convert it to the user’s timezone due to the tags being immutable strings.
You can use these template keywords to define your new tag:
Template |
Description |
Example result |
|---|---|---|
|
The tag to promote |
1, 4.5, latest |
|
Day of the week |
Sunday, Monday |
|
Day of the week, abbreviated |
Sun, Mon, Tue |
|
Day of the week, as a number |
0, 1, 6 |
|
Number for the day of the month |
01, 15, 31 |
|
Month |
January, December |
|
Month, abbreviated |
Jan, Jun, Dec |
|
Month, as a number |
01, 06, 12 |
|
Year |
1999, 2015, 2048 |
|
Year, two digits |
99, 15, 48 |
|
Hour, in 24 hour format |
00, 12, 23 |
|
Hour, in 12 hour format |
01, 10, 10 |
|
Period of the day |
AM, PM |
|
Minute |
00, 10, 59 |
|
Second |
00, 10, 59 |
|
Microsecond |
000000, 999999 |
|
Name for the timezone |
UTC, PST, EST |
|
Day of the year |
001, 200, 366 |
|
Week of the year |
00, 10, 53 |
Use Helm charts
Helm is a tool that manages Kubernetes packages called charts, which are
put to use in defining, installing, and upgrading Kubernetes applications.
These charts, in conjunction with Helm tooling, deploy applications
into Kubernetes clusters. Charts are comprised of a collection of files and
directories, arranged in a particular structure and packaged as a .tgz
file. Charts define Kubernetes objects, such as the Service
and DaemonSet objects used in the application under deployment.
MSR enables you to use Helm to store and serve Helm charts, thus allowing users to push charts to and pull charts from MSR repositories using the Helm CLI and the MSR API.
Available since MSR 3.1.8
Helm charts can be mirrored between MSR instances, thus ensuring consistent availability and management across multiple environments. Furthermore, MSR supports the pulling and pushing of Helm charts between its instances, as well as the mirroring of Helm charts between MSR and external repositories, such as Docker Hub.
Note
To obtain the CA certificate required by the Helm charts commands, navigate
to https://<msr-url>/ca and download the certificate, or run:
curl -sk https://<msr-url>/ca > ca.crt
MSR supports both Helm v2 and v3. The two versions differ significantly with regard to the Helm CLI, which affects the applications under deployment rather than Helm chart support in MSR. One key difference is that while Helm v2 includes both the Helm CLI and Tiller (Helm Server), Helm v3 includes only the Helm CLI. Helm charts (referred to as releases following their installation in Kubernetes) are managed by Tiller in Helm v2 and by Helm CLI in Helm v3.
Note
For a breakdown of the key differences between Helm v2 and Helm v3, refer to Helm official documentation.
Add a Helm chart repository
Users can add a Helm chart repository to MSR through the MSR web UI.
Login to the MSR web UI.
Click Repositories in the navigation menu.
Click New repository.
In the name field, enter the name for the new repository and click Create.
To add the new MSR repository as a Helm repository:
helm repo add <reponame> https://<msrhost>/charts/<namespace>/<reponame> --username <username> --password <password> --ca-file ca.crt

"<reponame>" has been added to your repositories
To verify that the new MSR Helm repository has been added:
helm repo list

NAME        URL
<reponame>  https://<msrhost>/charts/<namespace>/<reponame>
Pull charts and their provenance files
Helm charts can be pulled from MSR Helm repositories using either the MSR API or the Helm CLI.
Pull with the MSR API
Note
Though the MSR API can be used to pull both Helm charts and provenance files, it is not possible to use it to pull both at the same time.
Pull a chart
To pull a Helm chart:
curl -u <username>:<password> \
  --request GET https://<msrhost>/charts/<namespace>/<reponame>/<chartname>/<chartname>-<chartversion>.tgz \
  -H "accept: application/octet-stream" \
  -o <chartname>-<chartversion>.tgz \
  --cacert ca.crt
Pull a provenance file
To pull a provenance file:
curl -u <username>:<password> \
  --request GET https://msrhost/charts/<namespace>/<reponame>/<chartname>/<chartname>-<chartversion>.tgz.prov \
  -H "accept: application/octet-stream" \
  -o <chartname>-<chartversion>.tgz.prov \
  --cacert ca.crt
Pull with the Helm CLI
Note
Though the Helm CLI can be used to pull a Helm chart by itself or a Helm chart and its provenance file, it is not possible to use the Helm CLI to pull a provenance file by itself.
Pull a chart
Use the helm pull CLI command to pull a Helm chart:
helm pull <reponame>/<chartname> --version <chartversion>
ls
ca.crt  <chartname>-<chartversion>.tgz
Alternatively, use the following command:
helm pull https://<msrhost>/charts/<namespace>/<reponame>/<chartname>/<chartname>-<chartversion>.tgz --username <username> --password <password> --ca-file ca.crt
Pull a chart and a provenance file in tandem
Use the helm pull CLI command with the --prov option to pull a Helm
chart and a provenance file at the same time:
helm pull <reponame>/<chartname> --version <chartversion> --prov

ls
ca.crt  <chartname>-<chartversion>.tgz  <chartname>-<chartversion>.tgz.prov
Alternatively, use the following command:
helm pull https://<msrhost>/charts/<namespace>/<reponame>/<chartname>/<chartname>-<chartversion>.tgz --username <username> --password <password> --ca-file ca.crt --prov
Push charts and their provenance files
You can use the MSR API or the Helm CLI to push Helm charts and their provenance files to an MSR Helm repository.
Note
Pushing and pulling Helm charts can be done with or without a provenance file.
Pushing charts with the MSR API
Using the MSR API, you can push Helm charts with application/octet-stream
or multipart/form-data.
Pushing with application/octet-stream
To push a Helm chart through the MSR API with application/octet-stream:
curl -H "Content-Type:application/octet-stream" --data-binary "@<chartname>-<chartversion>.tgz" https://<msrhost>/charts/api/<namespace>/<reponame>/charts -u <username>:<password> --cacert ca.crt
Pushing with multipart/form-data
To push a Helm chart through the MSR API with multipart/form-data:
curl -F "chart=@<chartname>-<chartversion>.tgz" https://<msrhost>/charts/api/<namespace>/<reponame>/charts -u <username>:<password> --cacert ca.crt
Force pushing a chart
To overwrite an existing chart, turn off repository immutability and include a
?force query parameter in the HTTP request.
Navigate to Repositories and click the Settings tab.
Under Immutability, select Off.
To force push a Helm chart using the MSR API:
curl -H "Content-Type:application/octet-stream" --data-binary "@<chartname>-<chartversion>.tgz" "https://<msrhost>/charts/api/<namespace>/<reponame>/charts?force" -u <username>:<password> --cacert ca.crt
Pushing provenance files with the MSR API
You can use the MSR API to separately push provenance files related to Helm charts.
To push a provenance file through the MSR API:
curl -H "Content-Type:application/json" --data-binary "@<chartname>-<chartversion>.tgz.prov" https://<msrhost>/charts/api/<namespace>/<reponame>/prov -u <username>:<password> --cacert ca.crt
Note
Attempting to push a provenance file for a nonexistent chart will result in an error.
Force pushing a provenance file
To force push a provenance file using the MSR API:
curl -H "Content-Type:application/json" --data-binary "@<chartname>-<chartversion>.tgz.prov" "https://<msrhost>/charts/api/<namespace>/<reponame>/prov?force" -u <username>:<password> --cacert ca.crt
Pushing a chart and its provenance file with a single API request
To push a Helm chart and a provenance file with a single API request:
curl -k -F "chart=@<chartname>-<chartversion>.tgz" -F "prov=@<chartname>-<chartversion>.tgz.prov" https://msrhost/charts/api/<namespace>/<reponame>/charts -u <username>:<password> --cacert ca.crt
Force pushing a chart and a provenance file
To force push both a Helm chart and a provenance file using a single API request:
curl -k -F "chart=@<chartname>-<chartversion>.tgz" -F "prov=@<chartname>-<chartversion>.tgz.prov" "https://<msrhost>/charts/api/<namespace>/<reponame>/charts?force" -u <username>:<password> --cacert ca.crt
Pushing charts with the Helm CLI
Note
To push a Helm chart using the Helm CLI, first install the helm cm-push
plugin from chartmuseum/helm-push. It is not possible to push
a provenance file using the Helm CLI. For detailed guidance on advanced
configuration options and additional parameters, consult the
plugin’s official documentation.
Use the helm push CLI command to push a Helm chart:
helm repo add <reponame> <repoURL> --username <user> --password <password>
helm cm-push <chartname>-<chartversion>.tgz <reponame>
Force pushing a chart
Use the helm cm-pus CLI command with the --force option to force push a
Helm chart:
helm repo add <reponame> <repoURL> --username <user> --password <password>
helm push <chartname>-<chartversion>.tgz <reponame> --force
View charts in a Helm repository
View charts in a Helm repository using either the MSR API or the MSR web UI.
Viewing charts with the MSR API
To view charts that have been pushed to a Helm repository using the MSR API, consider the following options:
Option |
CLI command |
|---|---|
View the index file |
curl --request GET
https://<msrhost>/charts/<namespace>/<reponame>/index.yaml -u
<username>:<password> --cacert ca.crt
|
View a paginated list of all charts |
curl --request GET
https://<msrhost>/charts/<namespace>/<reponame>/index.yaml -u
<username>:<password> --cacert ca.crt
|
View a paginated list of chart versions |
curl --request GET https://<msrhost>/charts/api/<namespace>/ \
<reponame>/charts/<chartname> -u <username>:<password> \
--cacert ca.crt
|
Describe a version of a particular chart |
curl --request GET https://<msrhost>/charts/api/<namespace>/ \
<reponame>/charts/<chartname>/<chartversion> -u \
<username>:<password> --cacert ca.crt
|
Return the default values of a version of a particular chart |
curl --request GET https://<msrhost>/charts/api/<namespace>/ \
<reponame>/charts/<chartname>/<chartversion>/values -u \
<username>:<password> --cacert ca.crt
|
Produce a template of a version of a particular chart |
curl --request GET https://<msrhost>/charts/api/<namespace>/ \
<reponame>/charts/<chartname>/<chartversion>/template -u \
<username>:<password> --cacert ca.crt
|
Viewing charts with the MSR web UI
Use the MSR web UI to view the MSR Helm repository charts.
In the MSR web UI, navigate to Repositories.
Click the name of the repository that contains the charts you want to view. The page will refresh to display the detail for the selected Helm repository.
Click the Charts tab. The page will refresh to display all the repository charts.
View |
UI sequence |
|---|---|
Chart versions |
Click the View Chart button associated with the required Helm repository. |
Chart description |
|
Default values |
|
Chart templates |
|
Delete charts from a Helm repository
You can only delete charts from MSR Helm repositories using the MSR API, not the web UI.
To delete a version of a particular chart from a Helm repository through the MSR API:
curl --request DELETE https://<msrhost>/charts/api/<namespace>/<reponame>/charts/<chartname>/<chartversion> -u <username>:<password> --cacert ca.crt
Helm chart linting
Helm chart linting can ensure that Kubernetes YAML files and Helm charts adhere to a set of best practices, with a focus on production readiness and security.
A set of established rules forms the basis of Helm chart linting. The process generates a report that you can use to take any necessary actions.
Implement Helm linting
Perform Helm linting using either the MSR web UI or the MSR API.
Helm linting with the web UI
Open the MSR web UI.
Navigate to Repositories.
Click the name of the repository that contains the chart you want to lint.
Click the Charts tab.
Click the View Chart button associated with the required Helm chart.
Click the View Chart button for the required chart version.
Click the Linting Summary tab.
Click the Lint Chart button to generate a Helm chart linting report.
Helm linting with the API
Run the Helm chart linter on a particular chart.
curl -k -H "Content-Type: application/json" --request POST "https://<msrhost>/charts/api/<namespace>/<reponame>/charts/<chartname>/<chartversion>/lint" -u <username>:<password>
Generate a Helm chart linting report.
curl -k -X GET "https://<msrhost>/charts/api/<namespace>/<reponame>/charts/<chartname>/<chartversion>/lintsummary" -u <username>:<password>
Helm chart linting rules
Helm linting reports offer the linting rules, rule descriptions, and remediation as they are presented in the following table.
Name |
Description |
Remediation |
|---|---|---|
|
Indicates when services do not have any associated deployments. |
Confirm that your service’s selector correctly matches the labels on one of your deployments. |
|
Indicates when pods use the default service account. |
Create a dedicated service account for your pod. Refer to Configure Service Accounts for Pods for details. |
|
Indicates when deployments use the deprecated |
Use the |
|
Indicates when containers do not drop |
|
|
Indicates when objects use a secret in an environment variable. |
Do not use raw secrets in environment variables. Instead, either mount
the secret as a file or use a |
|
Indicates when deployment selectors fail to match the pod template labels. |
Confirm that your deployment selector correctly matches the labels in its pod template. |
|
Indicates when deployments with multiple replicas fail to specify inter-pod anti-affinity, to ensure that the orchestrator attempts to schedule replicas on different nodes. |
Specify anti-affinity in your pod specification to ensure that the
orchestrator attempts to schedule replicas on different nodes. Using
|
|
Indicates when objects use deprecated API versions under |
Migrate using the |
|
Indicates when containers fail to specify a liveness probe. |
Specify a liveness probe in your container. Refer to Configure Liveness, Readiness, and Startup Probes for details. |
|
Indicates when containers are running without a read-only root filesystem. |
Set |
|
Indicates when containers fail to specify a readiness probe. |
Specify a readiness probe in your container. Refer to Configure Liveness, Readiness, and Startup Probes for details. |
|
Indicates when pods reference a service account that is not found. |
Create the missing service account, or refer to an existing service account. |
|
Indicates when deployments have containers running in privileged mode. |
Do not run your container as privileged unless it is required. |
|
Indicates when objects do not have an |
Add an |
|
Indicates when objects do not have an |
Add an |
|
Indicates when containers are not set to |
Set |
|
Indicates when deployments expose port 22, which is commonly reserved for SSH access. |
Ensure that non-SSH services are not using port 22. Confirm that any actual SSH servers have been vetted. |
|
Indicates when containers do not have CPU requests and limits set. |
Set CPU requests and limits for your container based on its requirements. Refer to Requests and limits for details. |
|
Indicates when containers do not have memory requests and limits set. |
Set memory requests and limits for your container based on its requirements. Refer to Requests and limits for details. |
|
Indicates when containers mount a host path as writable. |
Set containers to mount host paths as |
|
CIS Benchmark 5.1.1 Ensure that the |
Create and assign a separate role that has access to specific resources/actions needed for the service account. |
|
Alert on deployments with |
Ensure the Docker socket is not mounted inside any containers by
removing the associated |
|
Alert on services for forbidden types. |
Ensure containers are not exposed through a forbidden service type such
as |
|
Alert on pods/deployment-likes with sharing host’s IPC namespace. |
Ensure the host’s IPC namespace is not shared. |
|
Alert on pods/deployment-likes with sharing host’s network namespace. |
Ensure the host’s network namespace is not shared. |
|
Alert on pods/deployment-likes with sharing host’s process namespace. |
Ensure the host’s process namespace is not shared. |
|
Alert on containers if allowing privilege escalation that could gain more privileges than its parent process. |
Ensure containers do not allow privilege escalation by setting
|
|
Alert on deployments with privileged ports mapped in containers. |
Ensure privileged ports [ |
|
Alert on deployments with sensitive host system directories mounted in containers. |
Ensure sensitive host system directories are not mounted in containers
by removing those |
|
Alert on deployments with unsafe |
Ensure container does not unsafely exposes parts of |
|
Alert on deployments specifying unsafe |
Ensure container does not allow unsafe allocation of system resources by
removing unsafe |
Helm limitations
MSR API endpoints
For the following endpoints, note that while the Swagger API Reference does not specify example responses for HTTP 200 codes, this is due to a Swagger bug and responses will be returned.
# Get chart or provenance file from repo
GET     https://<msrhost>/charts/<namespace>/<reponame>/<chartname>/<filename>
# Template a chart version
GET     https://<msrhost>/charts/api/<namespace>/<reponame>/charts/<chartname>/<chartversion>/template
Chart storage limit
Users can safely store up to 100,000 charts per repository; storing a greater number may compromise some MSR functionality.
Tag pruning
Tag pruning is the process of cleaning up unnecessary or unwanted repository tags. As of v2.6, you can configure the Mirantis Secure Registry (MSR) to automatically perform tag pruning on repositories that you manage by:
Specifying a tag pruning policy or alternatively,
Setting a tag limit
Note
When run, tag pruning only deletes a tag and does not carry out any actual blob deletion.
Known Issue
While the tag limit field is disabled when you turn on immutability for a new repository, this is currently not the case with Repository Settings. As a workaround, turn off immutability when setting a tag limit via Repository Settings > Pruning.
In the following section, we will cover how to specify a tag pruning policy and set a tag limit on repositories that you manage. It will not include modifying or deleting a tag pruning policy.
Specify a tag pruning policy
As a repository administrator, you can now add tag pruning policies on
each repository that you manage. To get started, navigate to
https://<msr-url> and log in with your credentials.
Select Repositories in the left-side navigation panel, and then
click on the name of the repository that you want to update. Note that you will
have to click on the repository name following the / after the specific
namespace for your repository.
Select the Pruning tab, and click New pruning policy to specify your tag pruning criteria:
MSR allows you to set your pruning triggers based on the following image attributes:
Name |
Description |
Example |
|---|---|---|
Tag name |
Whether the tag name equals, starts with, ends with, contains, is one of, or is not one of your specified string values |
Tag name = test` |
Component name |
Whether the image has a given component and the component name equals, starts with, ends with, contains, is one of, or is not one of your specified string values |
Component name starts with |
Vulnerabilities |
Whether the image has vulnerabilities – critical, major, minor, or all – and your selected vulnerability filter is greater than or equals, greater than, equals, not equals, less than or equals, or less than your specified number |
Critical vulnerabilities = |
License |
Whether the image uses an intellectual property license and is one of or not one of your specified words |
License name = |
Last updated at |
Whether the last image update was before your specified number of hours, days, weeks, or months. For details on valid time units, see Go’s ParseDuration function |
Last updated at: Hours = |
Specify one or more image attributes to add to your pruning criteria, then choose:
Prune future tags to save the policy and apply your selection to future tags. Only matching tags after the policy addition will be pruned during garbage collection.
Prune all tags to save the policy, and evaluate both existing and future tags on your repository.
Upon selection, you will see a confirmation message and will be redirected to your newly updated Pruning tab.
If you have specified multiple pruning policies on the repository, the Pruning tab will display a list of your prune triggers and details on when the last tag pruning was performed based on the trigger, a toggle for deactivating or reactivating the trigger, and a View link for modifying or deleting your selected trigger.
All tag pruning policies on your account are evaluated every 15 minutes. Any qualifying tags are then deleted from the metadata store. If a tag pruning policy is modified or created, then the tag pruning policy for the affected repository will be evaluated.
Set a tag limit
In addition to pruning policies, you can also set tag limits on repositories that you manage to restrict the number of tags on a given repository. Repository tag limits are processed in a first in first out (FIFO) manner. For example, if you set a tag limit of 2, adding a third tag would push out the first.
To set a tag limit, do the following:
Select the repository that you want to update and click the Settings tab.
Turn off immutability for the repository.
Specify a number in the Pruning section and click Save. The Pruning tab will now display your tag limit above the prune triggers list along with a link to modify this setting.
Image enforcement policies and monitoring
MSR users can automatically block clients from pulling images stored in the registry by configuring enforcement policies at either the global or repository level.
An enforcement policy is a collection of rules used to determine whether an image can be pulled.
A good example of a scenario in which an enforcement policy can be useful is when an administrator wants to house images in MSR but does not want those images to be pulled into environments by MSR users. In this case, the administrator would configure an enforcement policy either at the global or repository level based on a selected set of rules.
Enforcement policies: global versus repository
Global image enforcement policies differ from those set at the repository level in several important respects:
Whereas both administrators and regular users can set up enforcement policies at the repository level, only administrators can set up enforcement policies at the global level.
Only one global enforcement policy can be set for each MSR instance, whereas multiple enforcement policies can be configured at the repository level.
Global enforcement policies are evaluated prior to repository policies.
Enforcement policy rule attributes
Global and repository enforcement policies are generated from the same set of rule attributes.
Note
Images must comply with all the enforcement policy rules to be pulled.
If any rule evaluates to false, the system blocks image pull.
This requirement also applies to tags associated with an image digest.
All tags must meet all the enforcement policy rules for an image digest they
refer to.
Configure enforcement policies
Use the MSR web UI to set up enforcement policies for both repository and global enforcement.
Set up repository enforcement
Important
Users can only create and edit enforcement policies for repositories within their user namespace.
To set up a repository enforcement policy using the MSR web UI:
Log in to the MSR web UI.
Navigate to Repositories.
Select the repository to edit.
Click the Enforcement tab and select New enforcement policy.
Define the enforcement policy rules with the desired rule attributes and select Save. The screen displays the new enforcement policy in the Enforcement tab. By default, the new enforcement policy is toggled on.
Once a repository enforcement policy is set up and activated, pull requests that do not satisfy the policy rules will return the following error message:
Error response from daemon: unknown: pull access denied against
<namespace>/<reponame>: enforcement policies '<enforcement-policy-id>'
blocked request
Set up global enforcement
Important
Only administrators can set up global enforcement policies.
To set up a global enforcement policy using the MSR web UI:
Log in to the MSR web UI.
Navigate to System.
Select the Enforcement tab.
Confirm that the global enforcement function is Enabled.
Define the enforcement policy rules with the desired criteria and select Save.
Once the global enforcement policy is set up, pull requests against any repository that do not satisfy the policy rules will return the following error message:
Error response from daemon: unknown: pull access denied against
<namespace>/<reponame>: global enforcement policy blocked request
Monitor enforcement activity
Administrators and users can monitor enforcement activity in the MSR web UI.
Important
Enforcement events can only be monitored at the repository level. It is not possible, for example, to view in one location all enforcement events that correspond to the global enforcement policy.
Navigate to Repositories.
Select the repository whose enforcement activity you want to review.
Select the Activity tab to view enforcement event activity. For instance you can:
Identify which policy triggered an event using the enforcement ID displayed on the event entry. (The enforcement IDs for each enforcement policy are located on the Enforcement tab.)
Identify the user responsible for making a blocked pull request, and the time of the event.
Upgrade MSR
MSR uses semantic versioning. While downgrades are not supported, Mirantis supports upgrades according to the following rules:
When upgrading from one patch version to another, you can skip patch versions because no data migration is performed for patch versions.
When upgrading between minor versions, you cannot skip versions, however you can upgrade from any patch version of the previous minor version to any patch version of the current minor version.
When upgrading between major versions, make sure to upgrade one major version at a time - and also to upgrade to the earliest available minor version. It is strongly recommended that you first upgrade to the latest minor/patch version for your major version.
Description |
From |
To |
Supported |
|---|---|---|---|
patch upgrade |
x.y.0 |
x.y.1 |
yes |
skip patch version |
x.y.0 |
x.y.2 |
yes |
patch downgrade |
x.y.2 |
x.y.1 |
no |
minor upgrade |
x.y.* |
x.y+1.* |
yes |
skip minor version |
x.y.* |
x.y+2.* |
no |
minor downgrade |
x.y.* |
x.y-1.* |
no |
skip major version |
x.. |
x+2.. |
no |
major downgrade |
x.. |
x-1.. |
no |
major upgrade |
x.y.z |
x+1.0.0 |
yes |
major upgrade skipping minor version |
x.y.z |
x+1.y+1.z |
no |
A few seconds of interruption may occur during the upgrade of an MSR cluster, so schedule the upgrade to take place outside of peak hours to avoid any business impacts.
Minor upgrade
Important
Only perform the MSR upgrade once any correlating upgrades to Mirantis Kubernetes Engine (MKE) and/or Mirantis Container Runtime (MCR) have completed.
Mirantis recommends the following upgrade sequence:
MCR
MKE
MSR
Before starting the MSR upgrade, confirm that:
The version of MKE in use is supported by the upgrade version of MSR.
The MKE and MSR backups are both recent.
A backup of current swarm state has been created.
To create a swarm state backup, perform the following from an MKE manager node:
ENGINE=$(docker version -f '{{.Server.Version}}')
systemctl stop docker
sudo tar czvf "/tmp/swarm-${ENGINE}-$(hostname -s)-$(date +%s%z).tgz" /var/lib/docker/swarm/
systemctl start docker
(if possible) A backup exists of the images stored by MSR, if it is configured to store images on the local filesystem or within an NFS store.
BACKUP_LOCATION=/example_directory/filename
# If local filesystem
sudo tar -cf ${BACKUP_LOCATION} -C /var/lib/docker/volumes/dtr-registry-${REPLICA_ID}
# If NFS store
sudo tar -cf ${BACKUP_LOCATION} -C /var/lib/docker/volumes/dtr-registry-nfs-${REPLICA_ID}
None of the MSR replica nodes are exhibiting time drift. To make this determination, review the kernel log timestamps for each of the nodes. If time drift is occurring, use clock synchronization (e.g., NTP) to keep node clocks in sync.
Local filesystems across MSR nodes are not exhibiting any disk storage issues.
Docker Content Trust in MKE is disabled.
All system requirements are met.
Step 1. Upgrade MSR to 2.9 if necessary
Confirm that you are running MSR 2.9. If this is not the case, upgrade your installation to the latest MSR 2.9.x iteration.
Step 2. Upgrade MSR
Pull the latest version of MSR:
docker pull registry.mirantis.com/msr/dtr
Confirm that at least 16GB RAM is available on the node on which you are running the upgrade. If the MSR node does not have access to the internet, follow the offline installation documentation to get the images.
Once you have the latest image on your machine (and the images on the target nodes, if upgrading offline), run the upgrade command.
Note
The upgrade command can be run from any available node, as MKE is aware of which worker nodes have replicas.
docker run -it --rm \
  registry.mirantis.com/msr/dtr:2.10.0 upgrade
By default, the upgrade command runs in interactive mode and prompts for any
necessary information. If you are performing the upgrade on an existing
replica, pass the --existing-replica-id flag.
The upgrade command will start replacing every container in your MSR cluster, one replica at a time. It will also perform certain data migrations. If anything fails or the upgrade is interrupted for any reason, rerun the upgrade command (the upgrade will resume from the point of interruption).
Step 3. Verify Upgrade Success
To confirm that the newly upgraded MSR environment is ready:
Make sure that all running MSR containers reflect the newly upgraded MSR version:
docker ps --filter name=dtr
Verify that the MSR web UI is accessible and operational.
Confirm push and pull functionality of Docker images to and from the registry
Ensure that the MSR metadata store is in good standing:
REPLICA_ID=$(docker inspect -f '{{.Name}}' $(docker ps -q -f name=dtr-rethink) | cut -f 3 -d '-')
docker run -it --rm --net dtr-ol \
   -v dtr-ca-$REPLICA_ID:/ca \
   dockerhubenterprise/rethinkcli:v2.3.0 $REPLICA_ID
# List problems in the cluster detected by the current node.
> r.db("rethinkdb").table("current_issues")
[]
Metadata Store Migration
When upgrading from 2.5 to 2.6, the system will run a
metadatastoremigration job following a successful upgrade. This involves
migrating the blob links for your images, which is necessary for online garbage
collection. With 2.6, you can log into the MSR web interface and navigate
to System > Job Logs to check the status of the
metadatastoremigration job.
Garbage collection is disabled while the migration is running. In the case of a
failed metadatastoremigration, the system will retry twice.
If the three attempts fail, it will be necessary to manually retrigger the
metadatastoremigration job. To do this, send a POST request to the
/api/v0/jobs endpoint:
curl https://<msr-external-url>/api/v0/jobs -X POST \
-u username:accesstoken -H 'Content-Type':'application/json' -d \
'{"action": "metadatastoremigration"}'
Alternatively, select API from the bottom left-side navigation panel of the MSR web interface and use the Swagger UI to send your API request.
Patch upgrade
A patch upgrade changes only the MSR containers and is always safer than a minor version upgrade. The command is the same as for a minor upgrade.
MSR cache upgrade
If you have previously deployed a cache, be sure to upgrade the node dedicated for your cache to keep it in sync with your upstream MSR replicas. This prevents authentication errors and other strange behaviors.
Download the vulnerability database
After upgrading MSR, it is necessary to redownload the vulnerability database.
Monitor MSR
Mirantis Secure Registry is a Dockerized application. To monitor it, you can use the same tools and techniques you’re already using to monitor other containerized applications running on your cluster. One way to monitor MSR is using the monitoring capabilities of Docker Universal Control Plane.
In your browser, log in to Mirantis Kubernetes Engine (MKE), and navigate to the Stacks page. If you have MSR set up for high-availability, then all the MSR replicas are displayed.
To check the containers for the MSR replica, click the replica you want to inspect, click Inspect Resource, and choose Containers.
Now you can drill into each MSR container to see its logs and find the root cause of the problem.
Health check endpoints
MSR also exposes several endpoints you can use to assess if an MSR replica is healthy or not:
/_ping: Checks if the MSR replica is healthy, and returns a simple json response. This is useful for load balancing or other automated health check tasks./nginx_status: Returns the number of connections being handled by the NGINX front-end used by MSR./api/v0/meta/cluster_status: Returns extensive information about all MSR replicas.
Cluster status
The /api/v0/meta/cluster_status endpoint requires administrator
credentials, and returns a JSON object for the entire cluster as observed by
the replica being queried. You can authenticate your requests using HTTP basic
auth.
curl -ksL -u <user>:<pass> https://<msr-domain>/api/v0/meta/cluster_status
{
  "current_issues": [
   {
    "critical": false,
    "description": "... some replicas are not ready. The following servers are
                    not reachable: dtr_rethinkdb_f2277ad178f7",
  }],
  "replica_health": {
    "f2277ad178f7": "OK",
    "f3712d9c419a": "OK",
    "f58cf364e3df": "OK"
  },
}
You can find health status on the current_issues and
replica_health arrays. If this endpoint doesn’t provide meaningful
information when trying to troubleshoot, try troubleshooting using
logs.
Check notary audit logs
Docker Content Trust (DCT) keeps audit logs of changes made to trusted repositories. Every time you push a signed image to a repository, or delete trust data for a repository, DCT logs that information.
These logs are only available from the MSR API.
Get an authentication token
To access the audit logs you need to authenticate your requests using an authentication token. You can get an authentication token for all repositories, or one that is specific to a single repository.
curl --insecure --silent \
  --user <user>:<password> \
  "https://<dtr-url>/auth/token?realm=dtr&service=dtr&scope=registry:catalog:*"
curl --insecure --silent \
  --user <user>:<password> \
  "https://<dtr-url>/auth/token?realm=dtr&service=dtr&scope=repository:<dtr-url>/<repository>:pull"
MSR returns a JSON file with a token, even when the user doesn’t have access to the repository to which they requested the authentication token. This token doesn’t grant access to MSR repositories.
The JSON file returned has the following structure:
{
  "token": "<token>",
  "access_token": "<token>",
  "expires_in": "<expiration in seconds>",
  "issued_at": "<time>"
}
Changefeed API
Once you have an authentication token you can use the following endpoints to get audit logs:
URL |
Description |
Authorization |
|---|---|---|
|
Get audit logs for all repositories. |
Global scope token |
|
Get audit logs for a specific repository. |
Repository-specific token |
Both endpoints have the following query string parameters:
Field name |
Required |
Type |
Description |
|---|---|---|---|
|
Yes |
String |
A non-inclusive starting change ID from which to start returning results. This will typically be the first or last change ID from the previous page of records requested, depending on which direction your are paging in. The value 0 indicates records should be returned starting from the beginning of time. The value 1 indicates records should be returned starting from the most recent record. If 1 is provided, the implementation will also assume the records value is meant to be negative, regardless of the given sign. |
|
Yes |
String integer |
The number of records to return. A negative value indicates the number of records preceding the change_id should be returned. Records are always returned sorted from oldest to newest. |
The response is a JSON like:
{
  "count": 1,
  "records": [
    {
      "ID": "0a60ec31-d2aa-4565-9b74-4171a5083bef",
      "CreatedAt": "2017-11-06T18:45:58.428Z",
      "GUN": "msr.example.org/library/wordpress",
      "Version": 1,
      "SHA256": "a4ffcae03710ae61f6d15d20ed5e3f3a6a91ebfd2a4ba7f31fc6308ec6cc3e3d",
      "Category": "update"
    }
  ]
}
Below is the description for each of the fields in the response:
Field name |
Description |
|---|---|
|
The number of records returned. |
|
The ID of the change record. Should be used in the change_id field of requests to provide a non-exclusive starting index. It should be treated as an opaque value that is guaranteed to be unique within an instance of notary. |
|
The time the change happened. |
|
The MSR repository that was changed. |
|
The version that the repository was updated to. This increments every time there’s a change to the trust repository. This is always 0 for events representing trusted data being removed from the repository. |
|
The checksum of the timestamp being updated to. This can be used with the existing notary APIs to request said timestamp. This is always an empty string for events representing trusted data being removed from the repository |
|
The kind of change that was made to the trusted repository. Can be update, or deletion. |
The results only include audit logs for events that happened more than 60 seconds ago, and are sorted from oldest to newest.
Even though the authentication API always returns a token, the changefeed API validates if the user has access to see the audit logs or not:
If the user is an admin they can see the audit logs for any repositories,
All other users can only see audit logs for repositories they have read access.
Troubleshoot MSR
This guide contains tips and tricks for troubleshooting MSR problems.
Troubleshoot overlay networks
High availability in MSR depends on swarm overlay networking. One way to test if overlay networks are working correctly is to deploy containers to the same overlay network on different nodes and see if they can ping one another.
Use SSH to log into a node and run:
docker run -it --rm \
  --net dtr-ol --name overlay-test1 \
  --entrypoint sh registry.mirantis.com/msr/dtr
Then use SSH to log into another node and run:
docker run -it --rm \
  --net dtr-ol --name overlay-test2 \
  --entrypoint ping registry.mirantis.com/msr/dtr -c 3 overlay-test1
If the second command succeeds, it indicates overlay networking is working correctly between those nodes.
You can run this test with any attachable overlay network and any Docker
image that has sh and ping.
Access RethinkDB directly
MSR uses RethinkDB for persisting data and replicating it across replicas. It might be helpful to connect directly to the RethinkDB instance running on an MSR replica to check the MSR internal state.
Warning
Modifying RethinkDB directly is not supported and may cause problems.
via RethinkCLI
The RethinkCLI can be run from a separate
image in the mirantis organization. Note that the
commands below are using separate tags for non-interactive and
interactive modes.
Non-interactive
Use SSH to log into a node that is running an MSR replica, and run the following:
# List problems in the cluster detected by the current node.
REPLICA_ID=$(docker container ls --filter=name=dtr-rethink --format '{{.Names}}' | cut -d'/' -f2 | cut -d'-' -f3 | head -n 1) && echo 'r.db("rethinkdb").table("current_issues")' | docker run --rm -i --net dtr-ol -v "dtr-ca-${REPLICA_ID}:/ca" -e DTR_REPLICA_ID=$REPLICA_ID mirantis/rethinkcli:v2.2.0-ni non-interactive
On a healthy cluster the output will be [].
Interactive
Starting in DTR 2.5.5, you can run RethinkCLI from a separate image. First, set an environment variable for your MSR replica ID:
REPLICA_ID=$(docker inspect -f '{{.Name}}' $(docker ps -q -f name=dtr-rethink) | cut -f 3 -d '-')
RethinkDB stores data in different databases that contain multiple tables. Run the following command to get into interactive mode and query the contents of the DB:
docker run -it --rm --net dtr-ol -v dtr-ca-$REPLICA_ID:/ca mirantis/rethinkcli:v2.3.0 $REPLICA_ID
# List problems in the cluster detected by the current node.
> r.db("rethinkdb").table("current_issues")
[]

# List all the DBs in RethinkDB
> r.dbList()
[ 'dtr2',
  'jobrunner',
  'notaryserver',
  'notarysigner',
  'rethinkdb' ]

# List the tables in the dtr2 db
> r.db('dtr2').tableList()
[ 'blob_links',
  'blobs',
  'client_tokens',
  'content_caches',
  'events',
  'layer_vuln_overrides',
  'manifests',
  'metrics',
  'namespace_team_access',
  'poll_mirroring_policies',
  'promotion_policies',
  'properties',
  'pruning_policies',
  'push_mirroring_policies',
  'repositories',
  'repository_team_access',
  'scanned_images',
  'scanned_layers',
  'tags',
  'user_settings',
  'webhooks' ]

# List the entries in the repositories table
> r.db('dtr2').table('repositories')
[ { enableManifestLists: false,
    id: 'ac9614a8-36f4-4933-91fa-3ffed2bd259b',
    immutableTags: false,
    name: 'test-repo-1',
    namespaceAccountID: 'fc3b4aec-74a3-4ba2-8e62-daed0d1f7481',
    namespaceName: 'admin',
    pk: '3a4a79476d76698255ab505fb77c043655c599d1f5b985f859958ab72a4099d6',
    pulls: 0,
    pushes: 0,
    scanOnPush: false,
    tagLimit: 0,
    visibility: 'public' },
  { enableManifestLists: false,
    id: '9f43f029-9683-459f-97d9-665ab3ac1fda',
    immutableTags: false,
    longDescription: '',
    name: 'testing',
    namespaceAccountID: 'fc3b4aec-74a3-4ba2-8e62-daed0d1f7481',
    namespaceName: 'admin',
    pk: '6dd09ac485749619becaff1c17702ada23568ebe0a40bb74a330d058a757e0be',
    pulls: 0,
    pushes: 0,
    scanOnPush: false,
    shortDescription: '',
    tagLimit: 1,
    visibility: 'public' } ]
Individual DBs and tables are a private implementation detail and may
change in MSR from version to version, but you can always use
dbList() and tableList() to explore the contents and data
structure.
via API
To check on the overall status of your MSR cluster without interacting with RethinkCLI, run the following API request:
curl -u admin:$TOKEN -X GET "https://<msr-url>/api/v0/meta/cluster_status" -H "accept: application/json"
Example API Response
{
  "rethink_system_tables": {
    "cluster_config": [
      {
        "heartbeat_timeout_secs": 10,
        "id": "heartbeat"
      }
    ],
    "current_issues": [],
    "db_config": [
      {
        "id": "339de11f-b0c2-4112-83ac-520cab68d89c",
        "name": "notaryserver"
      },
      {
        "id": "aa2e893f-a69a-463d-88c1-8102aafebebc",
        "name": "dtr2"
      },
      {
        "id": "bdf14a41-9c31-4526-8436-ab0fed00c2fd",
        "name": "jobrunner"
      },
      {
        "id": "f94f0e35-b7b1-4a2f-82be-1bdacca75039",
        "name": "notarysigner"
      }
    ],
    "server_status": [
      {
        "id": "9c41fbc6-bcf2-4fad-8960-d117f2fdb06a",
        "name": "dtr_rethinkdb_5eb9459a7832",
        "network": {
          "canonical_addresses": [
            {
              "host": "dtr-rethinkdb-5eb9459a7832.dtr-ol",
              "port": 29015
            }
          ],
          "cluster_port": 29015,
          "connected_to": {
            "dtr_rethinkdb_56b65e8c1404": true
          },
          "hostname": "9e83e4fee173",
          "http_admin_port": "<no http admin>",
          "reql_port": 28015,
          "time_connected": "2019-02-15T00:19:22.035Z"
        },
       }
     ...
    ]
  }
}
Recover from an unhealthy replica
When an MSR replica is unhealthy or down, the MSR web UI displays a warning:
Warning: The following replicas are unhealthy: 59e4e9b0a254; Reasons: Replica reported health too long ago: 2017-02-18T01:11:20Z; Replicas 000000000000, 563f02aba617 are still healthy.
To fix this, you should remove the unhealthy replica from the MSR cluster, and join a new one. Start by running:
docker run -it --rm \
  registry.mirantis.com/msr/dtr remove \
  --ucp-insecure-tls
And then:
docker run -it --rm \
  registry.mirantis.com/msr/dtr join \
  --ucp-node <mke-node-name> \
  --ucp-insecure-tls
Vulnerability scan warnings
Warnings display in a red banner at the top of the MSR web UI to indicate potential vulnerability scanning issues.
Warning |
Cause |
|---|---|
Warning: Cannot perform security scans because no vulnerability database was found. |
Displays when vulnerability scanning is enabled but there is no vulnerability database available to MSR. Typically, the warning displays when a vulnerability database update is run for the first time and the operation fails, as no usable vulnerability database exists at this point. |
Warning: Last vulnerability database sync failed. |
Displays when a vulnerability database update fails, even though there is a previous usable vulnerability database available for vulnerability scans. The warning typically displays when a vulnerability database update fails, despite successful completion of a prior vulnerability database update. |
Note
The terms vulnerability database sync and vulnerability database update are interchangeable, in the context of MSR web UI warnings.
Note
The issuing of warnings is the same regardless of whether vulnerability database updating is done manually or is performed automatically through a job.
MSR undergoes a number of steps in performing a vulnerability database update, including TAR file download and extraction, file validation, and the update operation itself. Errors that can trigger warnings can occur at any point in the update process. These errors can include such system-related matters as low disk space, issues with the transient network, or configuration complications. As such, the best strategy for troubleshooting MSR vulnerability scanning issues is to review the logs.
To view the logs for an online vulnerability database update:
Online vulnerability database updates are performed by a jobrunner container, the logs for which you can view through a docker CLI command or by using the MSR web UI:
CLI command:
docker logs <jobrunner-container-name>
MSR web UI:
Navigate to System > Job Logs in the left-side navigation panel.
To view the logs for an offline vulnerability database update:
The MSR vulnerability database update occurs through the dtr-api container.
As such, access the logs for that container to ascertain the reason for update
failure.
To obtain more log information:
If the logs do not initially offer enough detail on the cause of vulnerability database update failure, set MSR to enable debug logging, which will display additional debug logs.
Refer to the reconfigure CLI command documentation for information on how to enable debug logging. For example:
docker run -it --rm mirantis/dtr:<version-number> reconfigure --ucp-url
$MKE_URL --ucp-username $USER --ucp-password $PASSWORD --ucp-insecure-tls
--dtr-external-url $MSR_URL --log-level debug
Certificate issues when pushing and pulling images
If TLS is not properly configured, you are likely to encounter an
x509: certificate signed by unknown authority error when attempting to run
the following commands:
docker login
docker push
docker pull
To resolve the issue:
Verify that your MSR instance has been configured with your TLS certificate Fully Qualified Domain Name (FQDN). For more information, refer to Add a custom TLS certificate.
Alternatively, but only in testing scenarios, you can skip using a certificate
by adding your registry host name as an insecure registry in the Docker
daemon.json file:
{
    "insecure-registries" : [ "registry-host-name" ]
}
Disaster recovery
Disaster recovery overview
Mirantis Secure Registry is a clustered application. You can join multiple replicas for high availability.
For an MSR cluster to be healthy, a majority of its replicas (n/2 + 1) must be healthy and able to communicate with the other replicas. This is also known as maintaining quorum.
The three possible failure scenarios are detailed below.
Replica is unhealthy but cluster maintains quorum
One or more replicas are unhealthy, but the overall majority (n/2 + 1) is still healthy and able to communicate with one another.
Here, the MSR cluster has five replicas but one of the nodes has stopped working, and the other has problems with the MSR overlay network.
Even though these two replicas are unhealthy the MSR cluster has a majority of replicas that are still working, which means that the cluster is healthy.
Thus, you should repair the unhealthy replicas, or remove them from the cluster and join new ones.
The majority of replicas are unhealthy
A majority of replicas are unhealthy, making the cluster lose quorum, but at least one replica is still healthy, or at least the data volumes for MSR are accessible from that replica.
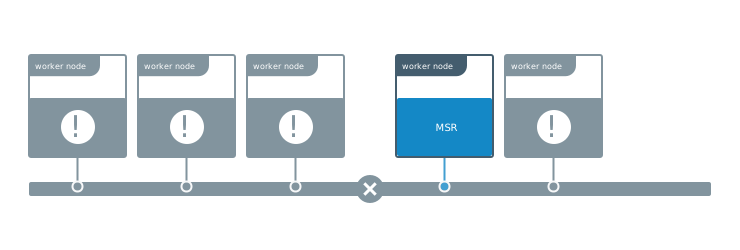
Here, the MSR cluster is unhealthy but since one replica is still running it is possible to repair the cluster without having to restore from a backup, which minimizes the amount of data loss.
All replicas are unhealthy
In this total disaster scenario, in which all MSR replicas are lost, the data volumes for all MSR replicas are corrupted or lost.
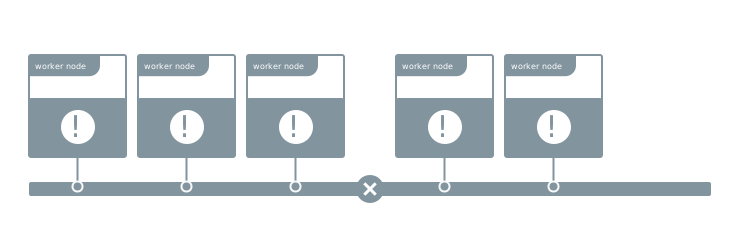
Here, you must restore MSR from an existing backup. Such an operation should be considered as a last resort, as such an emergency repair may prevent some data loss.
Repair a single replica
When one or more MSR replicas are unhealthy but the overall majority (n/2 + 1) is healthy and able to communicate with one another, your MSR cluster is still functional and healthy.
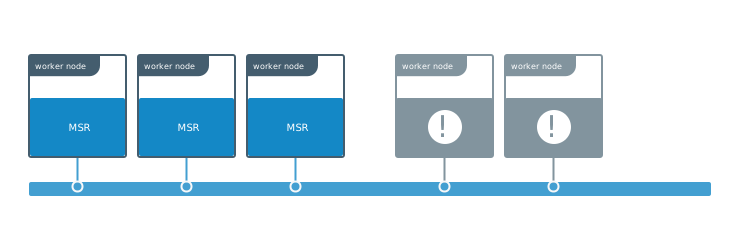
Given that the MSR cluster is healthy, there’s no need to execute any disaster recovery procedures like restoring from a backup.
Instead, you should:
Remove the unhealthy replicas from the MSR cluster.
Join new replicas to make MSR highly available.
Since an MSR cluster requires a majority of replicas to be healthy at all times, the order of these operations is important. If you join more replicas before removing the ones that are unhealthy, your MSR cluster might become unhealthy.
Split-brain scenario
To understand why you should remove unhealthy replicas before joining new ones, imagine you have a five-replica MSR deployment, and something goes wrong with the overlay network connection the replicas, causing them to be separated in two groups.
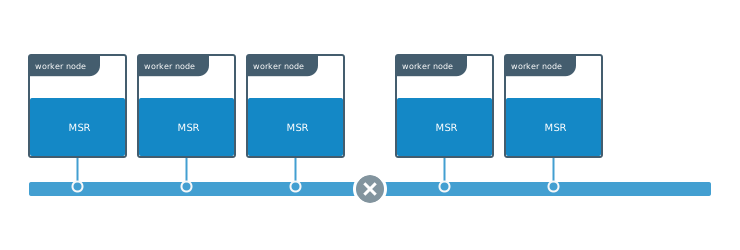
Because the cluster originally had five replicas, it can work as long as three replicas are still healthy and able to communicate (5 / 2 + 1 = 3). Even though the network separated the replicas in two groups, MSR is still healthy.
If at this point you join a new replica instead of fixing the network problem or removing the two replicas that got isolated from the rest, it’s possible that the new replica ends up in the side of the network partition that has less replicas.
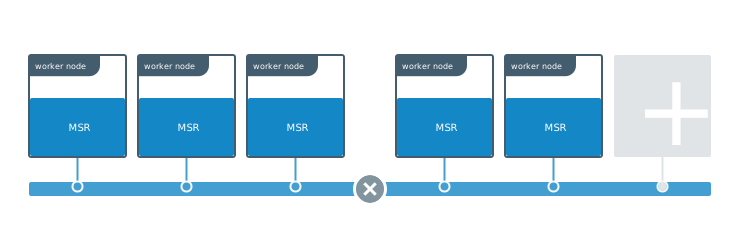
When this happens, both groups now have the minimum amount of replicas needed to establish a cluster. This is also known as a split-brain scenario, because both groups can now accept writes and their histories start diverging, making the two groups effectively two different clusters.
Remove replicas
To remove unhealthy replicas, you’ll first have to find the replica ID of one of the replicas you want to keep, and the replica IDs of the unhealthy replicas you want to remove.
You can find the list of replicas by navigating to Shared Resources > Stacks or Swarm > Volumes (when using swarm mode) on the MKE web interface, or by using the MKE client bundle to run:
docker ps --format "{{.Names}}" | grep dtr

# The list of MSR containers with <node>/<component>-<replicaID>, e.g.
# node-1/dtr-api-a1640e1c15b6
Another way to determine the replica ID is to SSH into an MSR node and run the following:
REPLICA_ID=$(docker inspect -f '{{.Name}}' $(docker ps -q -f name=dtr-rethink) | cut -f 3 -d '-')
&& echo $REPLICA_ID
Then use the MKE client bundle to remove the unhealthy replicas:
docker run -it --rm registry.mirantis.com/msr/dtr:2.10.0 remove \
  --existing-replica-id <healthy-replica-id> \
  --replica-ids <unhealthy-replica-id> \
  --ucp-insecure-tls \
  --ucp-url <mke-url> \
  --ucp-username <user> \
  --ucp-password <password>
You can remove more than one replica at the same time, by specifying multiple IDs with a comma.
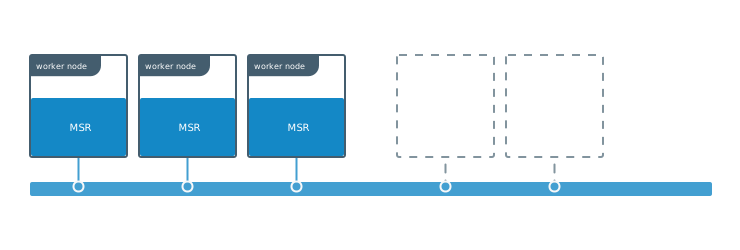
Join replicas
Once you’ve removed the unhealthy nodes from the cluster, you should join new ones to make sure your cluster is highly available.
Use your MKE client bundle to run the following command which prompts you for the necessary parameters:
docker run -it --rm \
  registry.mirantis.com/msr/dtr:2.10.0 join \
  --ucp-node <mke-node-name> \
  --ucp-insecure-tls
See also
Repair a cluster
For an MSR cluster to be healthy, a majority of its replicas (n/2 + 1) need to be healthy and be able to communicate with the other replicas. This is known as maintaining quorum.
In a scenario where quorum is lost, but at least one replica is still accessible, you can use that replica to repair the cluster. That replica doesn’t need to be completely healthy. The cluster can still be repaired as the MSR data volumes are persisted and accessible.
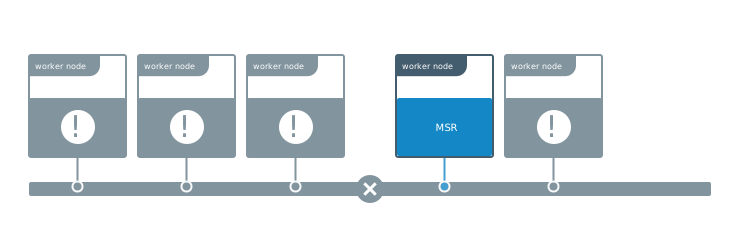
Repairing the cluster from an existing replica minimizes the amount of data lost. If this procedure doesn’t work, you’ll have to restore from an existing backup.
Diagnose an unhealthy cluster
When a majority of replicas are unhealthy, causing the overall MSR
cluster to become unhealthy, operations like docker login,
docker pull, and docker push present internal server error.
Accessing the /_ping endpoint of any replica also returns the same
error. It’s also possible that the MSR web UI is partially or fully
unresponsive.
Perform an emergency repair
Use the registry.mirantis.com/msr/dtr emergency-repair command to
try to repair an unhealthy MSR cluster, from an existing replica.
This command checks the data volumes for the MSR replica are uncorrupted, redeploys all internal MSR components and reconfigured them to use the existing volumes. It also reconfigures MSR removing all other nodes from the cluster, leaving MSR as a single-replica cluster with the replica you chose.
Start by finding the ID of the MSR replica that you want to repair from. You can find the list of replicas by navigating to Shared Resources > Stacks or Swarm > Volumes (when using swarm mode) on the MKE web interface, or by using an MKE client bundle to run:
docker ps --format "{{.Names}}" | grep dtr

# The list of MSR containers with <node>/<component>-<replicaID>, e.g.
# node-1/dtr-api-a1640e1c15b6
Another way to determine the replica ID is to SSH into an MSR node and run the following:
REPLICA_ID=$(docker inspect -f '{{.Name}}' $(docker ps -q -f name=dtr-rethink) | cut -f 3 -d '-')
&& echo $REPLICA_ID
Then, use your MKE client bundle to run the emergency repair command:
docker run -it --rm registry.mirantis.com/msr/dtr:2.10.0 emergency-repair \
  --ucp-insecure-tls \
  --existing-replica-id <replica-id>
If the emergency repair procedure is successful, your MSR cluster now has a single replica. You should now join more replicas for high availability.
Note
Learn more about the high availability configuration in Set up high availability.
If the emergency repair command fails, try running it again using a different replica ID. As a last resort, you can restore your cluster from an existing backup.
See also
Create a backup
Data managed by MSR
Mirantis Secure Registry data persists on the host on which MSR is running, using named volumes.
Run the registry.mirantis.com/msr/dtr backup command to back up the following MSR node data:
Note
A number of data types are not backed up as when you run registry.mirantis.com/msr/dtr backup, including:
Image content, which must be backed up separately, depending on the MSR configuration.
User, organization, and teams information, the backup for which must be made as part of your MKE backup.
Vulnerability database, which can be redownloaded following a restore operation.
Back up MSR data
To create a full backup of MSR you must back up both the image content and MSR metadata.
To ensure the smoothest possible restore, Mirantis recommends that you create your MSR backups from the same MSR replica.
Locate your replica ID
You need your MSR replica ID to create a backup. You can determine your replica ID through the MKE web UI, using the MKE client bundle, or by accessing an MSR node with SSH and running a command.
To locate your replica ID through the MKE web UI:
Navigate to Shared Resources > Stacks or Swarm > Volumes (when using swarm mode).
To locate your replica ID using the MKE client bundle:
From a terminal that uses an MKE client bundle, run:
docker ps --format "{{.Names}}" | grep dtr

# The list of MSR containers with <node>/<component>-<replicaID>, e.g.
# node-1/dtr-api-a1640e1c15b6
To locate your replica ID using SSH to access an MSR node:
Run the following command:
REPLICA_ID=$(docker ps --format '{{.Names}}' -f name=dtr-rethink | cut -f 3 -d '-') && echo $REPLICA_ID
Back up image content
The way you back up images depends on which storage backend you use.
To back up images when MSR is configured to store images on a local file system or NFS mount:
Use SSH to log in to an MSR node.
Create a
tararchive of the MSR volume.Note
The following command will result in the creation of an image backup of your MSR, {{ images_backup_file }}.
sudo tar -cvf image-backup.tar /var/lib/docker/volumes/dtr-registry-<replica-id>
If you are using a different storage backend, follow the best practices recommended for the particular system.
Back up MSR metadata
To create an MSR backup {{ images_backup_file }}, load your MKE client bundle, and run the following chained commands on the MSR node.
Note
Chained commands apply only to Linux.
DTR_VERSION=$(docker container inspect $(docker container ps -f name=dtr-registry -q) | \ >   grep -m1 -Po '(?<=DTR_VERSION=)\d+.\d+.\d+'); \
REPLICA_ID=$(docker ps --format '{{.Names}}' -f name=dtr-rethink | cut -f 3 -d '-'); \
read -p '<mke-url>: ' UCP_URL; \
read -p '<mke-username>: ' UCP_ADMIN; \
read -sp '<mke password>: ' UCP_PASSWORD; \
docker run --log-driver none -i --rm \
  --env UCP_PASSWORD=$UCP_PASSWORD \
  registry.mirantis.com/msr/dtr:$DTR_VERSION backup \
  --ucp-username $UCP_ADMIN \
  --ucp-url $UCP_URL \
  --ucp-ca "$(curl https://${UCP_URL}/ca)" \
  --existing-replica-id $REPLICA_ID > dtr-metadata-${DTR_VERSION}-backup-$(date +%Y%m%d-%H_%M_%S).tar
The chained commands detailed above perform the following tasks:
Set your MSR version and replica ID.
To back up a specific replica, modify the --existing-replica-id flag in the backup command to manually set the replica ID.
Prompt for the
<mke-url>and<mke-username>.Prompt for your
<mke password>without saving it to your disk or printing it to the terminal.Retrieve the CA certificate for the specified
<mke-url>.To skip TLS verification, replace the --ucp-ca flag with --ucp-insecure-tls. Mirantis does not recommend this flag for production environments.
Include the MSR version and timestamp in your
tarbackup file.
Important
To ensure constant user access to MSR, by default the backup
command does not pause the MSR replica that is undergoing the backup
operation. As such, you can continue to make changes to the replica, however
those changes will not be saved into the backup. To circumvent this
behavior, use the --offline-backup option and be sure to remove the
replica from the load balancing pool to avoid user interruption.
As the backup contains sensitive information, such as private keys, you may opt to encrypt it. To do so, run:
gpg --symmetric {{ metadata_backup_file }}
This command prompts you for a password to encrypt the backup, copies the backup file, and encrypts it.
Refer to registry.mirantis.com/msr/dtr backup for more information on supported command options.
Test your backup
Publish the contents of the new tar file to validate that your MSR backup was correctly performed:
tar -tf {{ images_backup_file }}

dtr-backup-v2.10.0/
dtr-backup-v2.10.0/rethink/
dtr-backup-v2.10.0/rethink/layers/
The backup of the MSR metadata should present as follows:
tar -tf {{ metadata_backup_file }}

# The archive should look like this
dtr-backup-v2.10.0/
dtr-backup-v2.10.0/rethink/
dtr-backup-v2.10.0/rethink/properties/
dtr-backup-v2.10.0/rethink/properties/0
Use the following command if you have encrypted the metadata backup:
gpg -d {{ metadata_backup_file }} | tar -t
Alternatively, you can create a backup of an MKE cluster and restore it to a new cluster, and then restore MSR on the new cluster to confirm your MSR backup.
Restore from backup
In the event that a majority of the RethinkDB table replicas in use by MSR are unhealthy, and an emergency repair is unsuccessful, you must restore the cluster from a backup.
Important
Use the same MKE cluster upon which you created the backup. If you restore on a different MKE cluster, the MSR resources will be owned by non-existent users, and thus you will not be able to manage the resources despite their being stored in the MSR data store.
Use the same version of the
registry.mirantis.com/msr/dtrimage that you used in creating the backup.
To restore MSR from a backup:
Using the client bundle, run the following command to stop and remove any MSR container that is still running:
docker run -it --rm \
registry.mirantis.com/msr/dtr:2.10.0 destroy \
--ucp-insecure-tls
Note
If the client bundle is not activated, you can run the command from an MSR node.
Extract your backup:
If MSR is configured to store images on the local file system, run the following command:
sudo tar -xf {{ image_backup_file }} -C /var/lib/docker/volumes
If MSR uses a different storage backend, follow the best practices recommended for that system.
Use the registry.mirantis.com/msr/dtr restore command to perform MSR installation and complete it with the configuration that was created during backup.
Load your MKE client bundle and run the following command:
read -sp 'ucp password: ' <MKE-password>;
Run the following command to restore MSR from your backup, for example:
docker run -i --rm \
--env UCP_PASSWORD=<MKE-password> \
registry.mirantis.com/msr/dtr:2.10.0 restore \
--ucp-url <mke-url> \
--ucp-insecure-tls \
--ucp-username <mke-admin-username> \
--ucp-node <hostname> \
--replica-id <replica-id> \
--dtr-external-url <msr-external-url> \
--dtr-use-default-storage < {{ metadata_backup_file }}
Note
Use
--dtr-use-default-storageif the storage backend has not been changed. If you are using a custom backend, use either--dtr-storage-volumeto reference an existing Docker volume, or--nfs-storage-urlif the backend is on NFS. For a full list of supported options, refer to CLI Reference: registry.mirantis.com/msr/dtr restore.If you scan images in MSR, you must update the vulnerability database in the MSR UI. Refer to Enable MSR security scanning for more information.
After you successfully restore MSR, you can join new replicas as you would following a fresh installation.
Customer feedback
You can submit feedback on MSR to Mirantis either by rating your experience or through a Jira ticket.
To rate your MSR experience:
Log in to the MSR web UI.
Click Give feedback at the bottom of the screen.
Rate your MSR experience from one to five stars, and add any additional comments in the provided field.
Click Send feedback.
To offer more detailed feedback:
Log in to the MSR web UI.
Click Give feedback at the bottom of the screen.
Click create a ticket in the 5-star review dialog to open a Jira feedback collector.
Fill in the Jira feedback collector fields and add attachments as necessary.
Click Submit.
Migration Guide
Moving from MSR 2.10 to MSR 4 is a significant transition that introduces a new architecture, improved security models, and streamlined policy-based configuration. The process may take time depending on your system and data volume, but your current MSR instance remains operational throughout.
For detailed instructions, see the Migration Guide in MSR 4 documentation.
Get Support
Subscriptions for MKE, MSR, and MCR provide access to prioritized support for designated contacts from your company, agency, team, or organization. Mirantis service levels for MKE, MSR, and MCR are based on your subscription level and the Cloud (or cluster) you designate in your technical support case. Our support offerings are described here, and if you do not already have a support subscription, you may inquire about one via the contact us form.
Mirantis’ primary means of interacting with customers who have technical issues with MKE, MSR, or MCR is our CloudCare Portal. Access to our CloudCare Portal requires prior authorization by your company, agency, team, or organization, and a brief email verification step. After Mirantis sets up its backend systems at the start of the support subscription, a designated administrator at your company, agency, team or organization, can designate additional contacts. If you have not already received and verified an invitation to our CloudCare Portal, contact your local designated administrator, who can add you to the list of designated contacts. Most companies, agencies, teams, and organizations have multiple designated administrators for the CloudCare Portal, and these are often the persons most closely involved with the software. If you don’t know who is a local designated administrator, or are having problems accessing the CloudCare Portal, you may also send us an email.
Once you have verified your contact details via our verification email, and changed your password as part of your first login, you and all your colleagues will have access to all of the cases and resources purchased. We recommend you retain your ‘Welcome to Mirantis’ email, because it contains information on accessing our CloudCare Portal, guidance on submitting new cases, managing your resources, and so forth. Thus, it can serve as a reference for future visits.
We encourage all customers with technical problems to use the knowledge base, which you can access on the Knowledge tab of our CloudCare Portal. We also encourage you to review the MKE, MSR, and MCR products documentation which includes release notes, solution guides, and reference architectures. These are available in several formats. We encourage use of these resources prior to filing a technical case; we may already have fixed the problem in a later release of software, or provided a solution or technical workaround to a problem experienced by other customers.
One of the features of the CloudCare Portal is the ability to associate cases with a specific MKE cluster; these are known as “Clouds” in our portal. Mirantis has pre-populated customer accounts with one or more Clouds based on your subscription(s). Customers may also create and manage their Clouds to better match how you use your subscription.
We also recommend and encourage our customers to file new cases based on a specific Cloud in your account. This is because most Clouds also have associated support entitlements, licenses, contacts, and cluster configurations. These greatly enhance Mirantis’ ability to support you in a timely manner.
You can locate the existing Clouds associated with your account by using the “Clouds” tab at the top of the portal home page. Navigate to the appropriate Cloud, and click on the Cloud’s name. Once you’ve verified that Cloud represents the correct MKE cluster and support entitlement, you can create a new case via the New Case button towards the top of the Cloud’s page.
One of the key items required for technical support of most MKE, MSR, and MCR cases is the support dump. This is a compressed archive of configuration data and log files from the cluster. There are several ways to gather a support dump, each described in the paragraphs below. After you have collected a support dump, you can upload the dump to your new technical support case by following this guidance and using the “detail” view of your case.
Use the Web UI to get a support dump
To get the support dump from the web UI:
Log into the MKE web UI with an administrator account.
In the top-left menu, click your username and choose Support Dump.
It may take a few minutes for the download to complete.
To submit the support dump to Mirantis Customer Support:
Click Share support bundle on the success prompt that displays when the support dump finishes downloading.
Fill in the Jira feedback dialog, and click Submit.
Use the CLI to get a support dump
To get the support dump from the CLI, use SSH to log into a node and run:
MKE_VERSION=$((docker container inspect ucp-proxy --format '{{index .Config.Labels "com.docker.ucp.version"}}' 2>/dev/null || echo -n 3.2.6)|tr -d [[:space:]])

docker container run --rm \
--name ucp \
-v /var/run/docker.sock:/var/run/docker.sock \
--log-driver none \
mirantis/ucp:${MKE_VERSION} \
support > \
docker-support-${HOSTNAME}-$(date +%Y%m%d-%H_%M_%S).tgz
Note
The support dump only contains logs for the node where you’re running the command. If your MKE is highly available, you should collect support dumps from all of the manager nodes.
Use PowerShell to get a support dump
On Windows worker nodes, run the following command to generate a local support dump:
docker container run --name windowssupport -v 'C:\ProgramData\docker\daemoncerts:C:\ProgramData\docker\daemoncerts' -v 'C:\Windows\system32\winevt\logs:C:\eventlogs:ro' mirantis/ucp-dsinfo-win:3.2.6; docker cp windowssupport:'C:\dsinfo' .; docker rm -f windowssupport
This command creates a directory named dsinfo in your current directory. If you want an archive file, you need to create it from the dsinfo directory.
API Reference
The Mirantis Secure Registry (MSR) API is a REST API, available using HTTPS, that enables programmatic access to resources managed by MSR.
CLI Reference
The CLI tool has commands to install, configure, and backup Mirantis Secure Registry (MSR). It also allows uninstalling MSR. By default the tool runs in interactive mode. It prompts you for the values needed.
Additional help is available for each command with the –help option.
Syntax
docker run -it --rm registry.mirantis.com/msr/dtr \
    command [command options]
If not specified, registry.mirantis.com/msr/dtr uses the
latest tag by default. To work with a different version, specify it in
the command. For example, docker run -it --rm
registry.mirantis.com/msr/dtr:2.10.0.
registry.mirantis.com/msr/dtr backup
Create a backup of MSR.
Usage
docker run -i --rm registry.mirantis.com/msr/dtr \
    backup [command options] > backup.tar
Example Commands
Basic
docker run -i --rm --log-driver none registry.mirantis.com/msr/dtr \
    backup --ucp-ca "$(cat ca.pem)" --existing-replica-id 5eb9459a7832 > backup.tar
Advanced (with chained commands)
The following command has been tested on Linux:
DTR_VERSION=$(docker container inspect $(docker container ps -f \
  name=dtr-registry -q) | grep -m1 -Po '(?<=DTR_VERSION=)\d.\d.\d'); \
REPLICA_ID=$(docker inspect -f '{{.Name}}' $(docker ps -q -f name=dtr-rethink) | cut -f 3 -d '-'); \
read -p 'ucp-url (The MKE URL including domain and port): ' UCP_URL; \
read -p 'ucp-username (The MKE administrator username): ' UCP_ADMIN; \
read -sp 'ucp password: ' UCP_PASSWORD; \
docker run --log-driver none -i --rm \
  --env UCP_PASSWORD=$UCP_PASSWORD \
  registry.mirantis.com/msr/dtr:$DTR_VERSION backup \
  --ucp-username $UCP_ADMIN \
  --ucp-url $UCP_URL \
  --ucp-ca "$(curl https://${UCP_URL}/ca)" \
  --existing-replica-id $REPLICA_ID > \
  dtr-metadata-${DTR_VERSION}-backup-$(date +%Y%m%d-%H_%M_%S).tar
Description
The backup command creates a tar file with the contents
of the volumes used by MSR, and prints it. You can then use
registry.mirantis.com/msr/dtr restore to restore the data from an existing backup.
Note
This command only creates backups of configurations, and image metadata. It does not back up users and organizations. Users and organizations can be backed up during an MKE backup.
It also does not back up Docker images stored in your registry. You should implement a separate backup policy for the Docker images stored in your registry, taking into consideration whether your MSR installation is configured to store images on the filesystem or is using a cloud provider.
This backup contains sensitive information and should be stored securely.
Using the
--offline-backupflag temporarily shuts down the RethinkDB container. Take the replica out of your load balancer to avoid downtime.
Options
Option |
Environment variable |
Description |
|---|---|---|
|
$DEBUG |
Enable debug mode for additional logs. |
|
$DTR_REPLICA_ID |
The ID of an existing MSR replica. To add, remove or modify an MSR replica, you must connect to the database of an existing replica. |
|
$DTR_EXTENDED_HELP |
Display extended help text for a given command. |
|
$DTR_IGNORE_EVENTS_TABLE |
Option to prevent backup of the events table for online backups, to reduce backup size (the option is not available for offline backups). |
|
$DTR_IGNORE_SCAN_DATA |
Option to prevent backup of the scanning data for online backups, to reduce backup size (the option is not available for offline backups). |
|
$DTR_INCLUDE_JOB_LOGS |
Option to include job logs in online backups. |
|
$NOCOLOR |
Disable output coloring in logs. |
|
$DTR_OFFLINE_BACKUP |
This flag takes RethinkDB down during backup and takes a more reliable backup. If you back up MSR with this flag, RethinkDB will go down during backup. However, offline backups are guaranteed to be more consistent than online backups. |
|
$UCP_CA |
Use a PEM-encoded TLS CA certificate for MKE. Download the MKE
TLS CA certificate from |
|
$UCP_INSECURE_TLS |
Disable TLS verification for MKE. The installation
uses TLS but always trusts the TLS certificate used by MKE, which can
lead to man-in-the-middle attacks. For production deployments,
use |
|
$UCP_PASSWORD |
The MKE administrator password. |
|
$UCP_URL |
The MKE URL including domain and port. |
|
$UCP_USERNAME |
The MKE administrator username. |
registry.mirantis.com/msr/dtr destroy
Destroy MSR replica data.
Usage
docker run -it --rm registry.mirantis.com/msr/dtr \
    destroy [command options]
Description
The destroy command forcefully removes all containers and volumes associated with an MSR replica without notifying the rest of the cluster. Use this command on all replicas uninstall MSR.
Use the remove command to gracefully scale down your MSR cluster.
Options
Option |
Environment variable |
Description |
|---|---|---|
|
$MSR_DESTROY_REPLICA_ID |
The ID of the replica to destroy. |
|
$UCP_URL |
The MKE URL including domain and port. |
|
$UCP_USERNAME |
The MKE administrator username. |
|
$UCP_PASSWORD |
The MKE administrator password. |
|
$DEBUG |
Enable debug mode for additional logs. |
|
$MSR_EXTENDED_HELP |
Display extended help text for a given command. |
|
$NOCOLOR |
Disable output coloring in logs. |
|
$UCP_INSECURE_TLS |
Disable TLS verification for MKE. The installation uses TLS but always
trusts the TLS certificate used by MKE, which can lead to
man-in-the-middle attacks. For production deployments, use |
|
$UCP_CA |
Use a PEM-encoded TLS CA certificate for MKE.Download the MKE TLS CA
certificate from |
registry.mirantis.com/msr/dtr emergency-repair
Recover MSR from loss of quorum.
Usage
docker run -it --rm registry.mirantis.com/msr/dtr \
    emergency-repair [command options]
Description
The emergency-repair command repairs an MSR cluster that has lost quorum by reverting your cluster to a single MSR replica.
There are three actions you can take to recover an unhealthy MSR cluster:
If the majority of replicas are healthy, remove the unhealthy nodes from the cluster, and join new ones for high availability.
If the majority of replicas are unhealthy, use the emergency-repair command to revert your cluster to a single MSR replica.
If you cannot repair your cluster to a single replica, you must restore from an existing backup, using the restore command.
When you run this command, an MSR replica of your choice is repaired and
turned into the only replica in the whole MSR cluster. The containers
for all the other MSR replicas are stopped and removed. When using the
force option, the volumes for these replicas are also deleted.
After repairing the cluster, you should use the join command to add more MSR replicas for high availability.
Options
Option |
Environment variable |
Description |
|---|---|---|
|
$DEBUG |
Enable debug mode for additional logs. |
|
$MSR_REPLICA_ID |
The ID of an existing MSR replica. To add, remove or modify MSR, you must connect to the database of an existing healthy replica. |
|
$MSR_EXTENDED_HELP |
Display extended help text for a given command. |
|
$NOCOLOR |
Disable output coloring in logs. |
|
$MSR_OVERLAY_SUBNET |
The subnet used by the dtr-ol overlay network.
Example: |
|
$PRUNE |
Delete the data volumes of all unhealthy replicas. With this option, the volume of the MSR replica you’re restoring is preserved but the volumes for all other replicas are deleted. This has the same result as completely uninstalling MSR from those replicas. |
|
$UCP_CA |
Use a PEM-encoded TLS CA certificate for MKE. Download the MKE
TLS CA certificate from |
|
$UCP_INSECURE_TLS |
Disable TLS verification for MKE. The installation
uses TLS but always trusts the TLS certificate used by MKE, which can
lead to man-in-the-middle attacks. For production deployments,
use |
|
$UCP_PASSWORD |
The MKE administrator password. |
|
$UCP_URL |
The MKE URL including domain and port. |
|
$UCP_USERNAME |
The MKE administrator username. |
|
$YES |
Answer yes to any prompts. |
|
$MAX_WAIT |
The maximum amount of time MSR allows an operation to complete within.
This is frequently used to allocate more startup time to very large MSR
databases. The value is a Golang duration string. For example, |
registry.mirantis.com/msr/dtr images
List all the images necessary to install MSR.
Usage
docker run -it --rm registry.mirantis.com/msr/dtr \
    images [command options]
Description
The images command lists all the images necessary to install MSR.
registry.mirantis.com/msr/dtr install
Install Mirantis Secure Registry.
Usage
docker run -it --rm registry.mirantis.com/msr/dtr \
    install [command options]
Description
The install command installs Mirantis Secure Registry (MSR) on a node managed by Mirantis Kubernetes Engine (MKE).
After installing MSR, you can join additional MSR replicas using
registry.mirantis.com/msr/dtr join.
Example Usage
$ docker run -it --rm registry.mirantis.com/msr/dtr install \
    --ucp-node <UCP_NODE_HOSTNAME> \
    --ucp-insecure-tls
Note
Use --ucp-ca "$(cat ca.pem)" instead of --ucp-insecure-tls for a production deployment.
Options
Option |
Environment variable |
Description |
|---|---|---|
|
$ASYNC_NFS |
Use async NFS volume options on the replica specified in the
|
|
$CLIENT_CA |
Specify root CA certificates for client authentication with
|
|
$CUSTOM_CA_CERTS_BUNDLE |
Provide a file containing additional CA certificates for MSR service containers to use when verifying TLS server certificates. |
|
$DEBUG |
Enable debug mode for additional logs. |
|
$MSR_CA |
Use a PEM-encoded TLS CA certificate for MSR. By default MSR generates a
self-signed TLS certificate during deployment. You can use your own root
CA public certificate with |
|
$MSR_CERT |
Use a PEM-encoded TLS certificate for MSR. By default MSR generates a
self-signed TLS certificate during deployment. You can use your own
public key certificate with |
|
$MSR_EXTERNAL_URL |
URL of the host or load balancer clients use to reach MSR. When you use
this flag, users are redirected to MKE for logging in. Once
authenticated they are redirected to the URL you specify in this flag.
If you do not use this flag, MSR is deployed without single sign-on with
MKE. Users and teams are shared but users log in separately into the two
applications. You can enable and disable single sign-on within your MSR
system settings. Format |
|
$MSR_KEY |
Use a PEM-encoded TLS private key for MSR. By default MSR generates a
self-signed TLS certificate during deployment. You can use your own TLS
private key with |
|
$MSR_STORAGE_VOLUME |
Customize the volume to store Docker images. By default MSR creates a
volume to store the Docker images in the local filesystem of the node
where MSR is running, without high-availability. Use this flag to
specify a full path or volume name for MSR to store images. For
high-availability, make sure all MSR replicas can read and write data on
this volume. If you are using NFS, use |
|
$ENABLE_CLIENT_CERT_AUTH |
Enables TLS client certificate authentication. Use
|
|
$MSR_PPROF |
Enables pprof profiling of the server. Use |
|
$MSR_EXTENDED_HELP |
Display extended help text for a given command. |
|
$MSR_HTTP_PROXY |
The HTTP proxy used for outgoing requests. |
|
$MSR_HTTPS_PROXY |
The HTTPS proxy used for outgoing requests. |
|
$LOG_HOST |
The syslog system to send logs to. The endpoint to send logs to. Use
this flag if you set |
|
$LOG_LEVEL |
Log level for all container logs when logging to syslog. Default: INFO. The supported log levels are debug, info, warn, error, or fatal. |
|
$LOG_PROTOCOL |
The protocol for sending logs. Default is internal. By default, MSR
internal components log information using the logger specified in the
Docker daemon in the node where the MSR replica is deployed. Use this
option to send MSR logs to an external syslog system. The supported
values are |
|
$NFS_OPTIONS |
Pass in NFS volume options verbatim for the replica specified in the
|
|
$NFS_STORAGE_URL |
Use NFS to store Docker images following this format: |
|
$NOCOLOR |
Disable output coloring in logs. |
|
$MSR_NO_PROXY |
List of domains the proxy should not be used for. When using
|
|
$MSR_OVERLAY_SUBNET |
The subnet used by the dtr-ol overlay network. Example: |
|
$REPLICA_HTTP_PORT |
The public HTTP port for the MSR replica. Default is |
|
$REPLICA_HTTPS_PORT |
The public HTTPS port for the MSR replica. Default is |
|
$MSR_INSTALL_REPLICA_ID |
Assign a 12-character hexadecimal ID to the MSR replica. Random by default. |
|
$RETHINKDB_CACHE_MB |
The maximum amount of space in MB for RethinkDB in-memory cache used by
the given replica. Default is auto. Auto is |
|
$UCP_CA |
Use a PEM-encoded TLS CA certificate for MKE. Download the MKE TLS CA
certificate from |
|
$UCP_INSECURE_TLS |
Disable TLS verification for MKE. The installation uses TLS but always
trusts the TLS certificate used by MKE, which can lead to
man-in-the-middle attacks. For production deployments, use |
|
$UCP_NODE |
The hostname of the MKE node to use to deploy MSR. Random by default. You can find the hostnames of the nodes in the cluster in the MKE web interface, or by running docker node ls command on an MKE manager node. Note that MKE and MSR must not be installed on the same node, and you should instead install MSR on worker nodes that will be managed by MKE. |
|
$UCP_PASSWORD |
The MKE administrator password. |
|
$UCP_URL |
The MKE URL including domain and port. |
|
$UCP_USERNAME |
The MKE administrator username. |
|
$REGISTRY_USERNAME |
Set the registry username to use when pulling MSR images. |
|
$REGISTRY_PASSWORD |
Set the registry password to use when pulling MSR images. |
registry.mirantis.com/msr/dtr join
Add a new replica to an existing MSR cluster. Use SSH to log into any node that is already part of MKE.
Usage
docker run -it --rm \
  registry.mirantis.com/msr/dtr join \
  --ucp-node <mke-node-name> \
  --ucp-insecure-tls
Description
The join command creates a replica of an existing MSR on a node managed by Mirantis Kubernetes Engine (MKE).
For setting MSR for high-availability, create 3, 5, or 7 replicas of MSR.
Options
Option |
Environment variable |
Description |
|---|---|---|
|
$DEBUG |
Enable debug mode for additional logs. |
|
$MSR_REPLICA_ID |
The ID of an existing MSR replica. To add, remove or modify MSR, you must connect to the database of an existing healthy replica. |
|
$MSR_EXTENDED_HELP |
Display extended help text for a given command. |
|
$NOCOLOR |
Disable output coloring in logs. |
|
$REPLICA_HTTP_PORT |
The public HTTP port for the MSR replica. Default is |
|
$REPLICA_HTTPS_PORT |
The public HTTPS port for the MSR replica. Default is |
|
$MSR_INSTALL_REPLICA_ID |
Assign a 12-character hexadecimal ID to the MSR replica. Random by default. |
|
$RETHINKDB_CACHE_MB |
The maximum amount of space in MB for RethinkDB in-memory cache used by
the given replica. Default is auto. Auto is |
|
$MSR_SKIP_NETWORK_TEST |
Do not test whether overlay networks are working correctly between MKE nodes. For high-availability, MSR creates an overlay network between MKE nodes and tests it before joining replicas. Important Do not use the |
|
$UCP_CA |
Use a PEM-encoded TLS CA certificate for MKE. Download the MKE TLS CA
certificate from |
|
$UCP_INSECURE_TLS |
Disable TLS verification for MKE. The installation uses TLS but always
trusts the TLS certificate used by MKE, which can lead to
man-in-the-middle attacks. For production deployments, use |
|
$UCP_NODE |
The hostname of the MKE node to use to deploy MSR. Random by default. You can find the hostnames of the nodes in the cluster in the MKE web interface, or by running docker node ls on an MKE manager node. Note that MKE and MSR cannot be installed on the same node, instead install MSR on worker nodes that will be managed by MKE. |
|
$UCP_PASSWORD |
The MKE administrator password. |
|
$UCP_URL |
The MKE URL including domain and port. |
|
$UCP_USERNAME |
The MKE administrator username. |
|
$MSR_UNSAFE_JOIN |
Join a new replica even if the cluster is unhealthy. Joining replicas to an unhealthy MSR cluster leads to split-brain scenarios, and data loss. Don’t use this option for production deployments. |
|
$MAX_WAIT |
The maximum amount of time MSR allows an operation to complete within.
This is frequently used to allocate more startup time to very large MSR
databases. The value is a Golang duration string. For example, |
|
$REGISTRY_USERNAME |
Set the registry username to use when pulling MSR images. |
|
$REGISTRY_PASSWORD |
Set the registry password to use when pulling MSR images. |
registry.mirantis.com/msr/dtr reconfigure
Change MSR configurations.
Usage
docker run -it --rm registry.mirantis.com/msr/dtr reconfigure [command options]
Description
The reconfigure command changes MSR configuration settings.
MSR is restarted for the new configurations to take effect. To have no down time, configure your MSR for high availability.
Options
Option |
Environment variable |
Description |
|---|---|---|
|
$ASYNC_NFS |
Use async NFS volume options on the replica specified in the
|
|
$CLIENT_CA |
Specify root CA certificates for client authentication with
|
|
$CUSTOM_CA_CERTS_ BUNDLE |
Specify additional CA certificates for MSR service containers to use
when verifying TLS server certificates with
|
|
$DEBUG |
Enable debug mode for additional logs of this bootstrap container (the
log level of downstream MSR containers can be set with |
|
$MSR_CA |
Use a PEM-encoded TLS CA certificate for MSR. By default MSR generates a
self-signed TLS certificate during deployment. You can use your own root
CA public certificate with |
|
$MSR_CERT |
Use a PEM-encoded TLS certificate for MSR. By default MSR generates a
self-signed TLS certificate during deployment. You can use your own
public key certificate with |
|
$MSR_EXTERNAL_URL |
URL of the host or load balancer clients use to reach MSR. When you use
this flag, users are redirected to MKE for logging in. Once
authenticated they are redirected to the url you specify in this flag.
If you don’t use this flag, MSR is deployed without single sign-on with
MKE. Users and teams are shared but users login separately into the two
applications. You can enable and disable single sign-on in the MSR
settings. Format |
|
$MSR_KEY |
Use a PEM-encoded TLS private key for MSR. By default MSR generates a
self-signed TLS certificate during deployment. You can use your own TLS
private key with |
|
$MSR_STORAGE_ VOLUME |
Customize the volume to store Docker images. By default MSR creates a
volume to store the Docker images in the local filesystem of the node
where MSR is running, without high-availability. Use this flag to
specify a full path or volume name for MSR to store images. For
high-availability, make sure all MSR replicas can read and write data on
this volume. If you’re using NFS, use |
|
$ENABLE_CLIENT_CERT_ AUTH |
Enables TLS client certificate authentication; use
|
|
$MSR_PPROF |
Enables pprof profiling of the server. Use |
|
$MSR_REPLICA_ID |
The ID of an existing MSR replica. To add, remove or modify MSR, you must connect to an existing healthy replica’s database. |
|
$FORCE_RECREATE_NFS_ VOLUME |
Force MSR to recreate NFS volumes on the replica specified by
|
|
$MSR_EXTENDED_HELP |
Display extended help text for a given command. |
|
$MSR_HTTP_PROXY |
The HTTP proxy used for outgoing requests. |
|
$MSR_HTTPS_PROXY |
The HTTPS proxy used for outgoing requests. |
|
$LOG_HOST |
The syslog system to send logs to. The endpoint to send logs to. Use
this flag if you set |
|
$LOG_LEVEL |
Log level for all container logs when logging to syslog. Default: INFO.
The supported log levels are |
|
$LOG_PROTOCOL |
The protocol for sending logs. Default is internal. By default, MSR
internal components log information using the logger specified in the
Docker daemon in the node where the MSR replica is deployed. Use this
option to send MSR logs to an external syslog system. The supported
values are |
|
$MAX_WAIT |
The maximum amount of time MSR allows an operation to complete within.
This is frequently used to allocate more startup time to very large MSR
databases. The value is a Golang duration string. For example, |
|
$NFS_OPTIONS |
Pass in NFS volume options verbatim for the replica specified in the
|
|
$NFS_STORAGE_URL |
Set the URL for the NFS storage backend. docker run -it --rm registry.mirantis.com/msr/dtr reconfigure --nfs-storage-url nfs://<IP-of-NFS-server>/path/to/mountdir
To reconfigure MSR to stop using NFS, leave the option empty: docker run -it --rm registry.mirantis.com/msr/dtr reconfigure --nfs-storage-url ""
Refer to Reconfigure MSR to use NFS for more details. |
|
$NOCOLOR |
Disable output coloring in logs. |
|
$MSR_NO_PROXY |
List of domains the proxy should not be used for. When using
|
|
$REINITIALIZE_STORAGE |
Set the flag when you have changed storage backends but have not moved the contents of the old storage backend to the new one. Erases all tags in the registry. |
|
$REPLICA_HTTP_PORT |
The public HTTP port for the MSR replica. Default is |
|
$REPLICA_HTTPS_PORT |
The public HTTPS port for the MSR replica. Default is |
|
$RETHINKDB_CACHE_ MB |
The maximum amount of space in MB for RethinkDB in-memory cache used by
the given replica. Default is auto. Auto is |
|
$STORAGE_MIGRATED |
A flag added in 2.6.4 which lets you indicate the migration status of your storage data. Specify this flag if you are migrating to a new storage backend and have already moved all contents from your old backend to your new one. If not specified, MSR will assume the new backend is empty during a backend storage switch, and consequently destroy your existing tags and related image metadata. |
|
$UCP_CA |
Use a PEM-encoded TLS CA certificate for MKE. Download the MKE TLS CA
certificate from |
|
$UCP_INSECURE_TLS |
Disable TLS verification for MKE. |
|
$UCP_PASSWORD |
The MKE administrator password. |
|
$UCP_URL |
The MKE URL including domain and port. |
|
$UCP_USERNAME |
The MKE administrator username. |
|
$REGISTRY_USERNAME |
Set the registry username to use when pulling MSR images. |
|
$REGISTRY_PASSWORD |
Set the registry password to use when pulling MSR images. |
registry.mirantis.com/msr/dtr remove
Remove an MSR replica from a cluster.
Usage
docker run -it --rm registry.mirantis.com/msr/dtr \
    remove [command options]
Description
The remove command scales down your MSR cluster by removing exactly one replica. All other replicas must be healthy and will remain healthy after this operation.
Options
Option |
Environment variable |
Description |
|---|---|---|
|
$DEBUG |
Enable debug mode for additional logs. |
|
$MSR_REPLICA_ID |
The ID of an existing MSR replica. To add, remove or modify MSR, you must connect to the database of an existing healthy replica. |
|
$DTR_FORCE_REMOVE_REPLICA |
Ignore pre-checks when removing a replica. |
|
$MSR_EXTENDED_HELP |
Display extended help text for a given command. |
|
$NOCOLOR |
Disable output coloring in logs. |
|
$MSR_REMOVE_REPLICA_ID |
DEPRECATED Alias for |
|
$MSR_REMOVE_REPLICA_IDS |
A comma separated list of IDs of replicas to remove from the cluster. |
|
$UCP_CA |
Use a PEM-encoded TLS CA certificate for MKE. Download the MKE TLS CA
certificate from |
|
$UCP_INSECURE_TLS |
Disable TLS verification for MKE. The installation uses TLS but always
trusts the TLS certificate used by MKE, which can lead to MITM
(man-in-the-middle) attacks. For production deployments, use |
|
$UCP_PASSWORD |
The MKE administrator password. |
|
$UCP_URL |
The MKE URL including domain and port. |
|
$UCP_USERNAME |
The MKE administrator username. |
registry.mirantis.com/msr/dtr restore
Install and restore MSR from an existing backup.
Usage
docker run -i --rm registry.mirantis.com/msr/dtr \
    restore
    --replica-id <replica-id>
    [command options] < backup.tar
Description
The restore command performs a fresh installation of MSR, and
reconfigures it with configuration data from a tar file generated by
registry.mirantis.com/msr/dtr backup. If you are restoring MSR
after a failure, please make sure you have destroyed the old MSR fully.
There are three actions you can take to recover an unhealthy MSR cluster:
If the majority of replicas are healthy, remove the unhealthy nodes from the cluster, and join new nodes for high availability.
If the majority of replicas are unhealthy, use the emergency-repair command to revert your cluster to a single MSR replica.
If you cannot repair your cluster to a single replica, you must restore from an existing backup, using the
restorecommand.
This command does not restore Docker images. You should implement a separate restore procedure for the Docker images stored in your registry, taking in consideration whether your MSR installation is configured to store images on the local filesystem or using a cloud provider.
After restoring the cluster, you should use the :command`join` command to add more MSR replicas for high availability.
Options
Option |
Environment variable |
Description |
|---|---|---|
|
$ASYNC_NFS |
Use async NFS volume options on the replica specified by
|
|
$CLIENT_CA |
PEM-encoded TLS root CA certificates for client certificate authentication. |
|
$CUSTOM_CA_CERTS_BUNDLE |
Provide a file containing additional CA certificates for MSR service containers to use when verifying TLS server certificates. |
|
$DEBUG |
Enable debug mode for additional logs. |
|
$MSR_REPLICA_ID |
The ID of an existing MSR replica. To add, remove or modify MSR, you must connect to an existing healthy replica’s database. |
|
$MSR_CA |
Use a PEM-encoded TLS CA certificate for MSR. By default MSR generates a
self-signed TLS certificate during deployment. You can use your own TLS
CA certificate with |
|
$MSR_CERT |
Use a PEM-encoded TLS certificate for MSR. By default MSR generates a
self-signed TLS certificate during deployment. You can use your own TLS
certificate with |
|
$MSR_EXTERNAL_URL |
URL of the host or load balancer clients use to reach MSR. When you use
this flag, users are redirected to MKE for logging in. Once
authenticated they are redirected to the URL you specify in this flag.
If you don’t use this flag, MSR is deployed without single sign-on with
MKE. Users and teams are shared but users log in separately into the two
applications. You can enable and disable single sign-on within your MSR
system settings. Format |
|
$MSR_KEY |
Use a PEM-encoded TLS private key for MSR. By default MSR generates a
self-signed TLS certificate during deployment. You can use your own TLS
private key with |
|
$MSR_STORAGE_VOLUME |
Note One of three options you can use for MSR backend storage, the other
two being If you have previously configured MSR to use a full path or volume name
for storage, specify the |
|
$MSR_DEFAULT_STORAGE |
Note One of three options you can use for MSR backend storage, the other
two being If cloud storage was previously configured, then the default storage on restore is cloud storage. Otherwise, local storage is used. |
|
$NFS_STORAGE_URL |
Note One of three options you can use for MSR backend storage, the other
two being If NFS was previously configured, you must manually create a storage
volume on each MSR node and specify |
|
$ENABLE_CLIENT_CERT_AUTH |
Enables TLS client certificate authentication; use
|
|
$MSR_PPROF |
Enables pprof profiling of the server. Use |
|
$MSR_EXTENDED_HELP |
Display extended help text for a given command. |
|
$MSR_HTTP_PROXY |
The HTTP proxy used for outgoing requests. |
|
$MSR_HTTPS_PROXY |
The HTTPS proxy used for outgoing requests. |
|
$LOG_HOST |
The syslog system to send logs to.The endpoint to send logs to. Use this
flag if you set |
|
$LOG_LEVEL |
Log level for all container logs when logging to syslog. Default:
|
|
$LOG_PROTOCOL |
The protocol for sending logs. Default is internal.By default, MSR
internal components log information using the logger specified in the
Docker daemon in the node where the MSR replica is deployed. Use this
option to send MSR logs to an external syslog system. The supported
values are tcp, udp, and internal. Internal is the default option,
stopping MSR from sending logs to an external system. Use this flag with
|
|
$MAX_WAIT |
The maximum amount of time MSR allows an operation to complete within.
This is frequently used to allocate more startup time to very large MSR
databases. The value is a Golang duration string. For example, |
|
$NFS_OPTIONS |
Pass in NFS volume options verbatim for the replica specified by
|
|
$NOCOLOR |
Disable output coloring in logs. |
|
$MSR_NO_PROXY |
List of domains the proxy should not be used for.When using
|
|
$REPLICA_HTTP_PORT |
The public HTTP port for the MSR replica. Default is |
|
$REPLICA_HTTPS_PORT |
The public HTTPS port for the MSR replica. Default is |
|
$MSR_INSTALL_REPLICA_ID |
Assign a 12-character hexadecimal ID to the MSR replica. Mandatory. |
|
$RETHINKDB_CACHE_MB |
The maximum amount of space in MB for RethinkDB in-memory cache used by
the given replica. Default is auto. Auto is |
|
$UCP_CA |
Use a PEM-encoded TLS CA certificate for MKE. Download the MKE TLS CA
certificate from |
|
$UCP_INSECURE_TLS |
Disable TLS verification for MKE. The installation uses TLS but always
trusts the TLS certificate used by MKE, which can lead to
man-in-the-middle attacks. For production deployments, use |
|
$UCP_NODE |
The hostname of the MKE node to use to deploy MSR. Random by default. You can find the hostnames of the nodes in the cluster in the MKE web interface, or by running docker node ls on an MKE manager node. Note that MKE and MSR must not be installed on the same node, instead install MSR on worker nodes that will be managed by MKE. |
|
$UCP_PASSWORD |
The MKE administrator password. |
|
$UCP_URL |
The MKE URL including domain and port. |
|
$UCP_USERNAME |
The MKE administrator username. |
|
$REGISTRY_USERNAME |
Set the registry username to use when pulling MSR images. |
|
$REGISTRY_PASSWORD |
Set the registry password to use when pulling MSR images. |
registry.mirantis.com/msr/dtr upgrade
Upgrade a DTR 2.9.x cluster to DTR 2.10.x.
Usage
docker run -it --rm registry.mirantis.com/msr/dtr \
    upgrade [command options]
Description
The dtr upgrade command upgrades DTR 2.9.x to the current version (2.10.x) of the image.
Options
Option |
Environment variable |
Description |
|---|---|---|
|
$DEBUG |
Enable debug mode for additional logs. |
|
$MSR_REPLICA_ID |
The ID of an existing MSR replica. To add, remove or modify MSR, you must connect to an existing healthy replica’s database. |
|
$MSR_EXTENDED_HELP |
Display extended help text for a given command. |
|
$NOCOLOR |
Disable output coloring in logs. |
|
$UCP_CA |
Use a PEM-encoded TLS CA certificate for MKE. Download the MKE TLS CA
certificate from |
|
$UCP_INSECURE_TLS |
Disable TLS verification for MKE. The installation uses TLS but always
trusts the TLS certificate used by MKE, which can lead to
man-in-the-middle attacks. For production deployments, use |
|
$UCP_PASSWORD |
The MKE administrator password. |
|
$UCP_URL |
The MKE URL including domain and port. |
|
$UCP_USERNAME |
The MKE administrator username. |
|
$MAX_WAIT |
The maximum amount of time MSR allows an operation to complete within.
This is frequently used to allocate more startup time to very large MSR
databases. The value is a Golang duration string. For example, |
|
$REGISTRY_USERNAME |
Set the registry username to use when pulling MSR images. |
|
$REGISTRY_PASSWORD |
Set the registry password to use when pulling MSR images. |
Release Notes
This document describes the latest changes, enhancements, known issues, and fixes for Mirantis Secure Registry (MSR) for versions 2.10.x.
2.10.0
Release date |
Name |
Highlights |
|---|---|---|
2026-07-07 |
MSR 2.10.0 |
Initial MSR 2.10 release introducing the following key features:
|
New features and enhancements
MSR 2.10.0 includes the following new features and enhancements:
Cosign and Notary updates
Component and dependency updates
Cosign and Notary updates
MSR introduces Cosign-aware signing in the web UI, deprecates legacy Notary, and adds API endpoints for Notary lifecycle management.
[ENGDTR-4543] Automatic Notary decommissioning
MSR now automatically disables the deprecated Notary subsystem during installation and upgrade when no Notary trust data (signed images) is present on the system.
[ENGDTR-4544] Notary management API endpoints
MSR adds the following API endpoints:
GET /api/v0/admin/notary/status- Reports the current status of the Notary subsystem.POST /api/v0/admin/notary/disable- Initiates decommissioning of the Notary subsystem.
[ENGDTR-4545] Cosign-aware signing
The MSR web UI now distinguishes between Cosign and legacy Notary signatures. The Signed column and image header display the appropriate signing status for each image.
[ENGDTR-4587] Signature facility badges
The MSR web UI now displays signature facility badges on each image tag to indicate whether the tag is signed with Cosign, DCT (Notary), or both:
A blue C badge indicates a valid Cosign signature.
A blue D badge indicates a valid DCT signature.
A red D badge indicates an expired DCT signature.
Both badges can appear together for a single tag. Unsigned tags display no badges. Each badge includes a hover tooltip with additional signature details.
Component and dependency updates
MSR updates the Black Duck security scanner, Docker, and the version-check source used by the upgrade API.
[ENGDTR-4509] Black Duck security scanner update
MSR updates the Black Duck security scanner (previously Synopsys security scanner) to version 2025.12.0. Notable upstream changes since the previous version include the following:
Chainguard container images
Minimus container images
Rust binaries
Go binaries
.NET components
OpenWRT ipkg packages
Wind River Linux
In addition, the following issues are resolved in Black Duck 25.12.0:
False negative CVE-2021-23792 missing from imageio-metadata 3.3.2
Unexpected match .NET 20171205-snapshot-8cb086ca for coreclr.dll
c-ares version is being detected as the wrong version
False negative: Apache Common Beanutils missing vulnerability
freeRTOS false positive match
CVE-2022-3515 mapping to gnupg 2.2.27-3ubuntu2.1
Fixed a memory consumption issue in a background job that applies new vulnerabilities to existing scans
Fixed an issue in distribution backport matching in cases where no backports matched to a component via hash sum; this will improve backport matching for example when linux distribution info is overridden via an analysis configuration file
Improved query for calculating vulnerability counts with large scans
[ENGDTR-4532] Version-check source update for the upgrade API
MSR now retrieves its version update list from registry.mirantis.com
instead of Docker Hub.
Note
Ensure that your network filtering rules allow outbound connections to
registry.mirantis.com so that the MSR web UI can display notification
banners when a new product version becomes available.
[ENGDTR-4541] Docker update
MSR adds support for Docker Engine v25 and v29.
Addressed issues
MSR 2.10.0 is an initial version release, and as such it has no legacy issues that require resolution.
Known issues
This section describes the MSR known issues with available workarounds, along with a list of current product limitations:
(ENGDTR-5013) Cosign signature details not listed in v1 API response
The signatures array returned by the MSR v1 repositories/tags API
does not include entries for Cosign signatures. Only DCT/Notary
signatures are listed there. The cosignSigned field still
correctly reports whether an image has one or more Cosign signatures,
but individual signature details are not enumerated for Cosign.
Workaround
Cosign signing and verification are client-side operations by design.
Use the cosign CLI (for example, cosign tree or cosign
verify) as the source of truth for inspecting and validating Cosign
signatures on an image.
Major component versions
The following table provides the versioning information for the major middleware components that comprise the MSR 2.10.0 patch release.
Security information
MSR 2.10.0 is an initial version release, and as such it has no legacy vulnerabilities or exposures that require resolution.
Deprecations
With the introduction of Cosign in MSR 2.10, Mirantis is deprecating Docker Content Trust (DCT) and the legacy Notary server and signer infrastructure. Although MSR 2.10 maintains backward compatibility for existing signatures, Mirantis will discontinue maintenance and support for the Notary stack in a future release. Users should plan to migrate their signing workflows to the client-only Cosign architecture.
Release Compatibility Matrix
MSR 2.10 Compatibility Matrix
Mirantis Secure Registry (MSR, and formerly Docker Trusted Registry) provides an enterprise grade container registry solution that can be easily integrated to provide the core of an effective secure software supply chain.
Support for MSR is defined in the Mirantis Cloud Native Platform Subscription Services agreement.
MSR |
Kubernetes required |
Compatible MKE versions |
Compatible MCR versions |
|---|---|---|---|
2.10.0 |
1.24 - 1.31 [1] |
3.6.x, 3.7.x, 3.8.x, 3.9.x |
23.x, 25.x, 29.x |
Storage backends
MSR supports the following storage systems:
Persistent volume |
|
Cloud storage providers |
|
Note
MSR cannot be deployed to Windows nodes.
MKE and MSR Browser compatibility
The Mirantis Kubernetes Engine (MKE) and Mirantis Secure Registry (MSR) web user interfaces (UIs) both run in the browser, separate from any backend software. As such, Mirantis aims to support browsers separately from the backend software in use.
Mirantis currently supports the following web browsers:
Browser |
Supported version |
Release date |
Operating systems |
|---|---|---|---|
Google Chrome |
96.0.4664 or newer |
15 November 2021 |
MacOS, Windows |
Microsoft Edge |
95.0.1020 or newer |
21 October 2021 |
Windows only |
Firefox |
94.0 or newer |
2 November 2021 |
MacOS, Windows |
To ensure the best user experience, Mirantis recommends that you use the latest version of any of the supported browsers. The use of other browsers or older versions of the browsers we support can result in rendering issues, and can even lead to glitches and crashes in the event that some JavaScript language features or browser web APIs are not supported.
Important
Mirantis does not tie browser support to any particular MKE or MSR software release.
Mirantis strives to leverage the latest in browser technology to build more performant client software, as well as ensuring that our customers benefit from the latest browser security updates. To this end, our strategy is to regularly move our supported browser versions forward, while also lagging behind the latest releases by approximately one year to give our customers a sufficient upgrade buffer.
MKE, MSR, and MCR Maintenance Lifecycle
The MKE, MSR, and MCR platform subscription provides software, support, and certification to enterprise development and IT teams that build and manage critical apps in production at scale. It provides a trusted platform for all apps which supply integrated management and security across the app lifecycle, comprised primarily of Mirantis Kubernetes Engine, Mirantis Secure Registry (MSR), and Mirantis Container Runtime (MCR).
Mirantis validates the MKE, MSR, and MCR platform for the operating system environments specified in the MCR compatibility matrix, adhering to the maintenance lifecycle detailed here. Support for the MKE, MSR, and MCR platform is defined in the Mirantis Cloud Native Platform Subscription Services agreement.
Detailed here are all currently supported product versions, as well as the product versions most recently deprecated. It can be assumed that all earlier product versions are at End of Life (EOL).
Important Definitions
“Major Releases” (X.y.z): Vehicles for delivering major and minor feature development and enhancements to existing features. They incorporate all applicable Error corrections made in prior Major Releases, Minor Releases, and Maintenance Releases.
“Minor Releases” (x.Y.z): Vehicles for delivering minor feature developments, enhancements to existing features, and defect corrections. They incorporate all applicable Error corrections made in prior Minor Releases, and Maintenance Releases.
“Maintenance Releases” (x.y.Z): Vehicles for delivering Error corrections that are severely affecting a number of customers and cannot wait for the next major or minor release. They incorporate all applicable defect corrections made in prior Maintenance Releases.
“End of Life” (EOL): Versions are no longer supported by Mirantis, updating to a later version is recommended.
GA to 12 months |
12 to 18 months |
18 to 24 months |
|---|---|---|
Full support |
Full support 1 |
Limited Support for existing installations 2 |
1 Software patches for critical bugs and security issues only; no feature enablement.
2 Software patches for critical security issues only.
Mirantis Kubernetes Engine (MKE)
3.9.z |
3.8.z |
|
|---|---|---|
General Availability (GA) |
2026-MAR-24 (3.9.0) |
2024-DEC-4 (3.8.0) |
End of Life (EOL) |
2028-MAR-24 |
2026-DEC-4 |
Release frequency |
x.y.Z every 8 weeks |
x.y.Z every 8 weeks |
Patch release content |
As needed:
|
As needed:
|
Supported lifespan |
2 years 1 |
2 years 1 |
1 Refer to the Support lifecycle table for details.
EOL MKE Versions
MKE Version |
EOL date |
|---|---|
2.0.z |
2017-AUG-16 |
2.1.z |
2018-FEB-07 |
2.2.z |
2019-NOV-01 |
3.0.z |
2020-APR-16 |
3.1.z |
2020-NOV-06 |
3.2.z |
2021-JUL-21 |
3.3.z |
2022-MAY-27 |
3.4.z |
2023-APR-11 |
3.5.z |
2023-NOV-22 |
3.6.z |
2023-OCT-13 |
3.7.z |
2025-AUG-29 |
Mirantis Secure Registry (MSR)
2.10.z |
2.9.z |
|
|---|---|---|
General Availability (GA) |
2026-JUL-07 (2.10.0) |
2021-APR-12 (2.9.0) |
End of Life (EOL) |
2028-JUL-07 |
2026-DEC-01 |
Release frequency |
x.y.Z every 8 weeks |
x.y.Z every 8 weeks |
Patch release content |
As needed:
|
As needed:
|
Supported lifespan |
2 years 1 |
2 years 1 |
1 Refer to the Support lifecycle table for details.
EOL MSR Versions
MSR Version |
EOL date |
|---|---|
2.1.z |
2017-AUG-16 |
2.2.z |
2018-FEB-07 |
2.3.z |
2019-FEB-15 |
2.4.z |
2019-NOV-01 |
2.5.z |
2020-APR-16 |
2.6.z |
2020-NOV-06 |
2.7.z |
2021-JUL-21 |
2.8.z |
2022-MAY-27 |
3.0.z |
2024-APR-20 |
3.1.z |
2025-SEP-27 |
Mirantis Container Runtime (MCR)
Enterprise 29.0 |
Enterprise 25.0 |
|
|---|---|---|
General Availability (GA) |
2026-MAR-24 (29.2.1) |
2024-DEC-04 (25.0.7) |
End of Life (EOL) |
2028-MAR-24 |
2026-DEC-04 |
Release frequency |
x.y.Z every 8 weeks |
x.y.Z every 8 weeks |
Patch release content |
As needed:
|
As needed:
|
Supported lifespan |
2 years 1 |
2 years 1 |
1 Refer to the Support lifecycle table for details.
EOL MCR Versions
MCR Version |
EOL date |
|---|---|
CSE 1.11.z |
2017-MAR-02 |
CSE 1.12.z |
2017-NOV-14 |
CSE 1.13.z |
2018-FEB-07 |
EE 17.03.z |
2018-MAR-01 |
Docker Engine - Enterprise v17.06 |
2020-APR-16 |
Docker Engine - Enterprise 18.03 |
2020-JUN-16 |
Docker Engine - Enterprise 18.09 |
2020-NOV-06 |
Docker Engine - Enterprise 19.03 |
2021-JUL-21 |
MCR 19.03.8+ |
2022-MAY-27 |
MCR 20.10.0+ |
2023-DEC-10 |
MCR 23.0.0+ |
2025-JUN-04 |
Release Cadence and Support Lifecycle
With the intent of improving the customer experience, Mirantis strives to offer maintenance releases for the Mirantis Secure Registry (MSR) software every six to eight weeks. Primarily, these maintenance releases will aim to resolve known issues and issues reported by customers, quash CVEs, and reduce technical debt. The version of each MSR maintenance release is reflected in the third digit position of the version number (as an example, for MSR 2.9 the most current maintenance release is MSR 2.10.0).
In parallel with our maintenance MSR release work, each year Mirantis will develop and release a new major version of MSR, the Mirantis support lifespan of which will adhere to our legacy two year standard.
End of Life Date
The End of Life (EOL) date for MSR 2.9 is 2026-DEC-01.
For more information on MSR version lifecycles, refer to the MKE, MSR, and MCR Maintenance Lifecycle.
The MSR team will make every effort to hold to the release cadence stated here. Customers should be aware, though, that development and release cycles can change, and without advance notice.
Technology Preview features
A Technology Preview feature provides early access to upcoming product innovations, allowing customers to experiment with the functionality and provide feedback.
Technology Preview features may be privately or publicly available and neither are intended for production use. While Mirantis will provide assistance with such features through official channels, normal Service Level Agreements do not apply.
As Mirantis considers making future iterations of Technology Preview features generally available, we will do our best to resolve any issues that customers experience when using these features.
During the development of a Technology Preview feature, additional components may become available to the public for evaluation. Mirantis cannot guarantee the stability of such features. As a result, if you are using Technology Preview features, you may not be able to seamlessly upgrade to subsequent product releases.
Mirantis makes no guarantees that Technology Preview features will graduate to generally available features.
Open Source Components and Licenses
Click any product component license below to download a text file of that license to your local system.