Introduction
Mirantis provides the MSR 4 documentation to help you understand the core concepts of Mirantis Secure Registry 4, and to provide information on how to deploy and operate the product.
Product Overview
Mirantis Secure Registry (MSR) 4 is an Enterprise-grade container registry solution that can be integrated easily with standard Kubernetes distributions to provide tight security controls for cloud native development. Based on Harbor, which is open source and the only CNCF graduated container registry, this Mirantis product can serve as the core of an effective secure software supply chain.
Using MSR 4, you can automate the security of your software supply chain, securely storing, sharing, and managing images in your own private container registry, to automate the security of your software supply chain.
With MSR 4, you can:
Run the software alongside your other applications in any standard Kubernetes version from 1.10 and up, deploying it with Docker Compose or a Helm chart.
Secure artifacts through policies and role-based access control (RBAC), to ensure your container images are free from vulnerabilities.
Improve DevOps collaboration while maintaining clear boundaries, by creating and pushing multiservice applications and images and making these resources accessible within your company.
Accelerate image distribution using peer-to-peer (P2P) preheating capabilities.
Automatically promote images from testing through to production in a controlled manner, thus ensuring that they comply with your defined security minimums, before mirroring containerized content to distributed teams using policy-based controls.
Integrate the software into your development pipeline using webhooks. In this way, policy-based promotion automates compliance checks to secure your application supply chain.
MSR 4 Key Changes
Mirantis Secure Registry 4 marks a major evolution in our container image management solution. With a new foundation based on the CNCF Harbor project, MSR 4 delivers improved performance, scalability, and flexibility for modern DevOps workflows.
This section outlines the key changes and improvements introduced in MSR 4, highlights differences compared to MSR 2 and MSR 3.
Product highlights
This section summarizes the major architectural and functional improvements introduced in MSR 4. These enhancements are designed to increase performance, improve scalability, simplify operations, and align the platform with current cloud-native standards.
Quota Management
Introduces project- and repository-level quotas.
Administrators can enforce storage usage limits across teams.
Helps prevent uncontrolled registry growth in shared environments.
Expanded Replication Targets
MSR 4 extends support for replicating images and artifacts to and from OCI-compatible registries.
Supported targets include:
Docker Hub, Docker Registry v2
AWS Elastic Container Registry (ECR), Azure ACR
Google Container Registry (GCR), Google Artifact Registry
AliCloud Container Registry, Huawei SWR, GitLab, Quay, JFrog Artifactory
Enables hybrid and multi-cloud workflows with minimal configuration.
Modern Image Signing with Cosign and Notary v2
Replaces Docker Content Trust (DCT) and Notary v1 with Cosign and Notary v2.
Cosign and Notary v2 support OCI-native signature formats and validation.
Signatures are stored alongside artifacts, improving integrity enforcement.
Enables keyless signing using OIDC identities.
Aligns with modern DevSecOps practices and cloud-native toolchains.
Enhanced Backup and Restore with Velero
Integrates Velero for backup and disaster recovery.
Supports full and selective repository restoration.
Compatible with AWS, GCP, Azure, and S3-compatible storage.
Enables point-in-time recovery and incremental backups.
SBOM Support (SPDX and CycloneDX)
Supports storage and distribution of Software Bills of Materials (SBOMs).
SPDX and CycloneDX formats are treated as first-class OCI artifacts.
Enables automated compliance checks and dependency transparency.
Modern Image Signing with Cosign
Replaces Docker Content Trust (DCT) and Notary v1 with Cosign and Notary v2.
Supports signing via OIDC without external signing services.
Enables signature validation and artifact integrity with OCI standards.
Enhances integration with Kubernetes-native DevSecOps workflows.
Proxy Caching with Bandwidth Throttling
Integrates Harbor’s proxy cache for upstream image caching.
Reduces bandwidth usage and improves image pull performance.
Administrators can apply speed limits to control network usage.
Enhanced Audit Logging and Observability
Captures detailed audit logs for UI and API-level actions.
Logs include user activity, system events, and admin operations.
Uses structured formats compatible with centralized logging and SIEM tools.
CloudNativeAI Model Registry Support
Supports OCI-format storage for ML models via the CloudNativeAI format.
Unifies container and model artifact management under a single registry.
Enables version control and secure distribution of AI/ML models.
Image Preheating with Dragonfly or Kraken
Supports image preheating using Dragonfly or Kraken.
Frequently used images are pulled to nodes in advance.
Reduces deployment startup times for large workloads.
Dragonfly provides peer-to-peer distribution across clusters.
Differences between MSR versions
Mirantis Secure Registry (MSR) 4 is now based on CNCF Harbor, bringing increased stability, an expanded feature set, and a broader ecosystem of integrations. This document outlines key changes and considerations between MSR versions.
For more information, refer to the full documentation or contact Mirantis.
API
API and webhook behavior has been updated to reflect Harbor’s implementation. These changes support better compatibility with ecosystem tools and simplify DevOps automation.
Architecture
MSR 4 introduces a Kubernetes-native architecture that is more scalable and easier to operate than the legacy Swarm-based design. Legacy components such as RethinkDB and embedded services have been removed or refactored, improving performance and simplifying upgrades.
Artifact Management and CI/CD Pipelines
Helm Support
Helm chart support in MSR 4 is now OCI-compliant. Charts are stored and managed as OCI artifacts rather than through a dedicated Helm repository. Use OCI commands:
helm push oci:///
helm pull oci:///
The helm search repo command is no longer supported. Instead, use the
Harbor UI or the forthcoming Harbor CLI.
This change improves compatibility with OCI tooling but may require minor adjustments to traditional Helm workflows.
Promotion Policies
Promotion policies are not supported in MSR 4. You must adapt CI/CD pipelines to reflect this change.
Authentication and Access Control
OpenID Connect (OIDC) Authentication
MSR 4 replaces legacy SAML support with OpenID Connect (OIDC). OIDC is more suitable for modern applications due to its lightweight protocol, better mobile and microservices compatibility, and broader support across enterprise Identity Providers (IdPs) such as Azure AD, Okta, Google Identity Platform, Amazon Cognito, Ping Identity, IBM Security Verify, OneLogin, and VMware Workspace ONE.
Customers using SAML must configure an IdP that supports SAML-to-OIDC bridging (e.g., Okta, Keycloak, Azure AD).
Role-Based Access Control (RBAC)
MSR 4 removes the legacy Teams and Enzi components. You must now add users manually to projects to configure access. Group-based access is supported only through AD Groups, which requires integration with LDAP/AD and OIDC.
For more information, refer to Authentication Configuration.
Database
MSR 4 replaces the legacy RethinkDB backend with PostgreSQL, an industry-standard relational database known for stability and scalability. This transition improves data consistency, query performance, and operational resilience in high-demand environments. PostgreSQL also simplifies administrative tasks and aligns MSR 4 with enterprise database best practices.
Deployment and Infrastructure Support
Swarm Support and HA
Upstream Harbor does not support Swarm. You can deploy MSR 4 as a single-node instance using Docker Compose. High availability (HA) requires Kubernetes. Most customers with HA needs already have Kubernetes and can use it for production deployments.
Backup and Disaster Recovery
MSR 2 and MSR 3 included built-in backup capabilities. MSR 4 requires external backup management using Velero, an open-source tool widely used in enterprise Kubernetes environments, including Azure.
Velero supports backup and restore, but it requires a Kubernetes-based deployment. Unlike earlier versions, MSR 4 does not provide native backup functionality.
For more information, refer to Backup Guide.
Upgrades
All MSR 4 upgrades are supported as in-place operations. You no longer need to use disruptive blue-green or backup-restore strategies. Administrators can apply version updates with less downtime and lower operational complexity.
For more information, refer to Upgrade Guide.
Job Runner for Background Task Execution
The MSR 4 job runner, inherited from Harbor’s job service, provides a modernized mechanism for executing background tasks such as garbage collection, replication, scanning, and retention.
Compared to MSR 2, the new job runner supports distributed execution, automatic retry policies, improved error reporting, and detailed job history. These features improve observability and reliability for registry operations.
Long Repository Names (256 Characters)
MSR 4 supports repository path lengths up to 256 characters, aligning with OCI registry specifications. This support enables deeper project namespaces and more descriptive naming, which are common in enterprise CI/CD pipelines.
Migration
CNCF MSR 4 supports mirroring-based migration from MSR 2 and MSR 3. The following elements transfer automatically:
Repositories
Images
Permissions
Push and Pull Mirroring Policies
Roles
Helm Charts
This migration method uses mirroring, which reduces the need for extended downtime or manual migration tools like MMT. MSR 2 or 3 can remain active alongside MSR 4, allowing teams to update pipelines while maintaining system availability.
For more information, refer to Migration Guide.
Summary
Migrating to MSR 4 improves performance, simplifies upgrades, and expands feature capabilities. However, functional changes may require you to adjust authentication, promotion workflows, and backup strategies.
Review the changes outlined in this document and plan your migration accordingly.
Removed features
The following capabilities available in previous MSR versions are not included in MSR 4:
SAML Support: MSR4 no longer supports SAML authentication and instead uses OpenID Connect (OIDC), a more modern and flexible standard that better aligns with cloud-native environments and improves security and scalability. Please refer to OIDC Authentication for more information on configuring OIDC.
Promotion Policies: Automated promotion policies are no longer included. Customers can adapt their CI/CD pipelines to achieve similar workflows.
Swarm support customers can use MSR4 as a single instance for Swarm environments instead of HA clusters
Feature |
MSR4 (Harbor-Based) |
MSR2 |
MSR3 |
|---|---|---|---|
Distribution |
CNCF Harbor |
Proprietary |
Proprietary |
Database |
PostgreSQL |
RethinkDB |
RethinkDB |
Redis (Caching) |
Yes |
Yes |
Yes |
Orchestration |
Kubernetes-native |
Docker Swarm |
Docker Swarm |
OCI Compliance |
Full OCI and Helm OCI support |
Limited support |
Limited support |
User Interface |
Modern and intuitive |
Basic |
Improved |
Quotas |
Fully supported |
Not available |
Not available |
Vulnerability Scanning |
Trivy, Grype, Aqua, Anchore, and others |
Synopsis (built-in) |
Synopsis (built-in) |
Backup Integration |
Velero-based backup/restore |
Manual/internal |
Manual/internal |
Promotion Policies |
Not Available |
Available |
Available |
SAML Support |
Replaced by OIDC |
Available |
Available |
In-Place Upgrades |
Yes |
No |
No |
Image Signing |
Uses Cosign for image signing and verification |
Uses Docker Content Trust (DCT) based on Notary v1 |
Uses Docker Content Trust (DCT) based on Notary v1 |
Long Repository Names |
256 characters |
Limited |
Limited |
SBOM Support |
SPDX, CycloneDX |
Not available |
Not available |
Artifact Replication |
Docker Hub, AWS ECR, GCR, GitLab, Quay, etc. |
Limited |
Limited |
Proxy Cache and Throttling |
Full support with bandwidth control |
Not available |
Not available |
Audit Logging |
Extended API/UI activity tracking |
Basic |
Basic |
AI Model Registry |
Supported via CloudNativeAI |
Not available |
Not available |
Preheat |
Dragonfly-based P2P preheat |
Not available |
Not available |
Architecture
The Mirantis Secure Registry (MSR) Reference Architecture provides comprehensive technical information on MSR, including component particulars, infrastructure specifications, and networking and volumes detail.
Reference Architecture
The diagram shown below is the high-level architecture of the MSR 4 solution.

As per the diagram, the MSR 4 solution contains:
MSR can also be integrated with various auxiliary services, for more information refer to Integration.
Consumers Layer
MSR 4 natively supports various related clients, including the Docker CLI, Cosign client, and OCI-compatible clients like Oras and Helm. In addition to these clients, MSR 4 features a web portal that enables administrators to manage and monitor all artifacts seamlessly.
The MSR 4 Web Portal is a graphical user interface that helps users manage images on the Registry.
Fundamental Services Layer
These are the core functional services of MSR 4, including Proxy, Core, and Job services, all built on Harbor. This layer can also accommodate third-party services installed and integrated to enhance functionality, such as improved replication, advanced logging capabilities, and additional integration drivers.

Core
Harbor’s core service, which provides the following functions, is illustrated in the diagram below:

Function |
Description |
|---|---|
API Server |
An HTTP server that accepts REST API requests and responds by utilizing its submodules, including Authentication and Authorization, Middleware, and API Handlers, to process and manage the requests effectively. |
Authentication and Authorization |
The authentication service can secure requests, which can be powered by a local database, AD/LDAP, or OIDC. The RBAC (Role-Based Access Control) mechanism authorizes actions such as pulling or pushing images. The Token service issues tokens for each Docker push/pull command based on the user’s role within a project. If a request from a Docker client lacks a token, the Registry redirects the request to the Token service for token issuance. |
Middleware |
This component preprocesses incoming requests to determine whether they meet the required criteria before passing them to backend services for further processing. Various functions, including quota management, signature verification, vulnerability severity checks, and robot account parsing, are implemented as middleware. MSR4 supports Cosign for image signing and verification. Cosign is part of the Sigstore project. Cosign allows signing without relying on a separate, heavyweight service like Notary and supports keyless signing with OIDC identities. Harbor integrates this natively, providing better interoperability with Kubernetes-native tools and workflows. |
API Handlers |
These handle the corresponding REST API requests, primarily parsing and validating request parameters. They execute the business logic associated with the relevant API controller and generate a response, which is then written back to the client. |
API Controller |
The API controller plays a critical role in orchestrating the processing of REST API requests. It’s a key component within the system’s architecture that manages the interaction between the user’s requests and the backend services. |
Configuration Manager |
Manages all system configurations, including settings for authentication types, email configurations, certificates, and other essential parameters. |
Project Management |
Oversees the core data and associated metadata of projects, which are created to isolate and manage the artifacts effectively. |
Quota Manager |
Manages project quota settings and validates quotas whenever new pushes are made, ensuring that usage limits are followed. |
Chart Controller |
Acts as a proxy for chart-related requests to the OCI-compatible registry backend and provides various extensions to enhance the chart management experience. |
Retention Manager |
Manages tag retention policies and oversees the execution and monitoring of tag retention processes, ensuring efficient storage management. |
Content Trust |
Enhances the trust capabilities provided by the backend Cosign, facilitating a seamless content trust process for secure and verified operations. |
Replication Controller |
Manages replication policies and registry adapters while also triggering and monitoring concurrent replication processes to ensure consistency and reliability across systems. |
Scan Manager |
Oversees multiple configured scanners from different providers and generates scan summaries and reports for specified artifacts, ensuring comprehensive security and vulnerability assessments. |
Label Manager |
The Label Manager is responsible for the creation and management of labels that can be applied to projects and resources within the registry. |
P2P Manager |
This component is crucial for enhancing the efficiency of image distribution across different instances using peer-to-peer (P2P) technology. It’s role involves setting up and managing P2P preheat provider instances. These instances allow specified images to be preheated into a P2P network, facilitating faster access and distribution across various nodes. |
Notification Manager (Webhook) |
A mechanism configured in Harbor that sends artifact status changes to designated webhook endpoints. Interested parties can trigger follow-up actions by listening to related webhook events, such as HTTP POST requests or Slack notifications. |
OCI Artifact Manager |
The core component manages the entire lifecycle of OCI artifacts across the Harbor registry, ensuring efficient storage, retrieval, and management. |
Registry Driver |
Implemented as a registry client SDK, it facilitates communication with the underlying registry (currently Docker Distribution), enabling seamless interaction and data management. |
Robot Manager |
The Robot Manager manages robot accounts, which are used to automate operations through APIs without requiring interactive user login. These accounts facilitate automated workflows such as CI/CD pipelines, allowing tasks like pushing or pulling images and Helm charts, among other operations, through command-line interfaces (CLI) like Docker and Helm. |
Log Collector |
Responsible for aggregating logs from various modules into a centralized location, ensuring streamlined access and management of log data. |
GC Controller |
Manages the online garbage collection (GC) schedule, initiating and tracking the progress of GC tasks to ensure efficient resource utilization and cleanup. |
Traffic Proxy |
The Traffic Proxy in Harbor primarily functions through its Proxy Cache feature, which allows Harbor to act as a middleman between users and external Docker registries. |
Job Service
The MSR 4 Job Service is a general job execution queue service to let other components/services submit requests of running asynchronous tasks concurrently with simple restful APIs.
Trivy
Trivy is a powerful and versatile security scanner with tools to detect security vulnerabilities across various targets, ensuring comprehensive scans for potential issues. However, if customers prefer to use a different scanner, MSR 4 allows such customization in the configuration.
Data Access Layer
The MSR 4 Data Access Layer manages data storage, retrieval, and caching within the system. It encompasses Key-Value storage for caching, an SQL database for storing metadata such as project details, user information, policies, and image data, and Data Storage, which serves as the backend for the registry.

Data Access Layer Elements |
Description |
|---|---|
Key Value Storage |
MSR 4 Key-Value (K-V) storage, powered by Redis, provides data caching functionality and temporarily persists job metadata for the Job Service. |
Database |
The MSR 4 database stores essential metadata for Harbor models, including information on projects, users, roles, replication policies, tag retention policies, scanners, charts, and images. PostgreSQL is used as the database solution. |
Data Storage |
Multiple storage options are supported for data persistence, serving as backend storage for the OCI-compatible registry. |
Integration
Functional services can be integrated with various auxiliary services, including publicly available providers and locally hosted corporate services.
Identity providers
Identity providers are centralized Identity and Access Management solutions, such as AD/LDAP or OIDC, that can be seamlessly integrated with MSR 4.
Metrics Observability
MSR 4 can be integrated with Prometheus to centralize the collection and management of metrics.
Scan providers
MSR 4 supports integration with multiple scanning providers. As mentioned in the core services, Trivy is used by default.
Registry providers
Multiple providers can support image storage in MSR 4. By default, MSR 4 uses an internal registry that stores data on Data Storage, as outlined in the Data Access Layer. Alternatively, various registry providers can be enabled, including:
Distribution (Docker Registry)
Docker Hub
Huawei SWR
Amazon ECR
Google GCR
Azure ACR
Ali ACR
Helm Hub
Quay
Artifactory
GitLab Registry
Once a provider is attached, MSR 4 will use it as a backend registry replication, pushing and pulling images. For more information regarding the replication and Backend Registry configuration please refer to the Configuring Replication.
Deployment
MSR 4 is deployed using Helm charts and supports two primary deployment options to address different operational and scalability needs:
All-in-One on a Single Node
Multi-Node High Availability (HA)
Explore the sections below to learn more about each deployment model and how to get started.
Deployment Options
MSR 4 offers two primary deployment options, each with the flexibility to accommodate various modifications. For instance, in the all-in-one deployment, local storage can be replaced with shared storage, and databases or key-value stores can be made remote. This adaptability allows MSR 4 to support various configurations and deployment scenarios.
However, to establish a standardized approach, we propose two primary deployment options tailored for specific use cases:
All-in-One on a Single Node – Ideal for testing and development
Multi-Node HA Deployment – Designed for production environments
Since MSR 4 operates as a Kubernetes workload, all of its core services run as Kubernetes pods. As a result, we consider a worker node as the minimum footprint for an all-in-one MSR 4 deployment, and three workers as the minimum footprint for an HA deployment. Master nodes, however, are not included in this count, giving you the flexibility to design and deploy the underlying Kubernetes cluster according to your needs.
All-in-one Deployment
The All-in-One Deployment consolidates all services onto a single worker node, making it the most straightforward way to deploy MSR 4. In this setup, all services run as single-instance components without high availability (HA) or replication. Such approach is not applicable for production usage but is useful for testing or Proof of Concept. Refer to the installation guidance in the MSR 4 documentation Install MSR on a Single Host using Docker Compose or you can use a Helm chart approach (that is mentioned in HA deployment variant) instead, but scaling replicas to 1 in variables configuration.
While this deployment effectively showcases MSR 4’s capabilities and functionality, it is not intended for production use due to its lack of redundancy. Instead, it is a lightweight option suitable for demonstrations, training, testing, and development.
The following diagram illustrates a single worker node running all MSR 4-related services.

There are two methods for installing the all-in-one MSR 4:
Using Kubernetes Helm
Each approach has its own advantages. The Kubernetes method is similar to High Availability (HA) mode and allows for easy scaling from a single-node to a multi-node deployment. On the other hand, Docker Compose is ideal for those not using Kubernetes in their infrastructure, enabling them to leverage MSR 4’s capabilities by running all services in containers.
High Availability Deployment
The Highly Available (HA) Deployment of MSR 4 is distributed across three or more worker nodes, ensuring resilience and reliability through multiple service instances. For installation guidance, refer to the Install MSR with High Availability.
A key aspect of this deployment is that Job Service and Registry utilize a shared volume, which should be backed by a non-local, shared file system or external storage cluster, such as Ceph (CephFS). Additionally, Redis and PostgreSQL run in a replicated mode within this example, co-hosted on the same worker nodes as MSR 4’s core services. However, it is also possible to integrate existing corporate Redis and PostgreSQL instances outside of these nodes, leveraging an enterprise-grade key-value store and database infrastructure.
The following diagram illustrates the service placement in an HA deployment. Dashed boxes indicate potential additional replicas for certain services. As a reference, we recommend deploying at least two instances of Portal, Core, Job Service, Registry, and Trivy—though this number can be adjusted based on specific requirements, workload, and use cases. These services are not quorum-based.
While the number of replicas for these services can scale as needed, Redis and PostgreSQL must always have a minimum of three replicas to ensure proper replication and fault tolerance. This requirement should be carefully considered when planning a production deployment. Redis and PostgreSQL are quorum-based services, so the number of replicas should always be odd, specifically 1, 3, 5, and so on.
The reference HA deployment of an MSR 4 is presented in the following diagram.

Components Deployment
As previously emphasized, MSR 4 components operate as a Kubernetes workload. This section provides a reference visualization of the resources involved in deploying each component. Additionally, it outlines how service deployment differs between a single-node and a highly available (HA) setup, highlighting key structural changes in each approach.
MSR 4 deployment includes the following components:
The reference between these components is illustrated in the following diagram:

Web Portal
The Web Portal is a graphical user interface designed to help users manage images within the Registry. To ensure scalability and redundancy, it is deployed as a ReplicaSet, with a single instance in an All-in-One deployment and multiple instances in a Highly Available (HA) setup. These replicas are not quorum-based, meaning there are no limits on the number of replicas. The instance count should be determined by your specific use case and load requirements. To ensure high availability, it is recommended to have at least two replicas.

Proxy (API Routing)
An API proxy, specifically NGINX, runs as a ReplicaSet. It can operate with a single instance in All-in-One deployments or scale with multiple instances in an HA deployment. The proxy uses a ConfigMap to store the nginx.conf and a Secret to provide and manage TLS certificates.
Important to know is that if services are exposed through Ingress, the NGINX Proxy will not be utilized. It happens because the Ingress controller in Kubernetes, often NGINX-based, handles the required tasks such as load balancing and SSL termination. So in such a case, all the functionality of an API Routing Proxy will be handed over to Ingress.

Core
The Core is a monolithic application that encompasses multiple controller and manager functions. The Fundamental Services -> Core section provides a detailed description. It is deployed as a Replica Set, with a single instance for All-in-One deployments and multiple replicas for HA deployments. These replicas are not quorum-based, meaning there are no limits on the number of replicas. The instance count should be determined by your specific use case and load requirements. To ensure high availability, it is recommended to have at least two replicas. The Core uses a ConfigMap to store non-sensitive configurations while securely attaching encrypted parameters, such as passwords, to sensitive data.

Job Service
The Harbor Job Service runs as a ReplicaSet, with a single replica in All-in-One deployments and multiple replicas in HA deployments. These replicas are not quorum-based, meaning there are no limits on the number of replicas. The instance count should be determined by your specific use case and load requirements. To ensure high availability, it is recommended to have at least two replicas. It utilizes a PVC to store job-related data, which can be configured using local or remote shared storage. Please refer to the separate Storage section for more details on storage options. The Job Service also uses a ConfigMap to retrieve the config.yaml and a Secret to access sensitive parameters, such as keys and passwords.

Registry
The Harbor Registry is deployed as a ReplicaSet, running as a single instance in All-in-One deployments and supporting multiple replicas in HA mode. These replicas are not quorum-based, meaning there are no limits on the number of replicas. The instance count should be determined by your specific use case and load requirements. To ensure high availability, it is recommended to have at least two replicas. Like the Job Service, it utilizes a PVC to store registry data, using either local or shared backend storage. For more details on storage options, please refer to the Storage section. The Registry workload relies on a ConfigMap to store the config.yaml and uses Secrets to manage sensitive parameters, such as keys and passwords.

Tivy
The Trivy service is deployed as a StatefulSet and utilizes a PVC, with a separate volume for each Trivy instance. The number of instances can range from a single instance in All-in-One deployments to multiple instances in HA deployments. These replicas are not quorum-based, meaning there are no limits on the number of replicas. The instance count should be determined by your specific use case and load requirements. To ensure high availability, it is recommended to have at least two replicas. Trivy also uses a Secret to store connection details for the Key-Value store.

K-V storage
Unlike other fundamental services in MSR 4, K-V storage is part of the Data Access Layer. It can either be installed as a simplified, single-instance setup using the same Harbor Helm Chart suitable for All-in-One deployments or deployed in HA mode using a separate Redis Helm Chart. Alternatively, an individual instance of K-V storage can be used and integrated into MSR 4 as an independent storage service. In this case, it is not considered part of the deployment footprint but rather a dependency managed by a dedicated corporate team. While a remote service is an option, it is not part of the reference architecture and is more suited for specific customization in particular deployment scenarios.
Single Node Deployment Redis
It is a simplified, single-instance Redis deployment that runs as a StatefulSet and utilizes a PVC for storage.

HA Deployment Redis
Unlike the previous single-instance deployment, this setup is more robust and comprehensive. It involves deploying K-V Redis storage in replication mode, distributed across multiple worker nodes. This configuration includes two types of pods: replicas and master. Each pod uses a PVC for storage and a ConfigMap to store scripts and configuration files, while sensitive data, such as passwords, is securely stored in a Secret.
Redis is a quorum-based service, so the number of replicas should always be odd—specifically 1, 3, 5, and so on.

SQL Database
Like K-V Storage, the SQL Database service is not part of the Fundamental Services but is included in the Data Access Layer. It can be installed as a simplified, single-instance setup using the same Harbor Helm Chart, making it suitable for All-in-One deployments, or deployed in HA mode using a separate PostgreSQL Helm Chart. Alternatively, a separate SQL Database instance can be integrated into MSR 4 as an independent storage service. In this case, it is considered a dependency rather than part of the deployment footprint and is managed by a dedicated corporate team. While a remote service is an option, it is not part of the reference architecture and is more suited for custom deployments based on specific needs.
Single Node Deployment
This is a streamlined, single-instance PostgreSQL deployment that runs as a StatefulSet and utilizes a PVC for storage.

HA Deployment
Unlike the previous single-node deployment, this setup is more robust and comprehensive. It involves deploying PostgreSQL in replication mode across multiple worker nodes. The configuration includes two types of pods: replicas, managed as a StatefulSet, and pgpool, running as a ReplicaSet. Each pod uses a PVC for storage and a ConfigMap to store scripts and configuration files, while sensitive data, such as passwords, is securely stored in a Secret.
Pgpool operates as an efficient middleware positioned between PostgreSQL servers and PostgreSQL database clients. It maintains and reuses connections to PostgreSQL servers. When a new connection request with identical properties (such as username, database, and protocol version) is made, Pgpool reuses the existing connection. This minimizes connection overhead and significantly improves the system’s overall throughput.
PostgreSQL is a quorum-based service, so the number of replicas should always be odd—specifically 1, 3, 5, and so on.

Deployment Resources
MSR 4 deployment is performed through the Helm charts. The following resources, described in the following tables, are expected to be present in the environment after the deployment.
Harbor Helm Chart
Please note that the type and number of resources may vary based on the deployment configuration and the inclusion of additional services.
Secret
Name |
Namespace |
Description |
|---|---|---|
msr-4-harbor-core |
default |
Stores data needed for integration with other fundamental and data storage services and API-related keys, certificates, and passwords for DB integration. |
msr-4-harbor-database |
default |
Contains a DB password. |
msr-4-harbor-jobservice |
default |
Contains a job service secret and a registry credential password. |
msr-4-harbor-nginx |
default |
Contains TLS certs for API proxy. |
msr-4-harbor-registry |
default |
Contains a registry secret and Redis password. |
msr-4-harbor-registry-htpasswd |
default |
Contains the registry password. |
msr-4-harbor-registryctl |
default |
Contains registry-controller sensitive configuration. |
msr-4-harbor-trivy |
default |
Contains Trivy reference to Redis K-V storage. |
ConfigMap
Name |
Namespace |
Description |
|---|---|---|
msr-4-harbor-core |
default |
Stores configuration for core services, defining integrations, databases, URLs, ports, and other non-sensitive settings (excluding passwords, keys, and certs). |
msr-4-harbor-jobservice-env |
default |
Job service configuration parameters such as URLs, ports, users, proxy configuration, etc. |
msr-4-harbor-jobservice |
default |
A job service config.yaml. |
msr-4-harbor-nginx |
default |
Nginx.config. |
msr-4-harbor-portal |
default |
Portal virtual host HTTP config. |
msr-4-harbor-registry |
default |
Registry config.yaml. |
msr-4-harbor-registryctl |
default |
Register controller configuration. |
PersistentVolumeClaim
Name |
Namespace |
Description |
|---|---|---|
msr-4-harbor-jobservice |
default |
PVC for job service. |
msr-4-harbor-registry |
default |
PVC for registry. |
Service
Name |
Namespace |
Description |
|---|---|---|
msr-4-harbor-core |
default |
Service for Core. |
msr-4-harbor-database |
default |
Service for DB. |
msr-4-harbor-jobservice |
default |
Service for Job Service. |
harbor |
default |
Service for Harbor. |
msr-4-harbor-portal |
default |
Service for Portal. |
msr-4-harbor-redis |
default |
Service for k-v Redis. |
msr-4-harbor-registry |
default |
Service for Registry. |
msr-4-harbor-trivy |
default |
Service for Trivy. |
Deployment
Name |
Namespace |
Description |
|---|---|---|
msr-4-harbor-core |
default |
A Deployment configuration for Core. |
msr-4-harbor-jobservice |
default |
A Deployment configuration for Job Service. |
msr-4-harbor-nginx |
default |
A Deployment configuration for Proxy. |
msr-4-harbor-portal |
default |
A Deployment configuration for Portal. |
msr-4-harbor-registry |
default |
A Deployment configuration for Registry. |
ReplicaSet
Name |
Namespace |
Description |
|---|---|---|
msr-4-harbor-core |
default |
A ReplicaSet configuration for Core. |
msr-4-harbor-jobservice |
default |
A ReplicaSet configuration for Job Service. |
msr-4-harbor-nginx |
default |
A ReplicaSet configuration for Proxy. |
msr-4-harbor-portal |
default |
A ReplicaSet configuration for Portal. |
msr-4-harbor-registry |
default |
A ReplicaSet configuration for Registry. |
StatefulSet
Name |
Namespace |
Description |
|---|---|---|
msr-4-harbor-database |
default |
A StatefulSet configuration for DB. |
msr-4-harbor-redis |
default |
A StatefulSet configuration for k-v. |
msr-4-harbor-trivy |
default |
A StatefulSet configuration for Trivy. |
Redis Helm Chart
For a Highly Available (HA) deployment, a dedicated Redis Helm chart can be used to deploy a Redis instance, ensuring distribution across nodes for replication and enhanced reliability.
NetworkPolicy
Name |
Namespace |
Description |
|---|---|---|
redis |
default |
A NetworkPolicy for Redis declares an ingress port for exposure. |
PodDisruptionBudget
Name |
Namespace |
Description |
|---|---|---|
redis-master |
default |
Helps maintain the availability of applications during voluntary disruptions like node drains or rolling updates. It specifies the minimum number or percentage of pods that must remain available during a disruption for redis-master pods. |
redis-replicas |
default |
It’s the same for replica pods. |
ServiceAccount
Name |
Namespace |
Description |
|---|---|---|
redis-master |
default |
Service account configuration for redis-master. |
redis-replicas |
default |
Service account configuration for redis-replicas. |
Secrets
Name |
Namespace |
Description |
|---|---|---|
redis |
default |
It contains a Redis password. |
ConfigMaps
Name |
Namespace |
Description |
|---|---|---|
redis-configuration |
default |
Master.conf, redis.conf, replica.conf. |
redis-health |
default |
Multiple .sh files with health checks. |
redis-scripts |
default |
start-master.sh and start-replica.sh. |
Services
Name |
Namespace |
Description |
|---|---|---|
redis-headless |
default |
Service for redis-headless. |
redis-master |
default |
Service for redis-master. |
redis-replicas |
default |
Service for redis-replica. |
StatefulSet
Name |
Namespace |
Description |
|---|---|---|
redis-master |
default |
StatefulSet configuration for redis-master. |
redis-replicas |
default |
StatefulSet configuration for redis-replica. |
PostgreSQL Helm Chart
PostgreSQL helm chart {#postgresql-helm-chart}
For a Highly Available (HA) deployment, a dedicated PostgreSQL Helm chart can be used to deploy a PostgreSQL instance, ensuring distribution across nodes for replication and enhanced reliability.
NetworkPolicy
Name |
Namespace |
Description |
|---|---|---|
postgresql-ha-pgpool |
default |
A NetworkPolicy for PostgreSQL pgpool declares an ingress port for exposure. |
postgresql-ha-postgresql |
default |
A NetworkPolicy for PostgreSQL declares an ingress port for exposure. |
PodDisruptionBudget
Name |
Namespace |
Description |
|---|---|---|
postgresql-ha-pgpool |
default |
Helps maintain the availability of applications during voluntary disruptions like node drains or rolling updates. It specifies the minimum number or percentage of pods that must remain available during a disruption for postgres-pgpool pods. |
postgresql-ha-postgresql |
default |
It’s the same for PostgreSQL replicas. |
postgresql-ha-postgresql-witness |
default |
It’s the same for PostgreSQL witness. |
ServiceAccount
Name |
Namespace |
Description |
|---|---|---|
postgresql-ha |
default |
A Service Account configuration for PostgreSQL. |
Secrets
Name |
Namespace |
Description |
|---|---|---|
postgresql-ha-pgpool |
default |
A Service Account configuration for PostgreSQL pgpool. |
postgresql-ha-postgresql |
default |
A Service Account configuration for PostgreSQL replicas. |
ConfigMaps
Name |
Namespace |
Description |
|---|---|---|
postgresql-ha-postgresql-hooks-scripts |
default |
pre-stop.sh and readiness-probe.sh. |
Services
Name |
Namespace |
Description |
|---|---|---|
postgresql-ha-pgpool |
default |
A Service configuration for PostgreSQL pgpool. |
postgresql-ha-postgresql-headless |
default |
A Service configuration for PostgreSQL headless. |
postgresql-ha-postgresql |
default |
A Service configuration for PostgreSQL replicas. |
Deployments
Name |
Namespace |
Description |
|---|---|---|
postgresql-ha-pgpool |
default |
A Deployment configuration for PostgreSQL pgpool. |
StatefulSet
Name |
Namespace |
Description |
|---|---|---|
postgresql-ha-postgresql |
default |
A StatefulSet configuration for PostgreSQL replicas. |
System requirements
To learn more about Mirantis Secure Registry (MSR) system requirements go to Prerequisites in the Installation Guide.
Storage
Storage is a critical component of the MSR 4 deployment, serving multiple purposes, such as temporary job-related data and image storage. It can be configured as local storage on the worker nodes or as shared storage, utilizing a remote standalone storage cluster like Ceph, or by attaching a dedicated storage application license.
Local
Local storage is used for non-critical data that can be safely discarded during development, testing, or when service instances are reinitialized. This setup is primarily applicable in All-in-One deployments or when storage redundancy is provided through hardware solutions, such as RAID arrays on the worker nodes.
Volumes
Please refer to the
Volume access type
outlined in the installation section. While volumes used in
All-in-One deployments can utilize
the WriteToOne access mode, volumes that leverage shared storage may be
configured with the ReadWriteMany access mode. This allows the same volume
to be accessed by multiple replicas of services, such as Job Service or
Registry.
External
Please be aware that Harbor also offers the capability to integrate with external object storage solutions, allowing data to be stored directly on these platforms without the need for configuring Volumes and Persistent Volume Claims (PVCs). This integration remains optional.
Networking
MSR 4 is deployed as a workload within a Kubernetes (K8s) cluster and offers multiple deployment options. The diagram below illustrates the network communication between the MSR 4 components.

Network communication between the MSR 4 components varies depending on the deployment configuration.
In a closed deployment, where all components—including Data Layer services—are deployed within the same Kubernetes cluster (either as an all-in-one or high-availability setup), communication occurs over the internal workload network. These components interact through Kubernetes Service resources, with the only externally exposed endpoints belonging to MSR 4. To ensure security, these endpoints must be protected with proper firewall configurations and TLS encryption.
For deployments where Data Layer components are remote, as depicted in the diagram, communication must be secured between the Cluster IP network used by Kubernetes worker nodes and the external endpoints of the key-value (K-V) and database (DB) storage systems.
For a comprehensive list of ports requiring security configurations, refer to Network requirements.
Security
Securing MSR 4 requires a comprehensive approach that encompasses all its components, including Harbor, Redis, and PostgreSQL running on Kubernetes, along with additional services such as Trivy and others if enabled. Ensuring the integrity, confidentiality, and availability of data and services is paramount.
This section provides guidance on securing both individual system components and the broader Kubernetes environment.
By implementing security best practices for Kubernetes, Harbor, Redis, and PostgreSQL, you can enhance the security, reliability, and resilience of MSR 4 against potential threats. Continuous monitoring and proactive assessment of your security posture are essential to staying ahead of emerging risks.
Kubernetes Security
Kubernetes serves as the foundation for MSR 4, making its security a top priority. Adhering to best practices and maintaining vigilance over the underlying infrastructure that supports MSR 4 is essential.
Since MSR 4 is deployed as a workload within Kubernetes, the following sections outline best practices and recommendations for strengthening the security of the underlying infrastructure.
Access Control
To ensure security, the MSR 4 workload should be isolated from other services within the cluster. Ideally, it should be the only workload running on a dedicated Kubernetes cluster. However, if it is co-hosted with other applications, strict access control becomes essential.
A well-configured Role-Based Access Control (RBAC) system is crucial in such cases. Kubernetes RBAC should be enabled and carefully configured to enforce the principle of least privilege, ensuring that each component has only the necessary permissions.
Additionally, using dedicated service accounts for each MSR 4 component, such as Harbor, Redis, and PostgreSQL, helps minimize the attack surface and prevent unnecessary cross-service access.
Securing the Kubernetes platform itself is equally important. The API server must be protected against unauthorized access by implementing strong authentication mechanisms, such as certificate-based or token-based authentication. These measures help safeguard MSR 4 and its infrastructure from potential threats.
Network Policies
Defining proper Network Policies is essential to restrict traffic between pods and ensure that only authorized components, such as Redis and PostgreSQL, can communicate with each other and with Harbor.
As outlined in the deployment resources, specific NetworkPolicies are provided for Redis and PostgreSQL when they are deployed separately from the Harbor core. The same level of attention must be given to securing remote data storage solutions if they are used, ensuring that communication remains controlled and protected from unauthorized access.
Secrets Management
Kubernetes Secrets store sensitive information such as passwords and tokens, making their protection a critical aspect of security.
Enabling encryption of secrets at rest using Kubernetes’ built-in encryption feature ensures that even if an attacker gains access to the backend storage, they cannot easily retrieve the secrets’ contents.
For environments with more complex security requirements, integrating an external secrets management solution like HashiCorp Vault can provide an additional layer of protection, offering enhanced control and security for sensitive data.
TLS Encryption
All internal communications within the Kubernetes cluster must be encrypted using TLS to protect data in transit.
Kubernetes’ native support for TLS certificates should be utilized, or alternatively, integration with a service like cert-manager can streamline certificate management through automation.
Implementing these measures ensures secure communication between components and reduces the risk of unauthorized access or data interception.
Harbor Security
Harbor serves as the container registry in MSR 4, making its security crucial for safeguarding both container images and their associated metadata. Ensuring proper security measures are in place helps protect against unauthorized access, image tampering, and potential vulnerabilities within the registry.
Image Signing and Scanning
Cosign is used to sign images stored in Harbor, ensuring their authenticity and providing a layer of trust.
In addition, vulnerability scanning via Trivy is enabled by default for all images pushed to Harbor. This helps identify potential security flaws before the images are deployed, ensuring that only secure and trusted images are used in production environments.
Secure Communication
It is crucial to configure Harbor to use HTTPS with strong SSL/TLS certificates to secure client-server communications.
For production environments, corporate-signed certificates should be used rather than self-signed ones. Self-signed certificates are acceptable only for testing purposes and should not be used in production, as they do not provide the same level of trust and security as certificates issued by a trusted certificate authority.
Registry Hardening
For added security, it is important to assess your specific use case and disable any unused features in Harbor, such as unnecessary APIs, to reduce the attack surface. Regularly reviewing and disabling non-essential functionalities can help minimize potential vulnerabilities.
Additionally, credentials used to access Harbor—such as API tokens and system secrets—should be rotated regularly to enhance security.
Since these credentials are not managed by the internal MSR 4 mechanism, it is recommended to use third-party CI tools or scripts to automate and manage the credential rotation process, ensuring that sensitive resources are updated and protected consistently.
K-V Storage (Redis) Security
Redis is an in-memory data store, and securing its configuration and access is critical to maintaining the integrity of cached data. While Redis is often part of MSR 4 installations, it’s important to note that in some cases, a corporate key-value (K-V) storage solution may be used instead. In such scenarios, the responsibility for securing the K-V storage is transferred to the corresponding corporate service team, which must ensure the storage is appropriately configured and protected against unauthorized access or data breaches.
Authentication
To secure Redis, it is essential to enable authentication by setting a strong password using the requirepass directive in the Redis configuration. This ensures that only authorized clients can access the Redis instance.
Additionally, TLS/SSL encryption should be enabled to secure communication between Redis clients and the Redis server. This helps protect sensitive data in transit, preventing unauthorized interception or tampering of the information being exchanged.
Network Security
Since the placement of the K-V Storage service may vary—whether cohosted on the same cluster, accessed from another cluster, or deployed entirely separately—it is crucial to bind Redis to a private network to prevent unauthorized external access. Redis should only be accessible from trusted sources, and access should be restricted to the minimum necessary.
To achieve this, Kubernetes Network Policies should be used to enforce strict controls on which pods can communicate with the Redis service. This ensures that only authorized pods within the cluster can access Redis, further minimizing the attack surface and enhancing security.
Redis Configuration
To enhance security, the CONFIG command should be disabled in Redis to prevent unauthorized users from making changes to the Redis configuration. This reduces the risk of malicious users altering critical settings.
Additionally, for Redis instances that should not be exposed to the internet, consider enabling Redis’ protected mode. This mode ensures that Redis only accepts connections from trusted sources, blocking any unauthorized access attempts from external networks.
DB Service (PostgreSQL) Security
PostgreSQL is a relational database, and its security is vital for ensuring data protection and maintaining compliance with regulations. Securing PostgreSQL helps safeguard sensitive information from unauthorized access, tampering, and potential breaches, ensuring that both the integrity and confidentiality of the data are preserved. Proper security measures are essential for both operational efficiency and regulatory adherence.
Data Encryption
To protect sensitive data stored on disk, enable data-at-rest encryption in PostgreSQL. This ensures that any data stored in the database is encrypted and remains secure even if the underlying storage is compromised.
Additionally, use SSL/TLS for data-in-transit encryption to secure communications between PostgreSQL and application components. This ensures that data exchanged between the database and clients is encrypted, preventing interception or tampering during transit.
Access Control
To enhance security, ensure that PostgreSQL is not directly accessible from the public internet. Use Kubernetes Network Policies to restrict access to authorized services only, ensuring that only trusted internal services can communicate with the database.
Additionally, apply restrictions to limit access based on IP addresses, allowing only trusted sources to connect to PostgreSQL. Furthermore, configure client authentication methods, such as certificate-based authentication, to further secure access and ensure that only authenticated clients can interact with the database.
Backups and Disaster Recovery
Regularly backing up the PostgreSQL database is crucial to ensure data integrity and availability. It is essential that backup files are stored securely, preferably in an encrypted format, to protect them from unauthorized access or tampering.
Additionally, enable point-in-time recovery (PITR) to provide the ability to recover the database to a specific state in case of corruption or failure. PITR ensures minimal data loss and allows for quick recovery in the event of an incident.
Logging and Monitoring
Proper logging and monitoring are crucial for identifying and responding to security incidents in a timely manner. By capturing detailed logs of database activity, access attempts, and system events, you can detect anomalies and potential security threats. Implementing comprehensive monitoring allows you to track system health, performance, and security metrics, providing visibility into any suspicious behavior. This enables a proactive response to mitigate risks and maintain the integrity and security of the system.
Centralized Logging
Implementing centralized logging for Harbor, Redis, PostgreSQL, and Kubernetes is essential for maintaining visibility into system activity and detecting potential security incidents. By aggregating logs from all components in a centralized location, you can more easily monitor and analyze events, track anomalies, and respond to threats quickly.
To achieve this, consider using tools like Fluentd, Elasticsearch, and Kibana (EFK stack). Fluentd can collect and aggregate logs, Elasticsearch stores and indexes the logs, and Kibana provides a user-friendly interface for visualizing and analyzing log data. This setup allows for efficient log management and better insights into system behavior, enabling prompt detection of security incidents.
Security Monitoring
Setting up Prometheus and Grafana is an effective way to monitor the health and performance of the system, as well as detect any unusual behavior. Prometheus can collect and store metrics from various components, while Grafana provides powerful dashboards for visualizing those metrics in real-time.
For enhanced security, integrating with external monitoring solutions like Falco or Sysdig is recommended for runtime security monitoring. These tools help detect suspicious activity and provide real-time alerts for potential security breaches, ensuring a comprehensive security monitoring strategy.
Supply Chain
Mirantis hosts and controls all sources of MSR 4 that are delivered to the environment, ensuring a secure supply chain. This controlled process is essential for preventing any malware injections or unauthorized modifications to the system infrastructure. By maintaining tight control over the software delivery pipeline, Mirantis helps safeguard the integrity and security of the environment from the outset.
Platform Sources
Helm charts and images used for building MSR 4 are hosted and maintained by Mirantis. These resources are regularly scanned and updated according to Mirantis’ corporate schedule, ensuring that they remain secure and up-to-date.
To ensure the security of the environment, the customer must establish a secure communication channel between their infrastructure and Mirantis’ repositories and registries. This can be achieved through specific proxy configurations, which ensure a direct and controlled connection, minimizing the risk of unauthorized access or data breaches.
Patch Management
Regularly applying security patches to all components—such as Harbor, Redis, PostgreSQL, and Kubernetes—is essential to mitigate vulnerabilities promptly and maintain a secure environment. Keeping components up-to-date with the latest security patches helps protect the system from known threats and exploits.
It is also important to monitor security bulletins and advisories for updates and fixes relevant to your stack. Staying informed about new vulnerabilities and their corresponding patches allows for quick action when necessary.
While Mirantis handles the security of sources delivered from its repositories and registries, third-party integrations require additional security measures. These must be secured with proper scanning and a regular patching schedule to ensure they meet the same security standards as internal components, reducing the risk of introducing vulnerabilities into the environment.
Compliance Standards
Implementing audit trails is essential for tracking and monitoring system activity, enabling you to detect and respond to potential security incidents. Audit logs should capture all critical events, such as access attempts, configuration changes, and data modifications, ensuring accountability and traceability.
Additionally, sensitive data must be encrypted both at rest and in transit. Encryption at rest protects stored data from unauthorized access, while encryption in transit ensures that data exchanged between systems remains secure during transmission. This dual-layer approach helps safeguard sensitive information from potential breaches and attacks.
Mirantis actively checks the sources for Common Vulnerabilities and Exposures (CVEs) and malware injections. This proactive approach ensures that the software and components delivered from Mirantis repositories are thoroughly vetted for security risks, helping to prevent vulnerabilities and malicious code from being introduced into the environment. By conducting these checks, Mirantis maintains a secure supply chain for MSR 4 deployments.
Ensure that the environment adheres to relevant compliance standards such as GDPR, HIPAA, or PCI-DSS, depending on your use case.
Installation Guide
Mirantis Secure Registry (MSR) supports two installation scenarios designed to meet most customer needs:
The following comparison highlights key differences to help you choose the most appropriate option for your environment.
Installation Scenario |
Detail |
|---|---|
High Availability |
Deployment of MSR in a high availability configuration on Kubernetes using Helm charts. Benefits
Use case Production environments of medium to large enterprises, where uptime is critical. |
Single host using Docker Compose |
High availability is not supported. Thus, if the MSR instance becomes unavailable, there is no orchestrator to provide redundancy. Benefits
Use case Non-production environments, or smaller enterprises or office sites. Also suitable for non-Kubernetes environments. |
Some organizations may have unique infrastructure requirements or prefer custom deployment strategies that extend beyond the scope outlined here. While Mirantis supports a wide range of use cases, official support is limited to the configurations described above.
Contact Mirantis Professional Services for assistance with specialized installations or custom deployments.
Note
The full set of installation options for MSR follows the Harbor upstream documentation at.
Prerequisites
Before proceeding, verify that your environment meets the system requirements.
Hardware requirements
The following hardware requirements outline the resources that must be available on the worker node to run MSR 4 services effectively.
Resource |
Minimum |
Recommended |
|---|---|---|
CPU |
2 CPU |
4 CPU |
RAM |
4 GB |
8 GB |
Disk |
40 GB |
160 GB |
Software requirements
The following software requirements must be met to run the MSR 4 workload successfully.
Software |
Version and Comment |
|---|---|
Kubernetes |
1.21+ |
HELM |
3.7+ |
Redis |
If remote and not a part of the deployment |
PostgreSQL |
If remote and not a part of the deployment |
Network requirements
Certain services will be exposed through the following ports. These ports must be accessible and configured correctly in the firewall.
Port |
Protocol |
Description |
|---|---|---|
80 |
HTTP |
The Harbor portal and core API accept HTTP requests on this port. You can change this port in the configuration file. |
443 |
HTTPS |
The Harbor portal and core API accept HTTPS requests on this port. You can change this port in the configuration file. |
Prepare MKE 3.x for MSR Installation
Important
This procedure applies only to Kubernetes environments running MKE 3.x. If you are using MKE 4.x, no additional preparation is required before installing MSR.
To install MSR on MKE you must first configure both the
default:postgres-operator user account and the default:postgres-pod
service account in MKE 3.x with the privileged permission.
To prepare MKE 3.x for MSR install:
Log in to the MKE web UI.
In the left-side navigation panel, click the <username> drop-down to display the available options.
Click Admin Settings > Privileges.
Navigate to the User account privileges section.
Enter
<namespace-name>:postgres-operatorinto the User accounts field.Note
You can replace
<namespace-name>withdefaultto indicate the use of the default namespace.Select the privileged check box.
Scroll down to the Service account privileges section.
Enter
<namespace-name>:postgres-podinto the Service accounts field.Note
You can replace
<namespace-name>withdefaultto indicate the use of the default namespace.Select the privileged checkbox.
Click Save.
Important
For already deployed MSR instances, issue a rolling restart of the
postgres-operator deployment:
kubectl rollout restart deploy/postgres-operator
Install MSR with High Availability
This section provides a comprehensive guide for installing MSR with High Availability (HA) into an existing Kubernetes cluster.
Prerequisites
To deploy MSR with High Availability (HA) ensure that your environment meets the following requirements.
Host environment
- Kubernetes 1.10+ Cluster
HA MSR runs on an existing MKE or other Kubernetes cluster, preferably with a highly available control plane (at least three controllers), a minimum of three worker nodes, and highly available ingress.
- Kubernetes storage backend with ReadWriteMany (RWX) support
A storage backend that allows a Persistent Volume Claim to be shared across all worker nodes in the host cluster (for example, CephFS, AWS EFS, Azure Files).
- Highly-Available PostgreSQL 9.6+
A relational database for metadata storage.
- Highly-Available Redis
An in-memory cache and message/job queue.
Management workstation
Use a laptop or virtual machine running Linux, Windows, or macOS, configured to manage Kubernetes and install MSR and its dependencies:
Helm 2.8.0+ - Required for installing databases (PostgreSQL, Redis), MSR components, and other dependencies.
kubectl - Install a kubectl version that matches your Kubernetes cluster.
Kubernetes client access
Obtain and install a Kubernetes client bundle or
kubeconfig with embedded certificates on your management workstation to
allow kubectl and Helm to manage your cluster.
This depends on your Kubernetes distribution and configuration.
For MKE 3.8 host cluster, refer to Download the client bundle for more information.
Install Helm
To install Helm, run the following command:
curl -fsSL https://raw.githubusercontent.com/helm/helm/main/scripts/get-helm-3 | bash
To learn more about Helm refer to Helm’s official documentation Quickstart Guide.
Create PVC across Kubernetes workers
HA MSR requires a Persistent Volume Claim (PVC) that can be shared across all worker nodes.
Note
MSR 4 can use any StorageClass and PVC that you configure on your
Kubernetes cluster. The following examples set up cephfs or NFS as your
default StorageClass. For more information, see
Storage Classes
in the official Kubernetes documentation.
Configure cephfs
The following example shows how to configure persistent storage for Kubernetes
using cephfs. You can adapt these steps for your environment.
Create a
StorageClass, the specifics of which depend on the storage backend you are using. The following example illustrates how to create a StorageClass class with a CephFS backend and Ceph CSI:apiVersion: storage.k8s.io/v1 kind: StorageClass metadata: name: cephfs annotations: storageclass.kubernetes.io/is-default-class: "true" provisioner: cephfs.csi.ceph.com parameters: clusterID: <cluster-id>
Run kubectl apply to apply the StorageClass configuration to the cluster, in the appropriate namespace.
Create the PVC:
apiVersion: v1
kind: PersistentVolumeClaim
metadata:
  name: shared-pvc
spec:
  accessModes:
    - ReadWriteMany
  resources:
    requests:
      storage: 10Gi
  storageClassName: cephfs
Note
The
.spec.storageClassNamereferences the name of theStorageClassyou created above.Run kubectl apply to apply PVC to the cluster, in the appropriate namespace.
Configure NFS
The following example shows how to configure persistent storage for Kubernetes using NFS. You can adapt these steps for your environment.
Add the Helm repository for the NFS subdirectory external provisioner.
helm repo add nfs-provisioner https://kubernetes-sigs.github.io/nfs-subdir-external-provisioner/
helm repo update
Install the NFS client provisioner. Replace the placeholders with values for your environment.
helm install nfs-client-provisioner nfs-provisioner/nfs-subdir-external-provisioner \
  --set nfs.server=<NFS-SERVER-IP> \
  --set nfs.path=</DIRECTORY/YOU/WANT/TO/USE> \
  --set storageClass.name=nfs-storage \
  --set storageClass.defaultClass=true
Install highly available PostgreSQL
Install the Zalando Postgres Operator:
helm install postgres-operator postgres-operator --repo https://opensource.zalando.com/postgres-operator/charts/postgres-operator --set configGeneral.docker_image=registry.mirantis.com/msr/spilo:17-4.0-p3-20251117010013
Note
Alternatively, you can configure the deployment to use the default image provided in the upstream Zalando Postgres Operator community release:
helm install postgres-operator postgres-operator --repo https://opensource.zalando.com/postgres-operator/charts/postgres-operator
Create and configure the
msr-postgres-manifest.yamlfile:OpenShift deployments only
While the default PostgreSQL Operator settings allow the operator to run in a general Kubernetes environment, they are not sufficient for OpenShift. To ensure proper functionality, enable the
kubernetes_use_configmapsparameter. For details, refer to the Zalando Postgres Operator quickstart guide.Note
Adjust
numberOfInstancesto match your desired cluster size.apiVersion: "acid.zalan.do/v1" kind: postgresql metadata: name: msr-postgres spec: teamId: "msr" volume: size: 1Gi numberOfInstances: 3 users: msr: # database owner - superuser - createdb databases: registry: msr # dbname: owner postgresql: version: "17"
If you are running RHEL 9.4 or later, exclude the
bg_monmodule from the PostgreSQL configuration as shown below. Refer to the Known issues for more details.apiVersion: "acid.zalan.do/v1" kind: postgresql metadata: name: msr-postgres spec: teamId: "msr" volume: size: 1Gi numberOfInstances: 3 users: msr: # database owner - superuser - createdb databases: registry: msr # dbname: owner postgresql: version: "17" parameters: shared_preload_libraries: "pg_stat_statements,pgextwlist,pg_auth_mon,set_user,timescaledb,pg_cron,pg_stat_kcache"
Deploy the Postgres instance:
kubectl create -f msr-postgres-manifest.yaml
Retrieve connection details for the Postgres service:
Get the service’s IP address:
kubectl get svc \
  -l application=spilo,cluster-name=msr-postgres,spilo-role=master \
  -o jsonpath={.items..spec.clusterIP}
Get the service’s port number:
kubectl get svc \
  -l application=spilo,cluster-name=msr-postgres,spilo-role=master \
  -o jsonpath={.items..spec.ports..port}
Upgrade highly available PostgreSQL
Verify the Zalando Postgres Operator image:
kubectl get operatorconfiguration.acid.zalan.do -o=jsonpath='{.items[0].configuration.docker_image}'
Perform the upgrade:
helm upgrade postgres-operator postgres-operator --repo https://opensource.zalando.com/postgres-operator/charts/postgres-operator --set configGeneral.docker_image=registry.mirantis.com/msr/spilo:17-4.0-p3-20251117010013
Install highly available Redis
Install the Redis Operator from the OT-Container-Kit Helm repository:
helm install redis-operator redis-operator \
  --repo https://ot-container-kit.github.io/helm-charts
Generate a strong, random password for authenticating with Redis:
PASSWORD=$(LC_ALL=C tr -dc A-Za-z0-9 </dev/urandom | head -c 24)
Create a Kubernetes secret to securely store the password:
kubectl create secret generic msr-redis-secret \
  --from-literal=REDIS_PASSWORD=${PASSWORD}
Deploy the Redis instance:
Note
Set
clusterSizeto the desired number of Redis nodes.helm install msr-redis redis-replication \ --repo https://ot-container-kit.github.io/helm-charts \ --set redisReplication.clusterSize=3 \ --set redisReplication.redisSecret.secretName=msr-redis-secret \ --set redisReplication.redisSecret.secretKey=REDIS_PASSWORD \ --set redisReplication.image=quay.io/opstree/redis \ --set redisReplication.tag=v8.2.2
Retrieve the connection details for the Redis service:
Get the service’s port number:
kubectl get svc msr-redis -o jsonpath={.spec.ports..port}
Upgrade highly available Redis
Verify Redis version:
kubectl get pod <Redis pod> -o jsonpath='{.spec.containers[*].image}'
Upgrade Redis:
helm upgrade msr-redis redis-replication \
  --repo https://ot-container-kit.github.io/helm-charts \
  --set redisReplication.clusterSize=3 \
  --set redisReplication.redisSecret.secretName=msr-redis-secret \
  --set redisReplication.redisSecret.secretKey=REDIS_PASSWORD \
  --set redisReplication.image=quay.io/opstree/redis \
  --set redisReplication.tag=v8.2.2
Note
Mirantis recommends installing Redis version 8.2.2 or the latest validated release. For more options, refer to the official redis-operator page.
Install highly available MSR
Generate a configuration values file for the chart:
helm show values oci://registry.mirantis.com/harbor/helm/msr --version <MSR-VERSION> > msr-values.yaml
Helm automatically creates certificates. To manually create your own, follow these steps:
Create a directory for certificates named
certs:mkdir certsCreate a
certs.conftext file in thecertsdirectory:[req] distinguished_name = req_distinguished_name x509_extensions = v3_req prompt = no [req_distinguished_name] C = US ST = State L = City O = Organization OU = Organizational Unit CN = msr [v3_req] keyUsage = digitalSignature, keyEncipherment, dataEncipherment extendedKeyUsage = serverAuth subjectAltName = @alt_names [alt_names] IP.1 = <IP-ADDRESS-OF-WORKERNODE> # Replace with your actual IP address
Generate the certificate and the key using the
certs.conffile you just created:openssl req -x509 -nodes -days 365 -newkey rsa:2048 -keyout tls.key -out tls.crt -config certs.conf
If you are using the Helm certificates skip this step. If you manually created your own certificates, create the Kubernetes secret. Run the following command from outside of the
certsfolder:kubectl create secret tls <NAME-OF-YOUR-SECRET> \ --cert=certs/tls.crt \ --key=certs/tls.key
Modify the
msr-values.yamlfile to configure MSR:Set the expose type:
expose:
   # Set how to expose the service. Set the type as "ingress", "clusterIP", "nodePort" or "loadBalancer"
   # and fill the information in the corresponding section
   type: nodePort
Set the cert source to TLS and the secret name:
certSource: secret
secret:
# The name of secret which contains keys named:
# "tls.crt" - the certificate
# "tls.key" - the private key
   secretName: "<NAME-OF-YOUR-SECRET>"
Set the
nodePortports to allownodePort ingress. You can use any ephemeral port. Some Kubernetes distributions restrict the range. Generally accepted range is 32768-35535.nodePort: # The name of NodePort service name: harbor ports: http: # The service port Harbor listens on when serving HTTP port: 80 # The node port Harbor listens on when serving HTTP nodePort: <httpNodePort> https: # The service port Harbor listens on when serving HTTPS port: 443 # The node port Harbor listens on when serving HTTPS nodePort: <httpNodePort>
Set the external URL, if using nodePort use a worker node IP address (the same one that you used in generating the cert):
externalURL: <A-WORKER-NODE-EXTERNAL-IP:httpsNodePort>
Enable data persistence:
persistence:
   enabled: true
If you are using a named StorageClass (as opposed to the default StorageClass) you need to specify it as shown in the following sample:
persistence:
  enabled: true
  resourcePolicy: "keep"
  persistentVolumeClaim:
   registry:
   existingClaim: ""
   storageClass: “<STORAGE-CLASS-NAME>”
   subPath: ""
   accessMode: ReadWriteOnce
   size: 5Gi
   annotations: {}
Set the initial admin password:
harborAdminPassword: "Harbor12345"
Note
After you launch MSR 4, change the admin password from the MSR web UI, or provide an existing secret by using the
existingSecretAdminPasswordKeyparameter.Set the replica number to at least 2 under
portal,registry,core,trivyand jobservice:jobservice: image: repository: harbor-jobservice replicas: 2
Set PostgreSQL as an external database:
database:
# if external database is used, set "type" to "external"
# and fill the connection information in "external" section
   type: external
Update external database section to reflect PostgreSQL configuration:
external:
   sslmode: require
   host: <POSTGRES-SERVICE-IP-ADDRESS>
   port: <POSTGRES-SERVICE-PORT-NUMBER>
   coreDatabase: registry
   username: msr
   existingSecret: msr.msr-postgres.credentials.postgresql.acid.zalan.do
Set Redis as an external database:
redis:
      # if external Redis is used, set "type" to "external"
      # and fill the connection information in "external" section
      type: external
Update the external Redis configuration:
external:
   addr: msr-redis-master:<REDIS-PORT-NUMBER>
   existingSecret: msr-redis-secret
Check you settings against a full example of MSR configuration:
expose:
  type: loadBalancer
persistence:
  enabled: true
  resourcePolicy: "keep"
  persistentVolumeClaim:
    registry:
      storageClass: "<STORAGE-CLASS-NAME>"
      accessMode: ReadWriteOnce
      size: 5Gi
    jobservice:
      jobLog:
        storageClass: "<STORAGE-CLASS-NAME>"
        accessMode: ReadWriteOnce
        size: 5Gi
    trivy:
      storageClass: "<STORAGE-CLASS-NAME>"
      accessMode: ReadWriteOnce
      size: 5Gi
portal:
  replicas: 2
core:
  replicas: 2
jobservice:
  replicas: 2
registry:
  replicas: 2
trivy:
  replicas: 2
database:
  type: external
  external:
     sslmode: require
     host: "<POSTGRES-SERVICE-IP-ADDRESS>"         # Replace with actual IP
     port: "<POSTGRES-SERVICE-PORT-NUMBER>"        # Replace with actual port
     coreDatabase: registry
     username: msr
     existingSecret: msr.msr-postgres.credentials.postgresql.acid.zalan.do
redis:
  type: external
  external:
    addr: "msr-redis-master:<REDIS-PORT-NUMBER>"
    existingSecret: msr-redis-secret
Install MSR using Helm:
helm install my-release oci://registry.mirantis.com/harbor/helm/msr --version <MSR-VERSION> -f <PATH-TO/msr-values.yaml>
Configure Docker to trust the self-signed certificate. On the system logged into MSR:
Create a directory:
/etc/docker/certs.d/<IPADDRESS:NODEPORT>
Move and rename the certificate:
mv tls.crt /etc/docker/certs.d/<IPADDRESS:NODEPORT>/ca.crt
Access the MSR web UI at
https://<WORKER-NODE-EXTERNAL-IP>:<httpsNodePort>provided the same NodePort numbers were used as specified in this guide. You can also log in using:docker login <WORKER-NODE-EXTERNAL-IP>:<httpsNodePort>
Warning
By default, robot account names start with the
$character, which some software may interpret as a variable. As such, you should change the default prefix to avoid any potential issues:Log in to the MSR 4 web UI with an account that has administrator privileges.
Navigate to Configuration and select System Settings.
In the Robot Name Prefix row, modify the prefix.
Install MSR on a Single Host using Docker Compose
This section describes how to perform a new single-node Mirantis Secure Registry (MSR) installation and configuration using Docker Compose. By following the procedure, you will have a fully functioning single-node MSR installation with SSL encryption.
Warning
Single-host installations should not be put to use in production environments. Mirantis strongly recommends that you use this deployment method for development or testing purposes only.
Prerequisites
To ensure that all of the key prerequisites are met:
Verify that your system is running a Linux-based operating system. Recommended distributions include Red Hat Enterprise Linux (RHEL), Rocky Linux, and Ubuntu.
Verify the Docker installation. If Docker is not installed, run:
curl -fsSL https://get.docker.com -o get-docker.sh
sudo sh get-docker.sh
Verify the Docker Compose installation:
Note
If you are using Docker Compose v1, replace all instances of
docker composewithdocker-composein the relevant steps of the installation procedure.docker composeIf the command returns help information, Docker Compose is already installed. Otherwise, install Docker Compose:
sudo curl -L "https://github.com/docker/compose/releases/download/$(curl -s https://api.github.com/repos/docker/compose/releases/latest | grep 'tag_name' | cut -d '"' -f 4)/docker-compose-$(uname -s)-$(uname -m)" -o /usr/local/bin/docker-compose
sudo chmod +x /usr/local/bin/docker-compose
Ensure the following ports are available and not blocked by firewalls:
Port availability¶ Port
Protocol
Description
443
HTTPS
Harbor portal and core API accept HTTPS requests on this port
80
HTTP
Harbor portal and core API accept HTTP requests on this port if SSL is not configured
4443
HTTPS
Connections requires for administrative purposes
Install MSR using Docker Compose
After installing the prerequisites, you can deploy MSR by following the steps below.
Download the MSR installer
Locate the
.tgzinstaller package of the latest release of MSR at https://packages.mirantis.com/?prefix=msr/. The release is available as a single bundle and is suitable only for offline installations.Right-click on the installer package and copy the download link.
Download the package to your instance:
wget https://s3-us-east-2.amazonaws.com/packages-mirantis.com/msr/msr-offline-installer-<VERSION>.tgzExtract the package:
tar xvf msr-offline-installer-<VERSION>.tgz
Navigate to the extracted folder:
cd msr
Configure MSR
Open the
harbor.ymlconfiguration file in your editor of choice, for example:cp harbor.yml.tmpl harbor.yml vim harbor.yml
Modify key parameters:
Set the hostname for MSR to the domain name or IP address where MSR will run:
hostname: <YOUR-DOMAIN.COM>Set a password for the MSR admin:
harbor_admin_password: <YOUR-PASSWORD>Ensure the directory where MSR stores its data has enough disk space:
data_volume: </YOUR/DATA/PATH>
Prepare certificates for SSL
To enable SSL, configure paths to your SSL certificate and key:
If you do not have an SSL certificate from a trusted certificate authority (CA), you can generate self-signed certificates for testing purposes:
openssl req -newkey rsa:4096 -nodes -sha256 -keyout ./<YOUR-DOMAIN.COM>.key -x509 -days 365 -out ./<YOUR-DOMAIN.COM>.crt
Note
For production environments, you can acquire the SSL certificates through providers like Let’s Encrypt or commercial CA vendors.
Place the generated
<YOUR-DOMAIN.COM>.crtand<YOUR-DOMAIN.COM>.keyin a secure directory.Update your
harbor.ymlconfiguration file to point to these certificate files:certificate: </PATH/TO/YOUR-DOMAIN.COM>.crt private_key: </PATH/TO/YOUR-DOMAIN.COM>.key
Verify that your firewall settings allow traffic on port
443as SSL communication requires this port to be open.
Install and start MSR
You can proceed to the MSR installation only after you have configured
harbor.yml.
Run the installation script:
sudo ./install.shThis script uses Docker Compose to install the MSR services.
Note
To enable image scanning, install Trivy along with MSR by running:
sudo ./install.sh --with-trivy
Verify if the services are running:
sudo docker compose ps
You should be able to see services like
harbor-core,harbor-db,registry, and so on, running.
Access MSR
Once the services are running, you can access MSR from a web browser at
http://<YOUR-DOMAIN.COM> using the admin credentials set in
harbor.yml. You will get redirected to https if SSL is enabled
on the instance.
Manage MSR with Docker Compose
You can manage MSR services using Docker Compose commands. For example:
To stop MSR services:
sudo docker compose down
To restart MSR services:
sudo docker compose up -d
To view service logs for troubleshooting:
sudo docker compose logs <SERVICE-NAME>
Operations Guide
Usage instruction for Mirantis Secure Registry 4 follows what is presented in the Harbor Administration upstream documentation.
Authentication Configuration
Authentication in MSR ensures secure access by validating user credentials against an external provider or internal database. Supported methods include:
LDAP Authentication: Leverages existing LDAP directories to authenticate users.
OpenID Connect (OIDC): A federated identity standard for single sign-on (SSO) and secure authentication.
Database Authentication: Built-in method that manages user credentials locally within MSR. This is the default authentication option.
Each authentication method offers unique advantages depending on your organization’s requirements. Database Authentication offers the option for smaller organizations or for sandbox and testing environments that don’t need or have access to an external provider to get started. For larger organizations and production environments the protocols LDAP or OIDC can be used for bulk user onboarding and group management.
LDAP Authentication
Prerequisites
Ensure you have access to your organization’s LDAP server.
Obtain the LDAP Base DN, Bind DN, Bind Password, and server URL.
Configure LDAP in MSR
Access MSR Administration Interface:
Log in as an administrator and navigate to the Administration > Configuration section.
Set Auth Mode to LDAP:
Under the Authentication tab, select LDAP from the Auth Mode dropdown.
Provide LDAP Server Details:
Auth Mode will say LDAP.
LDAP URL: Enter the server URL (e.g.,
ldap://example.comorldaps://example.comfor secure connections).LDAP Search DN and LDAP Search Password: When a user logs in to Harbor with their LDAP username and password, Harbor uses these values to bind to the LDAP/AD server. For example,
cn=admin,dc=example.com.LDAP Base DN: Harbor looks up the user under the LDAP Base DN entry, including the subtree. For example,
dc=example.com.LDAP Filter: The filter to search for LDAP/AD users. For example,
objectclass=user.LDAP UID: An attribute, for example uid, or cn, that is used to match a user with the username. If a match is found, the user’s password is verified by a bind request to the LDAP/AD server.
LDAP Scope: The scope to search for LDAP/AD users. Select from Subtree, Base, and OneLevel.
Optional. To manage user authentication with LDAP groups configure the group settings:
LDAP Group Base DN: Base DN for group lookup. Required when LDAP group feature is enabled.
LDAP Group Filter: Search filter for LDAP/AD groups. Required when LDAP group feature is enabled. Available options:
OpenLDAP:
objectclass=groupOfNamesActive Directory:
objectclass=group
LDAP Group GID: Attribute naming an LDAP/AD group. Required when LDAP group feature is enabled.
LDAP Group Admin DN: Group DN for users with Harbor admin access.
LDAP Group Admin Filter: Grants Harbor system administrator privileges to all users in groups that match the specified filter.
LDAP Group Membership: User attribute for group membership. Default:
memberof.LDAP Scope: Scope for group search: Subtree, Base, or OneLevel.
LDAP Group Attached in Parallel: Attaches groups in parallel to prevent login timeouts.
Uncheck LDAP Verify Cert if the LDAP/AD server uses a self-signed or untrusted certificate.
Test LDAP Connection:
Use the Test LDAP Server button to validate the connection. Troubleshoot any errors before proceeding.
Save Configuration:
Click Save to apply changes.
Manage LDAP users in MSR
After configuring LDAP, MSR automatically authenticates users based on their LDAP credentials.
To assign user roles, navigate to Projects and assign LDAP-based user accounts to project roles.
Use the table below to identify and apply the correct roles based on the new structure:
MSR 2.9 or MSR 3.1 Roles |
MSR 4 Roles |
Description |
Permissions |
Limitations |
|---|---|---|---|---|
IRE, Cloudview, CIE |
Administrator |
Full control over the MSR 4 instance. |
Manage system settings, users, and projects. Manage registries and replication rules. View and delete audit logs. Manage garbage collection. |
Cannot perform operations restricted by external access policies, for example, LDAP-integrated roles. |
Project Admin |
Full control within a specific project. |
Manage project settings, members, and quotas. Push and pull images. Delete repositories and artifacts. |
Cannot modify settings outside their assigned project. Cannot manage global configurations or other projects. |
|
Who to grant this role?
DEV, QA, OPS, ReleaseManager, and such
|
Maintainer |
Responsible for managing and maintaining project content. |
Push and pull images. Add tags to images. Manage replication rules for their project. |
Cannot manage project members. Cannot delete the project or modify project settings. |
Who to grant this role?
DEV, QA, OPS, ReleaseManager, and such
|
Developer |
Focused on pushing and managing images within the project. |
Push images and tags. Pull images from the project. |
Cannot delete images or repositories. Cannot manage project members or settings. |
Guest |
Has read-only access to project resources. |
Pull images from the project. View repository and artifact metadata. |
Cannot push images. Cannot delete, modify, or manage anything in the project. |
|
Limited Guest |
Restricted read-only access to specific projects. |
View some project resources based on permissions. |
Cannot pull images unless explicitly granted permission. Cannot push, delete, or manage project resources. |
OIDC Authentication
Configuring OpenID Connect (OIDC) provides a secure and scalable method for integrating authentication with identity providers.
Prerequisites
Register MSR as a client in your OIDC provider (e.g., Okta, Keycloak, Azure AD).
Obtain the client ID, client secret, and OIDC endpoint.
Configure OIDC in MSR
Access the MSR Administration Interface:
Log in and navigate to Administration > Configuration > Authentication.
Set Authentication Mode to OIDC:
Select OIDC as the authentication mode.
Enter OIDC Provider Details:
OIDC Provider Name: The name of the OIDC provider.
OIDC Provider Endpoint: The URL of the endpoint of the OIDC provider which must start with https.
OIDC Client ID: The client ID with which Harbor is registered with the OIDC provider.
OIDC Client Secret: The secret with which Harbor is registered with the OIDC provider.
Group Claim Name: The name of a custom group claim that you have configured in your OIDC provider, that includes the groups to add to Harbor.
OIDC Admin Group: The name of the admin group, if the ID token of the user shows that he is a member of this group, the user will have admin privilege in Harbor. Note: You can only set one Admin Group. Please also make sure the value in this field matches the value of group item in ID token.
OIDC Scope: A comma-separated string listing the scopes to be used during authentication.
The OIDC scope must contain openid and usually also contains profile and email. To obtain refresh tokens it should also contain offline_access. If you are using OIDC groups, a scope must identify the group claim. Check with your OIDC provider administrator for precise details of how to identify the group claim scope, as this differs from vendor to vendor.
Uncheck Verify Certificate if the OIDC Provider uses a self-signed or untrusted certificate.
Check the Automatic onboarding if you don’t want the user to set their username in Harbor during their first login. When this option is checked, the attribute Username Claim must be set, Harbor will read the value of this claim from ID token and use it as the username for onboarding the user. Therefore, you must make sure the value you set in Username Claim is included in the ID token returned by the OIDC provider you set, otherwise there will be a system error when Harbor tries to onboard the user.
Verify that the Redirect URI that you configured in your OIDC provider is the same as the one displayed at the bottom of the page on the Mirantis Harbor configuration page.
Test OIDC Server Connection:
Use the Test OIDC Server button to verify the configuration.
Save Configuration:
After a successful test, click Save.
Authenticate users with OIDC
Users authenticate with the OIDC provider’s login page.
OIDC tokens are used for API and CLI access.
Database Authentication
Database authentication is the simplest method, ideal for environments without external authentication services. The one limitation is you will not be able to use groups in the MSR environment.
Set up Database Authentication
Access the MSR Administration Interface:
Log in and navigate to Administration > Configuration > Authentication.
Set Authentication Mode to Database:
Select Database from the Auth Mode dropdown.
Manage User Accounts:
Add, update, or delete user accounts directly from the Users section of the MSR interface.
Authenticate users with database
Users log in with their locally stored username and password.
Admins manage user roles and permissions within MSR.
Configuring Replication
Introduction to Replication
Purpose of Replication: Replication is a critical feature that allows the synchronization of container images across multiple registry instances. It is often employed for:
Disaster Recovery: Creating replicas in geographically distant locations provides redundancy and ensures accessibility during outages.
Load Balancing: Distributing image pull requests across several registries improves performance and reduces latency.
Collaborative Environments: In complex deployment scenarios, replication enables teams across locations to access synchronized image repositories.
Key Concepts:
Replication Endpoint: An endpoint defines the registry location MSR will replicate images to or from. This includes both internal and external registries.
Replication Rule: Rules specify which images to replicate, with filters based on namespace, tags, or patterns. This rule framework ensures only relevant data is synchronized, saving time and storage space.
Triggers: Triggers determine the timing and conditions under which replication occurs. Common triggers include manual, immediate replication, or scheduled replications.
Configuring Replication Endpoints
We start by creating a Replication Endpoint in the MSR4 UI
Log into the MSR4 Web Interface: Use your admin credentials to access the MSR4 web interface.
Navigate to Registries:
From the main menu, select Administration > Registries.
Here, you will manage all endpoints that your MSR4 instance connects to for replication purposes
Creating a New Endpoint:
Click + New Endpoint to start setting up an endpoint.
Select Provider Type
Choose from options like MSR, Docker Registry, Harbor, or AWS ECR, each with unique requirements.
Endpoint Name: Enter a name that clearly describes the endpoint’s function (e.g., “US-West Registry” or “Production Backup”). You can add additional information in the Description field.
Endpoint URL: Input the full URL of the target registry (e.g., https://example-registry.com).
Access ID: Is the username for the remote registry
Access Secret: Is the password for the account to access the remote registry.
Verify Connection:
Click Test Connection to ensure MSR4 can reach the endpoint successfully. A success message confirms network connectivity and credential accuracy.
Save Endpoint Configuration:
After successful testing, click Save to finalize the endpoint configuration.
Considerations: Always verify that the registry URL and credentials are current and correct. Expired tokens or incorrect URLs can interrupt replication jobs and require troubleshooting.
Creating Replication Rules
Replication rules define the replication’s scope, ensuring that only necessary images are synchronized. This approach conserves bandwidth and maintains efficient storage use.
Setting Up a New Replication Rule in MSR4
Access the Replication Rules Panel:
In the MSR4 web interface, go to Administration > Replications.
The Replications page displays all existing rules and allows you to add new rules or modify existing ones.
Define a New Rule:
Click + New Replication Rule to open the rule configuration screen.
Name: Assign a unique name (e.g., “Sync to Europe Backup”) that indicates the rule’s purpose.
Replication Mode: Select Push to send data to the remote location, or pull to copy data from the remote location.
Source Resource Filter: This is where you can filter a subset of images by name, tag, label, or resource type.
Namespace: Sync only images within specific namespaces.
Tag Patterns: Define tag patterns to limit replication to specific versions or releases (e.g.,
*latest).Label: Replicate images tagged with specific labels.
If you set name to ** you will download all images. .
Destination Registry: Select from the list of previously configured endpoints.
Name Space & Flattening: When you mirror MSR4 Harbor has the ability to flatten the name space.
Configure the Trigger Mode:: Specify how and when the replication should occur:
Manual: Requires an admin to start replication manually
Immediate: Begins replication as soon as an image is pushed to the source registry.
Scheduled: Allows you to define a CRON-based schedule (e.g., daily at midnight).
Save and Activate the Rule:
Once configured, click Create to save and activate the rule.
Managing and Monitoring Replications
Efficient replication management and monitoring are essential to ensure seamless synchronization and detect issues early.
Monitoring Replication Jobs
Accessing Replication Jobs:
Go to Administration > Replications in the MSR4 interface to view all replication rules.
Select the replication rule of interest, then selection Actions > Edit., You can now modify the existing replication rule.
Running a Replication Job Manually:
In Administration > Replications. To manually start a replication, select the relevant rule and click Replicate. This action initiates replication immediately, even if the rule is set to a schedule.
Viewing Job Details:
Go to Administration > Replications in the MSR4 interface to monitor and manage ongoing and completed replication jobs.
Select the replication rule, and below you should see the historical data of executions. Including any current and past replications.
Click on a job entry ID to view logs, error messages, and specific replication statistics. This information aids in troubleshooting and verifying data integrity.
Re-running Failed Jobs:
For any job that has encountered issues, select Replicate. Ensure that the endpoint connection and credentials are valid before re-running jobs.
Configuring Webhooks
As a project administrator, you can establish connections between your Harbor projects and external webhook endpoints. This integration enables Harbor to notify specified endpoints of particular events occurring within your projects, thereby facilitating seamless integration with other tools and enhancing continuous integration and development workflows.
Supported Events
Harbor supports two types of webhook endpoints: HTTP and Slack. You can define multiple webhook endpoints per project. Webhook notifications are delivered in JSON format via HTTP or HTTPS POST requests to the specified endpoint URL or Slack address. Harbor supports two JSON payload formats:
Default: The traditional format used in previous versions.
CloudEvents: A format adhering to the CloudEvents specification.
The following table outlines the events that trigger notifications and the contents of each notification:
Event |
Webhook Event Type |
Contents of Notification |
|---|---|---|
Push artifact to registry |
|
Repository namespace name, repository name, resource URL, tags, manifest digest, artifact name, push time timestamp, username of user who pushed artifact |
Pull artifact from registry |
|
Repository namespace name, repository name, manifest digest, artifact name, pull time timestamp, username of user who pulled artifact |
Delete artifact from registry |
|
Repository namespace name, repository name, manifest digest, artifact name, artifact size, delete time timestamp, username of user who deleted image |
Artifact scan completed |
|
Repository namespace name, repository name, tag scanned, artifact name, number of critical issues, number of major issues, number of minor issues, last scan status, scan completion time timestamp, username of user who performed scan |
Artifact scan stopped |
|
Repository namespace name, repository name, tag scanned, artifact name, scan status |
Artifact scan failed |
|
Repository namespace name, repository name, tag scanned, artifact name, error that occurred, username of user who performed scan |
Project quota exceeded |
|
Repository namespace name, repository name, tags, manifest digest, artifact name, push time timestamp, username of user who pushed artifact |
Project quota near threshold |
|
Repository namespace name, repository name, tags, manifest digest, artifact name, push time timestamp, username of user who pushed artifact |
Artifact replication status changed |
|
Repository namespace name, repository name, tags, manifest digest, artifact name, push time timestamp, username of user who trigger the replication |
Artifact tag retention finished |
|
Repository namespace name, repository name |
Configuring Webhook Notifications
Access the Harbor Interface:
Log in to the Harbor web portal.
Navigate to the project for which you want to configure webhooks.
Navigate to Webhooks Settings:
Within the project, click on the Webhooks tab.
Add a New Webhook:
Click the NEW WEBHOOK button.
In the form that appears, provide the following details:
Name: A descriptive name for the webhook.
Description: (Optional) Additional information about the webhook’s purpose.
Notify Type: Choose between HTTP or SLACK based on your endpoint.
Payload Format: Select either Default or CloudEvents.
Event Type: Check the boxes corresponding to the events you want to trigger notifications.
Endpoint URL: Enter the URL where the webhook payloads should be sent.
Auth Header: (Optional) Provide authentication credentials if required by the endpoint.
Verify Remote Certificate: Enable this option to verify the SSL certificate of the endpoint.
Save the Webhook:
After filling in the necessary details, click the ADD button to create the webhook
Manage Existing Webhooks
Access the Harbor Interface:
Log in to the Harbor web portal.
Navigate to the project for which you want to configure webhooks.
Navigate to Webhooks Settings:
Within the project, click on the Webhooks tab.
Select the existing webhook under Webhooks.
Select ACTION then EDIT.
Webhook Payload Examples
When an artifact is pushed to the registry, and you’ve configured a webhook for the PUSH_ARTIFACT event, Harbor sends a JSON payload to the specified endpoint. Below is an example of such a payload in the Default format:
{
  "type": "PUSH_ARTIFACT",
  "occur_at": 1680501893,
  "operator": "harbor-jobservice",
  "event_data": {
    "resources": [
      {
        "digest": "sha256:954b378c375d852eb3c63ab88978f640b4348b01c1b3e0e1e4e4e4e4e4e4e4e4",
        "tag": "latest",
        "resource_url": "harbor.example.com/project/repository:latest"
      }
    ],
    "repository": {
      "name": "repository",
      "namespace": "project",
      "repo_full_name": "project/repository",
      "repo_type": "private"
    }
  }
}
In the CloudEvents format, the payload would be structured differently, adhering to the CloudEvents specification.
Recommendations for Webhook Endpoints
HTTP Endpoints: Ensure that the endpoint has a listener capable of interpreting the JSON payload and acting upon the information, such as executing a script or triggering a build process.
Slack Endpoints: Follow Slack’s guidelines for incoming webhooks to integrate Harbor notifications into Slack channels.
By configuring webhook notifications, you can automate responses to various events within your Harbor projects, thereby enhancing your continuous integration and deployment pipelines.
Differences Between MSR 3 Webhooks and MSR 4 Webhooks (Harbor-Based)
When migrating from Mirantis Secure Registry (MSR) 3 to MSR 4 (based on Harbor), several key differences in webhook functionality should be noted. These changes reflect the enhanced architecture and expanded event support in Harbor, offering greater flexibility and compatibility while addressing certain legacy limitations.
Event Coverage:
In MSR 3, webhook notifications were primarily focused on repository-level events, such as image push and deletion. However, MSR 4 expands the event coverage significantly, including notifications for:
Artifact scans (completed, stopped, or failed).
Project quota thresholds (exceeded or nearing limits).
Replication and tag retention processes.
This expanded event set allows for more granular monitoring and automation opportunities.
Payload Format Options:
MSR 3 supported a single JSON payload format for webhook events, designed to integrate with basic CI/CD pipelines. In contrast, MSR 4 introduces dual payload format options:
Default Format: Maintains backward compatibility for simple integrations.
CloudEvents Format: Complies with the CloudEvents specification, enabling integration with modern cloud-native tools and ecosystems.
Webhook Management Interface:
In MSR 3, managing webhooks required navigating a simpler interface with limited options for customization. In MSR 4, the management UI is more sophisticated, allowing users to configure multiple endpoints, select specific event types, and apply authentication or SSL verification for secure communication.
Slack Integration:
MSR 3 did not natively support direct Slack notifications. With MSR 4, you can configure webhook notifications to integrate directly with Slack channels, streamlining team collaboration and real-time monitoring
Authentication and Security Enhancements:
MSR 4 enhances webhook security by supporting authentication headers and remote certificate verification for HTTPS endpoints, which were limited or unavailable in MSR 3.
Ease of Configuration:
The MSR 4 webhook interface provides a user-friendly experience for creating, testing, and managing webhooks, compared to the more rudimentary configuration options in MSR 3.
Features No Longer Present in MSR 4 Webhooks
While MSR 4 webhooks offer enhanced functionality, a few MSR 3-specific behaviors are no longer present:
Tight Coupling with Legacy Components:
MSR 3 webhooks were tightly integrated with certain Mirantis-specific features and configurations. MSR 4’s Harbor-based webhooks embrace open standards, which may mean that legacy integrations require adjustments.
Simplistic Event Payloads:
For users relying on MSR 3’s minimalistic payloads, the more detailed JSON structures in MSR 4 may require updates to existing automation scripts or parsers.
By understanding these differences and new capabilities, organizations can better adapt their workflows and take full advantage of the modernized webhook architecture in MSR 4.
Log Rotation in Mirantis Secure Registry
Mirantis Secure Registry (MSR) maintains a comprehensive audit log of all image pull, push, and delete operations. To effectively manage these logs, MSR provides functionalities to configure audit log retention periods and to forward logs to a syslog endpoint.
Scheduling Log Purge
To schedule a log purge in MSR:
Access the MSR Interface: Log in with an account that has system administrator privileges.
Navigate to Administration:
Select Clean Up.
Select Log Rotation:
Select the Schedule to purge drop-down menu, choose the desired frequency for log rotation:
None: No scheduled log rotation.
Hourly: Executes at the start of every hour.
Daily: Executes daily at midnight.
Weekly: Executes every Saturday at midnight.
Custom: Define a custom schedule using a cron expression
To adjust the audit log retention period, select Keep records in, specify the duration to retain audit logs.
Choose between Hours or Days.
For instance, setting this to 7 days will purge audit logs older than 7 days.
Under Included Operations, select the operations to include in the purge:
Create
Delete
Pull
Click Save to apply the log rotation schedule.
Optional Actions:
Dry Run: Click DRY RUN to simulate the purge and view the estimated number of logs that would be deleted.
Immediate Purge: Click PURGE NOW to execute the purge immediately, bypassing the scheduled time.
Viewing Log Rotation History
To review the history of log purges:
Access the Purge History:
Navigate to Administration > Clean Up > Log Rotation.
The Purge History table displays details of each purge, including:
Task ID: Unique identifier for each purge operation.
Trigger Type: Indicates whether the purge was initiated manually or by schedule.
Dry Run: Specifies if the purge was a dry run.
Status: Current status of the purge operation.
Creation Time: Timestamp when the purge started.
Update Time: Timestamp of the last update to the purge operation.
Logs: Links to detailed logs generated during the purge.
Stopping an In-Progress Log Rotation
To halt a running log purge operation:
Access the Purge History:
Navigate to Administration > Clean Up > Log Rotation.
Select the Running Purge task:
In the Purge History table, locate the running purge operation.
Check the box next to the corresponding Task ID.
Stop the Purge:
Click Stop.
Confirm the action when prompted.
Note: Stopping the purge will cease further processing, but any logs already purged will not be restored.
Configuring Audit Log Forwarding
To forward audit logs to a syslog endpoint:
Access System Settings:
Log in with system administrator privileges.
Navigate to Configuration > System Settings.
Set Syslog Endpoint:
In the Audit Log Forward Endpoint field, enter the syslog endpoint for example harbor-log:10514.
To skip storing audit logs in the MSR database and forward them directly to the syslog endpoint:
Select the Skip Audit Log Database checkbox.
This action ensures that all audit logs are forwarded immediately to the specified endpoint without being stored in the MSR database.
For more detailed information, refer to the Harbor documentation on Log Rotation.
Managing Garbage Collection
Mirantis Secure Registry (MSR) supports garbage collection, the automatic cleanup of unused image layers. Effective management of storage resources is crucial for maintaining optimal performance in Mirantis Secure Registry (MSR). When images are deleted, the associated storage is not immediately reclaimed. To free up this space, you must perform garbage collection, which removes unreferenced blobs from the filesystem.
Running Garbage Collection
To initiate garbage collection in MSR:
Access the MSR Interface: Log in with an account that has system administrator privileges.
Navigate to Administration:
Click on the Administration tab.
Select Clean Up from the dropdown menu.
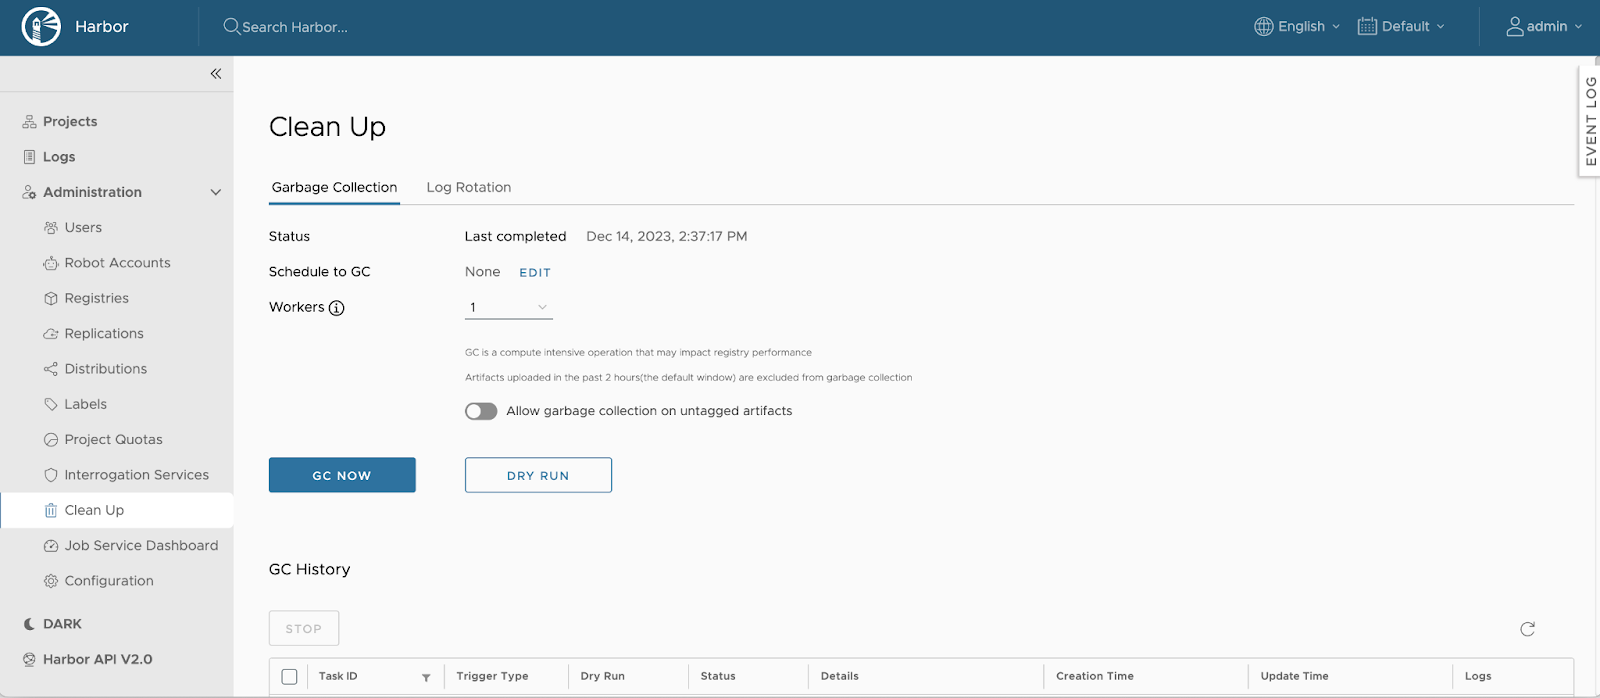
Configure Garbage Collection Settings:
Allow Garbage Collection on Untagged Artifacts:
To enable the deletion of untagged artifacts during garbage collection, select the checkbox labeled Allow garbage collection on untagged artifacts.
Dry Run Option:
To preview the blobs eligible for deletion and estimate the space that will be freed without actually removing any data, click DRY RUN.
Initiate Garbage Collection:
To start the garbage collection process immediately, click GC Now.
Note
MSR introduces a 2-hour time window to protect recently uploaded layers from being deleted during garbage collection. This ensures that artifacts uploaded within the last two hours are not affected. Additionally, MSR allows you to continue pushing, pulling, or deleting artifacts while garbage collection is running. To prevent frequent triggering, the GC Now button can only be activated once per minute.
Scheduling Garbage Collection
To automate garbage collection at regular intervals:
Access the Garbage Collection Tab:
Navigate to Administration > Clean Up.
Select the Garbage Collection tab.
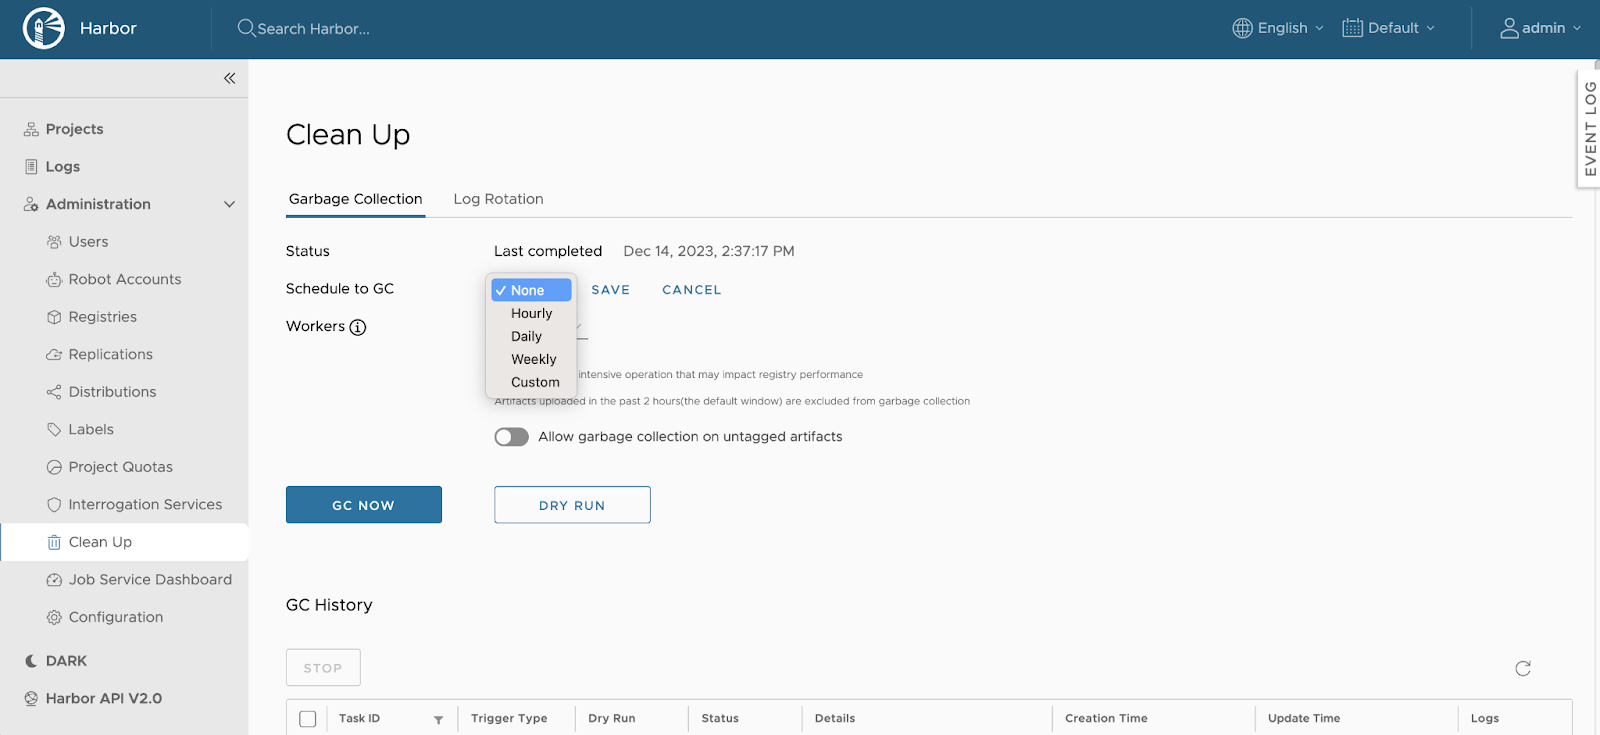
Set the Schedule:
Use the dropdown menu to choose the desired frequency:
None: No scheduled garbage collection.
Hourly: Runs at the beginning of every hour.
Daily: Runs at midnight every day.
Weekly: Runs at midnight every Saturday.
Custom: Define a custom schedule using a cron expression.
Enable Garbage Collection on Untagged Artifacts:
If you want untagged artifacts to be deleted during the scheduled garbage collection, select the checkbox labeled Allow garbage collection on untagged artifacts.
Save the Configuration:
Click Save to apply the changes.
Viewing Garbage Collection History
To monitor past garbage collection activities:
Access the Garbage Collection History:
Navigate to Administration > Clean Up.
Select the Garbage Collection tab.
Review the History Table:
The table displays the following information for each run:
Job ID: Unique identifier assigned to each run.
Trigger Type: Indicates whether the run was initiated manually or by schedule.
Dry Run: Specifies if the run was a dry run.
Status: Current status of the run.
Creation Time: Timestamp when the run started.
Update Time: Timestamp of the last update.
Logs: Links to logs generated by the run, including estimates of artifacts that will be garbage collected during a dry run.
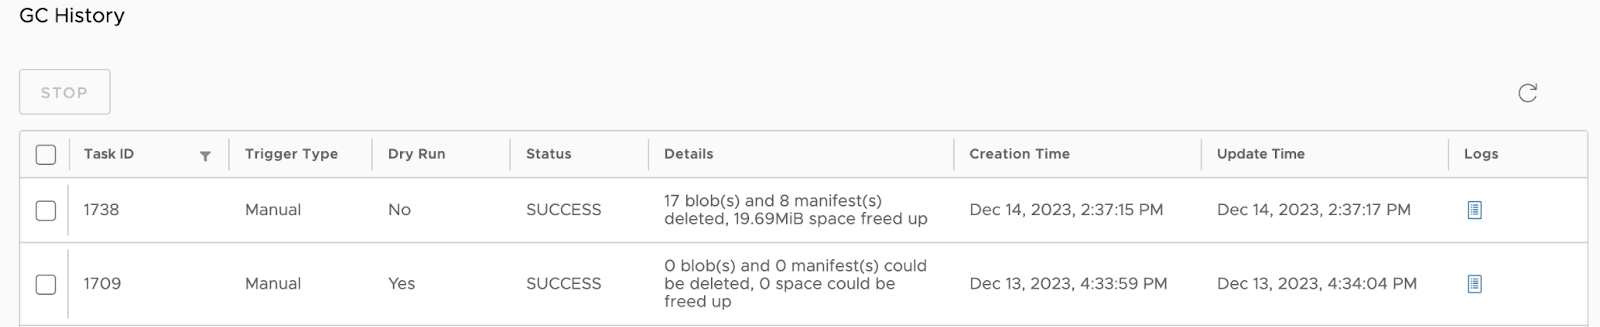
Stopping an In-Progress Garbage Collection
To halt a running garbage collection job:
Access the Garbage Collection History:
Navigate to Administration > Clean Up.
Select the Garbage Collection tab.
Select the Running Job:
In the history table, check the box next to the Job ID of the running garbage collection you wish to stop.
Stop the Job:
Click Stop.
Confirm the action in the modal that appears.
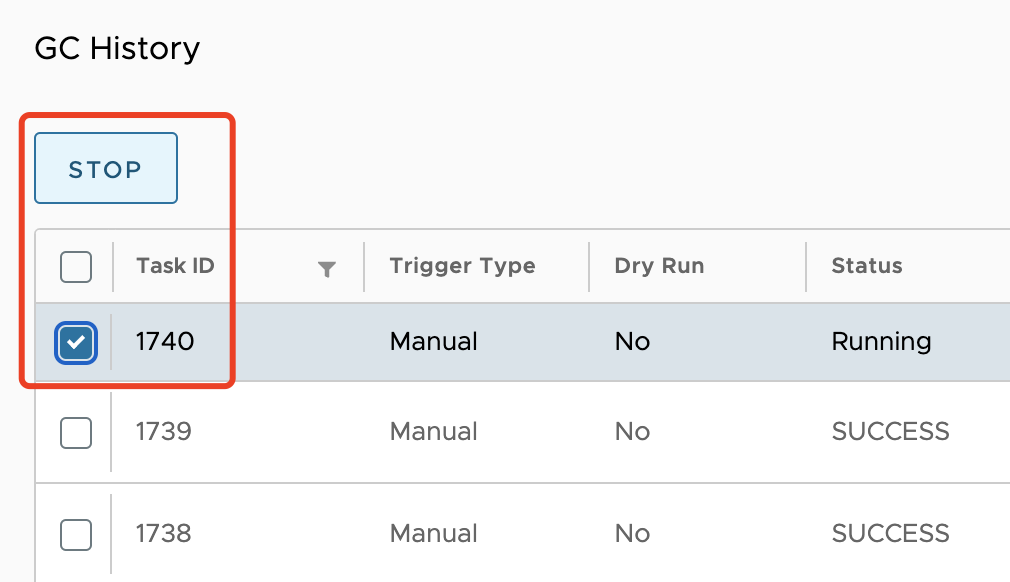
Caution
Stopping a garbage collection job will prevent it from processing additional artifacts. However, any artifacts that have already been garbage collected will not be restored. By following these procedures, you can effectively manage storage resources in Mirantis Secure Registry, ensuring optimal performance and efficient use of space.
Managing Project Permissions
Purpose: Permissions allow controlled access to projects, ensuring only authorized users can modify and interact with registry content.
Key Terms:
Project: A logical container in goharbor.io where users can store, manage, and share images.
User Roles: Project Admin, Maintainer, Developer, Guest—each with specific permission levels.
Key Concepts
Security Best Practices
Least-Privilege Principle: Regularly audit and apply the minimum required permissions.
Review and Audit: Routinely check project member lists, adjust roles as needed, and remove users who no longer need access.
There are two System-Level Roles in MSR
Harbor System Administrator: The Harbor System Administrator role holds the highest level of privileges within the system. In addition to the standard user permissions, a system administrator can:
View and manage all projects, including private and public projects.
Assign administrative privileges to regular users.
Delete user accounts.
Configure vulnerability scanning policies for all images.
Manage the default public project, “library”, which is owned by the system administrator.
Anonymous User. A user who is not logged into the system is classified as an Anonymous User. Anonymous users:
Have read-only access to public projects.
Cannot view or access private projects.
Overview of User and Group Permissions
ProjectAdmin: When creating a new project, you will be assigned the “ProjectAdmin” role to the project. Besides read-write privileges, the “ProjectAdmin” also has some management privileges, such as adding and removing members, starting a vulnerability scan.
Developer: Developer has read and write privileges for a project.
Maintainer: Maintainer has elevated permissions beyond those of ‘Developer’ including the ability to scan images, view replication jobs, and delete images and helm charts.
Guest: Guest has read-only privilege for a specified project. They can pull and retag images, but cannot push.
Limited Guest: A Limited Guest does not have full read privileges for a project. They can pull images but cannot push, and they cannot see logs or the other members of a project. For example, you can create limited guests for users from different organizations who share access to a project.
Instructions for Setting Up Project Permissions
Log in to the MSR4 web interface using your admin credentials.
Navigate to Projects from the main menu.
Click + New Project.
Project Name: Enter a unique name for your project.
Access Level: Choose between Private (restricted access) or Public (accessible to all authenticated users).
Select Project quota limits to enable any quota as desired by MiB, GiB, and TiB sizes.
Select Proxy Cache to enable this to allow this project to act as a pull-through cache for a particular target registry instance.
MSR4 can only act a proxy for DockerHub, Docker Registry, Harbor, Aws ECR, Azure ACR, Alibaba Cloud ACR, Quay, Google GCR, Github GHCR, and JFrog Artifactory registries.
Click OK to create the project.
Adding Users and Groups to a Project
** To add groups to a project you must first have OIDC authentication enabled.
Go to Projects and select the project where you want to add users.
In the project menu, select Members.
Click + Add Member or + Group.
Member Name: Enter the exact username or group name as registered in Harbor.
Role: Select the role (e.g., Developer, Guest) based on the required access level.
Click Save to assign the member with the specified role.
Changing Permissions to Project Members
Access the Members tab within the chosen project.
Select the checkbox next to the member or group.
Select ACTION then select the role (e.g., Developer, Guest) based on the required access level.
Editing or Removing Members
Access the Members tab within the chosen project.
Select the checkbox next to the member or group.
Select ACTION then select Remove
Automation Using the Harbor API
Install Harbor CLI (if applicable).
Use commands like add-user, assign-role, and create-project to automate user setup.
Example:
harbor-cli project create example-project --public
harbor-cli project member add example-project --user john_doe --role developer
Managing Tag Retention Rules
Introduction to Tag Retention in MSR
Tag retention rules are essential for maintaining an efficient and organized registry. They help manage storage by defining policies that determine which image tags to retain and which to remove. This process is crucial for preventing the accumulation of outdated or unused images, optimizing storage usage, and supporting organizational policies for image lifecycle management.
Key Concepts:
Tag Retention Rules: Policies that specify criteria for keeping or deleting image tags in a registry.
Policy Filters: Parameters such as tags, repositories, or labels used to control the application of rules.
Priority: The order in which rules are executed, allowing granular control over tag retention or removal.
Understanding Tag Retention Rules
Tag retention rules are evaluated against repositories within a project to determine which tags to keep and which to remove. By utilizing a combination of filters—such as specific tag patterns or image age—administrators can fine-tune retention policies to meet their organization’s needs.
Example Use Cases:
Development Projects: Retain only the latest five tags of a repository to keep the environment clean and manageable.
Production Repositories: Retain tags with specific labels like stable or release to ensure critical versions are preserved.
Cleanup Operations: Remove all tags older than 30 days to free up storage space and eliminate obsolete images.
Configuring Tag Retention Rules in MSR
Access the Tag Retention Panel
Log in to the MSR web interface using your credentials.
Navigate to Projects and select the specific project where you want to configure tag retention.
Select Policy.
Click on Tag Retention under the project settings.
Define a New Rule
Click + New Rule to initiate the configuration process.
Select matching or excluding rule
In the Repositories drop-down menu, select matching or excluding.
Use the Repositories text box to specify the repositories to which the rule will apply. You can define the target repositories using any of the following formats:
A specific repository name, such as
my_repo_1.A comma-separated list of repository names, such as
my_repo_1,my_repo_2,your_repo_3.A partial repository name with wildcard characters (*), for example:
my_*to match repositories starting withmy_.*_3to match repositories ending with_3.*_repo_*to match repositories containingrepoin their name.
**to apply the rule to all repositories within the project.
Select by artifact count or number of days to define how many tags to retain or the period to retain tags.
Option
Description
retain the most recently pushed # artifacts
Enter the maximum number of artifacts to retain, keeping the ones that have been pushed most recently. There is no maximum age for an artifact.
retain the most recently pulled # artifacts
Enter the maximum number of artifacts to retain, keeping only the ones that have been pulled recently. There is no maximum age for an artifact.
retain the artifacts pushed within the last # days
Enter the number of days to retain artifacts, keeping only the ones that have been pushed during this period. There is no maximum number of artifacts.
retain the artifacts pulled within the last # days
Enter the number of days to retain artifacts, keeping only the ones that have been pulled during this period. There is no maximum number of artifacts.
retain always
Always retain the artifacts identified by this rule.
Specifying Tags for Rule Application
Use the Tags text box to define the tags that the rule will target. You can specify tags using the following formats:
A single tag name, such as
my_tag_1.A comma-separated list of tag names, such as
my_tag_1,my_tag_2,your_tag_3.A partial tag name with wildcards (*), such as:
my_*to match tags starting withmy_.*_3to match tags ending with_3.*_tag_*to match tags containingtag.
**to apply the rule to all tags within the project.
The behavior of the rule depends on your selection:
If you select matching, the rule is applied only to the tags you specify.
If you select excluding, the rule is applied to all tags in the repository except the ones you specify.
Save and Activate the Rule
Once all fields are complete, click Save. The rule will now appear in the Tag Retention Rules table.
Managing and Executing Retention Policies
Viewing and Managing Rules
Access the Tag Retention Policy page in your selected Project to view all configured rules.
To edit a rule, go to Retention rules, select ACTION, then Edit to make changes to the scope, filters, or priority.
To delete a rule, use the Delete option from ACTION to remove outdated or unnecessary rules.
Executing Retention Rules
Scheduled Execution:
Under Projects select the project you would like to adjust the retention runs for.
Select Policy
Under retention rules ensure there is a policy in place.
Under Schedule select Hourly, Daily, Weekly, or Custom.
Selecting Custom will have you modify a cron schedule.
Manual Execution:
Under Projects select the project you would like to adjust the retention runs for.
Select Policy
Under retention rules ensure there is a policy in place.
You can now select DRY RUN to ensure the run is successful without any adverse impact or RUN NOW.
Review Execution Logs:
After execution, view logs to confirm the outcome or troubleshoot issues. Logs display details on retained and deleted tags, along with any errors encountered.
Under Policy then Retention runs, select the job you would like to investigate, then select the > symbol.
You will see the policy for each repository in the project. To view the logs for each repository select the Log on the far right which shows a log per repository.
Interaction Between Tag Retention Rules and Project Quotas
The Harbor system administrator can configure project quotas to set limits on the number of tags a project can contain and the total amount of storage it can consume. For details about configuring project quotas, refer to Configure Project Quotas.
When a quota is applied to a project, it acts as a strict limit that cannot be exceeded. Even if you configure tag retention rules that would retain more tags than the quota allows, the quota takes precedence. Retention rules cannot override or bypass project quotas.
Metrics Collection and Visualization
This article describes how to enable metrics collection for MSR and visualize the collected data using the Grafana web UI.
Prerequisites
A Grafana instance (either Grafana OSS or Grafana Cloud).
Prometheus deployed in the same Kubernetes cluster as MSR. You can use the community-provided Helm chart: kube-prometheus-stack.
Prometheus configured as a data source in Grafana. For details, refer to the Prometheus data source official documentation from Grafana Labs.
Metrics collection
Enabling metrics collection consists of two parts:
Configure MSR to expose metrics by adding dedicated endpoints to its services.
Configure Prometheus to scrape those endpoints and collect MSR metrics.
Configure MSR
During the initial deployment, or updating an existing MSR cluster, you need to pass an additional value to the MSR Helm chart. For more information, see Install highly available MSR.
Set the metrics.enabled value to true.
Example Helm installation or upgrade command:
helm upgrade --install my-release oci://registry.mirantis.com/harbor/helm/msr --version <MSR-VERSION> -f <PATH-TO/msr-values.yaml> --set metrics.enabled=true
This command enables metrics collection by creating additional endpoints in selected MSR Kubernetes services.
Configure Prometheus
Next, configure Prometheus to scrape the newly exposed MSR metrics endpoints.
To do so, deploy a Prometheus custom resource called ServiceMonitor.
Verify that the Prometheus Operator is deployed in the
monitoringnamespace.Verify that the MSR cluster is deployed in the
msr4namespace.Apply the following manifest to create the
ServiceMonitorresource:cat <<EOF | kubectl apply -f - apiVersion: monitoring.coreos.com/v1 kind: ServiceMonitor metadata: labels: app: msr4 release: prometheus name: msr4 namespace: monitoring spec: endpoints: - port: http-metrics namespaceSelector: matchNames: - msr4 selector: matchLabels: app: harbor EOF
After the ServiceMonitor is deployed, Prometheus starts scraping
metrics from MSR. You can then query these metrics directly in
the Prometheus web UI.
Metrics visualization
You can now visualize the collected MSR metrics. Because Prometheus is already configured as a data source in Grafana, the only remaining step is to create a dashboard.
Mirantis provides an MSR4-specific dashboard, available at the following URL:
https://get.mirantis.com/monitoring/msr4-dashboard.json
To use the dashboard, paste the URL directly into the Grafana web UI when importing a new dashboard.
Dashboard example:

Mirror Images
Manual Helm Chart Migration Required
When mirroring images from MSR 2.x or MSR 3.x to MSR 4.x, Helm charts do not automatically migrate. You must manually migrate any existing Helm charts to the new environment.
To migrate images, repositories, and tags from an MSR 2.x or MSR 3.x environment to an MSR 4.x environment, follow these steps:
Access the MSR Web UI.
Navigate to Administration → Registries.
Select New Endpoint to add a new registry connection.
Fill in the pop-up with the following details:
Provider:
DTRName:
<your-identifier>Endpoint URL:
<root-of-the-registry>Access ID:
<admin-username>Access Secret:
<admin-password>
Note
Avoid specifying a user or repository namespace, as this will restrict access. Using the root enables full crawling of the host.
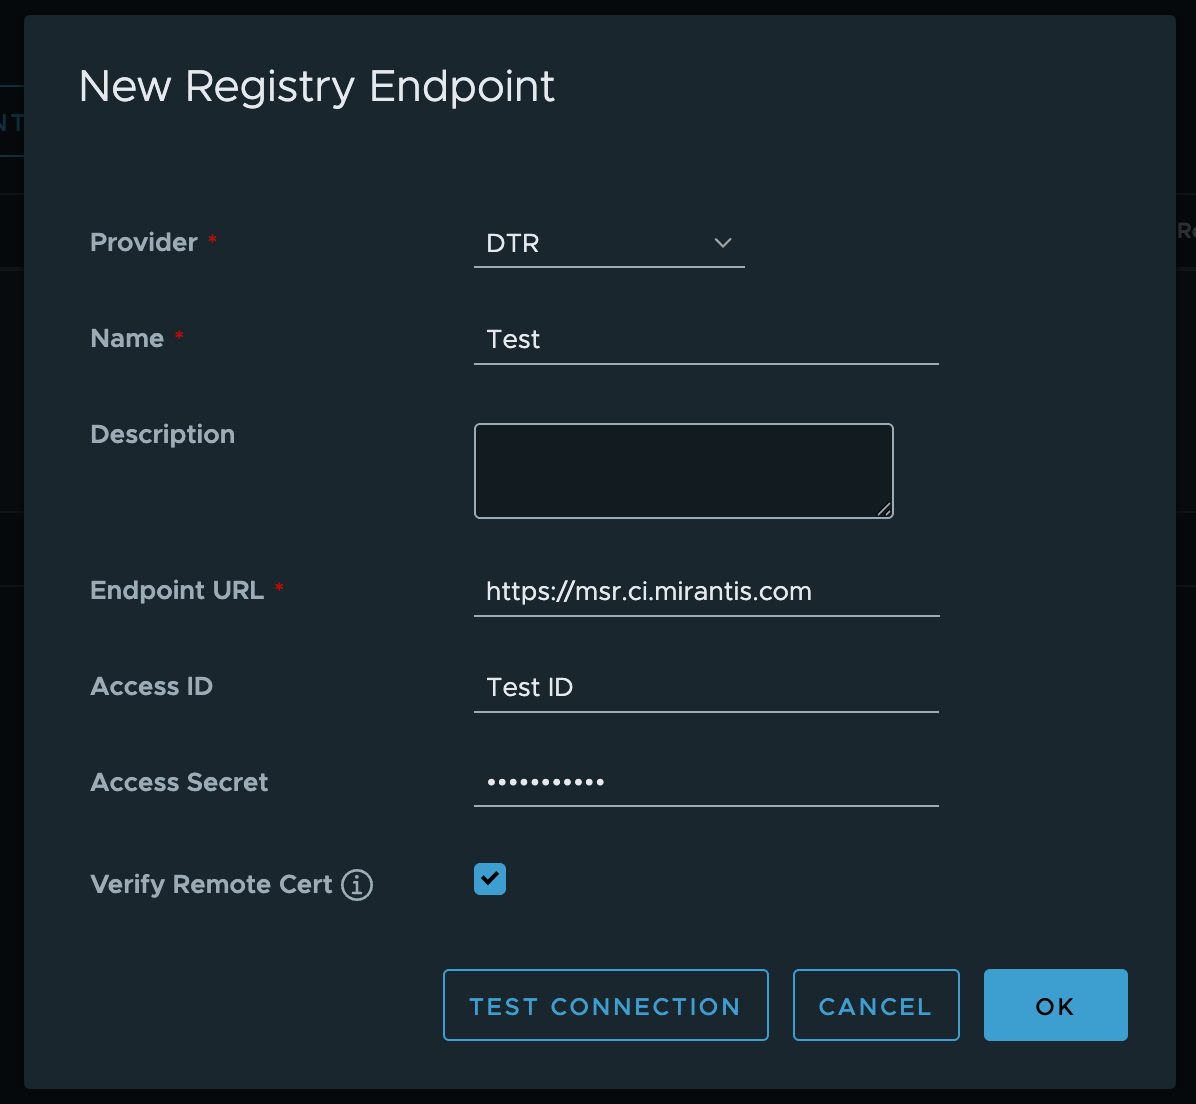
Navigate to Administration → Replications.
Select New Replication Rule to create a replication rule.
In the pop-up window, review and confirm the following settings:
Replication mode: Ensure it is set to Pull-based.
Source registry: Verify that the MSR 2 and MSR 3 hosts added in previous steps are listed.
Source resource filter: Ensure the Name field is set to
**, with all other fields left blank.Destination: Make sure flattening is set to
Flatten 1 Level. If your environment uses an organization namespace in MSR 2 or MSR 3, you may choose an alternative flattening option.
Click to learn more about flattening options
You can choose to flatten or retain the original structure of any organization or namespace. Enabling the flattening option will merge all content into a single namespace (
ns). If your organization uses a more flexible namespace or organizational structure, review the following guidelines to understand how flattening may affect your setup:Flatten All Levels:
a/b/c/d/img→ns/imgNo Flattening:
a/b/c/d/img→ns/a/b/c/d/imgFlatten 1 Level:
a/b/c/d/img→ns/b/c/d/imgFlatten 2 Levels:
a/b/c/d/img→ns/c/d/imgFlatten 3 Levels:
a/b/c/d/img→ns/d/img
The term
Levelsrefers to the directory depth of the source path (a/b/c/d/img).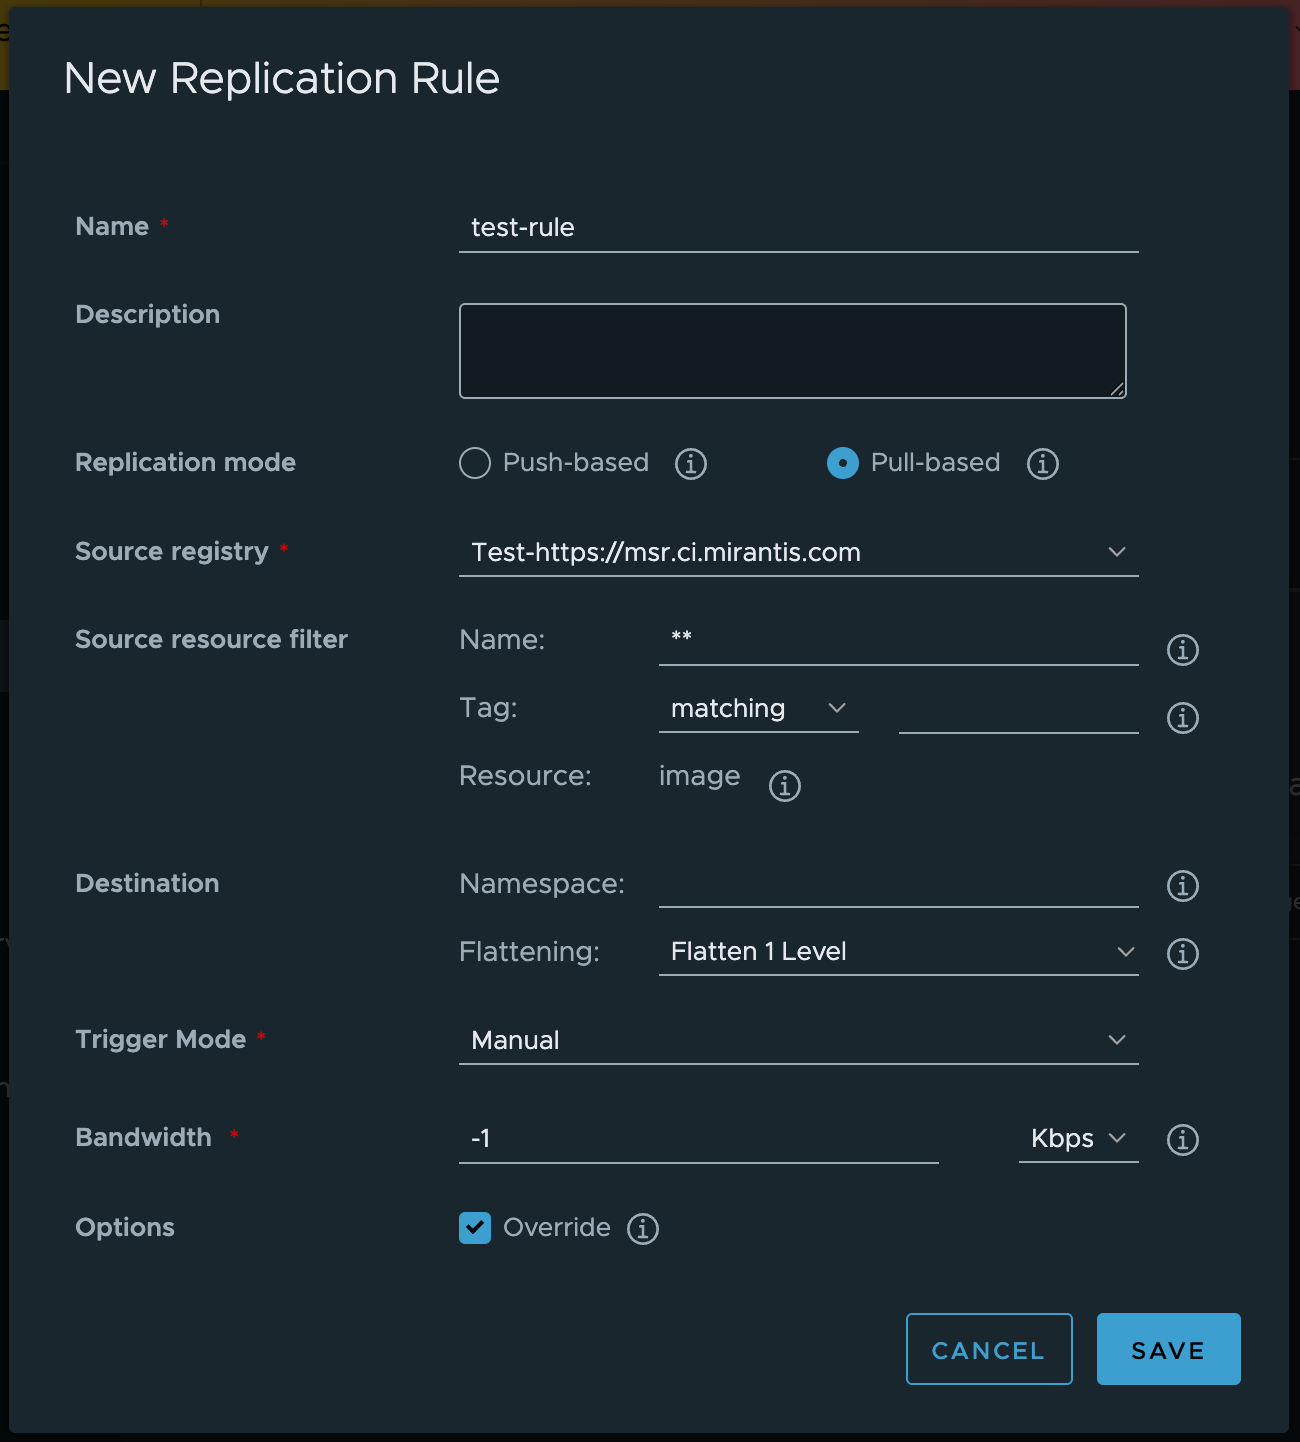
Select the rule created in the previous step and click Replicate. Be aware that pulling down the entire host may take some time to complete.
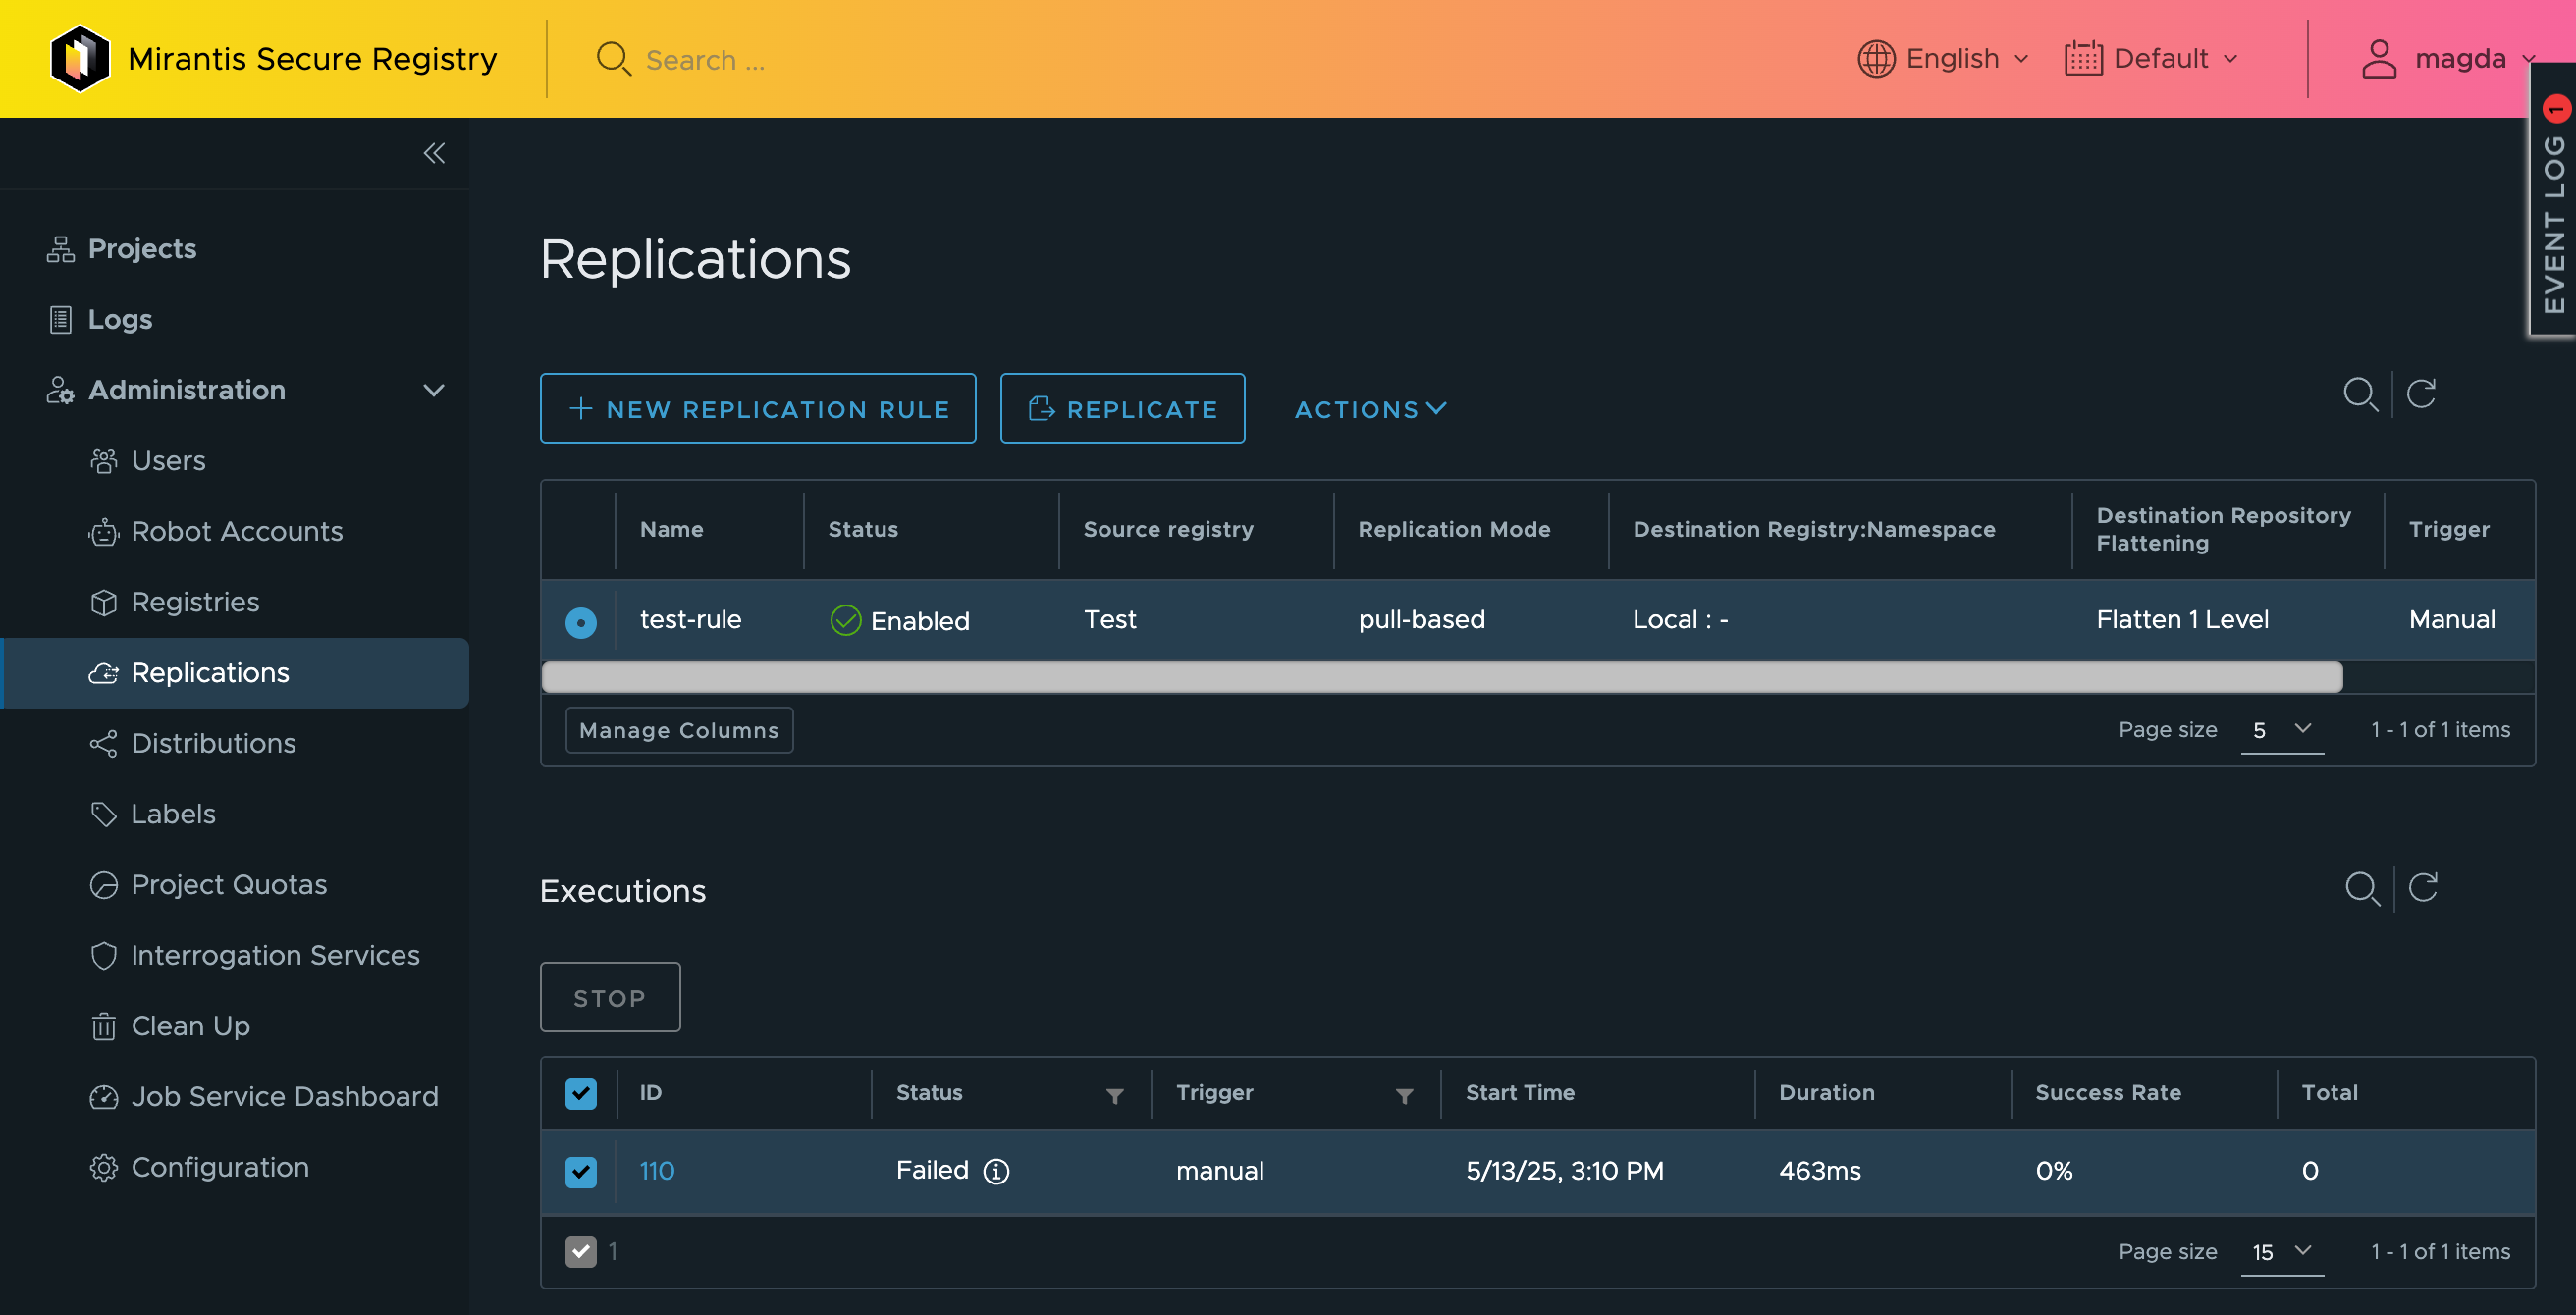
To check the status of the replication process, click the job ID.
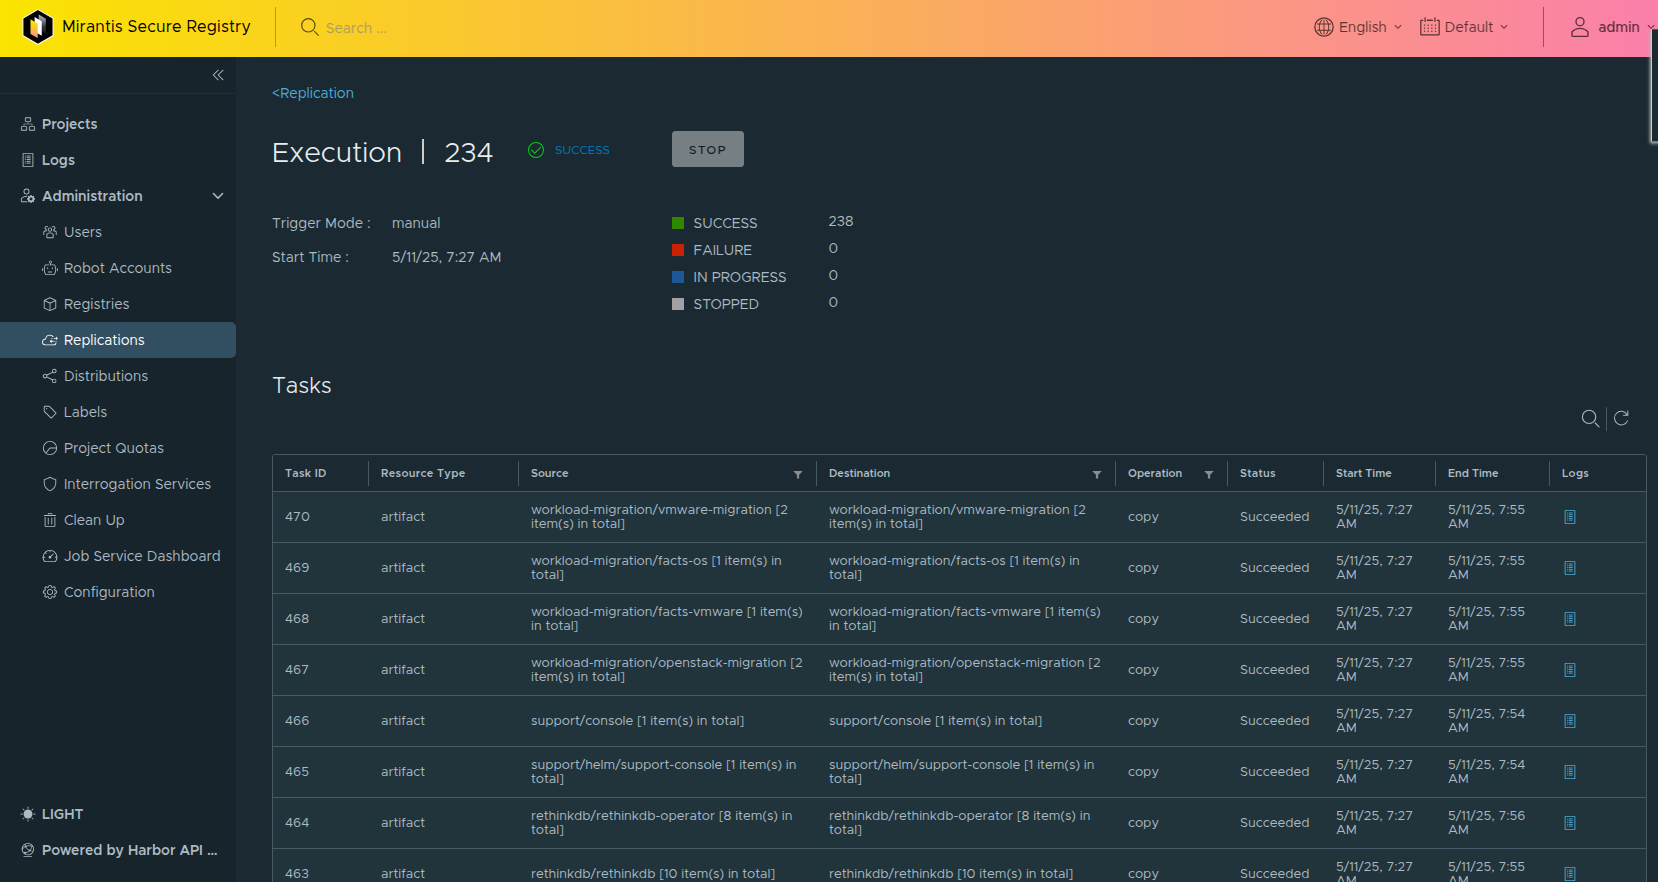
Signing Artifacts with Cosign
Artifact signing and signature verification are essential security measures that ensure the integrity and authenticity of artifacts. MSR facilitates content trust through integrations with Cosign. This guide provides detailed instructions on utilizing Cosign to sign your artifacts within MSR.
Note
Project administrators can enforce content trust, requiring all artifacts to be signed before they can be pulled from a MSR registry.
Using Cosign to Sign Artifacts
MSR integrates support for Cosign, an OCI artifact signing and verification solution that is part of the Sigstore project. Cosign signs OCI artifacts and uploads the generated signature to MSR, where it is stored as an artifact accessory alongside the signed artifact. MSR manages the link between the signed artifact and its Cosign signature, allowing the application of tag retention and immutability rules to both the artifact and its signature.
Key Features of Cosign Integration in MSR:
Signature Management: MSR treats Cosign signatures as artifact accessories, enabling consistent management alongside the signed artifacts.
Replication Support: MSR’s replication capabilities extend to signatures, ensuring that both artifacts and their associated signatures are replicated together.
Limitations:
Vulnerability scans of Cosign signatures are not supported.
Only manual and scheduled replication trigger modes are applicable; event-based replication is currently unsupported.
Prerequisites
Install Cosign: Ensure that Cosign is installed on your local machine. Refer to the Cosign documentation for installation instructions.
Generate a Private Key: Create a private key for signing artifacts.
Signing and Uploading Artifacts with Cosign
Log in to MSR: Authenticate with your MSR instance using the Docker client:
docker login <MSR-instance>
Replace <MSR-instance> with the URL of your MSR registry.
Tag the Image: Tag the local image to match the MSR repository format:
docker tag <local-image> <MSR-instance>/<project>/<repository>:<tag>
Replace <local-image>, <project>, <repository>, and <tag> with your specific details.
Push the Image to MSR:
docker push <MSR-instance>/<project>/<repository>:<tag>
Sign the Image with Cosign:
cosign sign --key cosign.key <MSR-instance>/<project>/<repository>:<tag>
You will be prompted to enter the password for your Cosign private key.
Viewing Cosign Signatures in MSR
Access the MSR Interface: Log in to the MSR web interface.
Navigate to the Project: Select the project containing the signed artifact.
Locate the Artifact: Find the specific artifact in the repository list.
Expand Accessories: Click the “>” icon next to the artifact to display the Accessories table, which lists all associated Cosign signatures.
Deleting Cosign Signatures
Individual Deletion:
In the MSR interface, navigate to the project and locate the artifact.
Expand the Accessories table.
Click the three vertical dots next to the signature and select “Delete.”
Upgrade Guide
The information offered herein relates exclusively to upgrades between MSR 4.x.x versions. To upgrade to MSR 4.x.x from MSR 2.x.x, or 3.x.x, you must use the Migration Guide.
Upgrade instructions for MSR 4.0 to 4.13 coming soon
We are currently finalizing the validated upgrade path for MSR 4.0 to 4.13. Detailed instructions will be published shortly.
If you are performing a migration from versions 2.9.x or 3.1.x, or a new installation, refer to the existing guides:
We appreciate your patience as we complete this work to ensure a safe and reliable upgrade experience.
Vulnerability Scanning
Mirantis Secure Registry (MSR) 4, built on the Harbor open-source project, includes powerful tools for vulnerability scanning. Scanning container images for vulnerabilities is a critical step in ensuring your applications are secure before deploying them into production environments. This document provides detailed instructions for configuring and using the vulnerability scanning features in MSR 4. By default, MSR 4 leverages Trivy, an efficient and fast vulnerability scanner. Additionally, MSR supports advanced capabilities, including integration with other scanners like Grype and Anchore, as well as third-party security tools.
Prerequisites
Before configuring vulnerability scanning, ensure the following:
MSR 4 is installed and operational, deployed on your Swarm or Kubernetes cluster.
You have administrator-level access to the MSR web console.
Network access is configured for any external vulnerability scanners you plan to use.
Configuring Vulnerability Scanning in MSR 4
To get started with vulnerability scanning, follow these steps:
Enabling Vulnerability Scanning with Trivy (Default Scanner)
Log in to the MSR web console using your administrator credentials.
Navigate to the Administration section from the left-hand navigation menu.
Under Interrogation Services, select Scanners.
Trivy is enabled as the default scanner in MSR 4.
If Trivy is not marked as “Default” select the scanner and click the “SET AS DEFAULT” button.
To test connection, select the scanner, click ACTION drop down, and select EDIT. In the popup click Test Connection to verify Trivy is functional. If the connection is successful, save the configuration by clicking Save.
Trivy provides fast, lightweight scanning for common vulnerabilities and exposures (CVEs) in container images. This setup ensures all images pushed to MSR 4 are scanned for security issues by default.
Adding and Configuring Additional Scanners
To enhance your vulnerability scanning strategy, you can integrate additional scanners, such as Grype and Anchore, into MSR 4. These tools provide broader coverage and specialized features for detecting vulnerabilities.
Deploy the scanner you want to add (e.g., Grype or Anchore) according to its documentation.
In the MSR web console, navigate to Administration > Interrogation Services > Scanners and click + New Scanner.
Provide the required details for the new scanner:
Name: A unique identifier for the scanner (e.g., Grype-Primary).
Endpoint URL: The API endpoint for the scanner.
Select the appropriate Authorization mechanism and provide the appropriate credentials, tokens, or key.
Click Test Connection to validate the configuration, and then click Add.
Once additional scanners are configured, they can be used alongside Trivy or set as the default scanner for specific projects.
Configuring Automated Scans
Automated scans ensure that images are evaluated for vulnerabilities immediately when they are pushed to the registry. This helps enforce security policies consistently across your container ecosystem.
To enable automated scans,
Navigate to Projects in the MSR web console.
Select a Project, then click Configuration.
enable the Automatically Scan Images on Push option.
Save the configuration to apply the change.
Viewing and Managing Scan Results
After a scan is completed, results are accessible in the MSR web console.
Navigate to the image repository in the desired project, select the image
Then select the artifact digest.
Scroll down to Artifacts then Vulnerabilities
The report includes detailed information about detected vulnerabilities, categorized by severity (Critical, High, Medium, Low, Unknown). Export the results in JSON or CSV format for further analysis if needed.
Enhancing Security with Third-Party Scanners
In addition to using Trivy and integrating scanners like Grype and Anchore, MSR 4 supports third-party scanners to create a comprehensive vulnerability management strategy. Leveraging multiple tools enables a layered security approach, enhancing protection against various types of vulnerabilities and compliance risks.
Supported Third-Party Scanners
MSR 4 can integrate with a wide range of third-party security tools, including:
Aqua Trivy: Provides enhanced compliance checks and detailed vulnerability information.
Clair: A simple, lightweight scanner suitable for cloud-native environments.
Aqua CSP: Offers runtime protection and advanced vulnerability scanning.
DoSec Scanner: Focuses on detecting and mitigating sophisticated vulnerabilities.
Sysdig Secure: Provides runtime monitoring and vulnerability analysis with policy enforcement.
TensorSecurity: Uses AI-driven insights for identifying vulnerabilities in containerized applications.
Benefits of Third-Party Scanners
Each of these tools brings unique advantages to your container security strategy. For instance, Aqua CSP and Sysdig Secure extend vulnerability scanning into runtime environments, ensuring your containers remain protected after deployment. TensorSecurity uses machine learning to identify patterns in vulnerability data, uncovering risks that traditional scanners might miss.
Configuring a Third-Party Scanner
Deploy the third-party scanner on your infrastructure or subscribe to its hosted service.
Retrieve API credentials and endpoint details from the scanner’s documentation.
Add the scanner to MSR 4 by navigating to Administration > Interrogation Services and using the Add Scanner workflow described earlier.
Validate the scanner’s functionality by running test scans and analyzing the results.
By integrating third-party scanners, MSR 4 empowers you to customize your security strategy to meet specific organizational needs and regulatory requirements.
Conclusion
Mirantis Secure Registry (MSR) 4 provides a robust and flexible vulnerability scanning solution. With Trivy enabled by default, organizations can quickly detect and mitigate vulnerabilities in container images. The ability to integrate additional scanners, including third-party tools, allows you to create a comprehensive security strategy tailored to your needs.
Backup Guide
This section provides a comprehensive guide for backing up and restoring MSR.
HA Backup
This section provides a comprehensive guide for backing up and restoring MSR with High Availability (HA) on Kubernetes cluster.
File System backup vs Snapshot backup
- Filesystem Backup (FSB)
A backup method that works with almost any storage type, including NFS, local disks, or cloud storage that doesn’t support snapshots. Useful when snapshots aren’t available or when fine-grained control over files is needed.
- Snapshot Backup
A fast, efficient way to back up entire volumes that is tightly integrated with the storage provider. Ideal for cloud-native environments where CSI snapshots are supported.
Note
Filesystem backups are NOT truly cross-platform because they capture files and directories in a way that depends on the underlying storage system. If you back up on AWS, for example, restoring to Azure might not work smoothly.
Snapshot backups are also NOT cross-platform by default because they rely on storage provider technology (like AWS EBS snapshots or Azure Disk snapshots). However, if you use a snapshot with a data mover, you can transfer it between cloud providers, making it more portable.
Advantages and disadvantages
Feature |
Filesystem Backup |
Snapshot Backup |
|---|---|---|
Speed |
Slower – Reads and transfers all files, making large backups time-consuming. |
Faster – Works at the storage level, quickly capturing an entire volume. |
Efficiency |
More storage needed – Stores files individually, which may increase backup size. |
More efficient – Uses incremental snapshots, reducing backup size and time. |
Compatibility |
Works with almost any storage – Supports NFS, local storage, cloud object storage, etc. |
Requires CSI drivers or storage provider support – Only works if the storage supports snapshots. |
Portability |
Not fully cross-platform – Can be tricky to restore across different storage systems. |
Cross-platform with data mover – Can be transferred between cloud providers with extra tools. |
Granular restore |
Can restore individual files – Useful if you only need specific files. |
Restores entire volume – No easy way to get individual files without additional tools. |
When to use each backup type
Use Filesystem Backup if:
Your storage provider doesn’t support snapshots (e.g., NFS, EFS, AzureFile).
You need to restore specific files instead of the whole volume.
You want a backup that works with different storage backends (but not necessarily cross-platform).
Use Snapshot Backup if:
You want a fast and efficient backup for large persistent volumes.
Your storage supports CSI snapshots or cloud-native snapshots (e.g., AWS EBS, Azure Disks).
You need incremental backups to reduce storage costs.
Best backup practices
Schedule Incremental Backups
Automate backups using Kubernetes CronJobs:
velero backup create daily-harbor-backup-$(date +\%Y\%m\%d\%H\%M\%S) --include-namespaces=<MSR4 namespace> --snapshot-volume
Note
This cron job is scheduled to run daily at 2 AM. The $(date +%Y%m%d%H%M%S) command appends a timestamp to each backup name to ensure uniqueness.
Retention Policy
Configure Velero to prune old backups:
velero backup delete msr4-full-backup --confirm
OR set a time-to-live (TTL) when creating backups:
velero backup create msr4-backup-<timestamp> --include-namespaces <MSR4-namespace> --snapshot-volumes --ttl 168h --wait
The example above retains the backup for 7 days.
Store Backups in Multiple Locations
For disaster recovery, store a copy of backups in an external object storage system (e.g., AWS S3, Azure Blob, GCS):
velero backup describe msr4-backup-<timestamp>
velero restore create --from-backup msr4-backup-<timestamp>
Monitoring backup and restore status
Use these commands to check the status of backups and restores:
To list all backups:
velero backup get
To list all restores:
velero restore get
To check details of a specific backup:
velero backup describe msr4-full-backup --details
To check details of a specific restore:
velero restore describe msr4-restore --details
Filesystem-Level Backups with Velero
Create a backup
Set MSR4 to Read-Only Mode.
Before initiating the backup, set MSR4 to Read-Only mode to prevent new data from being written during the process, minimizing inconsistencies.
Log in to MSR4 as an administrator.
Navigate to Administration > Configuration.
Under System Settings, enable the Repository Read-Only option.
Click Save to apply the changes.
Optional: Label Redis-Related Resources for Exclusion.
To avoid backing up ephemeral data, exclude Redis-related resources from the backup.
Label the Redis Pod:
kubectl -n <MSR4-NAMESPACE> label pod <REDIS-POD-NAME> velero.io/exclude-from-backup=true
Repeat the labeling process for the Redis PersistentVolumeClaim (PVC) and PersistentVolume (PV):
kubectl -n <MSR4-NAMESPACE> label pvc <REDIS-PVC-NAME> velero.io/exclude-from-backup=true
kubectl -n <MSR4-NAMESPACE> label pv <REDIS-PV-NAME> velero.io/exclude-from-backup=true
Create a backup.
Create a Full Backup
Run the following command to create a full backup:
velero backup create msr4-full-backup --include-namespaces harbor --default-volumes-to-fs-backup --wait
Create an Incremental Backup
After the full backup, incremental backups happen automatically. They capture only the changes since the last backup:
velero backup create msr4-incremental-backup --include-namespaces harbor --default-volumes-to-fs-backup --wait
Complete backup by unsetting Read-Only mode.
Once the backup is complete, revert MSR4 to its normal operational state:
Navigate to Administration > Configuration.
Under System Settings, disable the Repository Read-Only option by unchecking it.
Click Save to apply the changes.
Restore process
Restore a Full Backup
To restore from a Full Backup, use the following command:
velero restore create msr4-restore --from-backup msr4-full-backup
Restore an Incremental Backup
To restore from a Incremental Backup, use the following command:
velero restore create msr4-incremental-restore --from-backup msr4-incremental-backup
Snapshot Backups with Velero
This method leverages Velero’s integration with Container Storage Interface (CSI) drivers to create volume snapshots, providing efficient and consistent backups for cloud-native environments.
Prerequisites
- Velero Installation with CSI Support
Ensure Velero is installed with CSI snapshot support enabled. This requires the EnableCSI flag during installation. For detailed instructions, refer to the official Velero documentation Container Storage Interface Snapshot Support in Velero.
- CSI Driver Installation
Confirm that a compatible CSI driver is installed and configured in your Kubernetes cluster. The CSI driver should support snapshot operations for your storage provider.
Backup process using Velero with CSI Snapshots
Set MSR4 to Read-Only Mode.
Before initiating the backup, set MSR4 to Read-Only mode to prevent new data from being written during the process, minimizing inconsistencies.
Log in to MSR4 as an administrator.
Navigate to Administration > Configuration.
Under System Settings, enable the Repository Read-Only option.
Click Save to apply the changes.
Optional: Label Redis-Related Resources for Exclusion.
To avoid backing up ephemeral data, exclude Redis-related resources from the backup.
Label the Redis Pod:
kubectl -n <MSR4-NAMESPACE> label pod <REDIS-POD-NAME> velero.io/exclude-from-backup=true
Repeat the labeling process for the Redis PersistentVolumeClaim (PVC) and PersistentVolume (PV):
kubectl -n <MSR4-NAMESPACE> label pvc <REDIS-PVC-NAME> velero.io/exclude-from-backup=true
kubectl -n <MSR4-NAMESPACE> label pv <REDIS-PV-NAME> velero.io/exclude-from-backup=true
Create a backup.
Create a Full Snapshot Backup (Recommended for initial backup)
Full Snapshot Backup is recommended for an initial backup.
Use the following command to backup the entire MSR4 namespace, capturing snapshots of all PersistentVolumes:
velero backup create msr4-full-backup --include-namespaces <MSR4-namespace> --snapshot-volumes --wait
Create an Incremental Snapshot Backup
After the full backup, incremental backups happen automatically. They capture only the changes since the last backup if the CSI Storage driver supports this capability. Please check with the manufacturer of your CSI driver.
When running incremental backups, use the
--from-backupflag:velero backup create msr4-full-backup --include-namespaces <MSR4-NAMESPACE> --snapshot-volumes --wait
Note
Replace <TIMESTAMP> with the current date and time to uniquely identify each backup.
This command can be scheduled to run periodically.
Restore process
To restore MSR4 from a snapshot backup, follow these steps:
Restore a Full Backup
Set MSR4 to Read-Only Mode.
Log in to MSR4 as an administrator.
Navigate to Administration > Configuration.
Under System Settings, enable the Repository Read-Only option.
Click Save to apply the changes.
Run the restore command.
Restore from the most recent backup:
velero restore create msr4-restore --from-backup msr4-full-backup --wait
Restore an Incremental Backup
Set MSR4 to Read-Only Mode.
Log in to MSR4 as an administrator.
Navigate to Administration > Configuration.
Under System Settings, enable the Repository Read-Only option.
Click Save to apply the changes.
Run the restore command.
Restore from the most recent backup:
velero restore create msr4-restore-incremental --from-backup msr4-incremental-backup --wait
Complete backup by unsetting Read-Only mode
After the backup is complete, revert MSR4 to its normal operational state:
Navigate to Administration > Configuration.
Under System Settings, disable the Repository Read-Only option by unchecking it.
Click Save to apply the changes.
Schedule backups and restores
Automate and schedule MSR backups and restores with Velero.
Verify Velero installation
Ensure that Velero is already installed and configured in your Kubernetes cluster. Check that:
Velero is installed.
Backup storage is configured (e.g., AWS S3, MinIO, Azure Blob).
Snapshots are enabled if using incremental snapshot backup.
Run the following command to test if Velero is working:
velero backup create test-backup --include-namespaces=harbor
Verify the backup status:
velero backup describe test-backup
Create a backup schedule with Velero
Velero provides a built-in schedule command for automating backups.
Create a daily schedule
Run the following command to create a backup schedule that runs daily at a specific time:
velero schedule create daily-harbor-backup \
  --schedule="0 2 * * *" \
  --include-namespaces=harbor \
  --ttl=168h
--schedule="0 2 * * *"- Schedules the backup to run daily at 2 AM (UTC). Modify this cron expression as needed.--include-namespaces=harbor- Ensures only the harbor namespace is backed up. Adjust if you need to include other namespaces.--ttl=168h- Sets the backup retention time to 7 days. Adjust based on your storage needs.
Single Instance Backup
This section provides a comprehensive guide for single instance backup for Docker Compose MSR installation.
Backup for Docker Compose Installation
Prerequisites
Stop Write Operations (optional but recommended)
Set MSR to read-only mode to prevent data inconsistencies.
Enable Read-Only Mode in MSR:
Log in as an administrator.
Go to Administration → Configuration.
Under System Settings, enable Repository Read-Only mode.
Click Save.
Backup Components
A complete backup includes:
Registry Storage (Images and Artifacts)
Harbor Databases (PostgreSQL and Redis)
Configuration Files
Backup Registry Storage (Default: /data)
If using filesystem storage, copy the image storage directory:
tar -czvf harbor-registry-backup.tar.gz /data
If using an S3-compatible backend, ensure retention policies exist on the object storage.
Backup Databases (PostgreSQL and Redis)
MSR uses PostgreSQL and Redis. Back them up separately.
Backup PostgreSQL:
docker exec -t harbor-db pg_dumpall -U harbor > harbor-db-backup.sql
Backup Redis (if needed - used for caching/session storage):
docker exec -t harbor-redis redis-cli save
cp /var/lib/redis/dump.rdb harbor-redis-backup.rdb
Backup Configuration Files
Back up the configuration and TLS certs from the install directory (typically
/etc/harbor/):
tar -czvf harbor-config-backup.tar.gz /etc/harbor/
Restore Process
If disaster recovery is needed, follow these steps:
Stop Running Containers:
docker compose down
Restore Registry Storage:
tar -xzvf harbor-registry-backup.tar.gz -C /
Restore PostgreSQL Database:
cat harbor-db-backup.sql | docker exec -i harbor-db psql -U postgres -d registry
Use
-d registryto restore into the correct database.Restore Redis (if needed):
cp harbor-redis-backup.rdb /var/lib/redis/dump.rdb
Restore Configuration Files:
tar -xzvf harbor-config-backup.tar.gz -C /
Restart MSR:
docker compose up -d
Automate and Schedule Backups
For regular automated backups, use cron jobs.
Edit the crontab
crontab -eAdd a scheduled task to run nightly at 2 AM:
0 2 * * * /bin/bash -c "tar -czvf /backup/harbor-registry-$(date +\%F).tar.gz /data && docker exec -t harbor-db pg_dumpall -U harbor > /backup/harbor-db-$(date +\%F).sql"
How Long Will This Take?
Component |
Estimated Time |
|---|---|
Configuration Files ( |
<1 minute |
PostgreSQL DB Backup |
1-5 minutes (depends on size) |
Redis Backup |
<1 minute |
Registry Storage ( |
Varies (Minutes to Hours for TBs) |
Disaster Recovery
Warning
The procedures herein are validated Disaster Recovery approaches for MSR 4, leveraging Velero, MinIO, and an NFS CSI backend.
To accommodate diverse customer environments, Velero supports multiple backup and recovery options, including integration with various cloud and on-premises storage providers. Thus, Mirantis strongly recommends that you consult the official Velero documentation for an overview of all supported providers and advanced features.
To ensure the DR solution aligns with your infrastructure, security, and performance requirements, contact Mirantis for assistance. The team will evaluate your environment and design a custom backup and disaster recovery strategy for your specific MSR 4 deployment.
The following section provides detailed guidance for implementing a Disaster Recovery (DR) strategy for Mirantis Secure Registry 4 (MSR 4). This solution focuses on the backup and restoration of an MSR 4 instance that is deployed on a Kubernetes cluster using Helm, with NFS CSI providing persistent storage.
The DR implementation is based on the following key components:
Component |
Description |
|---|---|
MSR 4 (deployed with Helm) |
The target application whose data and Kubernetes resources are protected through the backup and restore process. |
NFS CSI Driver |
The provider of Persistent Volumes (PVs) for Harbor’s stateful components to ensure data persistence across cluster operations. |
Velero |
The primary tool used for backing up and restoring Kubernetes cluster resources and persistent volumes. |
MinIO |
An S3-compatible object storage server that acts as the Backup Storage Location (BSL) for Velero to store the backup archives. |
The Disaster Recovery documentation provides detailed instructions for implementing a DR strategy for MSR 4. This solution focuses on the backup and restoration of an MSR 4 instance deployed on a Kubernetes cluster using Helm, with NFS CSI providing persistent storage.
NFS Metadata Restore
The procedure herein details the steps required to perform a cross-cluster disaster recovery restore of an MSR 4 instance. This method is intended for environments wherein both the source and target Kubernetes clusters use the same underlying NFS storage backend along with MinIO backup storage.
Shared persistent storage significantly accelerates the recovery process by circumventing the movement of large registry data files.
Prerequisites
Verify that a compatible CSI driver is installed and configured in your Kubernetes cluster. For Snapshot backup, the CSI driver must support snapshot operations for your storage provider.
Procedure
Install MinIO and Velero
Install MinIO and Velero on the Kubernetes cluster on which you are running MSR 4.
Deploy MinIO Operator in its own namespace:
helm repo add minio-operator https://operator.min.io
helm repo up
helm install   --namespace minio-operator   --create-namespace   operator minio-operator/operator
Set up MinIO Tenant.
Download the MinIO Tenant
values.ymlfile:curl -sLo values.yaml https://raw.githubusercontent.com/minio/operator/master/helm/tenant/values.yaml
Configure a username and password for Minio:
[...]
  configSecret:
    name: myminio-env-configuration
    accessKey: <username>
    secretKey: <password>
[...]
Configure the pools:
[...]
  pools:
    ###
    # The number of MinIO Tenant Pods / Servers in this pool.
    # For standalone mode, supply 1. For distributed mode, supply 4 or more.
    # Note that the operator does not support upgrading from standalone to distributed mode.
    - servers: 1
      ###
      # Custom name for the pool
      name: pool-0
      ###
      # The number of volumes attached per MinIO Tenant Pod / Server.
      volumesPerServer: 4
      ###
      # The capacity per volume requested per MinIO Tenant Pod.
      size: 30Gi
[...]
Note
Use NodeSelector to run MinIO Tenant on a specific node on which the public IP or DNS will be used to connect to Minio’s console.
Install MinIO Tenant in its own namespace:
helm install --namespace minio-tenant --create-namespace --values values.yml minio-tenant minio-operator/tenant
Expose the MinIO API and console using NodePort:
Create the Kubernetes Services’ YAML files:
minio-api-svc.yml
$ cat minio-api-svc.yml
apiVersion: v1
kind: Service
metadata:
  name: minio-nodeport
  namespace: minio-tenant
spec:
  type: NodePort
  selector:
    v1.min.io/tenant: myminio
  ports:
    - name: https-minio
      port: 9000
      targetPort: 9000
      nodePort: 33000
minio-console-svc.yml
$ cat minio-console-svc.yml
apiVersion: v1
kind: Service
metadata:
  name: minio-console-nodeport
  namespace: minio-tenant
spec:
  type: NodePort
  selector:
    v1.min.io/tenant: myminio
  ports:
    - name: https-console
      port: 9443
      targetPort: 9443
      nodePort: 33001
Deploy the Kubernetes Services:
kubectl apply -f minio-console-svc.yml
kubectl apply -f minio-api-svc.yml
Note
Alternatively, MinIO Tenant can use LoadBalancer and Ingress, refer to MinIO official documentation for more details:
Login to MinIO console:
https://MINIO_CONSOLE_URL:CONSOLE_nodePort
Create a bucket for backup and restore data.
Install the Velero CLI on both the source (primary) and target (recovery) Kubernetes clusters using the instructions from the official Velero documentation.
Install Velero on both the source (primary) and target (recovery) Kubernetes cluster:
Create the
credentials-velerofile:cat credentials-velero [default] aws_access_key_id=<access key from mino-tenant> aws_secret_access_key=<secret access key from mino-tenant>
Install Velero:
For the snapshot backup:
velero install --provider aws --plugins velero/velero-plugin-for-aws:v1.13.0 --bucket msr4-backup --secret-file ./credentials-velero --backup-location-config s3Url=https://<minio-tenant API URL>:<minio-tenant API Port>,s3ForcePathStyle=true,insecureSkipTLSVerify=true --use-volume-snapshots=true --use-node-agent --features=EnableCSI --snapshot-location-config region=default
For the file system backup:
velero install --provider aws --plugins velero/velero-plugin-for-aws:v1.13.0 --bucket <Minio bucket name> --secret-file ./credentials-velero --backup-location-config s3Url=https://<minio-tenant API URL>:<minio-tenant API Port>,s3ForcePathStyle=true,insecureSkipTLSVerify=true --use-volume-snapshots=false --use-node-agent
Note
Both the source and target clusters must have Velero configured to point to the same MinIO Tenant URL and Backup Storage Location (BSL) bucket.
Verify backup location on both the source (primary) and target (recovery) Kubernetes cluster:
For the snapshot backup:
kubectl -n velero describe VolumeSnapshotLocation
For the file system backup:
kubectl -n velero describe backupstoragelocations
Backup and Restore
Important
The examples herein are illustrative. Always review and adjust all deployment details to align with your actual MSR 4 instance before you execute any commands.
Set MSR 4 to Repository Read-Only mode.
Before initiating the backup, to minimize inconsistencies set MSR 4 to Repository Read-Only mode. This prevents new data from being written during the process.
Log in to MSR 4 as an administrator.
Navigate to Administration > Configuration.
Under System Settings, enable the Repository Read-Only option.
Click Save to apply the changes.
Exclude the Redis Persistent Volume Claims (PVCs), Persistent Volumes (PVs) and PODs from backup:
kubectl -n <msr4 namespace> label pod <msr4 redis pod> velero.io/exclude-from-backup=true
kubectl -n <msr4 namespace> label pvc <msr4 redis pvc> velero.io/exclude-from-backup=true
kubectl label pv/$(kubectl -n <msr4 namespace> get pvc <msr4 redis pvc> --template={{.spec.volumeName}}) velero.io/exclude-from-backup=true
Exclude the Registry POD, Persistent Volume Claims (PVCs) and Persistent Volumes (PVs) from the backup:
kubectl label pod <msr4 registry pod> velero.io/exclude-from-backup=true
kubectl label pvc <msr4 registry pvc> velero.io/exclude-from-backup=true
kubectl label pv/$(kubectl get pvc <msr4 registry pvc>  --template={{.spec.volumeName}}) velero.io/exclude-from-backup=true
Create the MSR 4 backup:
Note
If Redis and/or Postgres are in a different namespaces than MSR 4, include all the namespaces in the backup command:
velero backup create <backup name> --include-namespaces postgres,msr4 [..]
Save the Registry’s Persistent Volume Claims (PVCs) and Persistent Volumes (PVs) specifications in the YAML files:
kubectl get pvc <MSR4 registry PVC> -o yaml > msr4-pvc-registry.yml
kubectl get pv <MSR4 registry PV> -o yaml > msr4-pv-registry.yaml
Modify the YAML files that will be applied to the target (Rrcovery) Kubernetes cluster:
In the
msr4-pvc-registry.ymlfile, ensure that:storageClassNameis empty.volumeNamematches the PV name.spec.capacity.storage: 5Giis the same as the original.accessModes: ReadWriteManyis the same as the original.
$ cat msr4-pvc-registry.yml
apiVersion: v1
kind: PersistentVolumeClaim
metadata:
  name: msr4-harbor-registry
  namespace: <MSR4 namespace>
spec:
  accessModes:
  - ReadWriteMany
  resources:
    requests:
      storage: 5Gi
  storageClassName:
  volumeName: <PV name>
In the
msr4-pv-registry.yamlfile, ensure that:spec.nfs.servercontains the IP or hostname of the NFS server.spec.nfs.pathcontains the exact export path on the NFS server where the blobs are stored.spec.capacity.storage: 5Giis the same as the original.spec.accessModes: ReadWriteManyis the same as the original.persistentVolumeReclaimPolicyis always retained to avoid data loss.The entire
statussection is removed.The entire
spec.claimRefsection is removed.
$ cat msr4-pv-registry.yaml
apiVersion: v1
kind: PersistentVolume
metadata:
  annotations:
    pv.kubernetes.io/provisioned-by: nfs.csi.k8s.io
    volume.kubernetes.io/provisioner-deletion-secret-name: ""
    volume.kubernetes.io/provisioner-deletion-secret-namespace: ""
  finalizers:
  - external-provisioner.volume.kubernetes.io/finalizer
  - kubernetes.io/pv-protection
  labels:
  name: <PV name>
spec:
  accessModes:
  - ReadWriteMany
  capacity:
    storage: 5Gi
  csi:
    driver: nfs.csi.k8s.io
    volumeAttributes:
      csi.storage.k8s.io/pv/name: <PV name>
      csi.storage.k8s.io/pvc/name: msr4-harbor-registry
      csi.storage.k8s.io/pvc/namespace: <MSR4 namespace>
      mountPermissions: "0"
      server: <NFS URL>
      share: <NFS path>
      subdir: <PV name>
    volumeHandle: <NFS URL>#var/nfs/general#<NFS path>##
  mountOptions:
  - nfsvers=4.1
  persistentVolumeReclaimPolicy: Delete
  storageClassName: <NFS CSI storage class>
  volumeMode: Filesystem
Apply Persistent Volumes (PVs) to the target (recovery) Kubernetes cluster, and verify that it is in
Availablestatus:kubectl apply -f msr4-pv-registry.yaml kubectl get pv <PV name>
Example output:
NAME                                       CAPACITY   ACCESS MODES   RECLAIM POLICY   STATUS      CLAIM                                      STORAGECLASS   VOLUMEATTRIBUTESCLASS   REASON   AGE
pvc-c9383d47-74b6-4c04-857c-6b5f05164171   5Gi        RWX            Delete           Available                                              nfs-csi        <unset>                          5s
Apply Persistent Volume Claim (PVC) and wait until it is in
Boundstatus:kubectl apply -f msr4-pvc-registry.yml kubectl get pvc <PVC name>
Example output:
kubectl get pvc
NAME                   STATUS    VOLUME                                     CAPACITY   ACCESS MODES   STORAGECLASS   VOLUMEATTRIBUTESCLASS   AGE
msr4-harbor-registry   Pending   pvc-c9383d47-74b6-4c04-857c-6b5f05164171   0                         nfs-csi        <unset>                 6s

kubectl get pvc
NAME                   STATUS   VOLUME                                     CAPACITY   ACCESS MODES   STORAGECLASS   VOLUMEATTRIBUTESCLASS   AGE
msr4-harbor-registry   Bound    pvc-c9383d47-74b6-4c04-857c-6b5f05164171   5Gi        RWX            nfs-csi        <unset>                 15s
If Postgres Operator is used as the database provider for MSR 4, verify that the target (recovery) Kubernetes cluster includes
ClusterRole postgres-pod:Verify that the
ClusterRoleexists:kubectl get clusterrole postgres-pod
If the output of the command above is empty, create the role manually:
$ cat postgres-pod.yml
apiVersion: rbac.authorization.k8s.io/v1
kind: ClusterRole
metadata:
  annotations:
    meta.helm.sh/release-name: postgres-operator
    meta.helm.sh/release-namespace: <msr4 namespace>
  labels:
    app.kubernetes.io/instance: postgres-operator
    app.kubernetes.io/managed-by: Helm
    app.kubernetes.io/name: postgres-operator
    helm.sh/chart: postgres-operator-1.14.0
  name: postgres-pod
  resourceVersion: "66364"
rules:
- apiGroups:
  - ""
  resources:
  - endpoints
  verbs:
  - create
  - delete
  - deletecollection
  - get
  - list
  - patch
  - update
  - watch
- apiGroups:
  - ""
  resources:
  - pods
  verbs:
  - get
  - list
  - patch
  - update
  - watch
- apiGroups:
  - ""
  resources:
  - services
  verbs:
  - create

$ kubectl apply -f postgres-pod.yml
Restore MSR 4 on the target (recovery) Kubernetes cluster:
Reconfigure the restored instance of MSR 4 on the target (recovery) Kubernetes cluster:
Locate the Postgres Database service IP:
kubectl get svc \
  -l application=spilo,cluster-name=msr-postgres,spilo-role=master \
  -o jsonpath={.items..spec.clusterIP} -n <postgres or msr4 namespace>
Reconfigure MSR 4:
Note
Do not use the URL port for
expose.tls.auto.commonNameandexpose.ingress.hosts.coreif either is configured. Use only IP or DNS.helm upgrade <MSR4 Helm deployment name> \ oci://registry.mirantis.com/harbor/helm/msr \ --debug \ --set externalURL=https://<Restored MSR4 URL> \ -n <MSR4 namespace> \ --reuse-values \ --set expose.tls.auto.commonName=<Restored MSR4 URL> \ --set expose.ingress.hosts.core=<Restored MSR4 URL> \ --set database.external.host=<Postgres Database's service IP>
NFS Full Restore
The procedure herein details the steps that are required to perform a full cross-cluster Disaster Recovery restore of an MSR 4 instance, leveraging Velero and MinIO to perform a complete end-to-end backup. This method is intended for scenarios wherein both the Kubernetes configuration and all registry data (blobs) must be migrated to a separate cluster, regardless of whether the underlying storage is shared.
Mirantis recommends using this approach only for small MSR 4 instances, as it requires that you copy all registry data (image blobs) into and out of the MinIO backup storage, which is time-consuming and resource-intensive. Full backup and restore is recommended only for MSR 4 instances that have a small total size of image and artifact data. For production environments with large registries, use the NFS Metadata Restore to a different cluster method.
Prerequisites
Verify that your Kubernetes cluster is configured with a compatible CSI driver. For Snapshot backup, the CSI driver must support snapshot operations for your storage provider.
Procedure
Install MinIO and Velero
Install MinIO and Velero on the Kubernetes cluster on which you are running MSR 4.
Deploy MinIO Operator in its own namespace:
helm repo add minio-operator https://operator.min.io
helm repo up
helm install --namespace minio-operator --create-namespace operator \
  minio-operator/operator
Download the MinIO Tenant
values.ymlfile, configure it, and install it in its own namespace:curl -sLo values.yaml https://raw.githubusercontent.com/minio/operator/master/helm/tenant/values.yaml
Configure a username and password for Minio:
[...]
  configSecret:
    name: myminio-env-configuration
    accessKey: <username>
    secretKey: <password>
[...]
Configure the pools:
[..]
  pools:
    ###
    # The number of MinIO Tenant Pods / Servers in this pool.
    # For standalone mode, supply 1. For distributed mode, supply 4 or more.
    # Note that the operator does not support upgrading from standalone to distributed mode.
    - servers: 1
      ###
      # Custom name for the pool
      name: pool-0
      ###
      # The number of volumes attached per MinIO Tenant Pod / Server.
      volumesPerServer: 4
      ###
      # The capacity per volume requested per MinIO Tenant Pod.
      size: 30Gi
[..]
Note
Use NodeSelector to run MinIO Tenant on a specific node on which the public IP or DNS will be used to connect to MinIO’s console.
Install MinIO Tenant in its own namespace:
helm install --namespace minio-tenant --create-namespace --values values.yml \ minio-tenant minio-operator/tenant
Expose the MinIO API and console using NodePort:
Create the Kubernetes Services’ YAML files:
minio-api-svc.yml
$ cat minio-api-svc.yml
apiVersion: v1
kind: Service
metadata:
  name: minio-nodeport
  namespace: minio-tenant
spec:
  type: NodePort
  selector:
    v1.min.io/tenant: myminio
  ports:
    - name: https-minio
      port: 9000
      targetPort: 9000
      nodePort: 33000
minio-console-svc.yml
$ cat minio-console-svc.yml
apiVersion: v1
kind: Service
metadata:
  name: minio-console-nodeport
  namespace: minio-tenant
spec:
  type: NodePort
  selector:
    v1.min.io/tenant: myminio
  ports:
    - name: https-console
      port: 9443
      targetPort: 9443
      nodePort: 33001
Deploy the Kubernetes Services:
kubectl apply -f minio-console-svc.yml
kubectl apply -f minio-api-svc.yml
Note
Alternatively MinIO Tenant can use LoadBalancer and Ingress, refer to MinIO official documentation for more details:
Login to MinIO console:
https://MINIO_CONSOLE_URL:CONSOLE_nodePort
Create a bucket for backup and restore data.
Install the Velero’s CLI on both the Source (Primary) and Target (Recovery) Kubernetes clusters using the instructions from the official Velero documentation.
Install Velero on both the Source (Primary) and Target (Recovery) Kubernetes cluster:
Create the
credentials-velerofile:cat credentials-velero [default] aws_access_key_id=<access key from mino-tenant> aws_secret_access_key=<secret access key from mino-tenant>
Install Velero:
For the snapshot backup:
velero install --provider aws --plugins velero/velero-plugin-for-aws:v1.13.0 --bucket msr4-backup --secret-file ./credentials-velero --backup-location-config s3Url=https://<minio-tenant API URL>:<minio-tenant API Port>,s3ForcePathStyle=true,insecureSkipTLSVerify=true --use-volume-snapshots=true --use-node-agent --features=EnableCSI --snapshot-location-config region=default
For the file system backup:
velero install --provider aws --plugins velero/velero-plugin-for-aws:v1.13.0 --bucket <Minio bucket name> --secret-file ./credentials-velero --backup-location-config s3Url=https://<minio-tenant API URL>:<minio-tenant API Port>,s3ForcePathStyle=true,insecureSkipTLSVerify=true --use-volume-snapshots=false --use-node-agent
Note
Both the Source and Target clusters must configure Velero to point to the same MinIO Tenant URL and Backup Storage Location (BSL) bucket.
Verify backup location on both the Source (Primary) and Target (Recovery) Kubernetes cluster:
For the snapshot backup:
kubectl -n velero describe VolumeSnapshotLocation
For the file system backup:
kubectl -n velero describe backupstoragelocations
Backup and Restore
Important
The examples herein are illustrative. Always review and adjust all deployment details to align with your actual MSR 4 instance before you execute any commands.
Set MSR 4 to Repository Read-Only mode..
Before you initiate the backup, set MSR 4 to guilabel:Repository Read-Only mode to prevent new data from being written during the process, minimizing inconsistencies.
Log in to MSR 4 as an administrator.
Navigate to Administration > Configuration.
Under System Settings, enable the Repository Read-Only option.
Click Save to apply the changes.
Exclude Redis Persistent Volume Claims (PVCs), Persistent Volumes (PVs), and PODs from the backup:
kubectl -n <msr4 namespace> label pod <msr4 redis pod> \
  velero.io/exclude-from-backup=true
kubectl -n <msr4 namespace> label pvc <msr4 redis pvc> \
  velero.io/exclude-from-backup=true
kubectl label pv/$(kubectl -n <msr4 namespace> get pvc <msr4 redis pvc> \
  --template={{.spec.volumeName}}) velero.io/exclude-from-backup=true
Create the MSR 4 backup:
Note
If Redis and/or Postgres are in different namespaces than MSR 4, include all of the namespaces in the backup command:
velero backup create <backup name> --include-namespaces postgres,msr4 [..]
If you use postgres-operator as the database provider for MSR 4, verify that the target (recovery) Kubernetes cluster includes ClusterRole postgres-pod:
Verify that the
ClusterRoleexists:kubectl get clusterrole postgres-pod
If the output of the command above is empty, create the role manually:
$ cat postgres-pod.yml
apiVersion: rbac.authorization.k8s.io/v1
kind: ClusterRole
metadata:
  annotations:
    meta.helm.sh/release-name: postgres-operator
    meta.helm.sh/release-namespace: <msr4 namespace>
  labels:
    app.kubernetes.io/instance: postgres-operator
    app.kubernetes.io/managed-by: Helm
    app.kubernetes.io/name: postgres-operator
    helm.sh/chart: postgres-operator-1.14.0
  name: postgres-pod
  resourceVersion: "66364"
rules:
- apiGroups:
  - ""
  resources:
  - endpoints
  verbs:
  - create
  - delete
  - deletecollection
  - get
  - list
  - patch
  - update
  - watch
- apiGroups:
  - ""
  resources:
  - pods
  verbs:
  - get
  - list
  - patch
  - update
  - watch
- apiGroups:
  - ""
  resources:
  - services
  verbs:
  - create

$ kubectl apply -f postgres-pod.yml
Restore MSR 4 on the target (recovery) Kubernetes cluster:
Reconfigure the restored instance of MSR 4 on the target (recovery) Kubernetes cluster:
Locate the Postgres Database service IP:
kubectl get svc \
  -l application=spilo,cluster-name=msr-postgres,spilo-role=master \
  -o jsonpath={.items..spec.clusterIP} -n <postgres or msr4 namespace>
Reconfigure MSR 4:
Note
Do not include the URL port for
expose.tls.auto.commonNameandexpose.ingress.hosts.coreif either is configured. Use only IP or DNS.helm upgrade <MSR4 Helm deployment name> \ oci://registry.mirantis.com/harbor/helm/msr --debug \ --set externalURL=https://<Restored MSR4 URL> -n <MSR4 namespace> \ --reuse-values \ --set expose.tls.auto.commonName=<Restored MSR4 URL> \ --set expose.ingress.hosts.core=<Restored MSR4 URL> \ --set database.external.host=<Postgres Database's service IP>
Migration Guide
This guide provides instructions for performing migration from MSR 2.9 and 3.1 to MSR 4. MSR supports two migration paths:
The following comparison highlights the key differences to help you choose the most appropriate option for your environment.
Migration |
Description |
|---|---|
Manual migration |
Transfers repository data only. Benefits
Considerations
|
Tool-based migration |
Transfers repositories, associated permissions, and push and poll mirroring policies using Mirantis-provided automation tools. Benefits
Considerations
|
Manual Migration
This guide provides instructions for performing a manual migration from MSR 2.9 or 3.1 to MSR 4. Manual migration is recommended for small environments or limited migration scopes because it transfers repository data only. Permissions and policies are not included. Manual migration is easy to implement and does not require additional tools.
Use this guide if you need to preserve your existing registry content and organizational layout while maintaining full control over each migration step.
Before proceeding, review the following topics:
MSR 4 Key Changes for changes in MSR 4 behavior.
Removed features especially if you use Swarm, custom image signing, or repository permissions.
If you have any questions, contact support for further guidance.
Manual Migration Contents
Step |
Description |
|---|---|
Lists the technical requirements needed to run the manual migration successfully. |
|
Outlines how to run the manual migration to export repository data from the source MSR and import it into the MSR 4 deployment. |
|
Provides guidance on updating pipelines, credentials, and access controls for the new MSR system. |
Manual Migration Prerequisites
Before you begin the migration process, complete the following steps to ensure a smooth and secure transition:
- Administrative access
Confirm that you have administrative access to both source (MSR 2.9 and MSR 3.1) and target (MSR 4.x) environments to read all source data and configure the destination from your migration workstation.
- Backup
Perform a full backup of existing data to prevent any data loss in case of a misstep:
- MSR 4 installation
Complete the following tasks to prepare the target environment for migration:
Verify that the system meets all prerequisites. See Prerequisites.
Install MSR 4 using the steps in the Install MSR with High Availability.
Configure authentication as described in the Authentication Configuration.
- Storage
Ensure that the target system has sufficient storage capacity to accommodate all migrated artifact. The storage must be separate from MSR 2.9 or MSR 3.1.
The PostgreSQL database must have enough space for the following:
Current MSR RethinkDB
Plus 25% overhead
The BLOB storage must have enough space for the following:
Current used storage
Extra space for new images, based on your requirements
Plus at least 5% overhead for working space
Perform Migration
Manual Helm Chart Migration Required
When migrating from MSR 2.x or MSR 3.x to MSR 4.x, Helm charts do not automatically migrate. You must manually migrate any existing Helm charts to the new environment.
To migrate images, repositories, and tags from an MSR 2.x or MSR 3.x environment to an MSR 4.x environment, follow these steps:
Access the MSR Web UI.
Navigate to Administration → Registries.
Select New Endpoint to add a new registry connection.
Fill in the pop-up with the following details:
Provider:
DTRName:
<your-identifier>Endpoint URL:
<root-of-the-registry>Access ID:
<admin-username>Access Secret:
<admin-password>
Note
Avoid specifying a user or repository namespace, as this will restrict access. Using the root enables full crawling of the host.
Navigate to Administration → Replications.
Select New Replication Rule to create a replication rule.
In the pop-up window, review and confirm the following settings:
Replication mode: Ensure it is set to Pull-based.
Source registry: Verify that the MSR 2 and MSR 3 hosts added in previous steps are listed.
Source resource filter: Ensure the Name field is set to
**, with all other fields left blank.Destination: Make sure flattening is set to
Flatten 1 Level. If your environment uses an organization namespace in MSR 2 or MSR 3, you may choose an alternative flattening option.
Click to learn more about flattening options
You can choose to flatten or retain the original structure of any organization or namespace. Enabling the flattening option will merge all content into a single namespace (
ns). If your organization uses a more flexible namespace or organizational structure, review the following guidelines to understand how flattening may affect your setup:Flatten All Levels:
a/b/c/d/img→ns/imgNo Flattening:
a/b/c/d/img→ns/a/b/c/d/imgFlatten 1 Level:
a/b/c/d/img→ns/b/c/d/imgFlatten 2 Levels:
a/b/c/d/img→ns/c/d/imgFlatten 3 Levels:
a/b/c/d/img→ns/d/img
The term
Levelsrefers to the directory depth of the source path (a/b/c/d/img).
Select the rule created in the previous step and click Replicate. Be aware that pulling down the entire host may take some time to complete.
To check the status of the replication process, click the job ID.
Post-Migration Configuration
After upgrading MSR, several settings will not carry over automatically. Below are key aspects to consider after a successful migration:
Configuration area |
Required actions |
|---|---|
Project Visibility |
Project visibility (public/private) must be configured manually. In MSR 3.x, private and public image repositories could coexist under a single organization. In MSR 4, visibility is set only at the project level. Mixed public/private repositories under one organization in MSR 3.x must be manually adjusted. |
Project Permissions |
MSR 4 organizes repositories within projects. Ensure that project-level permissions are properly recreated. See: Managing Project Permissions. |
Registry Replication |
Re-establish any replication or mirroring rules and schedules in MSR 4. See: Configuring Replication. |
Image Tag Retention |
Manually configure existing retention policies for images in MSR 4 to ensure appropriate lifecycle management. See: Managing Tag Retention Rules. |
Scanning Settings |
Configure or re-enable Trivy image scanning policies. See: Vulnerability Scanning. |
Tag Immutability |
Navigate to each relevant project to set the tag immutability individually. See: Vulnerability Scanning. |
Audit Logs |
Set up logging mechanisms in MSR 4 for compliance. See: Log Rotation in Mirantis Secure Registry. |
Webhooks |
Recreate and configure webhooks to point to MSR 4. See: Configuring Webhooks. |
CI/CD Pipelines |
Update custom CI/CD pipelines to reference MSR 4. |
Signed Images |
Reconfigure image signing using Cosign. See: Signing Artifacts with Cosign. |
Garbage Collection Settings |
Manually reconfigure garbage collection policies in MSR 4. See: Managing Garbage Collection. |
Certificate Management |
Re-establish custom certificate configurations in MSR 4. |
API Updates |
Update API endpoints and account for changes in MSR 4’s API. |
Pruning policies
Pruning behavior in MSR 4 differs fundamentally from earlier versions. While previous releases used pruning policies to remove images that matched defined criteria, MSR 4 introduces retention policies, which are based on preserving images that meet certain tag patterns.
Use the mapping guide below to manually translate existing pruning rules into MSR 4 retention policies.
Operator Mapping Table:
Operator Name |
MSR 2.9 / MSR 3.1 Pruning Operator |
Regex Equivalent |
MSR 2.9 / MSR 3.1 > MSR 4 Translation (Prune = Not Retain) |
MSR 4 Time Frame ( |
MSR 4 Conversion to “doublestar” kind |
|---|---|---|---|---|---|
equals |
eq |
matching + exact value |
P if equal value = NOT R if equal value = exclude x if equal value |
always |
use exact value |
starts with |
sw |
matching + “^” + value + “*” |
exclude x if starts with value |
always |
|
ends with |
ew |
matching + “*” + value + “$” |
exclude x if ends with value |
always |
|
contains |
c |
matching + “” + value + “” |
exclude x if contains value |
always |
|
one of |
oo |
matching + |
exclude x if one of value |
always |
Use exact value multiple times |
not one of |
noo |
excluding + |
match x if one of value |
always |
Use exact value multiple times |
matches regex |
matches |
matching + regex value |
exclude x if match value |
always |
None |
Supported MSR 2.9 and MSR 3.1 Rule Types in MSR 4:
MSR 2.9 / MSR 3.1 Rule Type |
MSR 4 Mapping |
|---|---|
Tag Name |
Tags field |
Component Name |
For repositories |
All CVSS 3 vulnerabilities |
None |
Critical CVSS 3 vulnerabilities |
None |
High CVSS 3 vulnerabilities |
None |
Medium CVSS 3 vulnerabilities |
None |
Low CVSS 3 vulnerabilities |
None |
License name |
None |
Last updated at |
None |
Configure environment
The following infrastructure components require manual updates to align with the new MSR setup:
Infrastructure component |
Required actions |
|---|---|
CI/CD Pipelines |
Update custom CICD pipelines to leverage the new environments. |
DNS |
Update DNS CNAMEs to point to the new hosts after migration. |
Tool Migration
This guide offers comprehensive, step-by-step instructions for migrating artifacts from Mirantis Secure Registry (MSR) versions 2.9 and 3.1 to MSR 4 using the official migration tool.
The migration process is designed as an A/B operation. Your existing MSR deployment remains active and unaffected while data is copied to a new MSR 4.x instance. The migration tool runs independently on a separate host with network access to both source and destination environments. This design ensures operational continuity and limits risk to the current deployment.
Key characteristics of the migration:
Migration is non-disruptive to your existing MSR system until the final cutover.
Metadata are transferred using offline copies for consistency.
The database backend changes from RethinkDB to PostgreSQL.
Team names and repository paths may change. You will need to update pipelines accordingly.
Image data migration can take significant amount of time dependent on attributes of the customer environment such as image and layer count and size, as well as network and storage capabilities. It may be scheduled to manage network and storage usage or run immediately.
To minimize downtime during the final cutover, image migration can be repeated to reduce the size of the remaining delta before the last sync.
Before proceeding, review the following topics:
MSR 4 Key Changes for changes in MSR 4 behavior.
Removed features and What to Expect During the Migration especially if you use Swarm, custom image signing, or repository permissions.
If you have any questions, contact support for further guidance.
Tool Migration Contents
Step |
Description |
|---|---|
Summarizes major behavioral and architectural changes between MSR versions. Review before planning your migration timeline. |
|
Lists the technical requirements needed to run the migration tool successfully. |
|
Explains how to download, verify, and install the migration tool on your migration host. |
|
Describes how to configure and access the source and destination database environments. |
|
Explains how to configure your target environment. |
|
Outlines how to run the migration tool to export data from the source MSR and import it into the MSR 4 deployment. |
|
Describes how to migrate projects. |
|
Describes how to migrate permissions. |
|
Describes how to migrate push and poll mirroring policies. |
|
Details optional steps to confirm that repositories, metadata, and user configurations were migrated correctly. |
|
Provides guidance on updating pipelines, credentials, and access controls for the new MSR system. |
|
Lists cleanup tasks, including retiring the old MSR deployment and releasing temporary resources. |
|
Contains command-line options and configuration parameters for the migration tool. |
|
Contains migration tool release notes. |
What to Expect During the Migration
Mirantis Secure Registry (MSR) 4 represents a significant evolution in managing container images and associated metadata. The transition introduces a new architecture centered around projects, improved security models, and streamlined policy-based configuration.
The transition may take a significant amount of time, depending on your system and data volume. However, your current MSR instance may remain fully operational throughout the migration, allowing you to continue work without interruption.
Most core data will be transferred automatically, but some settings and features require manual reconfiguration after migration. Understanding what is and is not migrated will help you plan the migration effectively.
What is migrated
During migration, MSR automatically transfers key content and configurations, preserving the core of your container registry environment:

Repositories
Repositories from MSR 2.9 and MSR 3.1 are migrated as projects in MSR 4.
Images
All image data, including associated metadata and tags.
Permissions
Permissions are mapped into the MSR 4 project-based access control system as shown in the diagram below:

Push and Poll Mirroring Policies
Mirroring policies are exported and can be manually triggered or rescheduled.
Roles
LDAP-based user accounts assigned to project roles are migrated.
Helm Charts
Chart packages stored in the registry are preserved.
What is not migrated
The following items must be recreated or reconfigured after the migration:
Audit Logs
Set up new logging and compliance monitoring mechanisms.
API Updates
Some endpoints have changed; update as needed to maintain automation and tooling compatibility.
Authentication
SAML support is removed. Use LDAP or OIDC instead.
Certificate Management
Define retention and cleanup rules in the new system.
Garbage Collection Settings
Manually reconfigure garbage collection policies in MSR 4.
Image Tag Retention
Reconfigure rules to manage image lifecycle in MSR 4.
Labels
Update image and repository labels.
Local Groups and Users
Manually recreate any local groups and users that are defined only in Enzi and not managed by an external identity provider.
Project Permissions
Depending on your permission settings you may need to recreate user and team access rules using MSR 4’s project-level model.
Project Visibility
Set project visibility manually for each project. MSR 4 does not support mixed visibility within a single organization as shown in the diagram below:

Pruning Policies
Configure pruning policies manually. These settings cannot be imported directly, as MSR 4 uses reversed logic when evaluating pruning rules.
Scanning Settings
Enable and configure Trivy to support image vulnerability scanning in MSR 4.
Signed Images
Existing image signatures are not preserved. They need to be re-signed using Cosign.
Tag Immutability
Tag immutability is configured at the project level, and must be set up manually for each relevant project. However, if a repository had tag immutability previously set to
false, there is no need to apply a new tag immutability rule after the migration.Tokens
Tokens from previous versions are not preserved. Generate new tokens in MSR 4
Webhooks
Recreate and redirect webhooks to MSR 4 endpoints.
Removed features
The following features are not supported in MSR 4:
Swarm Support
While MSR 4 no longer supports Swarm HA clusters, single-instance deployments remain viable for Swarm users, though not recommended for production use. For more information visit Install MSR on a Single Host using Docker Compose.
Promotion Policies
Automate promotion workflows through updated CI/CD pipelines.
Migration Prerequisites
Before you begin the migration process, complete the following steps to ensure a smooth and secure transition:
- Administrative access
Confirm that you have administrative access to both source (MSR 2.9 and MSR 3.1) and target (MSR 4.x) environments to read all source data and configure the destination from your migration workstation.
- Backup
Perform a full backup of existing data to prevent any data loss in case of a misstep:
- MSR 4 installation
Complete the following tasks to prepare the target environment for migration:
Verify that the system meets all prerequisites. See Prerequisites.
Install MSR 4 using the steps in the Install MSR with High Availability.
Configure authentication as described in the Authentication Configuration.
- Storage
Ensure that the target system has sufficient storage capacity to accommodate all migrated artifact. The storage must be separate from MSR 2.9 or MSR 3.1.
The PostgreSQL database must have enough space for the following:
Current Enzi RethinkDB
Current MSR RethinkDB
Plus 25% overhead
The BLOB storage must have enough space for the following:
Current used storage
Extra space for new images, based on your requirements
Plus at least 5% overhead for working space
- Migration workstation
Set up a dedicated migration workstation to manage the migration process. This workstation must have:
Linux operating system.
Installed the following tools:
A container runtime, either:
RethinkDB version 2.4.4
Access to the following databases:
PostgreSQL — configured as part of the MSR 4 deployment.
Enzi — included in MSR 2.9 (through MKE) or directly in MSR 3.1.
RethinkDB — used in both MSR 2.9 and MSR 3.1 deployments.
Install Migration Tool
To install the migration tool:
Download the migration tool image:
docker pull registry.mirantis.com/msrh/migrate:latest
Verify if the pulled image is valid by running help command:
docker run -it --rm registry.mirantis.com/msrh/migrate:latest poetry run migration --help
Database Access Configuration
This guide assumes you are working on a dedicated migration workstation, a machine with access to both the source and destination environments, used for managing the migration.
Configure PostgreSQL access
To enable access to the MSR 4.x PostgreSQL instance:
Update any required inbound firewall rules to allow PostgreSQL traffic.
Note
Before running
kubectlcommands, source the client bundle by exporting thekubeconfigfile that provides access to the target MSR 4 registry.Retrieve the MSR 4 PostgreSQL credentials for the migration process:
Username:
kubectl get secret \
  msr.msr-postgres.credentials.postgresql.acid.zalan.do \
  -o jsonpath="{.data.username}" | base64 --decode; echo
Password:
kubectl get secret \
  msr.msr-postgres.credentials.postgresql.acid.zalan.do \
  -o jsonpath="{.data.password}" | base64 --decode; echo
Note
Connectivity will be validated in the later step.
Ensure that
socatis installed on PosgreSQL worker nodes.Identify the PostgreSQL leader Pod:
kubectl exec msr-postgres-0 -- patronictl list | grep -i leader
Forward the port to expose PostgreSQL locally:
kubectl port-forward pod/<LEADER-POD-NAME> 5432:5432
Replace
<LEADER-POD-NAME>with the actual Pod name returned in the previous command.
Local database access
Before running the migration tool, you must first copy and run both the MKE authorization store and the MSR database store locally.
To do so, complete the following steps on your local migration workstation:
Verify that a container runtime is installed, such as Docker Desktop, Mirantis Container Runtime (MCR), or Docker CE.
Verify that RethinkDB is installed.
Copy the
manage_source_registry_db.shscript from the container image to your local machine. The script copies the eNZi and MSR databases and starts local instances. Because the script cannot run from within the container image, you must copy it to the local environment first.Note
On macOS, the
manage_source_registry_db.shscript requiresgnu-getopt. Install the package by running the following command with Homebrew:brew install gnu-getopt
After installation, follow the instructions to add
gnu-getoptto yourPATHbefore running the script.Example of copying the script, making it executable, and displaying its help information:
docker run --rm registry.mirantis.com/msrh/migrate:latest cat utils/manage_source_registry_db.sh > manage_source_registry_db.sh

chmod +x manage_source_registry_db.sh

./manage_source_registry_db.sh --help
Start the required local databases:
Note
You need to source a client bundle that has access to the source registry to use the copy commands.
Important
Both commands must be executed, and the processes must remain active throughout the migration. Select one of the following options to ensure they stay running:
Open each command in a separate terminal window or tab.
Run each command in the background by appending
&.
Enzi database access.
To copy and start a local Enzi database instance, run:
./manage_source_registry_db.sh --copy-enzidb --start-enzidb
MSR RethinkDB access.
To copy and start a local MSR RethinkDB instance, run:
./manage_source_registry_db.sh --copy-msrdb --start-msrdb
Configure Migration Settings
The following guide explains how to configure the environment and migration settings to ensure a smooth transition between MSR versions.
Configure Environment
To configure your target environment:
Create a directory named
configin your current working directory.Inside the
configdirectory, create a file namedconfig.env.Add the required variables with the appropriate values according to your deployment.
Ensure the following configuration is present:
HARBOR_API_BASE_URL=<HARBOR-API-ENDPOINT-FQDN>
HARBOR_API_USER=admin
HARBOR_API_PASSWORD=<REDACTED>
HARBOR_API_TLS_VERIFICATION=False
HARBOR_DB_HOST=localhost
HARBOR_DB_USER=msr
HARBOR_DB_PASSWORD=<HARBOR-DB-PASSWORD>
HARBOR_SECRET_KEY=<MSR4-SECRETKEY-VALUE> #Obtain from MSR4 values secretKey
MIGRATION_SOURCE_REGISTRY_URL=<SOURCE-MSR-REGISTRY>
MIGRATION_SOURCE_REGISTRY_ADMIN_USERNAME=admin
MIGRATION_SOURCE_REGISTRY_ADMIN_PASSWORD=<ADMIN-PASSWORD>
MIGRATION_SOURCE_REGISTRY_WITH_TLS_VERIFICATION=False
# If there are any mirroring policies being migrated from the source MSR2/3 instance,
# the following values must be uncommented and set. These are used to inform the
# migration tool which remote registries in the policies are MSR 2 or MSR 3
# registries, and which ones are MSR 4 registries. The migration tool cannot
# determine this automatically, and this is necessary to assign the correct
# provider type in the resulting replication rules.
#REPLICATION_RULE_MSR4_REGISTRIES=msr4.example.com
#REPLICATION_RULE_MSR23_REGISTRIES=msr2.example.com,msr3.example.com
Note
The secret key in Harbor is required for replicating container images.
Configure the replication schedule in the
config/config.envfile. If you are running the migration immediately, update the default cron value to match your intended schedule.REUSE_ALREADY_FETCHED_DATA=True REPLICATION_TRIGGER_CRON="0 0 1 * * *"
Refer to the Configuration Reference for more details.
If you are migrating from an MSR 3 registry (as opposed to MSR 2), uncomment the following line:
ENZI_RETHINKDB_MKE_DB_NAME=enzi
Configure Migration Mode
By default, the migration tool migrates projects, repositories, and team
permissions in a granular mode, in which MSR 2 organization/repository
with team permissions are moved to MSR 4 project–team–repository path.
If the MSR 2 administrator assigns repository permissions only at the
organization level and not the team level, the migration will
preserve organization-level permissions. In such a case, MSR 2
organization/repository will map directly to MSR 4 project/repository.
To identify which migration mode to use, run the following command from the MSR 2 worker node:
export REPLICA_ID=$(docker ps -lf name='^/dtr-rethinkdb-.{12}$' --format '{{.Names}}' | cut -d- -f3)
docker run -it --rm --net dtr-ol -v dtr-ca-$REPLICA_ID:/ca mirantis/rethinkcli:v2.3.0 $REPLICA_ID

r.db('dtr2').table('repository_team_access')
If repository_team_access is empty, you can use 1-to-1 migration mode, but
if it contains entries, you should use granular migration mode.
The MSR 4 Migration Tool migrates project permissions from MSR 2 and MSR 3.
If permissions are not set in the source MSR version, the default role is
applied. For that reason, you must configure the default group role in
the config/config.env file.
Valid values are:
read-only(Limited Guest)read-write(Maintainer)admin
HARBOR_DEFAULT_GROUP_ROLE=read-only
For 1-to-1 migration mode, ensure the following settings are configured in
the config/config.env file:
IS_ENZI_TEAM_NAME_UNIQUE=True
IS_MAPPING_ORGANIZATION_1_TO_1=True
HARBOR_DEFAULT_GROUP_ROLE=read-only # or read-write, or admin
By default, in 1-to-1 migration mode repositories and tags are migrated using one migration replication rule per organization or project. In some cases, administrators might prefer one migration replication rule per repository. To enable this capability, set:
MIGRATION_REPLICATION_RULE_PER_REPO=True
When you migrate projects with this setting enabled, the replication
rules are created per project/repository.
Perform Migration
To migrate images, repositories, and tags from an MSR 2.9 or MSR 3.1
environment to MSR 4.x, you can either run the migration as a single
comprehensive operation, which is the recommended path, or break it into
specific steps if needed.
The migration tool supports both full and partial migrations, with detailed
options described in the --help flag and active configuration in
the --config flag.
To migrate all data in one step, run:
docker run --rm \
  -v ./sql:/app/data/sql \
  -v ./csv:/app/data/csv \
  -v ./config:/app/config \
  --network host \
  registry.mirantis.com/msrh/migrate:latest poetry run migration --all
To perform the migration in individual steps:
To view all available options for partial migrations use the --help flag
with the migration tool.
Migrate Projects
During migration, source organizations and repositories are recreated as projects. You can configure replication behavior both during and after migration using the options provided by the migration tool.
To migrate repositories as projects:
Run the migration tool with the
--projectsflag to prepare the MSR 2.9 or 3.1 repositories for migration:docker run --rm \ -v ./sql:/app/data/sql \ -v ./csv:/app/data/csv \ -v ./config:/app/config \ --network host \ registry.mirantis.com/msrh/migrate:latest poetry run migration --projects
The migration tool first exports data from MSR and Enzi. It then processes this data to import all repositories into MSR 4. Exported data is stored in the
csvdirectory, while data prepared for import resides in thesqldirectory.Optional. Verify if data has been exported:
Verify the
./csvdirectory for exported data:ls -l csv
Within the
csvdirectory, all exported files are prefixed with eithermsr_orenzi_, indicating their source. Files prefixed withharbor_represent data migrated to MSR 4, exported for verification purposes.Verify the
./sqldirectory for SQL files that contain data to be imported into MSR 4:ls -l sql
The migration recreates source organizations and repositories as projects.
Open the MSR web UI and verify if the projects are visible.
To run the migration replication process with Cron-Based trigger:
Configure the replication schedule in the
config/config.envfile:REUSE_ALREADY_FETCHED_DATA=True REPLICATION_TRIGGER_CRON="0 0 1 * * *"
See the Configuration Reference for complete configuration reference.
Start an interactive partial migration:
docker run --rm \
  -v ./data/sql:/app/data/sql \
  -v ./data/csv:/app/data/csv \
  -v ./config:/app/config \
  --network host \
  registry.mirantis.com/msrh/migrate:latest poetry run migration \
  --trigger-replication-rules
Note
The migration process may take a significant amount of time, depending on factors such as storage and network speed, and the volume of data in your project.
To trigger the migration replication process manually:
In the MSR 4 web UI, navigate to Replication rules page and check how many pages of
migration-rulereplication rules have been created.Set the
PAGEparameter in the command to match the number of pages.Note
The
PAGE_SIZEparameter corresponds to the page size setting in the MSR 4 web UI. For example, if the page size is set to15, use--PAGE_SIZE=15.docker run \ -v ./sql:/app/data/sql \ -v ./csv:/app/data/csv \ -v ./config:/app/config \ --network host \ registry.mirantis.com/msrh/migrate:latest \ utils/run-migration-replication-rules.sh --PAGE=1 --PAGE_SIZE=<NUMBER-OF-PAGES>
To verify that all replication tasks have completed, run the following command with your environment-specific values:
docker run registry.mirantis.com/msrh/migrate:latest utils/migration_replication_status.sh \
   --url=msr4.[MY-DOMAIN].com \
   --user=admin \
   --pwd=[ADMIN-PASSWORD]
Example output:
Fetching policies with prefix 'migration-rule-'...

=== Replication Summary ===
Total executions:   191
Succeeded       :   188 (98.4%)
In Progress     :     0 ( 0.0%)
Failed          :     3 ( 1.6%)
Stopped         :     0 ( 0.0%)
Others          :     0 ( 0.0%)
Note
To view command options and usage instructions, run:
docker run registry.mirantis.com/msrh/migrate:latest utils/migration_replication_status.sh --help
Optional. To reduce the load on the source system, administrators can limit the amount of migration replication requests that MSR 4 sends to MSR 2.9.
To reconfigure maxJobWorkers and limit how many tags are being concurrently
migrated by MSR 4:
Set MSR4 to Read-Only Mode:
Log in to MSR 4 as an administrator.
Navigate to Administration > Configuration.
Under System Settings, enable the Repository Read-Only option.
Click Save to apply the changes.
In the
msr-values.yamlfile, change themaxJobWorkersparameter from10to4.Apply the Helm chart.
Disable read-only mode:
Log in to MSR 4 as an administrator.
Navigate to Administration > Configuration.
Under System Settings, disable the Repository Read-Only option.
Click Save to apply the changes.
Migrate Permissions
In MSR 4, repositories and organizations are migrated as projects. As a result, permissions are added at the organization project level, and do not follow the same inheritance structure as in earlier MSR versions. See What to Expect During the Migration for detailed description.
Warning
If the permissions target paths are business-critical, you should migrate them manually to ensure accuracy and avoid disruptions.
To migrate permissions to MSR 4, you must transfer:
Team access at the repository level.
Team access at the organization (namespace) level.
Ensure that the MSR 4 authorization is properly configured to enable Groups section in the main menu. Refer to the Authentication Configuration for setup instructions.
Optional. Configure permission migration in the
config/config.envfile:Specify whether the organization name is added as a prefix (default) or suffix to team names by setting the value to prefix or suffix in the configuration.
ENZI_TEAM_NAME_PREFIX_OR_SUFFIX=<SET-PREFIX-OR-SUFFIX>
If all group names are already unique across the environment, you can prevent MSR from appending the organization name during import by setting:
IS_ENZI_TEAM_NAME_UNIQUE=True
Warning
Do not modify these environment variables after the migration begins. Changing them mid-process may cause duplicate groups or inconsistent team references.
Export groups data from MSR and Enzi, and import it into MSR 4:
docker run --rm \
    -v ./sql:/app/data/sql \
    -v ./csv:/app/data/csv \
    -v ./config:/app/config \
    --network host \
    registry.mirantis.com/msrh/migrate:latest \
    poetry run migration --groups
Confirm that group data appears under Groups in the MSR web UI.
Note
If the Groups section is missing from the main menu, LDAP may not be configured. See LDAP Authentication for instructions on how to set up user authentication.
Migrate team permissions for namespaces and repositories:
docker run --rm \
    -v ./sql:/app/data/sql \
    -v ./csv:/app/data/csv \
    -v ./config:/app/config \
    --network host \
    registry.mirantis.com/msrh/migrate:latest \
    poetry run migration --members
In the MSR web UI, navigate to Projects, select a project, and click the Members tab to verify that team permissions have been correctly applied.
Migrate Push and Poll Mirroring Policies
Follow the steps below to migrate push and poll mirroring policies. Each set of policies can be exported, triggered, and optionally reconfigured to use manual scheduling.
Run the migration tool to export push mirroring policies from MSR:
docker run --rm \
   -v ./sql:/app/data/sql \
   -v ./csv:/app/data/csv \
   -v ./config:/app/config \
   --network host \
   registry.mirantis.com/msrh/migrate:latest \
   poetry run migration --push-mirroring
Verify the imported policies in Administration > Replications. All push mirroring policies will have the prefix
push-. Each policy is migrated with its associated registry.Trigger the push mirroring policies:
docker run --rm \
   -v ./sql:/app/data/sql \
   -v ./csv:/app/data/csv \
   -v ./config:/app/config \
   --network host \
   registry.mirantis.com/msrh/migrate:latest \
   poetry run migration --trigger-push-replication-rules
This command applies a cron schedule defined in the
REPLICATION_TRIGGER_CRONenvironment variable.Optional. Remove scheduled triggers from all push mirroring policies and switch them to manual triggering:
docker run --rm \
   -v ./sql:/app/data/sql \
   -v ./csv:/app/data/csv \
   -v ./config:/app/config \
   --network host \
   registry.mirantis.com/msrh/migrate:latest \
   poetry run migration --remove-push-replication-rules-trigger
Run the migration tool to export poll mirroring policies from MSR:
docker run --rm \
   -v ./sql:/app/data/sql \
   -v ./csv:/app/data/csv \
   -v ./config:/app/config \
   --network host \
   registry.mirantis.com/msrh/migrate:latest \
   poetry run migration --poll-mirroring
Verify the imported policies in Administration > Replications. All poll mirroring policies will have the prefix
pull-. Each policy is migrated with its associated registry.Trigger the poll mirroring policies:
docker run --rm \
   -v ./sql:/app/data/sql \
   -v ./csv:/app/data/csv \
   -v ./config:/app/config \
   --network host \
   registry.mirantis.com/msrh/migrate:latest \
   poetry run migration --trigger-pull-replication-rules
This command applies a cron schedule defined in the
REPLICATION_TRIGGER_CRONenvironment variable.Optional. Remove scheduled triggers from all poll mirroring policies and switch them to manual triggering:
docker run --rm \
   -v ./sql:/app/data/sql \
   -v ./csv:/app/data/csv \
   -v ./config:/app/config \
   --network host \
   registry.mirantis.com/msrh/migrate:latest \
   poetry run migration --remove-pull-replication-rules-trigger
Validate Migration Data
This section outlines optional steps you can take to ensure that the data was imported successfully. These steps verify the artifacts generated by the migration tool, help confirm that the tool produced the expected outputs, and applied the correct translations and naming conventions.
Core validation procedures are already built into the migration workflow. To ensure all required checks are completed, follow the validation steps provided in every step of the migration guide.
Projects
To verify that all repositories have been migrated:
Truncate and sort the data on both versions of MSR:
Count how many namespace and repository name entries exist in the original MSR data:
cat msr_repo | wc -l
Repeat the process for MSR 4 data:
cat harbor_repo | wc -l
Compare the results. The MSR 4 output should have exactly one more entry. This extra entry comes from the default
libraryrepository included with the MSR 4 instance.To verify the migration, remove the
libraryproject from the MSR 4 results.Use
vimdiffor a similar tool to compare the files and confirm that repository names match between MSR versions.Note
vimdiffis not included in the container and must be installed separately if used.
Groups
To verify that all groups have been migrated:
Filter original MSR Enzi group data by removing any rows where the
groupDNfield is empty:docker run --rm \ -v ./sql:/app/data/sql \ -v ./csv:/app/data/csv \ -v ./config:/app/config \ --network host \ registry.mirantis.com/msrh/migrate:latest \ mlr --csv filter '!is_empty($groupDN)' /app/data/csv/enzi_teams.csv
Note
Groups with empty
groupDNvalues are skipped during migration and not imported into MSR 4.Count how many valid groups remain after filtering:
docker run --rm \ -v ./sql:/app/data/sql \ -v ./csv:/app/data/csv \ -v ./config:/app/config \ --network host \ registry.mirantis.com/msrh/migrate:latest \ mlr --csv filter '!is_empty($groupDN)' /app/data/csv/enzi_teams.csv | wc -l
Determine how many groups are currently present in MSR 4 using the exported PostgreSQL data:
docker run --rm \
 -v ./sql:/app/data/sql \
 -v ./csv:/app/data/csv \
 -v ./config:/app/config \
 --network host \
 registry.mirantis.com/msrh/migrate:latest \
 mlr --csv sort -f name data/csv/harbor_groups.csv | wc -l
Compare the group counts from both steps.
Extract and sort group names from the input Enzi set, saving the output to a file named
msr_groups:cat ./csv/msr_repositories_with_enzi_team.csv | cut -d, -f1,9,12 | awk -F',' '$3 != ""' | cut -d, -f1,2 | sort -u >
Repeat the process for MSR 4 groups:
cat ./csv/harbor_groups.csv | cut -d, -f2 | sort -u > msr4_groups
Compare the contents of
msr_groupsandmsr4_groups. Verify whether group names have been correctly prefixed by their namespaces. Use tools such asdeltaormlrfor a side-by-side comparison. These tools are available both locally and within the migration tool container.
Post-Migration Configuration
After upgrading MSR, several settings will not carry over automatically. Below are key aspects to consider after a successful migration:
Configuration area |
Required actions |
|---|---|
Project Visibility |
Project visibility (public/private) must be configured manually. In MSR 3.x, private and public image repositories could coexist under a single organization. In MSR 4, visibility is set only at the project level. Mixed public/private repositories under one organization in MSR 3.x must be manually adjusted. |
Project Permissions |
MSR 4 organizes repositories within projects. Ensure that project-level permissions are properly recreated. See: Managing Project Permissions. |
Registry Replication |
Re-establish any replication or mirroring rules and schedules in MSR 4. See: Configuring Replication. |
Image Tag Retention |
Manually configure existing retention policies for images in MSR 4 to ensure appropriate lifecycle management. See: Managing Tag Retention Rules. |
Scanning Settings |
Configure or re-enable Trivy image scanning policies. See: Vulnerability Scanning. |
Tag Immutability |
Navigate to each relevant project to set the tag immutability individually. See: Vulnerability Scanning. |
Audit Logs |
Set up logging mechanisms in MSR 4 for compliance. See: Log Rotation in Mirantis Secure Registry. |
Webhooks |
Recreate and configure webhooks to point to MSR 4. See: Configuring Webhooks. |
CI/CD Pipelines |
Update custom CI/CD pipelines to reference MSR 4. |
Signed Images |
Reconfigure image signing using Cosign. See: Signing Artifacts with Cosign. |
Garbage Collection Settings |
Manually reconfigure garbage collection policies in MSR 4. See: Managing Garbage Collection. |
Certificate Management |
Re-establish custom certificate configurations in MSR 4. |
API Updates |
Update API endpoints and account for changes in MSR 4’s API. |
Pruning policies
Pruning behavior in MSR 4 differs fundamentally from earlier versions. While previous releases used pruning policies to remove images that matched defined criteria, MSR 4 introduces retention policies, which are based on preserving images that meet certain tag patterns.
Use the mapping guide below to manually translate existing pruning rules into MSR 4 retention policies.
Operator Mapping Table:
Operator Name |
MSR 2.9 / MSR 3.1 Pruning Operator |
Regex Equivalent |
MSR 2.9 / MSR 3.1 > MSR 4 Translation (Prune = Not Retain) |
MSR 4 Time Frame ( |
MSR 4 Conversion to “doublestar” kind |
|---|---|---|---|---|---|
equals |
eq |
matching + exact value |
P if equal value = NOT R if equal value = exclude x if equal value |
always |
use exact value |
starts with |
sw |
matching + “^” + value + “*” |
exclude x if starts with value |
always |
|
ends with |
ew |
matching + “*” + value + “$” |
exclude x if ends with value |
always |
|
contains |
c |
matching + “” + value + “” |
exclude x if contains value |
always |
|
one of |
oo |
matching + |
exclude x if one of value |
always |
Use exact value multiple times |
not one of |
noo |
excluding + |
match x if one of value |
always |
Use exact value multiple times |
matches regex |
matches |
matching + regex value |
exclude x if match value |
always |
None |
Supported MSR 2.9 and MSR 3.1 Rule Types in MSR 4:
MSR 2.9 / MSR 3.1 Rule Type |
MSR 4 Mapping |
|---|---|
Tag Name |
Tags field |
Component Name |
For repositories |
All CVSS 3 vulnerabilities |
None |
Critical CVSS 3 vulnerabilities |
None |
High CVSS 3 vulnerabilities |
None |
Medium CVSS 3 vulnerabilities |
None |
Low CVSS 3 vulnerabilities |
None |
License name |
None |
Last updated at |
None |
Configure environment
The following infrastructure components require manual updates to align with the new MSR setup:
Infrastructure component |
Required actions |
|---|---|
CI/CD Pipelines |
Update custom CICD pipelines to leverage the new environments. |
DNS |
Update DNS CNAMEs to point to the new hosts after migration. |
Post-Migration Cleanup
Caution
Before deprecating MSR 2.9 or MSR 3.1, run the migration one last time to ensure all data has been transferred.
When you no longer plan to push data to your MSR 2.9 or MSR 3.1 instances, you can remove the replication schedules:
Remove the trigger of replication rules:
docker run --rm \
    -v ./sql:/app/data/sql \
    -v ./csv:/app/data/csv \
    -v ./config:/app/config \
    --network host \
    registry.mirantis.com/msrh/migrate:latest poetry run migration --remove-replication-rules-trigger
Check your Replications service dashboard to verify if they were switched to manual.
Delete all replication rules created for the migration, use the
--delete-migration-rulesoption. This removes all rules prefixed withmigration-rule-.docker run --rm \ -v ./sql:/app/data/sql \ -v ./csv:/app/data/csv \ -v ./config:/app/config \ --network host \ registry.mirantis.com/msrh/migrate:latest poetry run migration --delete-migration-rules
Additional considerations
Re-running the script with --trigger-replication-rules re-enables
scheduled execution for all migration-rule replication rules. The schedule
is defined by the REPLICATION_TRIGGER_CRON environment variable.
Use the appropriate command-line flags based on the replication policy type:
--trigger-push-replication-rulesand--remove-push-replication-rules-triggerfor push policies--trigger-pull-replication-rulesand--remove-pull-replication-rules-triggerfor pull policies
Before performing any deprecating operations, use
--export-all-replication-rules to back up all replication rules from
the replication_policy table in MSR 4.
Delete Custom Replication Rules
You can delete all pull or push replication rules or filter them by the source or destination registry domains.
To delete all pull replication rules:
docker run --rm \
    -v ./sql:/app/data/sql \
    -v ./csv:/app/data/csv \
    -v ./config:/app/config \
    --network host \
    registry.mirantis.com/msrh/migrate:latest poetry run migration --delete-pull-replication-rules
To delete pull replication rules that match a specific source registry domain, for example index.docker.io:
docker run --rm \
    -v ./sql:/app/data/sql \
    -v ./csv:/app/data/csv \
    -v ./config:/app/config \
    --network host \
    registry.mirantis.com/msrh/migrate:latest poetry run migration --delete-pull-replication-rules --replication-rule-remote-registry index.docker.io
To delete all push replication rules:
docker run --rm \
    -v ./sql:/app/data/sql \
    -v ./csv:/app/data/csv \
    -v ./config:/app/config \
    --network host \
    registry.mirantis.com/msrh/migrate:latest poetry run migration --delete-push-replication-rules
To delete push replication rules that match a specific source registry domain, for example index.docker.io:
docker run --rm \
    -v ./sql:/app/data/sql \
    -v ./csv:/app/data/csv \
    -v ./config:/app/config \
    --network host \
    registry.mirantis.com/msrh/migrate:latest poetry run migration --delete-push-replication-rules --replication-rule-remote-registry index.docker.io
Migration Tool Reference
This guide provides a reference for using the MSR (Mirantis Secure Registry) migration tool to map data from older MSR (2.9 or 3.1) tables to MSR 4. The tool can run one or multiple commands in a single execution, depending on your migration needs.
The reference includes:
Command Reference – Provides detailed breakdown of each migration tool command and their mapping between MSR versions.
Configuration Reference – Details all configuration values.
Command Reference
This table provides the most frequently used commands in the Mirantis Secure Registry (MSR) migration tool, along with their equivalent entities in both source MSR and target MSR 4.
Command |
MSR 2.9 / MSR 3.1 |
MSR 4 |
|---|---|---|
-a, –all |
All options below |
All options below |
-p, –projects |
repositories |
project, project_metadata, quota, quota_usage |
-m, –members |
repository_team_access |
project_member |
-g, –groups |
teams |
user_group |
-l, –poll-mirroring |
poll_mirroring_policies |
replication_policy, registry |
-s, –push-mirroring |
push_mirroring_policies |
replication_policy, registry |
This section provides detailed breakdown of each command used in the MSR migration tool, including behavior, transformations, and the database tables affected.
Displays the active configuration and then exits.
Enables additional debug-level logging output.
Exports repositories and namespaces. A namespace name is prefixed to
repository name to avoid issues with accessLevel permissions. The
project_metadata table on MSR 4 is populated with information such as
auto_scan (from scanOnPush on MSR) or public (from visibility
on MSR).
Additionally, quota and quota_usage tables on MSR 4 are populated
during project migration. These tables reference the project_id.
During migration, the tool initializes:
quotato infinity (-1)quota_usageto0
Exports team permissions. In MSR 4, project membership is per project, not per repository. Therefore, a team on MSR 2.9 or MSR 3.1 is migrated as a project member on MSR 4.
The repository_team_access table, which contains teamId and
repositoryId mappings, is used to populate the project_member
table by referencing a project_id. Therefore, projects must be created
before this step; otherwise, an error will occur. Each team is assigned an
entity_type of group, and roles are mapped as shown in the table below.
Team role mapping:
MSR 2.9 / MSR 3.1 Role |
MSR 2.9 / MSR 3.1 Permissions |
MSR 4 Role |
MSR 4 Permissions |
MSR 4 DB Role Type |
|---|---|---|---|---|
admin |
All permissions on given repository |
Project Admin |
All permissions on given repository |
1 |
read-write |
Same as read-only + Push + Start Scan + Delete Tags |
Maintainer |
Same as Limited Guest + Push + Start Scan + Create/Delete Tags + etc |
4 |
read-only |
View/Browse + Pull |
Limited Guest |
See a list of repositories + See a list of images + Pull Images + etc |
5 |
Exports LDAP groups. Because group names must be unique in MSR 4, each group is
prefixed with its organization name in the format
<organization>-<group name>. This naming convention helps prevent name
collisions. The LDAP group distinguished name (DN) in MSR 4 is set using the
groupDN field from Enzi.
Exporting LDAP groups only migrates the group definitions, it does not include
memberships or permissions. To migrate those, use the --members command.
Exports all poll mirroring policies.
Stored in the
replication_policiestable.Requires external
registryentries, repositories to pull from.Data is saved in a project, hence projects must be created beforehand.
Policies are prefixed with
pull-.Trigger is set to manual by default (no cron job is set).
Exports all push mirroring policies.
Stored in the
replication_policiestable.Requires external
registryentries, repositories to pull from.Data is saved in a project, hence projects must be created beforehand.
Policies are prefixed with
push-.Trigger is set to manual by default (no cron job is set).
Triggers all replication rules starting with migration-rule- using the cron
schedule set in REPLICATION_TRIGGER_CRON.
Removes cron trigger from all migration-rule- replication rules by setting
them to manual.
Deletes all replication rules starting with migration-rule-.
Data is recoverable with the -p option.
Adds a cron job trigger to all push mirroring policies using the
REPLICATION_TRIGGER_CRON value.
Removes all cron schedules from push replication rules. Sets them to manual.
Adds a cron job trigger to all poll mirroring policies using
REPLICATION_TRIGGER_CRON.
Removes all cron schedules from pull replication rules. Sets them to manual.
Exports all rows contained in the replication_policy table from MSR 4
database.
Configuration Reference
Parameter |
Description |
Default |
|---|---|---|
INSERT_HARBOR_PROJECTS_SQL |
File including SQL statements to create projects. |
|
INSERT_HARBOR_PROJECTS_USER_GROUPS_SQL |
File including SQL statements to create user groups. Maps <team-name> on Enzi to <organization>-<team-name>. |
|
INSERT_HARBOR_ORGANIZATIONS_USER_GROUPS_SQL |
File including SQL statements to create user groups. Maps <team-name> on Enzi to <team-name>. |
|
INSERT_HARBOR_MSR_REPO_TEAM_TO_PROJECTS_MEMBERS_SQL |
File with SQL statements to grant user permissions to projects. Maps
|
|
INSERT_HARBOR_MSR_ORG_TEAM_TO_PROJECTS_MEMBERS_SQL |
File with SQL statements to grant user permissions to projects.
Maps |
|
INSERT_HARBOR_PROJECT_METADATA_SQL |
File with SQL to attach project metadata, including visibility and
|
|
INSERT_HARBOR_PROJECT_QUOTA_SQL |
File including SQL statements to configure project quotas. Default is unlimited storage per project. |
|
INSERT_HARBOR_IMMUTABLE_TAG_RULE_SQL |
File including SQL to add immutability tag rules to projects. |
|
INSERT_HARBOR_RETENTION_POLICY_SQL |
File including SQL to create retention rules. Maps part of the pruning policies. |
|
INSERT_HARBOR_PUSH_MIRRORING_POLICIES_SQL |
File including SQL to define push replication policies. |
|
INSERT_HARBOR_POLL_MIRRORING_POLICIES_SQL |
File including SQL to define pull replication policies. |
|
HARBOR_API_BASE_URL |
Hostname or IP for connecting to the API. |
|
HARBOR_API_USER |
Username for connecting to the API. |
|
HARBOR_API_PASSWORD |
Password for connecting to the API. |
|
HARBOR_API_TLS_VERIFICATION |
Defines whether to verify SSL certificates. Should be |
None |
HARBOR_API_BATCH_SIZE |
Defines the chunk size of data handled per API request. |
None |
HARBOR_DB_PASSWORD |
Password used to connect to the MSR 4 PostgreSQL database. |
|
HARBOR_DB_HOST |
Hostname or IP address for the MSR 4 PostgreSQL database. |
|
HARBOR_DB_PORT |
Port for the MSR 4 PostgreSQL database connection. |
|
HARBOR_DB_USER |
Username to connect to the MSR 4 PostgreSQL database. |
|
HARBOR_DB_NAME |
Database name for the MSR 4 PostgreSQL database. |
|
HARBOR_DEFAULT_SYSTEM_ADMIN_ID |
Owner ID for all projects created during migration. Default is the MSR 4 system admin ID. |
|
HARBOR_DEFAULT_REGISTRY_ID |
Registry ID where all projects and replication policies are created. |
|
HARBOR_SECRET_KEY |
Secret key used to encrypt passwords for registries. |
|
ENZI_RETHINKDB_HOST |
Hostname or IP for the Enzi RethinkDB database. |
|
ENZI_RETHINKDB_PORT |
Port for the Enzi RethinkDB database. |
|
ENZI_RETHINKDB_DB_NAME |
Database name for Enzi RethinkDB. |
|
ENZI_RETHINKDB_MKE_DB_NAME |
Database name for the MKE-related Enzi RethinkDB content. The default
value applies to migration from an MSR 2 registry. Set this value to
|
|
ENZI_ACCOUNTS_CSV |
CSV file containing all Enzi accounts. |
|
ENZI_TEAMS_CSV |
CSV file containing all Enzi teams. |
|
MSR_RETHINKDB_HOST |
Hostname or IP for the MSR 2.9 or MSR 3.1 RethinkDB database. |
|
MSR_RETHINKDB_PORT |
Port for the MSR 2.9 or MSR 3.1 RethinkDB database. |
|
MSR_RETHINKDB_DB_NAME |
Database name for the MSR 2.9 or MSR 3.1 RethinkDB. |
|
MSR_REPO_CSV |
CSV file with all MSR 2.9 or MSR 3.1 repositories. |
|
MSR_REPO_WITH_TEAM_ID_CSV |
CSV with MSR 2.9 or MSR 3.1 repositories and their team IDs from
|
|
MSR_ORGANIZATIONS_WITH_TEAM_ID_CSV |
CSV with MSR 2.9 or MSR 3.1 organization and team ID mappings from
|
|
MSR_REPO_WITH_ENZI_TEAM_CSV |
CSV with MSR 2.9 or MSR 3.1 repository and team mappings, used to import MSR 4 permissions. |
|
MSR_ORGANIZATIONS_WITH_ENZI_TEAM_CSV |
CSV with MSR 2.9 or MSR 3.1 organization and team mappings, used to import MSR 4 permissions. |
|
MSR_ORGANIZATIONS_AND_REPO_WITH_ENZI_TEAM_CSV |
CSV with MSR 2.9 or MSR 3.1 organisation or repository and team data used to map permissions to MSR 4 projects. |
|
MSR_PRUNING_POLICIES_CSV |
CSV with all MSR 2.9 or MSR 3.1 pruning policies, imported as MSR 4 retention policies. |
|
MSR_POLL_MIRRORING_POLICIES_CSV |
CSV with MSR 2.9 or MSR 3.1 pull mirroring policies imported to MSR 4. |
|
MSR_PUSH_MIRRORING_POLICIES_CSV |
CSV with MSR 2.9 or MSR 3.1 push mirroring policies imported to MSR 4. |
|
MSR_RETHINKDB_FETCH_PAGING_SIZE |
Page size used when exporting MSR 2.9 or MSR 3.1 data to CSV. Helps limit memory usage. |
|
CSV_READER_CHUNK_SIZE |
Chunk size used to read data from CSV files. Helps limit memory usage. |
|
HARBOR_PROJECTS_CSV |
CSV containing all MSR 4 projects created. |
|
HARBOR_GROUPS_CSV |
CSV containing all MSR 4 user groups created. |
|
HARBOR_PROJECT_MEMBER_CSV |
CSV with MSR 4 group permissions attached to projects. |
|
HARBOR_RETENTION_POLICIES_CSV |
CSV with MSR 4 retention policies attached to projects. |
|
HARBOR_IMMUTABLE_TAG_RULES_CSV |
CSV containing all MSR 4 tag immutability rules set per project. |
|
HARBOR_POLL_MIRRORING_POLICIES_CSV |
CSV containing MSR 4 pull replication policies migrated from the previous MSR version. |
|
HARBOR_PUSH_MIRRORING_POLICIES_CSV |
CSV containing MSR 4 push replication policies migrated from the previous MSR version. |
|
REUSE_ALREADY_FETCHED_DATA |
Reuse previously fetched MSR 2.9 or MSR 3.1 and Enzi data, or download it again. |
|
DRY_RUN |
Simulates project creation by generating SQL statements without applying them. |
|
CSV_DATA_DIR |
Directory where CSV data is saved. |
|
SQL_DATA_DIR |
Directory where SQL files are generated. |
|
EXTERNAL_SCRIPT_DIR |
Directory for external scripts, including a background PostgreSQL keep-alive. |
|
ENZI_TEAM_NAME_PREFIX_OR_SUFFIX |
Specifies if organization name is added as a prefix (default) or suffix to teams. |
|
IS_ENZI_TEAM_NAME_UNIQUE |
Whether Enzi team names are unique. Set to |
|
HARBOR_DEFAULT_GROUP_ROLE |
Sets default group role for projects’ members in 1-to-1 migration mode.
Valid values are: |
None |
HARBOR_DEFAULT_VISIBILITY |
DEPRECATED Default visibility setting if MSR 2.9 or MSR 3.1 data is unavailable. |
|
HARBOR_DEFAULT_TAG_IMMUTABILITY |
DEPRECATED Default tag immutability setting if MSR 2.9 or MSR 3.1 data is unavailable. |
|
HARBOR_DEFAULT_SCAN_ON_PUSH |
DEPRECATED Default |
|
IS_MAPPING_ORGANIZATION_1_TO_1 |
Maps MSR 2.9 and 3.1 |
|
MIGRATION_REPLICATION_RULE_PER_REPO |
Creates migration replications rules per repository instead of per project in 1-to-1 migration mode. |
|
MIGRATION_SOURCE_REGISTRY_URL |
URL of the MSR 2.9 or MSR 3.1 source registry used for image migration. |
None |
MIGRATION_SOURCE_REGISTRY_NAME |
Name saved on MSR 4 for the source registry used in migration. |
None |
MIGRATION_SOURCE_REGISTRY_ADMIN_USERNAME |
Username to access the source MSR registry. |
None |
MIGRATION_SOURCE_REGISTRY_ADMIN_PASSWORD |
Password or token for accessing the source MSR registry. |
None |
MIGRATION_SOURCE_REGISTRY_WITH_TLS_VERIFICATION |
Defines whether to verify SSL certificates when connecting to the source registry. |
None |
MIGRATION_SOURCE_REGISTRY_REPLICATION_RULE_PREFIX |
Prefix used for naming replication rules for easier management. |
|
MIGRATION_SOURCE_REGISTRY_TYPE |
The provider type used for the source registry when setting up migration
replication rules. The default value of |
|
REPLICATION_RULE_MSR4_REGISTRIES |
A comma-separated list of registry URLs that are treated as MSR 4 registries when migrating mirroring policies to replication rules. |
None |
REPLICATION_RULE_MSR23_REGISTRIES |
A comma-separated list of registry URLs that are treated as MSR 2 or MSR 3 registries when migrating mirroring policies to replication rules. |
None |
REPLICATION_RULE_FLATTENING |
Flattening level for all migrated images. |
|
REPLICATION_TRIGGER_CRON |
Cron job schedule for triggering replication rules.
Format: |
|
Migration Tool Release Notes
New release that introduces the following key features:
Added support for filtering replication rules by the remote registry during replication rule deletion
Added a
--debugoption for more detailed logging during migration tool execution.Added options to specify the registry type during migration of mirroring policies.
Migration Tool 1.3.0
Release Date: 13 November 2025
[MSRH-498] Added a
--replication-rule-remote-registryoption, which enables filtering replication rules by the remote registry specified in each rule during the deletion process.[MSRH-585] Added a
--debugoption to produce more detailed logging information during migration tool execution.[FIELD-7961][MSRH-554] Added options to specify the registry type during migration of mirroring policies:
REPLICATION_RULE_MSR4_REGISTRIESandREPLICATION_RULE_MSR23_REGISTRIES.
Migration Tool 1.2.0
Release Date: 23 September 2025
[MSRH-431] Implemented the
utils/run-migration-replication-rules.shscript which allows triggering migration replication rules in a sequence.[MSRH-482] Added the new configuration options
EVENT_BASED_PUSH_MIRRORING_REPLICATION_TRIGGERandEVENT_BASED_POLL_MIRRORING_REPLICATION_TRIGGERto support Event Based trigger in migrated replication rules.
[MSRH-347] Fixed an issue wherein migration did not occur whenever
team-levelpermissions were not defined.[MSRH-483] Fixed an issue wherein non-unique push and pull mirroring policies were not migrated.
Migration Tool 1.1.0
Release Date: 12 September 2025
[MSRH-385] Fixed an issue wherein the MSR Migration Tool failed during project creation with an
Incorrect AES key lengtherror. The cause of this error was the improper parsing of trailing comments in theconfig.envfile.[MSRH-404] Fixed an issue that prevented the triggering of push and pull replication rules.
[MSRH-286] Implemented 1-to-1 migration mode, which allows users to migrate organizations and repositories as is.
[MSRH-425] Added the new configuration option
MIGRATION_REPLICATION_RULE_PER_REPOto create migration replication rules per repository that allow granular tag migrations for low-scale environments.
Migration Tool 1.0.1
Release Date: 1 August 2025
[MSRH-369] Stabilized local MKE RethinkDB after migration.
[MSRH-370] Stabilized local MSR RethinkDB after migration.
Migration Tool 1.0.0
Release Date: 29 July 2025
Initial release of the Migration Tool, providing support for migration from MSR 2 and MSR 3 to MSR 4.
Migration is non-disruptive to existing MSR 2 and 3 systems until the cutover.
Metadata transfer uses offline copies for consistency.
To minimize downtime during the final cutover, image migration can be repeated to reduce the size of the delta before the last synchronization.
The Migration Tool supports granular migration mode, to allow strict migration of permissions.
Get Support
Mirantis Secure Registry 4 subscriptions provide access to prioritized support for designated contacts from your company, agency, team, or organization. MSR4 service levels are based on your subscription level and the cloud or cluster that you designate in your technical support case.
For detail on all of the available Mirantis support options, go to Enterprise-Grade Cloud Native and Kubernetes Support. In addition, you can use the Let’s Talk form to arrange an appointment with a Mirantis support professional.
Access the Mirantis CloudCare Portal
The CloudCare Portal is the contact point through which customers with technical issues can interact directly with Mirantis.
Access to the CloudCare Portal requires prior internal authorization, and an email verification step. Once you have verified your contact details and changed your password, you can access all cases and purchased resources.
Note
Once Mirantis has set up its backend systems at the start of the support subscription, a designated internal administrator can appoint additional contacts. Thus, if you have not received and verified an invitation to the CloudCare Portal, you can arrange with your designated administrator to become a contact. If you do not know who your designated administrator is, or you are having problems accessing the CloudCare Portal, email Mirantis support at
support@mirantis.com.Retain your Welcome to Mirantis email, as it contains information on how to access the CloudCare Portal, guidance on submitting new cases, managing your resources, and other related issues.
If you have a technical issue you should first consult the knowledge base, which you can access through the Knowledge tab of the CloudCare Portal. You should also review the MSR4 product documentation and Release Notes prior to filing a technical case, as the problem may have been fixed in a later release, or a workaround solution may be available for a similar problem.
One of the features of the CloudCare Portal is the ability to associate cases with a specific MSR4 cluster. The associated cases are referred to in the Portal as Clouds. Mirantis pre-populates your customer account with one or more clouds based on your subscription(s). You may also create and manage your Clouds to better match the way in which you use your subscription.
Mirantis also recommends and encourages that you file new cases based on a specific Cloud in your account. This is because most Clouds also have associated support entitlements, licenses, contacts, and cluster configurations. These submissions greatly enhance the ability of Mirantis to support you in a timely manner.
To locate existing Clouds associated with your account:
Click the Clouds tab at the top of the portal home page.
Navigate to the appropriate Cloud and click on the Cloud name.
Verify that the Cloud represents the correct MSR4 cluster and support entitlement.
Click the New Case button near the top of the Cloud page to create a new case.
Collect support bundles on MKE clusters
If your MSR4 instance runs on MKE, you can use any of the following methods to obtain a support bundle.
Obtain full-cluster support bundle using the MKE web UI
To obtain a full-cluster support bundle using the MKE web UI:
Log in to the MKE web UI as an administrator.
In the left-side navigation panel, navigate to <user name> and click Support Bundle. The support bundle download will require several minutes to complete.
Note
The default name for the generated support bundle file is
docker-support-<cluster-id>-YYYYmmdd-hh_mm_ss.zip. Mirantis suggests that you not alter the file name before submitting it to the customer portal. However, if necessary, you can add a custom string betweendocker-supportand<cluster-id>, as in:docker-support-MyProductionCluster-<cluster-id>-YYYYmmdd-hh_mm_ss.zip.Submit the support bundle to Mirantis Customer Support by clicking Share support bundle on the success prompt that displays once the support bundle has finished downloading.
Fill in the Jira feedback dialog, and click Submit.
Obtain full-cluster support bundle using the MKE API
To obtain a full-cluster support bundle using the MKE API:
Create an environment variable with the user security token:
export AUTHTOKEN=$(curl -sk -d \
'{"username":"<username>","password":"<password>"}' \
https://<mke-ip>/auth/login | jq -r .auth_token)
Obtain a cluster-wide support bundle:
curl -k -X POST -H "Authorization: Bearer $AUTHTOKEN" \
-H "accept: application/zip" https://<mke-ip>/support \
-o docker-support-$(date +%Y%m%d-%H_%M_%S).zip
Obtain single-node support bundle through CLI
To obtain a single-node support bundle using the CLI:
Use SSH to log into a node and run:
MKE_VERSION=$((docker container inspect ucp-proxy \
--format '{{index .Config.Labels "com.docker.ucp.version"}}' \
2>/dev/null || echo -n 3.8.8)|tr -d [[:space:]])

docker container run --rm \
  --name ucp \
  -v /var/run/docker.sock:/var/run/docker.sock \
  --log-driver none \
  mirantis/ucp:${MKE_VERSION} \
  support > \
  docker-support-${HOSTNAME}-$(date +%Y%m%d-%H_%M_%S).tgz
Important
If SELinux is enabled, include the --security-opt label=disable flag.
Note
The CLI-derived support bundle only contains logs for the node on which you are running the command. If you are running a high availability MKE cluster, collect support bundles from all manager nodes.
Obtain support bundle using the MKE CLI with PowerShell
To obtain a support bundle using the MKE CLI with PowerShell:
Run the following command on Windows worker nodes to collect the support information and have it placed automatically into a .zip file:
$MKE_SUPPORT_DIR = Join-Path -Path (Get-Location) -ChildPath 'dsinfo'
$MKE_SUPPORT_ARCHIVE = Join-Path -Path (Get-Location) -ChildPath $('docker-support-' + (hostname) + '-' + (Get-Date -UFormat "%Y%m%d-%H_%M_%S") + '.zip')
$MKE_PROXY_CONTAINER = & docker container ls --filter "name=ucp-proxy" --format "{{.Image}}"
$MKE_REPO = if ($MKE_PROXY_CONTAINER) { ($MKE_PROXY_CONTAINER -split '/')[0] } else { 'mirantis' }
$MKE_VERSION = if ($MKE_PROXY_CONTAINER) { ($MKE_PROXY_CONTAINER -split ':')[1] } else { '3.6.0' }
docker container run --name windowssupport `
-e UTILITY_CONTAINER="$MKE_REPO/ucp-containerd-shim-process-win:$MKE_VERSION" `
-v \\.\pipe\docker_engine:\\.\pipe\docker_engine `
-v \\.\pipe\containerd-containerd:\\.\pipe\containerd-containerd `
-v 'C:\Windows\system32\winevt\logs:C:\eventlogs:ro' `
-v 'C:\Windows\Temp:C:\wintemp:ro' $MKE_REPO/ucp-dsinfo-win:$MKE_VERSION
docker cp windowssupport:'C:\dsinfo' .
docker rm -f windowssupport
Compress-Archive -Path $MKE_SUPPORT_DIR -DestinationPath $MKE_SUPPORT_ARCHIVE
Release Notes
Note
The Migration Tool Release Notes are published in the Migration Guide.
4.13.2
Release date |
Name |
Upstream release |
|---|---|---|
2025-SEP-03 |
MSR 4.13.2 |
Harbor 2.13.2 |
Changelog
MSR 4.13.2 comprises the Harbor 2.13.2 upstream release with several additional security fixes.
Changes specific to MSR
Patch release for MSR 4.13.2 that includes the following changes.
Addressed issues
[MSRH-292] Fixed an issue wherein link previews displayed Harbor branding instead of Mirantis Secure Registry branding.
Changes from upstream
For the complete list of upstream changes and pull requests, refer to the Harbor 2.13.2 Release Notes.
Security information
Resolved CVEs, as detailed:
CVE |
Problem details from upstream |
|---|---|
RADIUS Protocol under RFC 2865 is susceptible to forgery attacks by a local attacker who can modify any valid Response (Access-Accept, Access-Reject, or Access-Challenge) to any other response using a chosen-prefix collision attack against MD5 Response Authenticator signature. |
|
A flaw was found in GnuTLS. A double-free vulnerability exists in GnuTLS due to incorrect ownership handling in the export logic of Subject Alternative Name (SAN) entries containing an otherName. If the type-id OID is invalid or malformed, GnuTLS will call asn1_delete_structure() on an ASN.1 node it does not own, leading to a double-free condition when the parent function or caller later attempts to free the same structure. This vulnerability can be triggered using only public GnuTLS APIs and may result in denial of service or memory corruption, depending on allocator behavior. |
|
A heap-buffer-overread vulnerability was found in GnuTLS in how it handles the Certificate Transparency (CT) Signed Certificate Timestamp (SCT) extension during X.509 certificate parsing. This flaw allows a malicious user to create a certificate containing a malformed SCT extension (OID 1.3.6.1.4.1.11129.2.4.2) that contains sensitive data. This issue leads to the exposure of confidential information when GnuTLS verifies certificates from certain websites when the certificate (SCT) is not checked correctly. |
|
A heap-buffer-overflow (off-by-one) flaw was found in the GnuTLS software in the template parsing logic within the certtool utility. When it reads certain settings from a template file, it allows an attacker to cause an out-of-bounds (OOB) NULL pointer write, resulting in memory corruption and a denial-of-service (DoS) that could potentially crash the system. |
|
A use-after-free vulnerability was found in libxml2. This issue occurs when parsing XPath elements under certain circumstances when the XML schematron has the <sch:name path=”…”/> schema elements. This flaw allows a malicious actor to craft a malicious XML document used as input for libxml, resulting in the program’s crash using libxml or other possible undefined behaviors. |
|
A NULL pointer dereference vulnerability was found in libxml2 when processing XPath XML expressions. This flaw allows an attacker to craft a malicious XML input to libxml2, leading to a denial of service. |
|
A vulnerability was found in libxml2. Processing certain sch:name elements from the input XML file can trigger a memory corruption issue. This flaw allows an attacker to craft a malicious XML input file that can lead libxml to crash, resulting in a denial of service or other possible undefined behavior due to sensitive data being corrupted in memory. |
|
A stack buffer overflow was found in Internationl components for unicode (ICU ). While running the genrb binary, the ‘subtag’ struct overflowed at the SRBRoot::addTag function. This issue may lead to memory corruption and local arbitrary code execution. |
|
Helm is a package manager for Charts for Kubernetes. Prior to 3.18.4, a specially crafted Chart.yaml file along with a specially linked Chart.lock file can lead to local code execution when dependencies are updated. Fields in a Chart.yaml file, that are carried over to a Chart.lock file when dependencies are updated and this file is written, can be crafted in a way that can cause execution if that same content were in a file that is executed (e.g., a bash.rc file or shell script). If the Chart.lock file is symlinked to one of these files updating dependencies will write the lock file content to the symlinked file. This can lead to unwanted execution. Helm warns of the symlinked file but did not stop execution due to symlinking. This issue has been resolved in Helm v3.18.4. |
|
A flaw was found in libxml2’s xmlBuildQName function, where integer overflows in buffer size calculations can lead to a stack-based buffer overflow. This issue can result in memory corruption or a denial of service when processing crafted input. |
|
A NULL pointer dereference flaw was found in the GnuTLS software in _gnutls_figure_common_ciphersuite(). |
|
os.OpenFile(path, os.O_CREATE|O_EXCL) behaved differently on Unix and Windows systems when the target path was a dangling symlink. On Unix systems, OpenFile with O_CREATE and O_EXCL flags never follows symlinks. On Windows, when the target path was a symlink to a nonexistent location, OpenFile would create a file in that location. OpenFile now always returns an error when the O_CREATE and O_EXCL flags are both set and the target path is a symlink. |
|
Calling Verify with a VerifyOptions.KeyUsages that contains ExtKeyUsageAny unintentionally disabledpolicy validation. This only affected certificate chains which contain policy graphs, which are rather uncommon. |
|
Proxy-Authorization and Proxy-Authenticate headers persisted on cross-origin redirects potentially leaking sensitive information. |
|
Cancelling a query (e.g. by cancelling the context passed to one of the query methods) during a call to the Scan method of the returned Rows can result in unexpected results if other queries are being made in parallel. This can result in a race condition that may overwrite the expected results with those of another query, causing the call to Scan to return either unexpected results from the other query or an error. |
|
Helm is a package manager for Charts for Kubernetes. Prior to version 3.18.5, when parsing Chart.yaml and index.yaml files, an improper validation of type error can lead to a panic. This issue has been resolved in Helm 3.18.5. A workaround involves ensuring YAML files are formatted as Helm expects prior to processing them with Helm. |
|
Helm is a package manager for Charts for Kubernetes. Prior to version 3.18.5, it is possible to craft a JSON Schema file in a manner which could cause Helm to use all available memory and have an out of memory (OOM) termination. This issue has been resolved in Helm 3.18.5. A workaround involves ensuring all Helm charts that are being loaded into Helm do not have any reference of $ref pointing to /dev/zero. |
Known issues
This section outlines known issues with Mirantis Secure Registry (MSR), including available workarounds.
MSR installation may fail on RHEL 9.4 and later
When deploying MSR in High Availability mode using Helm on Red Hat Enterprise Linux (RHEL) 9.4 or later, installation may fail due to a segmentation fault in the bg_mon module. This issue occurs when PostgreSQL is deployed using the zalando/spilo image.
The failure manifests with the following error messages:
In the harbor-core pod:
2025-06-24T07:58:01Z [INFO] [/common/dao/pgsql.go:135]: Upgrading schema for pgsql ...
2025-06-24T07:58:01Z [ERROR] [/common/dao/pgsql.go:140]: Failed to upgrade schema, error: "Dirty database version 11. Fix and force version."
2025-06-24T07:58:01Z [FATAL] [/core/main.go:204]: failed to migrate the database, error: Dirty database version 11. Fix and force version.
On the node hosting the msr-postgres pod:
Jun 24 07:55:19 ip-172-31-0-252.eu-central-1.compute.internal systemd[1]: Created slice Slice /system/systemd-coredump.
Jun 24 07:55:19 ip-172-31-0-252.eu-central-1.compute.internal systemd[1]: Started Process Core Dump (PID 34335/UID 0).
Jun 24 07:55:19 ip-172-31-0-252.eu-central-1.compute.internal systemd-coredump[34336]: [🡕] Process 27789 (postgres) of user 101 dumped core.
Workaround:
Exclude the bg_mon module from the PostgreSQL configuration:
apiVersion: "acid.zalan.do/v1"
kind: postgresql
metadata:
  name: msr-postgres
spec:
  teamId: "msr"
  volume:
    size: 1Gi
  numberOfInstances: 3
  users:
    msr:
    - superuser
    - createdb
  databases:
    registry: msr
  postgresql:
    version: "17"
    parameters:
      shared_preload_libraries: "pg_stat_statements,pgextwlist,pg_auth_mon,set_user,timescaledb,pg_cron,pg_stat_kcache"
4.13.1
Release date |
Name |
Upstream release |
|---|---|---|
2025-JUL-14 |
MSR 4.13.1 |
Harbor 2.13.1 |
Changelog
MSR 4.13.1 comprises the Harbor 2.13.1 upstream release.
Changes specific to MSR
Patch release for MSR 4.13.1 focuses on delivery of bug fixes and component updates detailed in Security information.
Changes from upstream
For the complete list of upstream changes and pull requests, refer to the Harbor 2.13.1 Release Notes.
Security information
Resolved CVEs, as detailed:
CVE |
Problem details from upstream |
|---|---|
An attacker can craft an input to the Parse functions that would be processed non-linearly with respect to its length, resulting in extremely slow parsing. This could cause a denial of service. |
|
An attacker can pass a malicious malformed token which causes unexpected memory to be consumed during parsing. |
|
Matching of hosts against proxy patterns can improperly treat an IPv6 zone ID as a hostname component. For example, when the NO_PROXY environment variable is set to “*.example.com”, a request to “[::1%25.example.com]:80` will incorrectly match and not be proxied. |
|
The net/http package improperly accepts a bare LF as a line terminator in chunked data chunk-size lines. This can permit request smuggling if a net/http server is used in conjunction with a server that incorrectly accepts a bare LF as part of a chunk-ext. |
|
The tokenizer incorrectly interprets tags with unquoted attribute values that end with a solidus character (/) as self-closing. When directly using Tokenizer, this can result in such tags incorrectly being marked as self-closing, and when using the Parse functions, this can result in content following such tags as being placed in the wrong scope during DOM construction, but only when tags are in foreign content (e.g. <math>, <svg>, etc contexts). |
|
Helm is a tool for managing Charts. A chart archive file can be crafted in a manner where it expands to be significantly larger uncompressed than compressed (e.g., >800x difference). When Helm loads this specially crafted chart, memory can be exhausted causing the application to terminate. This issue has been resolved in Helm v3.17.3. |
|
Helm is a package manager for Charts for Kubernetes. A JSON Schema file within a chart can be crafted with a deeply nested chain of references, leading to parser recursion that can exceed the stack size limit and trigger a stack overflow. This issue has been resolved in Helm v3.17.3. |
|
Open Policy Agent (OPA) is an open source, general-purpose policy engine. Prior to version 1.4.0, when run as a server, OPA exposes an HTTP Data API for reading and writing documents. Requesting a virtual document through the Data API entails policy evaluation, where a Rego query containing a single data document reference is constructed from the requested path. This query is then used for policy evaluation. A HTTP request path can be crafted in a way that injects Rego code into the constructed query. The evaluation result cannot be made to return any other data than what is generated by the requested path, but this path can be misdirected, and the injected Rego code can be crafted to make the query succeed or fail; opening up for oracle attacks or, given the right circumstances, erroneous policy decision results. Furthermore, the injected code can be crafted to be computationally expensive, resulting in a Denial Of Service (DoS) attack. This issue has been patched in version 1.4.0. A workaround involves having network access to OPA’s RESTful APIs being limited to localhost and/or trusted networks, unless necessary for production reasons. |
|
containerd is an open-source container runtime. A bug was found in the containerd’s CRI implementation where containerd, starting in version 2.0.1 and prior to version 2.0.5, doesn’t put usernamespaced containers under the Kubernetes’ cgroup hierarchy, therefore some Kubernetes limits are not honored. This may cause a denial of service of the Kubernetes node. This bug has been fixed in containerd 2.0.5+ and 2.1.0+. Users should update to these versions to resolve the issue. As a workaround, disable usernamespaced pods in Kubernetes temporarily. |
|
gorilla/csrf provides Cross Site Request Forgery (CSRF) prevention middleware for Go web applications & services. Prior to 1.7.2, gorilla/csrf does not validate the Origin header against an allowlist. Its executes its validation of the Referer header for cross-origin requests only when it believes the request is being served over TLS. It determines this by inspecting the r.URL.Scheme value. However, this value is never populated for “server” requests per the Go spec, and so this check does not run in practice. This vulnerability allows an attacker who has gained XSS on a subdomain or top level domain to perform authenticated form submissions against gorilla/csrf protected targets that share the same top level domain. This vulnerability is fixed in 1.7.2. |
|
setuptools is a package that allows users to download, build, install, upgrade, and uninstall Python packages. A path traversal vulnerability in PackageIndex is present in setuptools prior to version 78.1.1. An attacker would be allowed to write files to arbitrary locations on the filesystem with the permissions of the process running the Python code, which could escalate to remote code execution depending on the context. Version 78.1.1 fixes the issue. |
Known issues
This section outlines known issues with Mirantis Secure Registry (MSR), including available workarounds.
MSR installation may fail on RHEL 9.4 and later
When deploying MSR in High Availability mode using Helm on Red Hat Enterprise Linux (RHEL) 9.4 or later, installation may fail due to a segmentation fault in the bg_mon module. This issue occurs when PostgreSQL is deployed using the zalando/spilo image.
The failure manifests with the following error messages:
In the harbor-core pod:
2025-06-24T07:58:01Z [INFO] [/common/dao/pgsql.go:135]: Upgrading schema for pgsql ...
2025-06-24T07:58:01Z [ERROR] [/common/dao/pgsql.go:140]: Failed to upgrade schema, error: "Dirty database version 11. Fix and force version."
2025-06-24T07:58:01Z [FATAL] [/core/main.go:204]: failed to migrate the database, error: Dirty database version 11. Fix and force version.
On the node hosting the msr-postgres pod:
Jun 24 07:55:19 ip-172-31-0-252.eu-central-1.compute.internal systemd[1]: Created slice Slice /system/systemd-coredump.
Jun 24 07:55:19 ip-172-31-0-252.eu-central-1.compute.internal systemd[1]: Started Process Core Dump (PID 34335/UID 0).
Jun 24 07:55:19 ip-172-31-0-252.eu-central-1.compute.internal systemd-coredump[34336]: [🡕] Process 27789 (postgres) of user 101 dumped core.
Workaround:
Exclude the bg_mon module from the PostgreSQL configuration:
apiVersion: "acid.zalan.do/v1"
kind: postgresql
metadata:
  name: msr-postgres
spec:
  teamId: "msr"
  volume:
    size: 1Gi
  numberOfInstances: 3
  users:
    msr:
    - superuser
    - createdb
  databases:
    registry: msr
  postgresql:
    version: "17"
    parameters:
      shared_preload_libraries: "pg_stat_statements,pgextwlist,pg_auth_mon,set_user,timescaledb,pg_cron,pg_stat_kcache"
4.13.0
Release date |
Name |
Upstream release |
|---|---|---|
2025-MAY-27 |
MSR 4.13.0 |
Harbor 2.11-2.13 |
Changelog
MSR 4.13.0 comprises the Harbor 2.13 upstream release. In addition, changes are included for the interceding upstream 2.11 and 2.12 releases, for which there was no MSR release.
Changes specific to MSR
[MSRH-162] LDAP Group Admin now supports nested groups in a search filter.
[MSRH-189] Docker Compose installation packages have been updated to reference
msrinstead ofharbor.[MSRH-194] The Helm chart has been updated to reference
msrandMirantisinstead ofharbor.[MSRH-242] Mirantis now recommends the following operators for deploying PostgreSQL and Redis in high availability (HA) mode:
PostgreSQL: zalando/postgres-operator
Redis: OT-CONTAINER-KIT/redis-operator
Changes from upstream
The upstream pull requests detailed in the sections that follow are those that pertain to the MSR product. For the complete list of changes and pull requests upstream, refer to the:
What’s new
SBOM Generation and Management: Harbor supports generating Software Bill of Materials (SBOM) both manually and automatically. Users can view, download, and replicate SBOMs across multiple Harbor instances.
OCI Distribution Spec v1.1.0 Support: Harbor now fully supports OCI Distribution Spec v1.1.0.
VolcEngine Registry Integration: Users can replicate images to and from the VolcEngine registry, which enhances interoperability and flexibility.
Enhanced Robot Account Management: Improved robot account functionality in Harbor v2.12.0 strengthens access control and automates CI/CD processes.
Proxy Cache Speed Limit: Harbor now allows setting speed limits for proxy cache projects, which provides better bandwidth management.
Improved LDAP Onboarding: Enhanced LDAP onboarding in Harbor v2.12.0 accelerates user login and improves authentication performance.
ACR & ACR EE Registry Integration: Users can now replicate images to and from Azure Container Registry (ACR) and ACR Enterprise Edition.
Extended Audit Logging: Harbor now provides more granular audit logging, with detailed user action tracking, enhanced API logging, and improved query performance.
Enhanced OIDC Integration: Improved OpenID Connect (OIDC) support adds user session logout and Proof Key for Code Exchange (PKCE) functionality.
CloudNativeAI Integration: Harbor integrates with CloudNativeAI (CNAI), which enables seamless management, versioning, and retrieval of AI models.
Redis TLS Support: Secure Redis communication in Harbor with TLS, which protects data in transit between components.
Enhanced Dragonfly Preheating: Improved Dragonfly preheating supports new parameters, customizable scopes, and cluster ID targeting. This optimizes image distribution for large-scale deployments.
Deprecations
Remove robotV1 from code base (#20958) by @sgaist in #20991
Breaking changes
Enhancements
Enable MAX_JOB_DURATION_SECONDS in the jobservice container by @stonezdj in #21232
Feat: extend the p2p preheat policy by @chlins in #21115
Fix: replication rule message in UI by @bupd in #21299
Feat: add execution_id and task_id to the replication webhook payload by @chlins in #21614
Support to audit logs by @xuelichao in #21377
Revamp Copy Pull Command by @bupd in #21155
Add PKCE support for OIDC authentication by @reasonerjt in #21702
Feat: Persistent Page Size UI by @bupd in #21627
Add list project artifacts API by @wy65701436 in #20803
Feature export Harbor statistics as Prometheus metric by @tpoxa in #18679
Refactor: p2p preheat dragonfly driver by @chlins in #20922
Make it possible to build the spectral image also on ARM by @Vad1mo in #20506
Enable MAX_JOB_DURATION_SECONDS in the jobservice container by @stonezdj in #21232
Feat: extend the p2p preheat policy by @chlins in #21115
Fix: replication rule message in UI by @bupd in #21299
Feat: add execution_id and task_id to the replication webhook payload by @chlins in #21614
Support to audit logs by @xuelichao in #21377
Revamp Copy Pull Command by @bupd in #21155
Add PKCE support for OIDC authentication by @reasonerjt in #21702
Feat: Persistent Page Size UI by @bupd in #21627
Security information
Updated the following middleware component versions to resolve vulnerabilities in MSR:
[MSRH-190] Golang v1.23.7
[MSRH-206] beego Go Web Framework v2.3.6
[MSRH-191] Go packages:
Aqua Trivy Vulnerability Scanner v0.60.0
Go Cryptography Libraries golang.org/x/crypto v0.35.0
go-jose JSON Object Signing and Encryption for Go v4.0.5
OAuth 2.0 for Go golang.org/x/oauth2 v0.27.0
Note
The CVE-2025-22868 may still appear in the trivy-adapter-photon image.
However, the image is not affected by the vulnerability.
Resolved CVEs, as detailed:
CVE |
Problem details from upstream |
|---|---|
The tokenizer incorrectly interprets tags with unquoted attribute values that end with a solidus character (/) as self-closing. When directly using Tokenizer, this can result in such tags incorrectly being marked as self-closing, and when using the Parse functions, this can result in content following such tags as being placed in the wrong scope during DOM construction, but only when tags are in foreign content (e.g. <math>, <svg>, etc contexts). |
|
An issue was discovered in Cloud Native Computing Foundation (CNCF) Helm through 3.13.3. It displays values of secrets when the –dry-run flag is used. This is a security concern in some use cases, such as a –dry-run call by a CI/CD tool. NOTE: the vendor’s position is that this behavior was introduced intentionally, and cannot be removed without breaking backwards compatibility (some users may be relying on these values). Also, it is not the Helm Project’s responsibility if a user decides to use –dry-run within a CI/CD environment whose output is visible to unauthorized persons. |
|
Helm is a package manager for Charts for Kubernetes. A JSON Schema file within a chart can be crafted with a deeply nested chain of references, leading to parser recursion that can exceed the stack size limit and trigger a stack overflow. This issue has been resolved in Helm v3.17.3. |
|
Helm is a tool for managing Charts. A chart archive file can be crafted in a manner where it expands to be significantly larger uncompressed than compressed (e.g., >800x difference). When Helm loads this specially crafted chart, memory can be exhausted causing the application to terminate. This issue has been resolved in Helm v3.17.3. |
|
Beego is an open-source web framework for the Go programming language. Prior to 2.3.6, a Cross-Site Scripting (XSS) vulnerability exists in Beego’s RenderForm() function due to improper HTML escaping of user-controlled data. This vulnerability allows attackers to inject malicious JavaScript code that executes in victims’ browsers, potentially leading to session hijacking, credential theft, or account takeover. The vulnerability affects any application using Beego’s RenderForm() function with user-provided data. Since it is a high-level function generating an entire form markup, many developers would assume it automatically escapes attributes (the way most frameworks do). This vulnerability is fixed in 2.3.6. |
|
golang-jwt is a Go implementation of JSON Web Tokens. Starting in version 3.2.0 and prior to versions 5.2.2 and 4.5.2, the function parse.ParseUnverified splits (via a call to strings.Split) its argument (which is untrusted data) on periods. As a result, in the face of a malicious request whose Authorization header consists of Bearer followed by many period characters, a call to that function incurs allocations to the tune of O(n) bytes (where n stands for the length of the function’s argument), with a constant factor of about 16. This issue is fixed in 5.2.2 and 4.5.2. |
|
containerd is an open-source container runtime. A bug was found in containerd prior to versions 1.6.38, 1.7.27, and 2.0.4 where containers launched with a User set as a UID:GID larger than the maximum 32-bit signed integer can cause an overflow condition where the container ultimately runs as root (UID 0). This could cause unexpected behavior for environments that require containers to run as a non-root user. This bug has been fixed in containerd 1.6.38, 1.7.27, and 2.04. As a workaround, ensure that only trusted images are used and that only trusted users have permissions to import images. |
|
SSH servers which implement file transfer protocols are vulnerable to a denial of service attack from clients which complete the key exchange slowly, or not at all, causing pending content to be read into memory, but never transmitted. |
|
go-redis is the official Redis client library for the Go programming language. Prior to 9.5.5, 9.6.3, and 9.7.3, go-redis potentially responds out of order when CLIENT SETINFO times out during connection establishment. This can happen when the client is configured to transmit its identity, there are network connectivity issues, or the client was configured with aggressive timeouts. The problem occurs for multiple use cases. For sticky connections, you receive persistent out-of-order responses for the lifetime of the connection. All commands in the pipeline receive incorrect responses. When used with the default ConnPool once a connection is returned after use with ConnPool#Put the read buffer will be checked and the connection will be marked as bad due to the unread data. This means that at most one out-of-order response before the connection is discarded. This issue is fixed in 9.5.5, 9.6.3, and 9.7.3. You can prevent the vulnerability by setting the flag DisableIndentity to true when constructing the client instance. |
|
Matching of hosts against proxy patterns can improperly treat an IPv6
zone ID as a hostname component. For example, when the NO_PROXY
environment variable is set to |
|
A vulnerability in the package_index module of pypa/setuptools versions up to 69.1.1 allows for remote code execution via its download functions. These functions, which are used to download packages from URLs provided by users or retrieved from package index servers, are susceptible to code injection. If these functions are exposed to user-controlled inputs, such as package URLs, they can execute arbitrary commands on the system. The issue is fixed in version 70.0. |
|
Jinja is an extensible templating engine. Prior to 3.1.5, An oversight in how the Jinja sandboxed environment detects calls to str.format allows an attacker that controls the content of a template to execute arbitrary Python code. To exploit the vulnerability, an attacker needs to control the content of a template. Whether that is the case depends on the type of application using Jinja. This vulnerability impacts users of applications which execute untrusted templates. Jinja’s sandbox does catch calls to str.format and ensures they don’t escape the sandbox. However, it’s possible to store a reference to a malicious string’s format method, then pass that to a filter that calls it. No such filters are built-in to Jinja, but could be present through custom filters in an application. After the fix, such indirect calls are also handled by the sandbox. This vulnerability is fixed in 3.1.5. |
|
Jinja is an extensible templating engine. Prior to 3.1.6, an oversight
in how the Jinja sandboxed environment interacts with the |
|
Jinja is an extensible templating engine. In versions on the 3.x branch prior to 3.1.5, a bug in the Jinja compiler allows an attacker that controls both the content and filename of a template to execute arbitrary Python code, regardless of if Jinja’s sandbox is used. To exploit the vulnerability, an attacker needs to control both the filename and the contents of a template. Whether that is the case depends on the type of application using Jinja. This vulnerability impacts users of applications which execute untrusted templates where the template author can also choose the template filename. This vulnerability is fixed in 3.1.5. |
|
An attacker can pass a malicious malformed token which causes unexpected memory to be consumed during parsing. |
|
SSH servers which implement file transfer protocols are vulnerable to a denial of service attack from clients which complete the key exchange slowly, or not at all, causing pending content to be read into memory, but never transmitted. |
|
Go JOSE provides an implementation of the Javascript Object Signing and Encryption set of standards in Go, including support for JSON Web Encryption (JWE), JSON Web Signature (JWS), and JSON Web Token (JWT) standards. In versions on the 4.x branch prior to version 4.0.5, when parsing compact JWS or JWE input, Go JOSE could use excessive memory. The code used strings.Split(token, “.”) to split JWT tokens, which is vulnerable to excessive memory consumption when processing maliciously crafted tokens with a large number of . characters. An attacker could exploit this by sending numerous malformed tokens, leading to memory exhaustion and a Denial of Service. Version 4.0.5 fixes this issue. As a workaround, applications could pre-validate that payloads passed to Go JOSE do not contain an excessive number of . characters. |
|
Distribution is a toolkit to pack, ship, store, and deliver container content. Systems running registry versions 3.0.0-beta.1 through 3.0.0-rc.2 with token authentication enabled may be vulnerable to an issue in which token authentication allows an attacker to inject an untrusted signing key in a JSON web token (JWT). The issue lies in how the JSON web key (JWK) verification is performed. When a JWT contains a JWK header without a certificate chain, the code only checks if the KeyID (kid) matches one of the trusted keys, but doesn’t verify that the actual key material matches. A fix for the issue is available at commit 5ea9aa028db65ca5665f6af2c20ecf9dc34e5fcd and expected to be a part of version 3.0.0-rc.3. There is no way to work around this issue without patching if the system requires token authentication. |
|
A certificate with a URI which has a IPv6 address with a zone ID may incorrectly satisfy a URI name constraint that applies to the certificate chain. Certificates containing URIs are not permitted in the web PKI, so this only affects users of private PKIs which make use of URIs. |
|
The HTTP client drops sensitive headers after following a cross-domain redirect. For example, a request to a.com/ containing an Authorization header which is redirected to b.com/ will not send that header to b.com. In the event that the client received a subsequent same-domain redirect, however, the sensitive headers would be restored. For example, a chain of redirects from a.com/, to b.com/1, and finally to b.com/2 would incorrectly send the Authorization header to b.com/2. |
|
setuptools is a package that allows users to download, build, install, upgrade, and uninstall Python packages. A path traversal vulnerability in PackageIndex is present in setuptools prior to version 78.1.1. An attacker would be allowed to write files to arbitrary locations on the filesystem with the permissions of the process running the Python code, which could escalate to remote code execution depending on the context. Version 78.1.1 fixes the issue. |
Known issues
This section outlines known issues with Mirantis Secure Registry (MSR), including available workarounds.
MSR installation may fail on RHEL 9.4 and later
When deploying MSR in High Availability mode using Helm on Red Hat Enterprise Linux (RHEL) 9.4 or later, installation may fail due to a segmentation fault in the bg_mon module. This issue occurs when PostgreSQL is deployed using the zalando/spilo image.
The failure manifests with the following error messages:
In the harbor-core pod:
2025-06-24T07:58:01Z [INFO] [/common/dao/pgsql.go:135]: Upgrading schema for pgsql ...
2025-06-24T07:58:01Z [ERROR] [/common/dao/pgsql.go:140]: Failed to upgrade schema, error: "Dirty database version 11. Fix and force version."
2025-06-24T07:58:01Z [FATAL] [/core/main.go:204]: failed to migrate the database, error: Dirty database version 11. Fix and force version.
On the node hosting the msr-postgres pod:
Jun 24 07:55:19 ip-172-31-0-252.eu-central-1.compute.internal systemd[1]: Created slice Slice /system/systemd-coredump.
Jun 24 07:55:19 ip-172-31-0-252.eu-central-1.compute.internal systemd[1]: Started Process Core Dump (PID 34335/UID 0).
Jun 24 07:55:19 ip-172-31-0-252.eu-central-1.compute.internal systemd-coredump[34336]: [🡕] Process 27789 (postgres) of user 101 dumped core.
Workaround:
Exclude the bg_mon module from the PostgreSQL configuration:
apiVersion: "acid.zalan.do/v1"
kind: postgresql
metadata:
  name: msr-postgres
spec:
  teamId: "msr"
  volume:
    size: 1Gi
  numberOfInstances: 3
  users:
    msr:
    - superuser
    - createdb
  databases:
    registry: msr
  postgresql:
    version: "17"
    parameters:
      shared_preload_libraries: "pg_stat_statements,pgextwlist,pg_auth_mon,set_user,timescaledb,pg_cron,pg_stat_kcache"
Release Compatibility Matrix
The following table lists the key software components and versions that have been tested and validated by Mirantis for compatibility with MSR.
Component |
Chart / App Version |
|---|---|
Postgres Operator |
Chart: 1.14.0
App: 1.14.0
|
PostgreSQL |
v17
Pod Image:
ghcr.io/zalando/spilo-17:4.0-p2 |
Redis Operator |
Chart: 0.20.3
App: 0.20.2
|
Redis |
Chart:
redis-replicationApp: 0.16.7
|
Kubernetes |
v1.31
Included in MKE 3.8; also met by MKE 4.
|
Release Cadence and Support Lifecycle
With the intent of improving the customer experience, Mirantis strives to offer maintenance releases for the Mirantis Secure Registry (MSR) software every six to eight weeks. Primarily, these maintenance releases will aim to resolve known issues and issues reported by customers, quash CVEs, and reduce technical debt. The version of each MSR maintenance release is reflected in the third digit position of the version number (as an example, for MSR 4.0 the most current maintenance release is MSR 4.13.2).
In parallel with our maintenance MKE release work, each year Mirantis will develop and release a new major version of MSR, the Mirantis support lifespan of which will adhere to our legacy two year standard.
The MSR team will make every effort to hold to the release cadence stated here. Customers should be aware, though, that development and release cycles can change, and without advance notice.
Technology Preview features
A Technology Preview feature provides early access to upcoming product innovations, allowing customers to experiment with the functionality and provide feedback.
Technology Preview features may be privately or publicly available and neither are intended for production use. While Mirantis will provide assistance with such features through official channels, normal Service Level Agreements do not apply.
As Mirantis considers making future iterations of Technology Preview features generally available, we will do our best to resolve any issues that customers experience when using these features.
During the development of a Technology Preview feature, additional components may become available to the public for evaluation. Mirantis cannot guarantee the stability of such features. As a result, if you are using Technology Preview features, you may not be able to seamlessly upgrade to subsequent product releases.
Mirantis makes no guarantees that Technology Preview features will graduate to generally available features.