Install MSR
Install MSR
MSR system requirements
Mirantis Secure Registry can be installed on-premises or on the cloud. Before installing, be sure your infrastructure has these requirements.
Hardware and Software requirements
You can install MSR on-premises or on a cloud provider. To install MSR, all nodes must:
- Be a worker node managed by MKE (Mirantis Kubernetes Engine). See Compatibility Matrix for version compatibility.
- Have a fixed hostname.
Minimum requirements
- 16GB of RAM for nodes running MSR
- 2 vCPUs for nodes running MSR
- 10GB of free disk space
Recommended production requirements
- 16GB of RAM for nodes running MSR
- 4 vCPUs for nodes running MSR
- 25-100GB of free disk space
Note that Windows container images are typically larger than Linux ones and for this reason, you should consider provisioning more local storage for Windows nodes and for MSR setups that will store Windows container images.
When image scanning feature is used, we recommend that you have at least 32 GB of RAM. As developers and teams push images into MSR, the repository grows over time so you should inspect RAM, CPU, and disk usage on MSR nodes and increase resources when resource saturation is observed on regular basis.
Ports used
When installing MSR on a node, make sure the following ports are open on that node:
| Direction | Port | Purpose |
|---|---|---|
| in | 80/tcp | Web app and API client access to MSR. |
| in | 443/tcp | Web app and API client access to MSR. |
These ports are configurable when installing MSR.
MKE Configuration
When installing or backing up MSR on a MKE cluster, Administrators need to be able to deploy containers on MKE manager nodes or nodes running MSR. This setting can be adjusted in the MKE Settings menu.
The MSR installation or backup will fail with the following error message if Administrators are unable to deploy on MKE manager nodes or nodes running MSR.
Error response from daemon: {"message":"could not find any nodes on which
the container could be created"}
Compatibility and maintenance lifecycle
Docker Enterprise Edition is a software subscription that includes three products:
- Mirantis Container Runtime
- Mirantis Secure Registry
- Mirantis Kubernetes Engine
Learn more about the Maintenance Lifecycle for these products.
Install MSR online
Mirantis Secure Registry (MSR) is a containerized application that runs on a swarm managed by the Mirantis Kubernetes Engine (MKE). It can be installed on-premises or on a cloud infrastructure.
Step 1. Validate the system requirements
Before installing MSR, make sure your infrastructure meets the MSR system requirements that MSR needs to run.
Step 2. Install MKE
MSR requires Mirantis Kubernetes Engine (MKE) to run. If MKE is not yet installed, refer to install MKE for production.
Note
Prior to installing MSR:
- When upgrading, upgrade MKE before MSR for each major version. For example, if you are upgrading four major versions, upgrade one major version at a time, first MKE, then MSR, and then repeat for the remaining three versions.
- MKE upgraded to the most recent version before an initial install of MSR.
- Mirantis Container Runtime should be updated to the most recent version before installing or updating MKE.
MKE and MSR must not be installed on the same node, due to the potential for resource and port conflicts. Instead, install MSR on worker nodes that will be managed by MKE. Note also that MSR cannot be installed on a standalone Mirantis Container Runtime.

Step 3. Install MSR
Once MKE is installed, navigate to the MKE web interface as an admin. Expand your profile on the left navigation pane, and select Admin Settings > Mirantis Secure Registry.
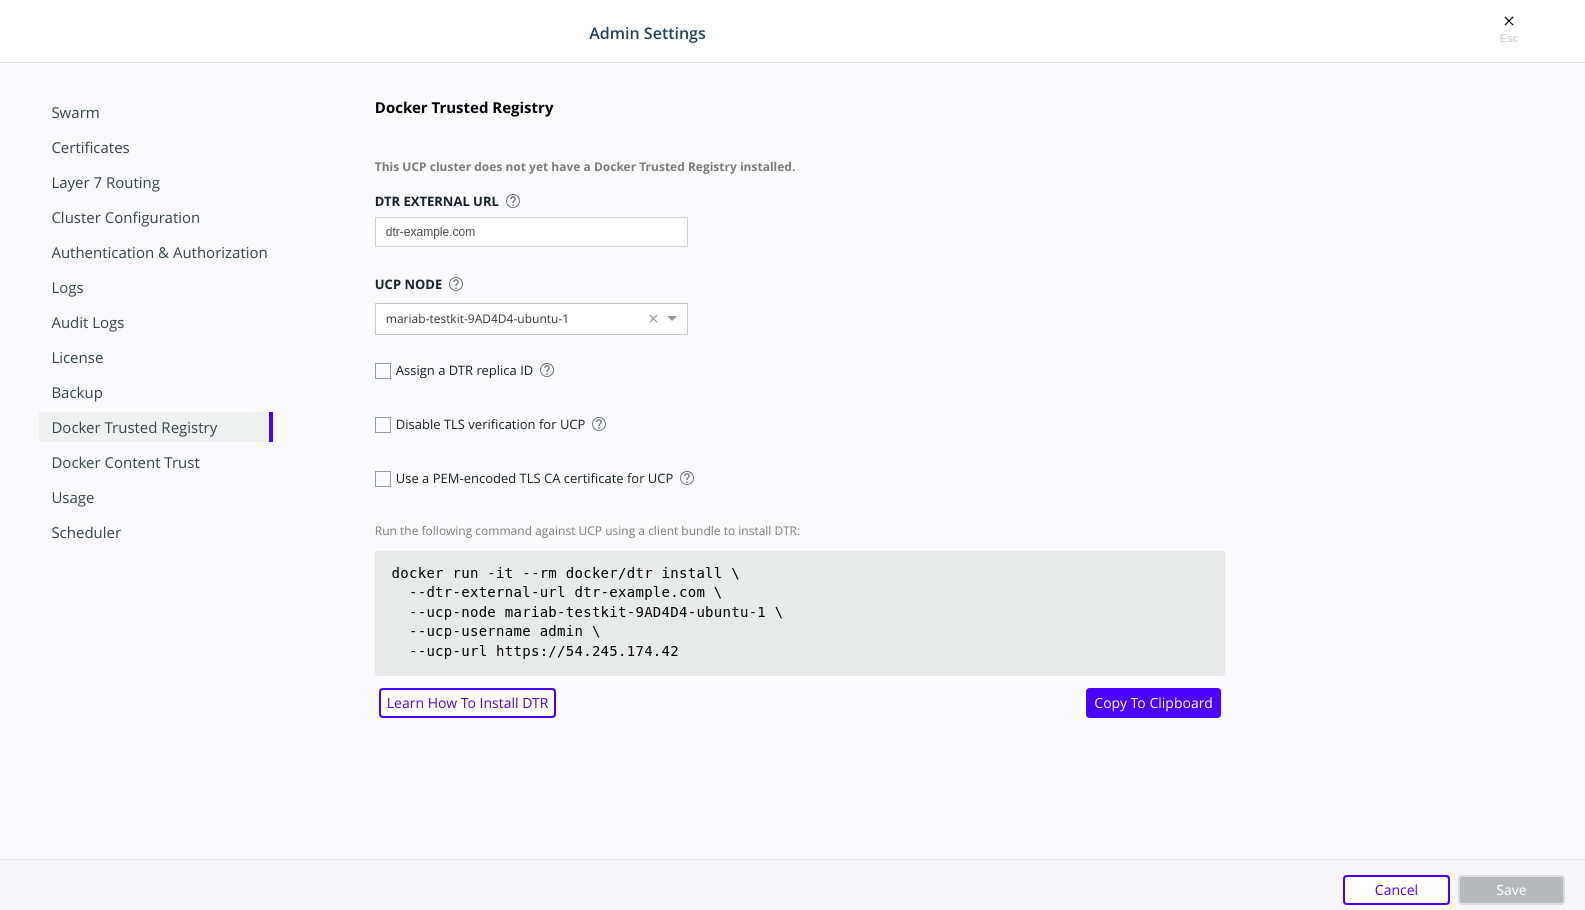
After you configure all the options, you should see a Docker CLI command that you can use to install MSR. Before you run the command, take note of the
--dtr-external-urlparameter:$ docker run -it --rm \ docker/dtr:2.7.5 install \ --dtr-external-url <msr.example.com> \ --ucp-node <mke-node-name> \ --ucp-username admin \ --ucp-url <mke-url>
If you want to point this parameter to a load balancer that uses HTTP for health probes over port
80or443, temporarily reconfigure the load balancer to use TCP over a known open port. Once MSR is installed, you can configure the load balancer however you need to.Run the MSR install command on any node connected to the MKE cluster, and with the Mirantis Container Runtime installed. MSR will not be installed on the node you run the install command on. MSR will be installed on the MKE worker defined by the
--ucp-nodeflag.For example, you could SSH into a MKE node and run the MSR install command from there. Running the installation command in interactive TTY or
-itmode means you will be prompted for any required additional information.Here are some useful options you can set during installation:
- To install a specific version of MSR, replace
2.7.6with your desired version in the installation command above. Find all MSR versions in the Mirantis Secure Registry release notes. - MSR is deployed with self-signed certificates by default, so MKE
might not be able to pull images from MSR. Use the
--dtr-external-url <msr-domain>:<port>optional flag during installation, or during a reconfiguration, so that MKE is automatically reconfigured to trust MSR. - With MSR 2.7, you can enable browser authentication via client certificates at install time. This bypasses the MSR login page and hides the logout button, thereby skipping the need for entering your username and password.
- To install a specific version of MSR, replace
Verify that MSR is installed. Either:
- See
https://<mke-fqdn>/manage/settings/msr, or; - Navigate to Admin Settings > Mirantis Secure Registry from the
MKE web UI. Under the hood, MKE modifies
/etc/docker/certs.dfor each host and adds MSR’s CA certificate. MKE can then pull images from MSR because the Mirantis Container Runtime for each node in the MKE swarm has been configured to trust MSR.
- See
Reconfigure your load balancer back to your desired protocol and port.
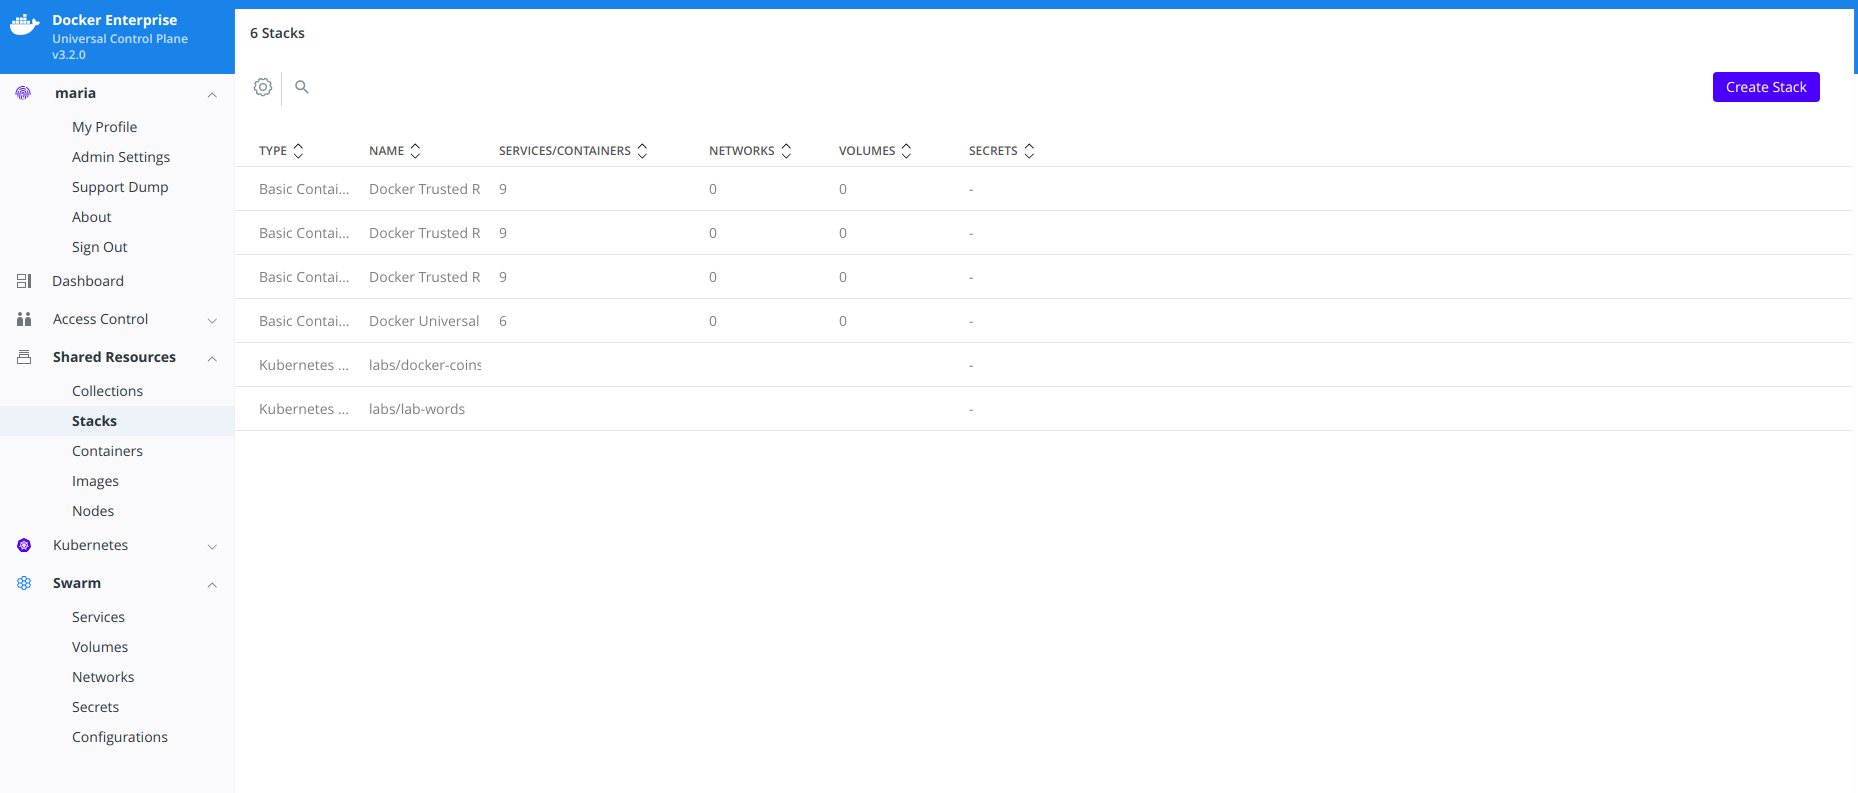
Step 4. Check that MSR is running
In your browser, navigate to the MKE web interface.
Select Shared Resources > Stacks from the left navigation pane. You should see MSR listed as a stack.
To verify that MSR is accessible from the browser, enter your MSR IP address or FQDN on the address bar. Since HSTS (HTTP Strict-Transport-Security) header is included in all API responses, make sure to specify the FQDN (Fully Qualified Domain Name) of your MSR prefixed with
https://, or your browser may refuse to load the web interface.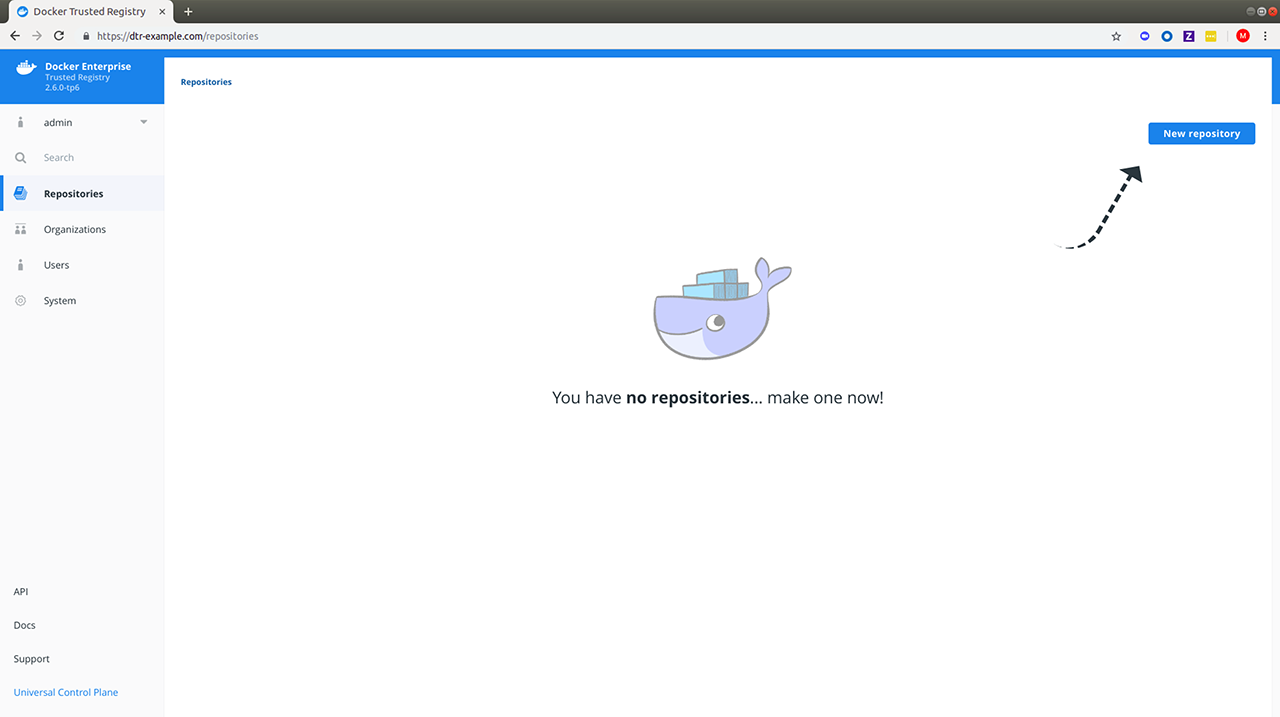
Step 5. Configure MSR
After installing MSR, you should configure:
- The certificates used for TLS communication. Learn more.
- The storage back end to store the Docker images. Learn more.
Web interface
- To update your TLS certificates, access MSR from the browser and navigate to System > General.
- To configure your storage backend, navigate to System > Storage. If you are upgrading and changing your existing storage back end, see Switch storage back ends for recommended steps.
Command line interface
To reconfigure MSR using the CLI, see the reference page for the reconfigure command.
Step 6. Test pushing and pulling
Now that you have a working installation of MSR, you should test that you can push and pull images:
Step 7. Join replicas to the cluster
This step is optional.
To set up MSR for high availability, you can add more replicas to your MSR cluster. Adding more replicas allows you to load-balance requests across all replicas, and keep MSR working if a replica fails.
For high-availability, you should set 3 or 5 MSR replicas. The replica nodes also need to be managed by the same MKE.
To add replicas to a MSR cluster, use the join command.
Load your MKE user bundle.
Run the join command.
docker run -it --rm \
  docker/dtr:2.7.6 join \
  --ucp-node <mke-node-name> \
  --ucp-insecure-tls
Caution
–ucp-node
The
<mke-node-name>following the--ucp-nodeflag is the target node to install the MSR replica. This is NOT the MKE Manager URL.When you join a replica to a MSR cluster, you need to specify the ID of a replica that is already part of the cluster. You can find an existing replica ID by going to the Shared Resources > Stacks page on MKE.
Check that all replicas are running.
In your browser, navigate to MKE’s web interface. Select Shared Resources > Stacks. All replicas should be displayed.
Install MSR offline
The procedure to install Mirantis Secure Registry on a host is the same, whether that host has access to the internet or not.
The only difference when installing on an offline host, is that instead of pulling the MKE images from Docker Hub, you use a computer that is connected to the internet to download a single package with all the images. Then you copy that package to the host where you’ll install MSR.
Versions available
Download the offline package
Use a computer with internet access to download a package with all MSR images:
$ wget <package-url> -O dtr.tar.gz
Now that you have the package in your local machine, you can transfer it to the machines where you want to install MSR.
For each machine where you want to install MSR:
Copy the MSR package to that machine.
$ scp dtr.tar.gz <user>@<host>
Use SSH to log in to the hosts where you transferred the package.
Load the MSR images.
Once the package is transferred to the hosts, you can use the
docker loadcommand to load the Docker images from the tar archive:$ docker load -i dtr.tar.gz
Install MSR
Now that the offline hosts have all the images needed to install MSR, you can install MSR on that host.
Preventing outgoing connections
MSR makes outgoing connections to:
- Report analytics
- Check for new versions
- Check online licenses
- Update the vulnerability scanning database
All of these uses of online connections are optional. You can choose to disable or not use any or all of these features on the admin settings page.
Upgrade MSR
MSR uses semantic versioning and Docker aims to achieve specific guarantees while upgrading between versions. While downgrades are not supported, Docker supports upgrades according to the following rules:
- When upgrading from one patch version to another, you can skip patch versions because no data migration is performed for patch versions.
- When upgrading between minor versions, you cannot skip versions, however you can upgrade from any patch version of the previous minor version to any patch version of the current minor version.
- When upgrading between major versions, make sure to upgrade one major version at a time – and also to upgrade to the earliest available minor version. It is strongly recommended that you first upgrade to the latest minor/patch version for your major version.
| Description | From | To | Supported |
|---|---|---|---|
| patch upgrade | x.y.0 | x.y.1 | yes |
| skip patch version | x.y.0 | x.y.2 | yes |
| patch downgrade | x.y.2 | x.y.1 | no |
| minor upgrade | x.y.* | x.y+1.* | yes |
| skip minor version | x.y.* | x.y+2.* | no |
| minor downgrade | x.y.* | x.y-1.* | no |
| skip major version | x.. | x+2.. | no |
| major downgrade | x.. | x-1.. | no |
| major upgrade | x.y.z | x+1.0.0 | yes |
| major upgrade skipping minor version | x.y.z | x+1.y+1.z | no |
A few seconds of interruption may occur during the upgrade of a MSR cluster, so schedule the upgrade to take place outside of peak hours to avoid any business impacts.
DTR 2.5 to MSR 2.6 upgrade
Note
Upgrade Best Practices
Important changes have been made to the upgrade process that, if not
correctly followed, can have impact on the availability of applications
running on the Swarm during upgrades. These constraints impact any upgrades
coming from any version before 18.09 to version 18.09 or greater.
In addition, to ensure high availability during the MSR upgrade, drain the MSR replicas and move their workloads to updated workers. This can be done by joining new workers as MSR replicas to your existing cluster and then removing the old replicas. Refer to mirantis/dtr join<:ref:`join command<msr-cli-join> and mirantis/dtr remove for command options and details.
Minor upgrade
Before starting the upgrade, confirm that:
- The version of MKE in use is supported by the upgrade version of MSR. Check the compatibility matrix.
- The MSR backup is recent.
- Docker content trust in MKE is disabled.
- All system requirements are met.
Step 1. Upgrade MSR to MSR 2.6 if necessary
Confirm that you are running MSR 2.6. If this is not the case, upgrade your installation to the 2.6 version.
Step 2. Upgrade MSR
Pull the latest version of MSR:
docker pull docker/dtr:2.7.6
Confirm that at least 16GB RAM is available on the node on which you are running the upgrade. If the MSR node does not have access to the Internet, follow the Install MSR offline to get the images.
Once you have the latest image on your machine (and the images on the target nodes, if upgrading offline), run the upgrade command.
Note
The upgrade command can be run from any available node, as MKE is aware of which worker nodes have replicas.
docker run -it --rm \
  docker/dtr:2.7.6 upgrade
By default, the upgrade command runs in interactive mode and prompts for any
necessary information. You can also check the upgrade reference
page for other existing flags. If you are performing the
upgrade on an existing replica, pass the --existing-replica-id flag.
The upgrade command will start replacing every container in your MSR cluster, one replica at a time. It will also perform certain data migrations. If anything fails or the upgrade is interrupted for any reason, rerun the upgrade command (the upgrade will resume from the point of interruption).
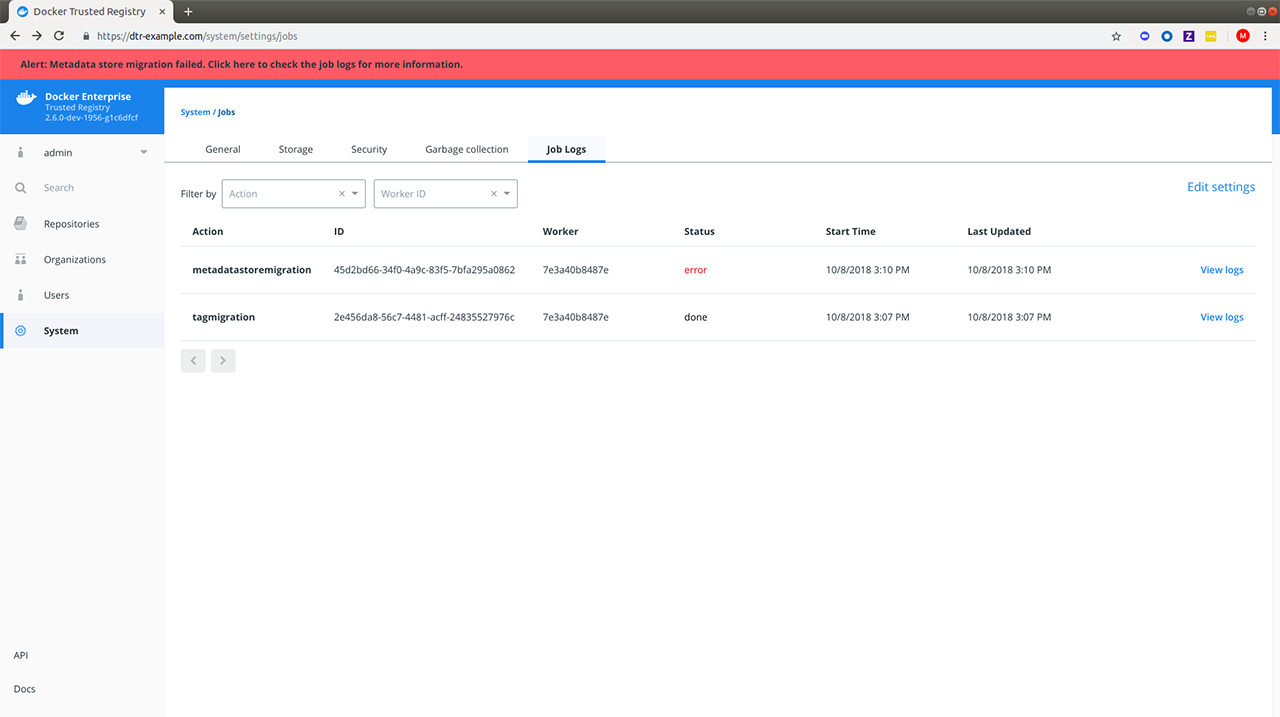
Metadata Store Migration
When upgrading from 2.5 to 2.6, the system will run a
metadatastoremigration job following a successful upgrade. This involves
migrating the blob links for your images, which is necessary for online garbage
collection. With 2.6, you can log into the MSR web interface and navigate
to System > Job Logs to check the status of the
metadatastoremigration job. Refer to Audit Jobs via the Web
Interface<msr-manage-jobs-audit-jobs-via-ui> for more details.
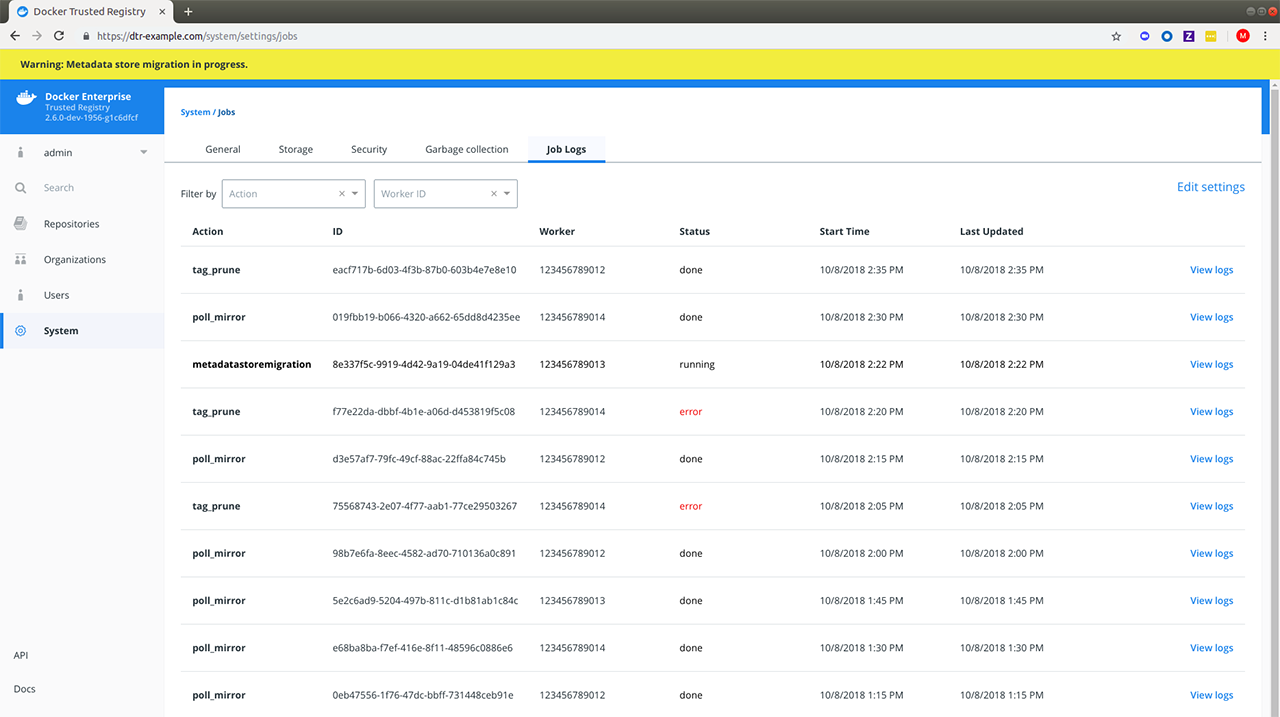
Garbage collection is disabled while the migration is running. In the
case of a failed metadatastoremigration, the system will retry
twice.
If the three attempts fail, it will be necessary to manually retrigger
the metadatastoremigration job. To do this, send a POST request
to the /api/v0/jobs endpoint:
curl https://<msr-external-url>/api/v0/jobs -X POST \
-u username:accesstoken -H 'Content-Type':'application/json' -d \
'{"action": "metadatastoremigration"}'
Alternatively, select API from the bottom left navigation pane of the MSR web interface and use the Swagger UI to send your API request.
Patch upgrade
A patch upgrade changes only the MSR containers and is always safer than a minor version upgrade. The command is the same as for a minor upgrade.
MSR cache upgrade
If you have previously deployed a cache, be sure to upgrade the node dedicated for your cache to keep it in sync with your upstream MSR replicas. This prevents authentication errors and other strange behaviors.
Download the vulnerability database
After upgrading MSR, it is necessary to redownload the vulnerability database. Learn how to update your vulnerability database.
Uninstall MSR
Uninstalling MSR can be done by simply removing all data associated with each replica. To do that, you just run the destroy command once per replica:
docker run -it --rm \
  docker/dtr:2.7.6 destroy \
  --ucp-insecure-tls
You will be prompted for the MKE URL, MKE credentials, and which replica to destroy.
To see what options are available in the destroy command, check the destroy command reference documentation.